If you want Units fast in No Man’s Sky, scan creatures with good scanner modules in the first hours, scrap Sentinel Interceptors in the mid game and craft Stasis Devices, worth 15.6 million each, once you have a farm.
As soon as you add a food buff from the Nutrient Ingestor to those scanner modules, a single new animal will usually pay somewhere between 10 and 30 million Units. That makes fauna scanning the quickest way to earn Units in the game once it is set up. For the biggest single sale, nothing you can craft beats the Stasis Device and the Fusion Ignitor, which are both worth 15.6 million.
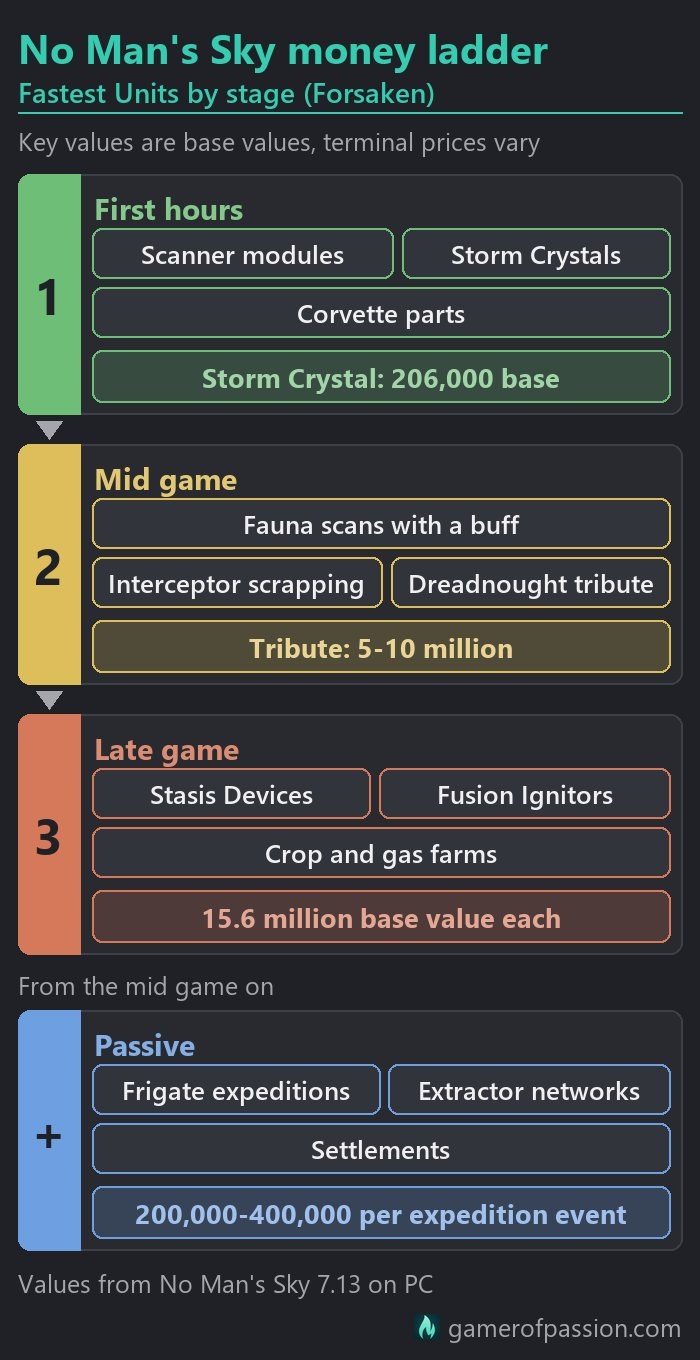
If you are starting out in 2026, the order is quite clear. In your first hours, you will sell Storm Crystals, corvette parts from Salvageable Scrap planets and the scrap from crashed ships. In the mid game, you are going to switch to food-buff scanning and Interceptor scrapping, with pirate tribute and frigates on the side. In the late game, a crop and gas farm turns into Stasis Devices and Fusion Ignitors, and that will take you all the way to the wallet limit.
Everything here is based on the current PC version, Forsaken 7.13 from 2 November 2026, and console players will see the same values. Most item values below were read straight out of that version’s data, and none of them changed between COSMOS and Forsaken.
Mind that these are base values. A trade terminal pays a little more or a little less from one system to the next, and the price will drop as you sell more of the same item in one place before it slowly recovers. When I write that something is worth about a certain amount, I mean that base value.
This guide will stick to Units. Nanites are a separate currency with their own sources, and the nanites guide goes through the main ones.
Contents
- Best ways to make money
- Early game Units
- Fauna scanning
- Scrapping Sentinel Interceptors
- Crafting for profit
- Base income
- Trading between systems
- Frigate expeditions
- Pirate fights
- Money plan by stage
- Mistakes that cost you Units
- Other money questions
- Conclusion
Best ways to make money
If you only want one answer, I would say fauna scanning with a food buff is the best money in the game right now. It needs three decent scanner modules, a Nutrient Ingestor and a bit of cooking, and after that every new animal you scan during the buff will pay millions.
Sentinel Interceptors are the easier mid-game option. Each one you scrap usually brings in between 20 and 50 million Units, and you mainly need a dissonant system, a few repair materials and the patience to fly from crash site to crash site.
Crafting has the highest ceiling. A farm for Stasis Devices or Fusion Ignitors takes hours to set up, but once it runs, it can carry you right up to the wallet limit.
Frigates, extractors and settlements make up the passive side. None of them is fast, but they will keep paying while you do other things.
| Method | You need | Worth | Stage |
|---|---|---|---|
| Scanning fauna | Scanner modules, Nutrient Ingestor and food | 10 to 30 million per new creature with a food buff | First hours, then mid with food |
| Storm Crystals | A planet with storms, hazard protection | 206,000 each | First hours |
| Corvette parts (Salvageable Scrap) | A Salvageable Scrap planet, Terrain Manipulator | 75,000-1,750,000, most hull 150,000 | First hours / early |
| Gravitino Balls | Gravitino Ball planet (Sentinels react) or Hosts | 42,130 each | First hours / early |
| Crashed ships, then scrap | Navigation Data, repair Launch Thruster + Pulse Engine | 1-5M per ship, Storage Augmentations 125,000 each | Early |
| Sentinel Interceptor scrapping | Dissonant system, repair materials | 20-50M, more for higher classes | Early to mid |
| Fossils and ancient bones | Dig sites, Terrain Manipulator, Fossil Collector | Bones 50,000-110,000, rare 700,000-1,700,000 | Early to mid |
| Trade goods (economy routes) | Economy Scanner, starting Units, cargo space | Buy at x0.7-0.9, sell at x1.4-1.8, surge x1.8-2.8 | Mid |
| Pirate tribute and bounties | Combat-ready ship, outlaw or high-conflict system | Tribute 5,000,000-10,000,000, bounties 100,000-500,000 | Mid |
| Extractors | Mineral Extractors, Supply Depots, power, a hotspot | Gold 353, Silver 186 per unit | Mid to late, passive |
| Frigate expeditions | Freighter, frigates, Fleet Command Room | 200,000-400,000 or an item per event | Mid to late, passive |
| Crafting Stasis Devices or Fusion Ignitors | 29 or 30 plants, 1,500 gas (600 via Large Refiner) | 15,600,000 each | Late |
For reference, these are some of the most valuable things you can sell in Forsaken:
- Stasis Device and Fusion Ignitor, about 15.6 million each
- Starship AI Valves, a scrap item worth about 12 million
- Quantum Processor, Portable Reactor and Cryogenic Chamber, the steps right below the top two at 3.8 to 4.4 million
- Compressed Indium Scraps and Alloy Scraps from scrapped ships and Multi-Tools, about 3.1 million each
- Corvette reactors and cockpits from Salvageable Scrap, about 1.75 and 1.6 million
- Rare ancient bones, up to about 1.7 million
Early game Units
Your first Units will come out of things you pick up or dig out while you explore. None of the methods below needs a base or a freighter, and most of them make sense from the first hour. If you are brand new to the game, the beginner guide explains the very first steps, such as where to sell and what to keep.
Scanning everything
Every new creature, plant and mineral you analyse with the Analysis Visor pays Units, and uploading the discovery pays Nanites. Without upgrades, the payouts are fairly modest.
That changes the moment you install scanner upgrade modules. With three S-class modules, a new creature can pay 100,000 to 600,000 Units, and big or rare ones pay even more. Spend your first Nanites on those modules, and read the scanning section further down before you buy any.
Salvageable Scrap
Planets with Salvageable Scrap are probably the best early money in the current version. You scan for buried containers, dig them out with the Terrain Manipulator and will find corvette parts in a lot of them, next to the older kind of scrap.
Those parts are worth anywhere from 75,000 Units for interior fittings and 150,000 for most hull pieces up to 1.6 million for a cockpit and 1.75 million for a reactor. Engines (1 to 1.4 million) and guns (1.2 million) are the other big finds. Keep what you want for your own corvette and sell the rest at a trade terminal.
Crashed ships
Crashed starships are a good early earner as well. Trade Navigation Data for distress signal charts at a Cartographer, claim the ship at the crash site, repair its Launch Thruster and Pulse Engine and fly it to a space station. At the Starship Outfitting terminal you can scrap it, and selling the scrap will usually get you about 1 to 5 million Units per ship.
Scrapping an S-class Fighter, Hauler, Shuttle or Explorer also gives you one to three Storage Augmentations. C-class ships only have a small chance of dropping one. Each Storage Augmentation is worth about 125,000 if you do not need the extra slots.
Storm Crystals
Storm Crystals are only found on planets with extreme weather, and they show up during storms. A Storm Crystal has a base value of 206,000 Units, and trade terminals pay close to that, with the exact offer differing a little from station to station.
Make sure to bring enough hazard protection, because you will spend the whole storm outside collecting them.
Gravitino Balls
A Gravitino Ball has a base value of 42,130 Units, which puts ten of them at roughly 400,000. Picking them up angers the local Sentinels, though, and you should expect a fight if you clear a whole field.
Later on, you can grow them yourself. A Gravitino Host on your base will grow one ball every two hours.
Ancient bones
Ancient bones from planetary dig sites are usually worth 50,000 to 110,000 Units each, while the rare ones can go up to 1.7 million. Most of what you dig up will be the common kind.
If you build finished fossil exhibits, you can sell them to the Fossil Collector on a space station instead. A good exhibit can pass a million.
Chlorine in the refiner
The Chlorine loop still works in Forsaken. In a Medium Refiner, 1 Chlorine and 2 Oxygen make 6 Chlorine. Chlorine has a base value of 205 Units, which means a full stack of 9,999 is worth about 2 million.
Harvest or extract your own Oxygen for this. Terminals charge several times more for Oxygen than they will ever pay you for it, and buying it cuts deep into the profit.
Fauna scanning
Fauna scanning is the fastest money in No Man’s Sky once it is set up, and it is also the method with the most half-true advice around it. On your side, three things decide what a scan pays: your scanner upgrade modules, the slots they sit in and the food buff.
Scanner upgrade modules
Scanner upgrade modules raise the Units you get for fauna, flora and mineral scans by huge percentages. The bonus shows on each module’s stat lines, and the ranges are:
- C-class modules show +1,000 to 2,000%
- B-class modules show +2,500 to 5,000%
- A-class modules show +5,000 to 10,000%
- S-class modules show +6,500 to 10,000%
- X-class modules from outlaw stations roll anywhere from +1,000 to 11,000%
An X-class module can beat an S-class one or be much worse, which makes S-class the safer buy from a station technology merchant. You can only install three of them, because a fourth one overloads the scanner.
Beware that every module rolls a random set of stats, and even an S-class module can come without the Fauna Analysis Rewards line. Check that line before you buy, and keep the three modules with the highest fauna number.
Put those three on supercharged slots next to the Scanner. A supercharged slot raises each module’s bonus by about a quarter.
Beyond those slots, the Multi-Tool type does not matter much. Any Multi-Tool with good modules on supercharged slots will earn the same per scan, because a type’s scanning bonus only widens the radius of the scan pulse. The best Multi-Tool guide shows how to lay the slots out.
The same goes for the Waveform Recycler. It only makes the scanner recharge faster and reach a little bit further, which is handy for scanning quickly, but it will not raise the Units per scan.
Food buffs
Food gives you the big jump. A fauna food in the Nutrient Ingestor boosts Fauna Analysis Rewards for 10 minutes, and that buff works as a separate boost next to your modules. That is why a creature worth a few hundred thousand Units turns into roughly 10 to 30 million while it runs, and the very best setups reach about 35 million for one scan.
Two foods are the usual picks:
- The Anomalous Doughnut is a Lumpen Doughnut combined with Anomalous Jam, and the jam needs Hexaberry and Processed Sugar. One doughnut gives a fauna analysis bonus of roughly +6,400% for 10 minutes.
- The Extra-Fluffy Cream Cake is Extra-Fluffy Batter plus Cream. It needs no Hexaberry, which means you will not have to visit an anomalous planet for it.
You cook both in the Nutrient Processor. Refined Flour can be made from Heptaploid Wheat or from Glass Grains (which you get from Frost Crystal), and Processed Sugar from Sweetroot or Grahberry.
Other fauna foods such as the Monstrous Honey Cake work as well. Pick the food that matches what you scan, though. Cake of Sin boosts mineral scans and the Wriggling Doughnut boosts plant scans, while Stellar Custard and The Stellarator do nothing for scanning at all.
Using the Nutrient Ingestor
Eating a doughnut straight from your inventory only refills your jetpack. The buff needs the Nutrient Ingestor, an exosuit technology that takes 30 Condensed Carbon, 1 Lubricant and 2 Microprocessors to install. Its blueprint sits with the other exosuit blueprints at Iteration: Selene on the Space Anomaly.
Put the food into the Ingestor and select Begin Ingestion once you have landed. The Ingestor keeps feeding whatever you load, which is why I would load one portion per scanning run and no more.
Then pick a planet with lots of fauna and scan every new creature you can find in those 10 minutes. Bigger and rarer creatures pay more, and only species you have not scanned before pay out. Once a planet has no new animals left, move on to the next one and start the next portion there.
Scrapping Sentinel Interceptors
Sentinel Interceptors are the crashed Sentinel ships you find in dissonant systems, and scrapping them is a fairly relaxed way to make tens of millions in the mid game. A scrapped Interceptor usually brings in between 20 and 50 million Units, and higher classes pay more.
The loop goes like this:
- Find a dissonant system, use an Echo Locator to mark a Harmonic Camp and pick Locate Dissonance Spikes at its terminal to mark a crash site.
- Claim the Interceptor and repair it enough to fly.
- Take it to a space station and scrap it at the Starship Outfitting terminal.
- Sell the scrap at a trade terminal and go back for the next one.
The best ships guide explains how to find the crash sites in more detail. Hunt in wealthy or outlaw systems, where the better-class Interceptors crash.
Interceptors only pay out in scrap that you sell for Units. Unlike an S-class Fighter or Hauler, they will not give you any Storage Augmentations when you scrap them.
Corvettes have allowed a different ship trick. In COSMOS, a basic corvette counted for far more as a trade-in than the roughly 8.6 million Units its modules cost, and it could pay for an expensive ship from a visiting pilot, which you then scrapped. Check the trade value on screen before you swap, because the trick has not been confirmed for Forsaken and can disappear with any patch.
Crafting for profit
Crafting is where the really big numbers are. The value of a product grows a lot with every step up the chain, and the two top items, the Stasis Device and the Fusion Ignitor, are each worth 15.6 million Units. Forsaken did not change either of them.
| Product | Base value | Made from | Farm needs |
|---|---|---|---|
| Living Glass | 566,000 | 1 Lubricant + 5 Glass | 8 Gamma Weed, 4 Frostwort, 2 Gutrot Flower |
| Liquid Explosive | 800,500 | 1 Acid + 1 Unstable Gel | 12 Fungal Cluster, 2 Echinocactus, 1 Mordite Root |
| Circuit Board | 916,250 | 1 Heat Capacitor + 1 Poly Fibre | 4 Solar Vine, 8 Star Bramble, 2 Frostwort, 1 Echinocactus |
| Cryogenic Chamber | 3,800,000 | 1 Living Glass + 1 Cryo-Pump | Living Glass crops + 250 each Radon, Nitrogen, Sulphurine |
| Quantum Processor | 4,400,000 | 1 Circuit Board + 1 Superconductor | Circuit Board crops + 250 each Sulphurine, Nitrogen, Radon |
| Stasis Device | 15,600,000 | 1 Quantum Processor + 1 Cryogenic Chamber + 1 Iridesite | 29 plants + 500 each Sulphurine, Radon, Nitrogen |
| Fusion Ignitor | 15,600,000 | 1 Portable Reactor + 1 Quantum Processor + 1 Geodesite | 30 plants + 500 each Sulphurine, Radon, Nitrogen |
Start with the farm products
The cheapest high-value products need nothing but crops. Living Glass, Liquid Explosive and Circuit Boards are all made from plants, none of them needs gas, and a single Circuit Board is already worth about 916,250.
Living Glass is the quickest of the three, as its crops are ready in 4 hours (Frostwort even in 1). Liquid Explosive and Circuit Board both need Echinocactus, which takes 16 hours to grow.
These three are also the first step of the ladder. Living Glass goes into a Cryogenic Chamber, Liquid Explosive into a Portable Reactor and Circuit Board into a Quantum Processor, and each of those is worth roughly four million. They also need a 1.5 million product made from gas compounds (a Cryo-Pump, a Fusion Accelerant or a Superconductor), and that is where the gas comes in.
Stasis Device farms
A Stasis Device is a Quantum Processor, a Cryogenic Chamber and one Iridesite. A Fusion Ignitor is a Portable Reactor, a Quantum Processor and one Geodesite. Both have the same base value, the highest of anything you can craft.
One Stasis Device takes the harvest of about 29 farm plants, and more than half of them are Gamma Weed and Star Bramble. A Fusion Ignitor needs about 30, mostly Fungal Cluster and Star Bramble.
On the gas side, every device needs 500 Sulphurine, 500 Radon and 500 Nitrogen, or only 200 of each if you make the gas compounds in a Large Refiner. Add some Condensed Carbon and a few metals for the Iridesite or Geodesite, and you have the full bill.
The slowest crops take 16 hours, while the crafting itself is instant. How much a farm makes is going to depend on how many plants and gas extractors you build and how often you come back to harvest.
You can also cut the number of plants roughly in half with a Medium Refiner. 1 Uranium and 1 Gamma Root make 2 Gamma Root, and the same works for Frost Crystal with Dioxite, Solanium with Phosphorus, Star Bulb with Paraffinium, Cactus Flesh with Pyrite and Fungal Mould with Ammonia.
Gas for the compounds
Gas is the part that takes the most planning. Each gas only shows up on certain biomes. Sulphurine is found on scorched, barren, red and lava worlds, Radon on radioactive, frozen and green ones, and Nitrogen on lush, toxic, swamp and blue ones. As such, a full Stasis Device setup needs Gas Extractors on three different planet types.
If you are short on one gas, the refiner can convert it. Three of one gas make one of the next (Nitrogen into Sulphurine, Sulphurine into Radon and Radon into Nitrogen), and one gas plus one Oxygen also makes one of the next.
The Large Refiner recipe for each compound takes 100 gas, 10 Condensed Carbon (or 20 Carbon) and 5 Chlorine (or 10 Salt) and runs for 45 seconds. That cuts the gas per device from 1,500 to 600, which is well worth the extra refiner time on any farm.
Selling the products
Stasis Devices and the other crafted products are not trade goods, which means no economy type pays a bonus for them. The offer only moves a little from system to system. Sell wherever it is convenient, and split big batches over several terminals, because the price drops as you sell more in one place.
Base income
Mining bases and crops pay slowly, but they keep producing while you are away. Personally, I would build extractors mainly to feed your crafting, because the gas and metals are worth far more inside a Stasis Device than at a terminal.
Extractors
Gold is the most valuable thing an extractor can pull, at 353 Units base value, ahead of Silver at 186. You will need a hotspot for it, and the hotspot’s class decides how fast it fills.
A better hotspot fills each extractor faster, roughly 250 of the resource an hour on a C-class hotspot and about 600 on an S-class one. In other words, a good hotspot mostly saves you extractors for the same output.
Each extractor holds 250 of the resource and each Supply Depot holds 1,000. If you only visit now and then, link a few depots to the network.
Extractors that share one connected network give less and less extra output once that network passes roughly 1,000 of the resource an hour. For a big setup, build several smaller networks, each with its own Supply Depots, instead of one huge one.
Crops you can sell directly
A few farm plants grow things that are worth selling as they are. A Gravitino Host grows one Gravitino Ball every two hours, and each ball is worth about 42,130. A Venom Urchin grows a Sac Venom worth about 64,000 every three hours and 20 minutes, while an Albumen Pearl Orb gives you an Albumen Pearl worth about 11,200 every two hours.
They are a nice extra, and they need no crafting. A Stasis Device farm will still make far more from the same number of plants.
Settlements
Settlements belong in the same group. They start out in debt and take a while to turn a profit, but once one is out of debt it will mostly look after itself and hand you goods to sell every day or two. The settlement guide explains how to get there.
Trading between systems
Trading is a fairly solid mid-game option if you like flying around. It works with the 35 trade goods, which come in seven categories and five tiers worth about 1,000, 6,000, 15,000, 30,000 and 50,000 Units.
Every economy type sells one category cheaply and needs another. Where a system sells a category, its terminal will offer those goods at 0.7 to 0.9 times their usual price, and where a system needs them, it will pay 1.4 to 1.8 times. During a trade surge, the price a system pays can even climb to 1.8 to 2.8 times.
The needs form two loops:
- Mining goods sell well in Manufacturing systems, Manufacturing goods in Technology systems, Technology goods in Power Generation systems and Power Generation goods back in Mining systems.
- Trading goods sell well in Advanced Materials systems, Advanced Materials goods in Scientific systems and Scientific goods back in Trading systems.
You will need an Economy Scanner in your starship to see a system’s economy before you warp, and you can buy it from the technology merchant on a space station. The game uses four names for each economy type. A Trading system can also be listed as Mercantile, Shipping or Commercial, for example, and a Technology system as High Tech, Nano-construction or Engineering. You will also need some starting Units and cargo space to make a run worthwhile. A wealthier system keeps more goods in stock, which matters once you trade in bulk.
Of course, you can also crash a price on purpose. Selling a big pile of one material and buying the stock back cheaply still works for some materials, but it is slow next to crafting.
Frigate expeditions
Once you own a freighter, frigates can earn money for you while you play. Each successful expedition event pays about 200,000 to 400,000 Units or an item instead, and failed events can cost up to 100,000 and damage the frigate.
One expedition usually brings back a few million Units plus loot. The loot is not worthless either, as mining events can hand out Storage Augmentations, Salvaged Frigate Modules or valuable trade goods, and exploration events bring back sellables such as Sac Venom and Gravitino Balls.
A fleet will not make you rich quickly, but it keeps paying in the background. Leave it until you have a few million to spare, and the freighter guide will tell you which freighter to get and how.
Pirate fights
Pirates are a decent side income, especially in the first hours. Pirate fights pay a bounty of 100,000 to 500,000 Units, and downed pirate ships can drop Pirate Transponders, which have a base value of 85,000 each. Additionally, saving a freighter from pirates and taking the captain’s payment gets you a Cargo Bulkhead, 200 to 300 Nanites and 300 to 500 Gold.
The big one is the Pirate Dreadnought. These fights only start when you warp into high-conflict systems (a 10% chance) or outlaw systems (20%), and they do not seem to appear before you own a freighter. Knock out its engines and shield generators until it surrenders, then choose to demand tribute for 5 to 10 million Units.
Destroying a Dreadnought only pays a much smaller bounty for saving the civilian fleet, plus an S-class freighter module. The module is nice for your own freighter, but if you came for money, take the tribute.
Money plan by stage
If you want a clear order to follow on a new save, this is how I would go about it.
First hours
- Scan every new creature, plant and mineral with the Analysis Visor, and upload your discoveries for Nanites.
- Spend your early Nanites on scanner modules from station technology merchants. Keep the three with the highest Fauna Analysis Rewards line and move them onto supercharged slots next to the Scanner.
- Sell Storm Crystals (about 206,000 each), the corvette parts you dig up on Salvageable Scrap planets and the scrap from crashed ships.
- Take the captain’s payment after freighter rescues, collect pirate bounties and sell your Pirate Transponders.
Mid game
- Install the Nutrient Ingestor and cook Anomalous Doughnuts or Extra-Fluffy Cream Cakes. Load one portion per run and scan a fauna-rich planet during the 10-minute buff.
- Scrap Sentinel Interceptors from dissonant systems, which usually pay 20 to 50 million each.
- In outlaw or high-conflict systems, make Pirate Dreadnoughts surrender and demand tribute. They only seem to appear once you own a freighter.
- Once you own a freighter, keep your frigates on expeditions.
- Build Gas and Mineral Extractors on several small networks, each with its own Supply Depots, to feed your crafting.
Late game
- Start with Living Glass, Liquid Explosive and Circuit Boards, then work up to Stasis Devices and Fusion Ignitors at 15.6 million each.
- Keep frigates and settlements running for passive income.
- Spend some of it before you reach the wallet limit.
Mistakes that cost you Units
A few things will lose you money or simply waste your time:
- Glass is worth less than the 40 Frost Crystal that go into it. The same is true for Microprocessors, Di-hydrogen Jelly, Carbon Nanotubes, Ion Batteries, Life Support Gel and Starship Launch Fuel. Sell the raw resources instead, or take them further up a chain that adds value.
- Warp Cells have a base value of 46,750, but the game will never let you sell one. Nanite Clusters cannot be sold either.
- Selling a whole haul at one terminal pushes the price down as you go. Split it between several stations and trade posts.
- Eating an Anomalous Doughnut from your inventory only refills your jetpack. The scan buff needs the Nutrient Ingestor.
- A fourth scanner module overloads the scanner instead of adding to it.
- A Royal Multi-Tool or a Waveform Recycler will not raise the Units per scan. Modules and food do.
- Salvaged Data is worth about 52,000 each, but you will want it for blueprints first. Only sell the surplus.
- Your wallet stops at 4,294,967,295 Units. Once you get close, sell big hauls in parts and spend before you sell more.
Other money questions
Do wealthy systems pay more?
Not in a way you can plan around. A system’s wealth mostly changes how much a terminal has in stock, and the bigger price swings from the economy type only apply to trade goods. Crafted products such as Stasis Devices still sell a little higher or lower from system to system, which means it can pay to check a second station before you sell a big batch.
Is Activated Indium still worth mining?
Not for money. Activated Indium has a base value of 165 Units, which is less than Silver (186) and less than half of Gold (353). Guides that still crown Activated Indium were written before its price cut, and a Gold extractor will serve you better today.
Forsaken mementos
Forsaken added six haunting mementos with a base value of 140,000 each, and spare ones can be sold to the forsaken trader for Units. Their main use is bartering for corvette parts with that same trader, though. The Forsaken guide explains where to find them and what to trade them for.
Starship AI Valves
Starship AI Valves have a base value of 12 million, which makes them the most valuable scrap item in the game. If another player at the Space Anomaly hands you a stack, those are very often duplicated. Whether you sell them is your call, but cashing them in will skip most of the grind this guide is about. The same goes for the refiner duplication tricks you might come across. They exist, but they are exploits, and this guide leaves them out.
Conclusion
Units are not hard to come by in No Man’s Sky once you know where to look. For quick money, nothing beats three good scanner modules and a few Anomalous Doughnuts, and Interceptors are the low-effort alternative.
If you want to fill your wallet for good, a Stasis Device farm will get you there. It simply takes a lot longer to set up, which makes it a good project once scanning and Interceptors have paid for your bases.