The Decrepit Altar on the Nameless Isle in the cave east of the Temple of Rhalic, has a mysterious, yet important secret in Divinity: Original Sin 2. If you’re wondering what’s the deal with the Decrepit Altar and how to solve it, you’ve come to the right place.
What you need to do is get past the troll (fight him or pass the speech check), then use the Cowl of True Sight on the wall behind the altar. Placing Bishop Alexander’s head on the altar works too.
This page is up to date for the Definitive Edition in its current Steam version (3.6.117.3735). Most details about the Cowl, Alexander’s head and the war room were verified in the game’s own quest scripts and dialogue.
The Troll that guards the cave
In front of the cave that leads into the Decrepit Altar, you will find a troll guarding it. You can choose to initiate combat or try to pass a speech check as you convince him to let you through.
If you choose to fight him, you should mind that the troll has the Troll blood ability, making him regenerate thousands of health per turn. Either burst him down quickly or use one of his weaknesses against him to disable the regeneration.
How to get past the Decrepit Altar
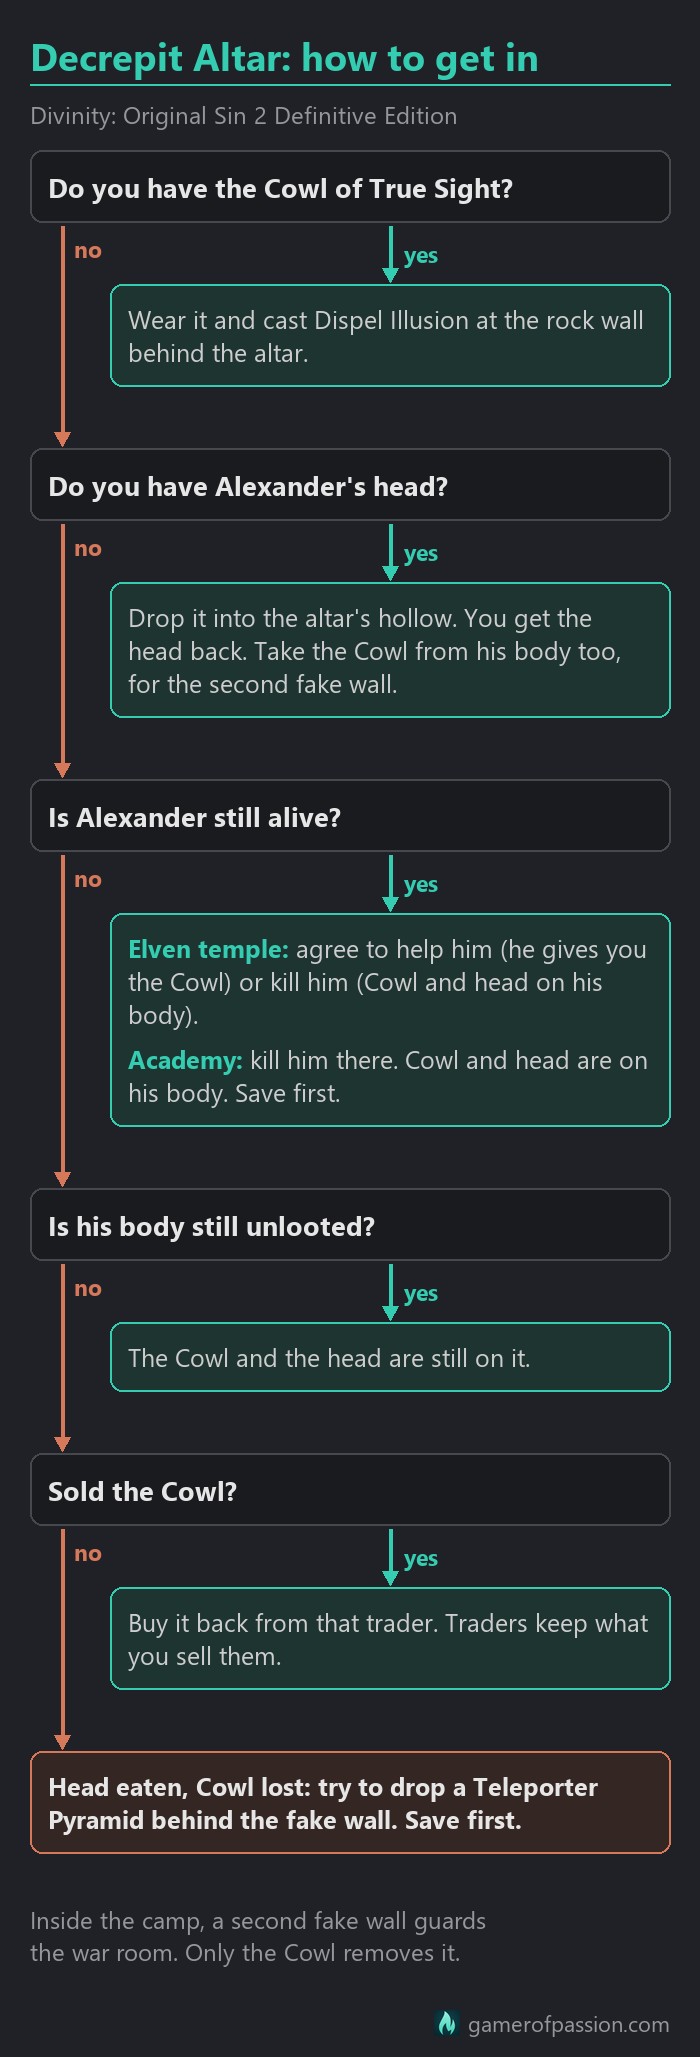
The Altar will ask for blood, which might prompt you to cast a spell, like Blood Rain on it, only to realize that it is no use. What you need to do is equip the Cowl of True Sight, preferably on your character with the highest intelligence level. Using the Cowl of True Sight on the wall behind the altar will dispel the illusory wall and allow you to enter the room behind it.
If you are having trouble with the dispel ability, make sure to use it on the wall and not the Altar. The ability has an area of effect, so the cone needs to hit the wall.
An alternative way of solving this riddle is placing the head of Bishop Alexander on the Decrepit Altar, if you have killed him (and not eaten his head which you should absolutely not do in this case). After the illusory wall disappears, you will still be able to take the head back with you.
Where to get the Cowl of True Sight
The Cowl of True Sight is a mage hood that only Bishop Alexander can give you. You will find him at the top of the elven temple (the Temple of Tir-Cendelius). If you agree to help him against the Sallow Man, he will hand it over during the conversation. If you kill him instead, the Cowl will be on his body, together with his head.
Pickpocketing it is not going to work, though. Alexander does not carry the Cowl while he is alive, and it only lands in his loot once he dies.
As soon as a character wears the hood, they get a new skill called Dispel Illusion. It is easy to overlook, since it is only there while the Cowl is equipped.
Look for it on that character’s hotbar or in their skills menu. Then stand next to the altar and aim the cone at the rock wall a few steps behind it.
In-game hints
If you stumble into the cave before you have talked to either side, the altar is a little bit cryptic. Your character will only remark on an empty cave with a bare altar, and the altar itself shows nothing but a smear of blood and a hollow that seems to call for something.
Kneeling down to pray will only get you whispers of blood and pain, and no amount of blood will open anything. The actual hints are tied to the two quests:
- When Alexander gives you the Cowl, he calls the Sallow Man a master of illusions, and your journal notes that the hood can help you find his lair.
- If you work with the Black Ring, the Sallow Man shows you the troll’s cave in a dark mirror and asks you to bring Alexander’s head to the altar inside.
The fake wall itself looks like any other rock in the cave, and it may not stand out at all when you walk by. Simply aim past the altar at the back wall.
No Cowl and no head?
Both ways in lead back to Bishop Alexander, so what you can still do depends on what happened to him. In most cases, you are probably not locked out yet.
Alexander is already at the Academy
The first time you set foot in the Academy, Alexander leaves the elven temple for good. You will find him again inside the Academy, waiting with the other Godwoken before the Arena of the One, and he no longer hands out the Cowl there.
To get it, you will have to kill him, and once he is down, his body will carry both the Cowl and his head, which means you can walk back to the troll’s cave, deal with the Sallow Man and only then return to the Academy. Save before you attack him, as the other Godwoken in the room can join the fight.
Alexander’s head was eaten
Eating the head uses it up. That closes the altar route, and the reward for bringing the head to the Sallow Man is gone as well (admitting what you did only makes him furious).
The Cowl will still get you in, since it dropped into Alexander’s loot when he died. Check the inventory of whoever looted him, or go back to the spot where he fell and take it from his corpse.
As a small consolation, the vision your elf got from eating the head shows which of the Seven favoured the sun and which the moon, and that is the order you need for the idols at the entrance to the Council.
The Cowl was sold
The game lets you sell the Cowl like any other hood, and it can easily slip out of your bags during a cleanup. Luckily, traders keep everything you sell to them, even after they restock. Go back to that trader and buy it back.
If Alexander is still alive, killing him will work as well. His body will carry a fresh Cowl even if he already gave you one.
Teleporter Pyramids as a last resort
If the head was eaten and the Cowl is gone for good, you can still try the Teleporter Pyramids. Drop one of them behind the fake wall and teleport to it with the other one.
The tunnel behind the wall will stay dark when you get in this way, but you can walk through it all the same. This trick does not work every time, so make sure to save before you try it.
The Black Ring Encampment
Once you pass the illusory wall, you will enter the Black Ring Encampment. Walk down the ramp into a larger room and you will find the Sallow Man. Now the interaction will depend on your party composition (if you have Lohse in your party, combat will be initiated immediately), as well as the choices you have made before and your own wishes.
- You can either fight the Sallow Man as requested by Bishop Alexander if you have sided with them and against the Black Ring.
- Or you can fight and kill Bishop Alexander as requested by the Sallow Man if you have sided with the Black Ring.
At any rate, revealing Bishop Alexander’s head to the Sallow Man (which is why you should not eat it) will complete the quest and make the Sallow Man give you a reward. If you did not kill Alexander and have sided with him, you will need to initiate combat and defeat the Sallow Man.
If you chose to engage the Sallow Man, three Black Ring members will join the fight. Beware that the Sallow Man himself will resurrect at least once after defeating him, meaning you will have to kill him twice.
Head deeper into the cave and you will eventually find the Sallow Man’s war room. There is an ornate chest that contains a piece of the Swornbreaker, more specifically the Haft of the Swornbreaker.
You should beware of the fact that inside the Sallow Man’s cave, you will also find another iteration of Windego, which you will have to fight and kill. It will yield no EXP but trigger the quest “Mercy is Power”.
The second fake wall
Keep the Cowl with you even if you opened the camp with the head. At the south end of the Sallow Man’s hall, there is a second fake wall, and Alexander’s head only opens the first one at the altar. Behind it lies the path to the war room with the Haft of the Swornbreaker, and further on, Windego.
Additionally, the Ornate Chest in the war room is locked. Its key is carried by the Black Ring Reaver, one of the three Black Ring members at the Sallow Man’s side.
If you came as the Sallow Man’s ally, cast Dispel Illusion where he cannot see you. He can turn hostile when he watches you remove his illusions.
Conclusion
While this secret behind the Decrepit Altar is optional, you should mind the fact that the Haft of the Swornbreaker will net you a powerful weapon if you manage to forge the whole weapon, as well as the possibility to use it in various quests.
Also, there are other quests that can be finished in the room of the Sallow Man as well as the extra encounter with Windego.
If you want to find out where to get other parts of the Swornbreaker, check out this guide:
Key of the One in Divinity: Original Sin 2
For another tricky encounter in Divinity 2, our Umbral Statue guide explains how to prepare for the fight.