The first part of this guide provides an updated Roadmap and Beginner Guide for new players focused on base-building. The second part provides in-depth sections for all players on specific topics in Kenshi, including Race/Role Rankings, Farming, Autohauling, and more. There are a lot of good guides out there for achieving particular goals, but few, if any, focus on base-building first, and warrior development second. This guide attempts to show you how to do that.
Introduction
Welcome, Drifter.
Like many people coming into Kenshi, my first few playthroughs were rough. I wanted to establish a settlement and I didn’t want to focus on training up a core group of fighters over a lengthier period of time to do it. To avoid spending hours on a death simulator, I’ve tried to walk you through what you need to do to successfully focus on base-building first, and warrior development second.
There are a lot of good guides out there that focus on particular ways of achieving certain goals, and there is a really great roadmap for building a faction based on a group of well-trained fighters (which I highly recommend). However, here, I will attempt to show you how to take the inverse approach.
This guide has two parts:
- Roadmap for New Players – Using a sample playthrough, I attempt to show you how to create a settlement in the harsh lands that you’ll inhabit in Kenshi.
- In-depth Topic Guides – Providing new or old players advice and strategies on specific topics, with an emphasis on large faction and city building.
These can and should be used in conjunction with one another. For instance, at various points in the roadmap (or as early as character selection), you may need to know specifics about the different races in Kenshi that aren’t covered until Section 8 and 9, so jump to those sections. When the roadmap tells you to focus on building up farm production, consult Section 5. Basically, if the roadmap doesn’t contain enough of a how-to, look below, where I’ve provided analysis, descriptions and links. If you feel like there is a segment that needs a better explanation, please feel free to let me know in the comments and I’ll try and update it.
There is almost certainly a way to play the game with even less early grinding than I did here, but this guide will demonstrate a way to get to a place where you can sustain a settlement and move on to whatever aspect of the game you most aspire to.
The world in Kenshi can be a tough master – it won’t necessarily force your play style but it will force you to make hard decisions or punish you for rushing. If you want to strike out on your own and empire build in a tax-free or lawless region, you may need to grind a bit and/or recruit a ton before you can adequately defend the settlement. If you want to live in a safe region, like the Holy Lands, you have to follow the rules (meaning you can’t recruit non-greenlanders or females without some risk of bringing unholy hell down upon your new settlement). And generally speaking, if you are in a more “controlled” portion of the map, your settlement will have to pay taxes. A lot of them. Unless you want to fight the very people you hope to trade with or receive protection from.
Important Initial Note:
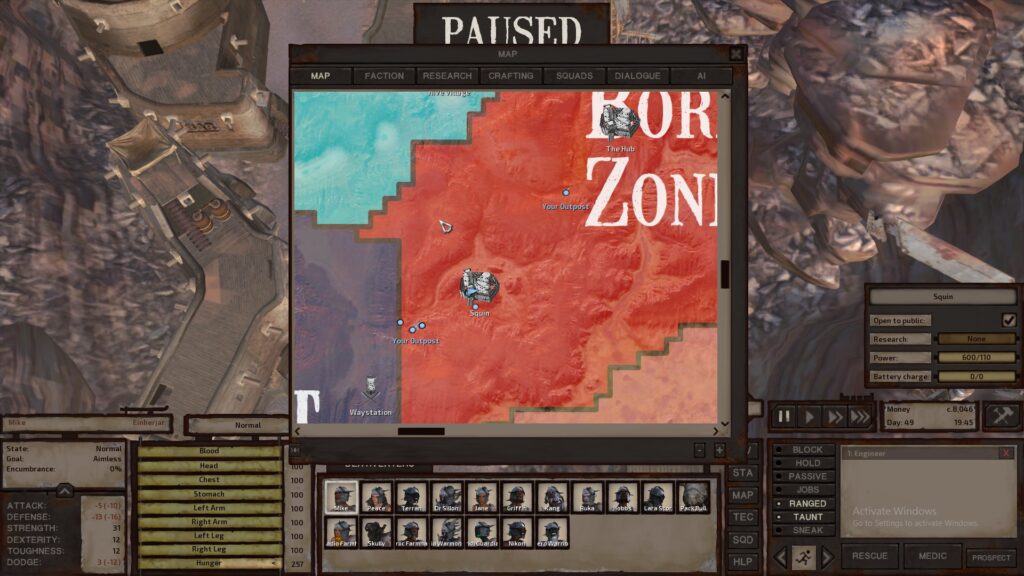
I’ve tried hard to refrain from putting in any spoilers, but the roadmap – by necessity – discusses the path I chose to take to get there. As such, it contains the names of a few of the towns and their relative location, an image of the map around Squin (the town I focused my start on), as well as some of the factions I had to deal with.
Changelog (after 12/11/18)
– 12/11/18 – Added Farming, Base Location and Layout, and Equipping your Squad Sections. Added other minor updates to various parts of it and tried to make it cleaner.
-12/12/18 – Greatly expanded section on Arming and Equipping squad; added weapon breakdowns and thoughts.
-12/13/18 – Pictures and a few updates added for Farming
-12/14/18 – Added notes on auto-hauling and efficiency
-12/16/18 – Added a few notes throughout, including base setup, farming, and stackable backpacks in auto-haul section.
-12/17/18 – Added sections on Early Money Making Strategies and Faction Economy Strategies. Changed up section locations and added info throughout.
-12/18/18 – Added sections on Race Breakdowns and Role Selection and Job Rankings. Additional edits made throughout. Advanced Killzone picture posted.
-12/20/18 – Added War Party and Advanced Research and Looting sections, made additions and edits throughout including moving sections around.
-1/6/19 – Began incorporating questions and suggestions from comments and messages, and added edits and a few tips throughout.
Character Creation and Start Choice
Character Creation and Start Choice
I started as a lone wanderer, which is what this guide will focus on as it is the standard start.
Your primary character will likely be your most complete. I chose a Male Greenlander, and if this is your first playthrough that makes a lot of sense. You won’t be hated by Holy Nation, which frees up much of the center-north portion of the map. However, the cooking, farming, and science bonusses, while great overall, are not real important on your starting character which will likely be one of your primary warriors/jack of all trades throughout.
If you want to play it a little less safe and get more combat bonusses, you could try:
- a Scorchlander due to how rare they are to recruit, they have few penalties making them a sort of jack of all trade plus combat bonuses and eat less than greenlanders or Shek. An added bonus is that while they aren’t liked by the Holy Nation, they are tolerated and won’t be attacked on sight, or
- a Shek warrior due to combat bonuses. They have a horrible hunger rate, which is painful early, and a ton of job limitations, which can also be painful. But they are good at fighting. Note that they get targeted by the Holy Nation so that might limit you for early recruiting and trade in the central northern portion of the map.
- Note – While Skeletons are incredible late game fighters, and a squad of them may be your desired roving warband, they are, in my opinion, a bad early selection for a new player. They will be attacked on sight by the Holy Nation, and are very expensive to repair and maintain, even if they have no hunger. That said, if you do go that route, you can rent skeleton repair beds in Hive territory (as well as in other tech areas).
For more on this, look at Sections 8 and 9, which break down the various races in Kenshi, their combat roles and non-combat roles.
Quick Primer on Stats
For the most part you’ll find this information readily available in other guides but I’ll provide a quick overlay below. Attributes and skill levels cap at level 100, and racial bonuses only go towards experience earned.
Attributes – your fundamental, underlying stats that drive everything, relate to combat and other skills.
- Strength – Ability to use heavier weapons, strike harder (particularly blunt dmg), carry more. Used to affect total blood level but may no longer do this (discussed below). This will be a skill you level on pretty much all your characters. This will go up naturally enough, especially if you’re swinging heavy weapons – but classic ways of leveling this include filling sacks up with iron ore and then doing your tasks (or running around), carrying captives while you work, swinging heavy weapons, etc.
- Toughness – Ability to take a hit, effects damage resistance, and KO level. You want this on everybody, but its the most difficult to level – Pretty much the only way to level this is to continually take a beating. I just allowed this to level up naturally, but the classic leveling for this involves prisoner training (discussed below).
- Dexterity – Effects attack speed, cutting damage, dodge ability. It is raised “per hit,” so faster weapons will train it up faster. Very important for all chars, especially martial artists.
- Perception – Pretty much the only “class” dependent skill, perception governs a character’s ability to see things in the wilderness, as well as ranged weapon accuracy. You pretty much will only be building this on your ranged fighters by practicing ranged combat.
Skills – Task specific skill levels, which fall into six categories:
- Weapon Skills – Self-explanatory, your ability to use particular weapon types (discussed in detail below) will level up as you use them. Also includes turret skills and friendly fire reduction (precision shooting).
- Combat Skills – Govern how effective your characters are in combat more generally – including success with attacks, blocks, dodges, and martial arts. You will level these up through combat.
- Thievery Skills – Govern all things related to being a thief/ninja, including stealth, lock picking, thievery, assassination.
- Athletic Skills – Athletics, and to a lesser extent swimming, are pretty important from the outset.
- Science Skills – Skills that govern intellectual activities include medic, engineer, robotics, and science. You will be developing medics and science from the getgo – your engineer and robotics characters come along later.
- Trade Skills – Skills that govern crafting, farming, and cooking. You will have a lot of characters uniquely focused on these.
Basic Roadmap – Part 1: First Steps
First Steps – Initial Training and Purchases
RUN. Always. This is the only rule for beginning your life in Kenshi. While getting beat up isn’t the end of the world (or even a bad thing), there is plenty of time for that later.
- Run speed is based on a character’s athletics skill.
- Initially, you want to be running around to get your athletics up to 20 or so – that way you have a higher chance of escaping punishment. You will do this naturally by running back to the copper or iron vein you want to mine, but you can also try finding the cities north and south of Hub, just remember to keep a close eye on the horizon for bandits and your inventory relatively weight free (one food, one medkit).
- Recruit the freebie Hobbs (free recruit) in Hub, and start mining copper or iron nearby. Note – There is some randomness built into the spawn location of the free recruits, so, for instance, Hobbs may not automatically be spawned in Hub at the start. Exploring the Biome a bit is dangerous, but it provides an added incentive to find Squin (South of Hub), and/or Stack (north of Hub) to see if they have any free recruits.
- Always keep food and a medkit on each of your guys.
- Save up money from copper mining south of Hub to buy the large backpack (3k) and access to the Thieves Guild in Hub (10k).
- The Thieves Guild will allow you to train your character in basic melee (up to 5 or 10), lockpicking, and sneak attacks (which you should train no higher than 17 or 18 right now, and are really only important for escaping imprisonment and stealth attacking bandits to get prisoners for training which is useful later).
While I relied on safely copper mining in this playthrough, Section 1, below, provides more depth on how to mine for money, and discusses additional early money-making strategies.
One example of this is a strategy I read about but didn’t try which requires that you find the Waystation south of Squin and hire bodyguards to attack the Dust Bandit king, heal him and turn him in for his bounty to give a sizeable starting income. I would recommend not doing this until you’ve looted the corpses creating by the guards at Hub or Squin.
Other things to keep in mind early on
- City Exclusion Zones – Unless you’re inside a purchased home, you can’t build in cities or in the areas immediately outside of them. This will limit your ability to use a starting city as your own personal settlement bc you can’t build many of the early buildings indoors (like refineries for building material).
- Configure your settings to reduce any potential lag while trying to maintain the highest view distance you can. Especially early on, when you need to be on the lookout for raiders and you don’t have the game running your gang of 30+ workers across large areas. There are a lot of different guides for reducing potential lag in Kenshi, simply turning down the display settings and selecting the option to only run the game where my screen was worked fine.
Basic Roadmap – Part 2: Before You Settle
Okay, you’ve trained your starting character up a bit, recruited the freebie in Hub (if he was available), and are now ready to build an empire, or at least some metal objects in the desert so you can say you’ve left your mark on the world.
Squin Base Start – In this sample playthrough, our first step is to find Squin (shown in the map below). It’s in a good central location south of the Hub with a ton of dried meat from its two bars and an adjacent copper source.
- If there’s a free recruit in a bar in Squin, you’ll want to scoop them up immediately. You’d like to start with at least 3 people.
- Set one of your recruits to mining that copper source just outside the south entrance of Squin full time.
- Always mine while in stealth, which doesn’t appear to slow down your mining and significantly reduces your chance of being attacked (plus it builds up your stealth skill when raiders wander by).
- Purchase and repair a longhouse in town and build a research bench. Try and pick the one closest to the copper source your guy is set on mining, and get one char to start researching mining and storage tech. Note: Basically, you want to rush copper storage, which is the “Storage Boxes: Ore” Research.
- During this time focus on buying up all the dried meat from the Bars; it is so much more affordable than other sources of food.
- Keep in mind that – unlike most stores – the Bars are always open, and restock daily.
- If Squin runs out of dried meat, do a run north to Hub (1 bar) and/or to Stack (3 Bars).
Automate Route – Once you’ve researched copper storage, automate the first route by setting up copper storage in the townhouse you purchased (by this I just mean, have one worker assigned to mining copper and then hauling it to the storage, allowing the process to repeat on its own and not freeze after hitting the 5 copper limit).
Early Recruiting – With your primary character focus on recruiting 1 Pack Bull (and eventually a second), freebie recruits and anyone that is 3k or less.
- The basic idea is to maximize the amount of mining/resource production for your two early outposts while not being forced to spend a ton of your early money on food.
- 3k recruits should always be picked up (and obviously freebies) because in most playthroughs they are relatively rare in the early going for this area – most recruits are 6k – and the amount you save on these guys makes an impact. I don’t think my squad went higher than 10 or so in this period so if you’re finding cheap recruits plentiful, you don’t need to go crazy (you can, it will make the later steps easier, but will cost you a lot more in food so make sure they have work).
Initial Outposts – Set up two small mining “outposts” (below) which you should never defend.
- When you see a raid, get all but your fastest character (highest athletics skill) back to the safety of Squin asap.
- Then, use your fastest character to pull the raids back to guards at Squin.
- Don’t worry about your stored resources – I never had any issues with the storage units being raided when I abandoned the bases, and you can now use the loot to upgrade your player equipment. Note – Food storage is the exception, so keep most of your foot in town and just run it back down as needed or as much as won’t be missed.
- The first and primary outpost should be located south of squin where you have a 2 man copper vein and a lot of iron/stone. Set up some refineries and start collecting stone, iron and copper. Put one pack mule here to ferry resources back to storage/town for sale and then bring food back to your workers. Note – If you build a food storage barrel, they’ll eat from it without you have to individually provide them with dried meat but remember that the food barrel can be looted by bandits. You can also use the miner back at Squin for your sales person in town.
- The second outpost should be setup north of squin where there were several 2 man copper veins. You already have iron and stone being mined, so just focus on copper mining here. Use the second packbull to repeat the process of bringing ore back to town for sale, and bringing food back to your miners from town.
Prepping for Expansion:
- First, you’ll probably need more space. Buy a second house and I recommend building an additional research bench (ideally tier III). You want to make sure you have researched defensive walls to at least Tier 2 so that when you actually construct your base you can mount them immediately.
- Also start building general storage chests – they fit the most compactly in your house and have the largest amount of space.
- You can also build some prison cells if you want to train fighters on the rooftop. Remember that prisoners are just more mouths to feed, and Sheks are the worst bc they have the highest hunger rate.
- This should only be done with characters who don’t have an explicit role in making you money.
- If you decide to go that route, focus on naked training to build toughness. In my case, I only worked on building my main character as my other guys were focused on building labor/research skills.
- Continue to stockpile as much building materials and iron plates as you can. You’re going to need a ton when you make the move south so gather as many as you can.
- When you’ve built up a fairly large stockpile of materials in town, start stockpiling a lot of cactus and wheat (I think I had at least 30+ cactus and 15 or so wheat) with 2 of all other farm resources for research purposes for the planned expansion.
- Research as much your level III bench allows for purposes of town building – ignore things like training dummies, and weapons crafting for now.
Building your faction – Once you’ve automated mining, selling excess scavenged goods, and any bounties that you pulled to the Squin guards you should have 30k to 50k resources saved up even while continuing to buy up all the dried meat you come across. Now is the time to explore a bit/start recruiting in earnest.
- Nearby recruits – Using your main character, find the Waystation (south of Squin) and Stack, which should both have some recruits for you to find for 3k. You can also recruit the 9k holy warrior in Stack as well. Gather them up and set them to tasks in your two outposts before beginning the journey north.
- World’s End – You can use your own discretion on this but in this sample playthrough, I wanted to find Scorchlanders for crafting, Sheks for fighting, and Greenlanders for farming. I had run into plenty of the latter two, but no scorchlander recruits so I headed north towards World End with my main character. I recruited every 3k person I could find, and a few 6ks (I think one was a skeleton).
- Afterward, I continued north to the Fishing Town above World’s end. I recruited a few more scorchlanders I found there and another one or two Greenlanders.
- No matter where you recruit from, send them running as fast as they can towards Squin. They will require monitoring to make sure they don’t go aimless on the long trek south.
- At this point, you want 17-20 recruits equipped with all the Dust Bandit gear you’ve looted, about 3-5 or so with backpacks, and 2 pack mules. I recommend making two of these 2 doctors/researchers which you should keep on passive (see more on this in the equipping section). If you can equip your guys with katanas/nodachis and polearms that’s a plus since they don’t take much skill to use and are good against the low armor opponents you’ll primarily encounter.
You are now ready to create your settlement.
Basic Roadmap – Part 3: Building The Settlement
Starting Your Settlement – There are so many workable locations in the game, each with different pros and cons. See the Section 2, below, on settlement location for more but in this sample playthrough, we will be going to “Rainbow Valley” (discovered by Stormbrooke on steam).
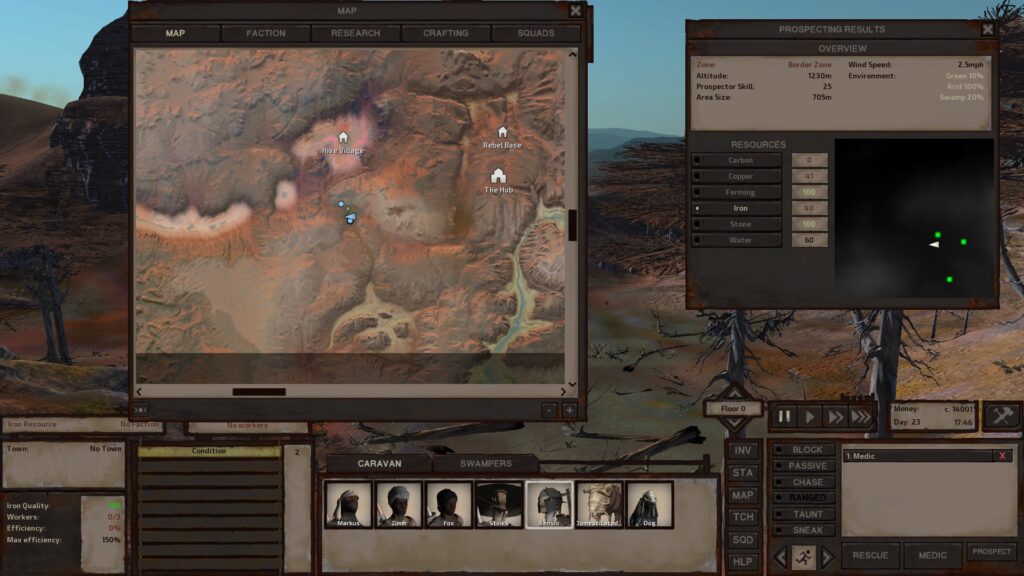
Background on this location:
- Its located between three different Biomes, with great arid farming, ample access to 6 copper mines, several iron mines, and 100% stone.
- First Biome – The Border Zone: Shek Territory. Primarily Arid with medium winds. This is where you’ve been operating, and it is fairly safe. Most animals you encounter won’t attack you unless provoked, and you should be familiar with the dust bandits that roam the wilds. It contains two major cities: Squin and Hub, and another very useful location is the Tech Hunter Waystation in the central south portion of the biome. There are also a number of quest locations which you will discover once your squad is able to leave its safe confines
- Second Biome – Vain: A dangerous biome on the western coast, it has low winds and is dominated by wild animals (Beak Things and Gorillos being the most prominent). It is also home to many Hive settlements and is split evenly between Green and Arid environments, although for our base location it is green. It also contains some swamp environments. There are many secret locations that you can explore and loot here, but it will take time before you’re ready and a key early move is to gate/wall off this section of the map to prevent wild animals from absolutely decimating your squad.
- Third Biome – Stenn Desert: Shek Territory. A completely arid environment with very high winds (best for wind generators). Contains the city of Admag, where the Shek leadership resides. Your biggest threat from here will be Shek war parties if you refuse to pay them taxes.
Now, you’re ready:
- Use your pack mules to haul all of your stored building materials, iron plates, food, etc. to this location. You can also use a few wooden/trader backpacks (which allow stacking) to help with this.
- First, you need to create storage bins for all basic base-building items (iron plates, building materials) and transfer all your stored materials to them which will allow your engineers to automate.
- Next, focus on getting up some initial refineries, mines, and storage containers.
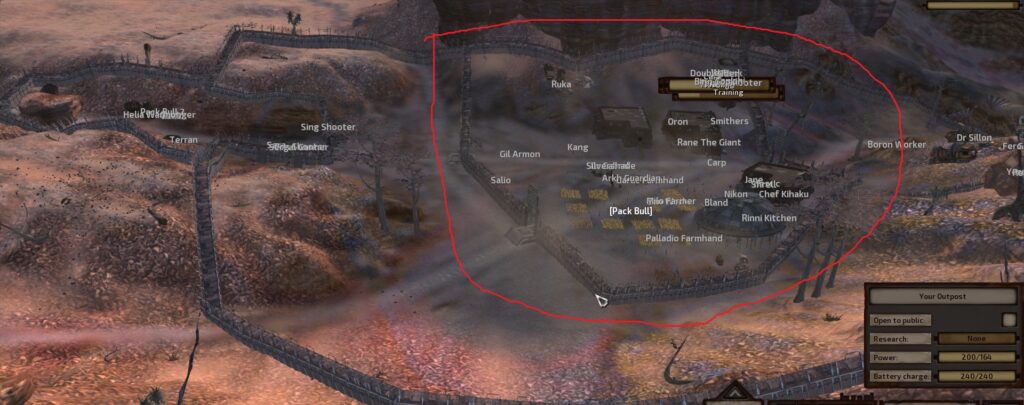
- Afterward, build defensive walls around the inner sanctum of your base. You don’t need to create a wall funnel yet, just a basic inner sanctum that you will later expand with other walled in segments to protect your resources from animals, create farming zones, battlements, etc.
Below you can see where I chose to build my inner sanction (ignore the rest for now):
- An additional and perhaps simultaneous priority here is to dismantle your two earlier outposts and go to the nearby Waystation to hire as many Mercs as possible for the town (2) – if you don’t dismantle them, the mercs will guard your old outposts unless you hire them as bodyguards (but then you’re limited to two days and if you’re using your main character to run all over the map it’s better to keep them in town).
- Once this is done, build a Storage House, then focus on building up food production with the Cactus and Wheat you had stored up in Squin. Food production and buildup are explained in depth in Sect. 5 (Farming), below.
- The next things on your agenda should be a Food Production Building (Kitchen) and a Research and Crafting Station.
Expanding
- From here, focus on trying to recruit some specialized characters (in particular: two Greenlander cooks, and two scorchlanders for armor and weapon smithing). If you followed my guide from earlier, you may already have done so, and that’s fine too.
- You can rely on mercs forever, but if you’d prefer not to, now is the time to start building up and training a “fighting group.” There are several ways you can do this – You can use a few training prisoners, training dummies, etc. Or you can form a hunting party with a few guys and try to hunt lesser creatures. I will be expanding on a hunting section after I experiment with it more. The raids and random attacks will also slowly build up your factions fighting capabilities while this is happening.
- The Shek will come to collect taxes. I chose not to pay them and had to fight their war parties continuously throughout my sample playthrough. It was completely doable, particularly with mercs, but you may consider doing otherwise. From these interactions, they eventually went to war with me.
- Expanding your walled sections is the next priority, particularly in the north by the Vain Biome to protect your miners from the Beak creatures that roam there. You probably will not have researched large defensive walls yet, but you can always tear them down and put up new ones later on. You want two main entrances to your base that have funneled kill-zones (explained in Sec. 3, Killzones, below).
- Build a few power plants just outside your inner sanctum. I used large wind generators, but there are benefits to using small wind generators since they don’t require as much wind to operate. The ideal location is in the Stenn Desert, but the Border Zone works well too, just make sure not to put them in Vain.
- Use your pack mules to ferry copper to nearby cities, the Hive Town and Squin primarily – you’ll be doing this even after you’ve developed your farming capacity to the point where you can craft lucrative trade resources and shops (see the relevant sections below for tips on how to do this).
- At this point, you will need to spend a good deal of time working on three things: 1) Continuing to recruit people to do basic jobs like farming and transport; 2) Training turret gunners and manning turrets in the kill zones; 3) Continuing to build up farm capacity to feed your growing faction; 4) Continually crafting and equipping better armor and weapons for your faction.
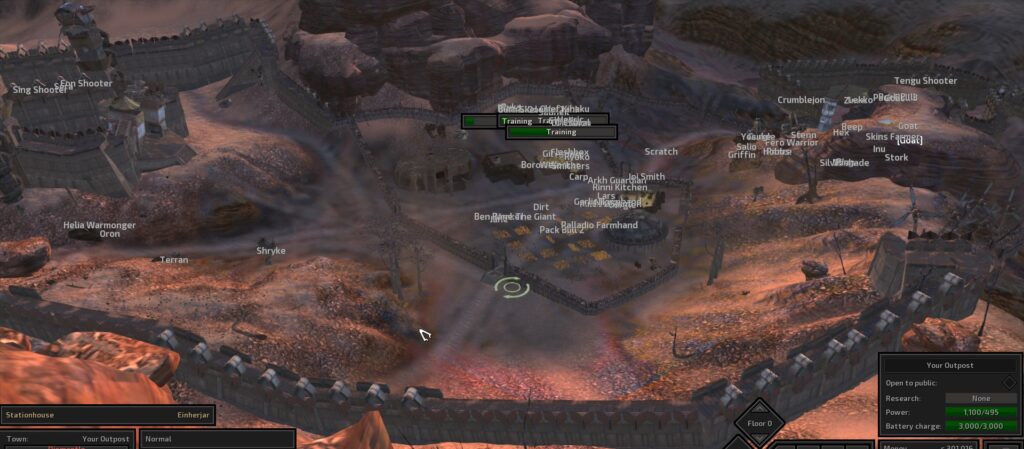
- When you feel reasonably comfortable with handling raids on your base, feel free to upgrade the walls and kill zones around your base. For reference, in my sample playthrough the outline of my base looked more like this after upgrading the walls and defenses (compare to the screenshot above, which captured the outline of my base with its original walls and kill zones):
9. At this point, you have all that you need to continue building an empire. Consult the second part of this guide for more in-depth information and enjoy your experience in Kenshi.
Second part of the guide
In-Depth Kenshi Guide on Base Building
Both this part and the second part were written by Ironslasher who has graciously permitted me to feature his guide on this blog. Thank you again.
Also check out this Kenshi Review if you want to convince your friends to try the game.