Introduction
Hello all and welcome to my perk guide!
You might be wondering why I’m creating a perk guide when several already exist. The reason is that many of the existing guides are outdated in regards to the DLC, only offer brief advice on the perks, focus too much on the end game, or have information I disagree with. Disagreement is healthy and I’m not arrogant enough to claim that other guides are completely wrong or that my guide is perfect. I encourage you to read other guides as well and come to your own conclusions where we guide writers disagree.
What is the point of this guide?
With the Blazing Deserts (BD) DLC out and the Switch release on the horizon, we will likely see an influx of new players that will be seeking assistance. I want to put out a guide that is current to the existing DLC, that goes into a high level of detail and nuance for each perk and their general usefulness, while also providing use cases on when you might want to choose a specific perk.
I wrote this guide so that people would get all the necessary information to make educated decisions when selecting perks. You can be successful in Battle Brothers (BB) using many different strategies so bear in mind that even if I do not value a perk highly it doesn’t mean you can’t make it work. I have cleared crises in a no-perks challenge and I’ve beaten Monolith with a team of Beggars/Cripples, so you do not need to stress so much about min-maxing or creating perfect builds. This guide will of course be subjected to my own biases, but I will still point out good ways to use perks that I don’t personally like.
What does in-depth mean?
This guide will take a close look at every single perk, explaining how they function at a basic and deep level, exploring mechanical and situational nuance, and giving tips and advice on how to best make use of each.
To give you an idea, here are some questions the guide addresses:
☆ How does the 3-Headed Flail function with various perks?
☆ What are the pros and cons of each Duelist option?
☆ How much does Fortified Mind help against Hexen?
☆ Is Head Hunter good on bros with Brute?
☆ How does Taunt work in various situations?
Answers to these questions and many others can be found throughout this guide.
I will also explain various gameplay mechanics along the way like injury and morale mechanics, damage calculation, and more. Attributes and stats will be focused on too as they impact the game to a varying degree, and this plays into perk valuation.
What is this guide not?
This guide is not short. If you are looking for a very quick pass on the perks then I suggest just checking out the summary section of each perk and then skimming through any sections of interest. Reading through the entire guide start to finish will take some time, so it may make more sense to focus your reading on sections that interest you.
This guide is not a build guide. I want to focus on the perks themselves and you can come up with the builds because that’s part of what makes BB so fun. Of course I will talk about perk tips, synergies, relative strength, and builds here and there, but I’m not creating a build script for you to replicate. Experiment yourself or look to other guides for that purpose.
This guide is not a min-maxers guide on how to beat the legendary locations really fast or how to create a company of super soldiers. If you like to play that way then this guide can still help you achieve those goals, but it isn’t specifically catering to that playstyle. Again, you can meet the majority of the game challenges without perks at all so you don’t need to worry so much about creating perfect bros or only using the strongest perks.
Who is this guide for?
I would like to hope everyone can get something out of this guide.
Beginners will find plenty of advice to make informed decisions on when and why to choose a particular perk. I will also answer some of the most recurring questions coming from new players on the forums, and I will debunk common misconceptions shared among the community.
Veteran players should still learn something new as I go heavily in-depth, or at least get different perspectives to enrich their own playstyle.
Spoiler warning
If you are new to the game and spoilers bother you then I apologize, but I will need to talk about enemies, bosses and legendary locations to help provide advice. I will not be marking spoilers throughout the guide. This is your warning!
Quantitative ratings and why I’m not using them
Quantitative ratings are fun but really fail to capture how you should be evaluating perks. Dodge for example is probably a 10/10 on some builds and a 1/10 on others, so how do we give it a singular rating quantitatively? It isn’t really the way you should be evaluating perks in game. Instead you should be looking at the bro in question, what role he can fill, what roles your party needs to be filled, and which perks can help a character succeed in that role.
My gameplay perspective and context
My perspective is that of Expert Economy and Combat, Low Funds and Ironman using all DLC and no mods. If you play on a lower difficulty, or do not have the DLC, or play with mods then most of the guide will likely still apply, but keep in mind the differences.
I will also focus mostly on the first 100, maybe 150 days. In my experience, the game becomes largely unthreatening by day 100. It is not too hard to have cleared the map, including legendary locations, by day 150 or 200 with a team of mostly average to good bros. Your team doesn’t have to be perfect or built specifically to win legendary fights. Some perks especially shine in the early and mid game and I’m going to be pointing this out.
A note about Blazing Deserts
I began writing this guide long before BD was announced. It is now updated with BD in mind. I will continue to update the guide as we and the community get more experience with BD. See the BD section for details on what has changed in the guide since the BD launch.
Where do your calculations come from?
I have built a damage calculator hat can simulate the game combat.
While sandbox calculator tests can’t fully capture the true dynamic nature of the game, they can still help us evaluate perks and answer questions such as:
◇ How much does Nimble, Forge, Brow, Indomitable really improve the toughness of a character?
◇ How much does Crossbow Mastery, Head Hunter, Duelist, increase damage?
Feedback welcome
My opinions are not law. If you like using a perk that I say is weak then by all means continue using it, and you don’t have to use perks that I say are strong. If you have any advice for improving the guide or want to offer a differing opinion then please feel free to share in the comments. Again, there are many ways to be successful in Battle Brothers.
If you enjoyed the guide, consider leaving a thumbs up or comment so it gets more visibility.
Format
Perk
“A dumb quote, reference, or joke I’m putting in for fun.”
Description: the in-game description for reference.
Summary: some + and − points that summarize the perk.
Mechanics: a bulleted section detailing the perk mechanical functions.
Discussion: in-depth analysis of the perk, its pros and cons.
Use Cases: specific scenarios worth considering when using the perk.
The summary serves as a quick reference. It’s not a rating scale.
Thank you!
Thanks for reading the introduction! I encourage you to check the Game Mechanics section as I reference it a number of times throughout the guide. Otherwise, feel free to use the table of contents on the sidebar to jump to perks of interest.
Game Mechanics
Some game mechanics will be relevant to multiple perk sections. Instead of repeating myself multiple times throughout the guide, I will explain these here.
Defense – Increasing returns from high defense values
Melee Defense (MDF) gets exponentially more valuable the more you already have. To illustrate, let’s assume a Chosen kills us in three hits. What returns can be expected from increasing MDF for different starting values?
- 10 defense (65% hit chance): death in 4.62 swings
- 15 defense (60% hit chance): death in 5 swings (+.38)
- 40 defense (35% hit chance): death in 8.57 swings
- 45 defense (30% hit chance): death in 10 swings (+1.43)
A 5 MDF increase with a starting value of 40 is more than 3 times as beneficial as it is for a value of 10. The takeaway is that stacking MDF is very strong. All of the MDF perks benefit from this interaction, and there is no such thing as too much defense.
Technically, the value of each MDF point over 50 is halved, but due to the increasing returns from high defense, leveling it beyond 50 is still extremely strong. The softcap only slows this down by a little.
As an example, going off of the above scenario:
- 50 defense (25% hit chance): death in 12 swings
- 56 defense (22% hit chance): death in 13.64 swings (+1.64)
Despite the softcap, raising defense is still yielding huge returns, and it continues to get stronger the higher you go.
See this post by Reddit user WeWantEverything for a graphical visual.
Ranged Defense (RDF) also gets increasing returns with higher values, but enemies can just shoot somebody else instead. So it is hard to actually benefit from high RDF, unless the opponent targeting behavior can be predicted and somewhat controlled.
Avoiding attacks thanks to a high defense also helps save Fatigue:
- Being hit: −5 Fatigue
- Dodging/Shielding vs. melee: −2 Fatigue
- Shielding vs. ranged: no Fatigue incurred
Related Perks – Dodge, Gifted, Shield Expert, Relentless (via Dodge), Reach Advantage, Overwhelm, Lone Wolf, Underdog.
Skill – Increasing/Decreasing returns depending on perspective
⊱ Increasing returns in reliability
From the perspective of reliability, Skill (SKL) has increasing returns. For example, going from 90 → 93 hit chance (≠ SKL) gives –30% less relative chance to miss (3 ÷ 10). Going from 70 → 73 hit chance on the other hand only grants –10% (3 ÷ 30).
⊱ Decreasing returns in expected damage output
As a counter to increasing returns from defense, SKL is more gainful when your hit chance is poor. To illustrate, let’s assume we kill an Ancient Legionary in 3 hits. Legionaries have 0 MDF unshielded and 50 with solo Shieldwall (SW) Tower Shield. How useful is having more MSK here?
- 70 SKL vs. Pike Legion (70% hit chance): death in 4.29 swings
- 90 SKL vs. Pike Legion (90% hit chance): death in 3.33 swings (–.96)
- 70 SKL vs. SW Tower (20% hit chance): death in 15 swings
- 90 SKL vs. SW Tower (40% hit chance): death in 7.5 swings (–7.5)
Gaining SKL is significantly more impactful to damage potential when your hit chances are poor. As such, bros with lower SKL will benefit more from accuracy perks than bros with higher SKL, and accuracy perks can even be stronger than damage perks in some cases.
Given that enemies have defense and some of them high, it is hard to have too much SKL. Even high SKL bros can benefit from accuracy perks, but lower SKL bros will benefit more.
Related Perks – Fast Adaptation, Gifted, Backstabber, Lone Wolf.
Damage – HP damage taken is reduced by 10% of the remaining armor
Hitpoints (HP) damage dealt to a target depends on a weapon and skill armor ignoring damage (AID) proportion as well as on the target’s remaining armor.
For instance, a Fighting Spear (25% AID) body hit rolling maximum HP damage (40) can deal up to 10 (40 x 25%) HP damage through armor. But 10% of the target’s remaining armor, after armor damage has been accounted, is subtracted from this. So if the target has 70 remaining body armor after taking the armor damage, then 7 of the 10 maximum damage ignoring armor is subtracted, and only 3 damage is dealt instead.
As a result, heavy armor is good at negating HP damage from weapons with low AID but is still vulnerable to attacks dealing high AID.
Since the damage mitigation from armor occurs near the end of the damage calculation, abilities that reduce damage prior to this occurring are stronger than expected.
Related Perks – Nimble, Battle Forged (via having more remaining armor after attacks), Indomitable.
Damage – Critical multiplier applies last in calculation
The critical (headshot) multiplier (1.5) is applied after all other modifiers which is why damage mitigation is so important. Let’s take a case:
- HP damage is 14
- after armor damage, remaining head armor is 100
- damage going through armor is 4 (14 − 10)
- final HP damage is 6 (4 x 1.5)
If the critical multiplier was applied earlier in the formula, damage taken would have been 11 instead of 6. In that regard, the damage formula works against Steel Brow and Head Hunter, because critical hits are weaker than you might expect assuming there is a helmet to help absorb the blow.
Related Perks – Steel Brow, Head Hunter, Nimble, Battle Forged, Indomitable.
Resolve – Hidden adjacency bonus/malus
Characters receive a hidden +3 Resolve on negative morale checks for each adjacent ally. They also suffer -3 Resolve on all morale checks for each adjacent enemy. So keeping a tight formation will help with morale. Incidentally, surrounding an isolated enemy will try his Resolve harder.
Fortified Mind does not modify these hidden effects nor does Underdog negate the Resolve malus.
Related Perks – Rally the Troops, Lone Wolf, Fearsome.
Initiative – Waiting lowers Initiative by 25% for the next turn order
Using the ‘Wait’ command will incur a 25% Initiative penalty for determining turn order next turn. This doesn’t reflect on your current Initiative, meaning that Dodge is not affected.
Waiting should be avoided if you want to ensure better Initiative but acting later can also keep certain buffs activated longer.
Adrenaline can circumvent this, If multiple Adrenaline users are present then these mechanics will apply to determine their turn order.
Relentless negates this penalty.
Related Perks – Adrenaline, Relentless, Reach Advantage, Overwhelm, Indomitable.
Decimal calculations – Decimals round down
Whether for damage or stat calculations, decimals always round down.
Related perks – Colossus, Recover, Executioner, Dodge, Fortified Mind, Steel Brow, Anticipation, Shield Expert, Brawny, Relentless, Rally the Troops, Overwhelm, Lone Wolf, Head Hunter, Nimble, Battle Forged, Fearsome, Duelist, Killing Frenzy, Indomitable.
Ranged hit chance – Weapon modifiers and distance play large role
While not influenced by perks, the in game tooltips struggle to tell the full story here.
Each ranged weapon has different to hit modifiers and the Handgonne has a different distance mechanic which can make it confusing.
Below chart has the weapon, base hit modifier displayed on the tooltip (Hit Mod), hit penalty per tile (DistPen), distance penalty begins (PenStart), and the resulting effect of these modifiers at 2 range as an example (Eff@2Range).
| Weapon | HIt Mod | DistPen | PenStart | Eff@2Range |
| Throwing | +30% | -10% | 2 | +20% |
| Handgonne | +10% | -10% | 3 | +10% |
| Crossbow | +15% | -3% | 2 | +12% |
| Bow QS | 0% | -4% | 2 | -4% |
Bullseye/Anticipation do not impact these mechanics.
Terminology | Abbreviations
Terminology
For the purpose of this guide, I want to define the following terms:
- Early game: The first ~40 days.
- Mid game: Day ~40 to ~80.
- Late game: Crisis and beyond.
- Legendary locations: Special battles like Monolith, Goblin City, etc.
- 120/95: Shorthand for armor line. This would be 120 helmet and 95 body.
- Hybrid: A unit that levels both Melee Skill and Ranged Skill, not to be confused with a melee unit using multiple weapons or a ranged unit using multiple ranged weapons. They have to use both.
- Nimble and Forge: Nimble and Battle Forged are the go-to mitigation perks so they will be referenced a lot when talking about other perks, as most bros will want one or the other. Bros are usually distinguished as Nimble bros or Forge bros when discussing perks/builds.
- Armor Ignoring Damage (AID): Refers to a weapon’s Ignore% which determines its ability to deal HP damage through an opponent’s existing armor.
Abbreviations
◿ Attributes
- MSK → Melee Skill
- RSK → Ranged Skill
- SKL → Melee or Ranged Skill
- MDF → Melee Defense
- RDF → Ranged Defense
- DEF → Melee or Ranged Defense
- FAT → Fatigue
- RES → Resolve
- INIT → Initiative
◿ Perks
- FA → Fast Adaptation
- CS → Crippling Strikes
- 9L → Nine Lives
- Bags or B&B → Bags and Belts
- Mind or FM → Fortified Mind
- Brow or SB → Steel Brow
- QH → Quick Hands
- Rally → Rally the Troops
- Reach or RA → Reach Advantage
- LW → Lone Wolf
- FW → Footwork
- HH → Head Hunter
- Forge or BF → Battle Forged
- Frenzy or KF → Killing Frenzy
- Indom → Indomitable
◿ Other
- B/E: Beasts and Exploration DLC
- WotN: Warriors of the North DLC
- BD: Blazing Deserts DLC
- AoE: Area of Effect, as in attacks that can hit multiple enemies in one attack
- ZoC: Zone of Control
- DoT: Damage over Time (such as Bleeding/Miasma)
- 3H or 3HF: 3-Headed Flail
- AFP: Additional Fur Padding attachment
- BP: Bone Platings attachment
- LPR: Light Padding Replacement attachment
Blazing Deserts
Balance changes summary
- Fast Ad. is now worth 10% per stack, up from 8%
- Nine Lives now clears existing DoT effects upon triggering, and grants +15 MDF/RDF/RES/INI until bro’s next turn
- Adrenaline AP cost to 1 (was 0)
- Anticipation now also provides a minimum of 10 RDF if the formula would have yielded less
- Brawny reduction to 30% (up from 25%)
- Relentless now negates the 25% Initiative penalty of “waiting”
- Rally the Troops now costs 5 AP (was 6)
- Sword Mastery now buffs Gash Injury chances
- Head Hunter reworked.
- Fearsome now adds 20% of attacker’s RES as a debuff to opponent’s RES when inflicting HP based morale checks.
- Indom AP cost to 5 (was 3)
Blazing Deserts Overview
BD brought a number of changes to the game: perk rebalancing, new enemies, new gear, more consumables, the Arena, another legendary location, and more. Here is just a very brief overview on how some of those things affect the perks.
⊱ Perk rebalancing: Some winners and losers
See the above list for the perk changes. There were a number of minor buffs to many perks. Head Hunter and Fearsome got reworked from being two of the worst perks to actually being good now. Adrenaline and Indom both got nerfed to kill the Adrenaline cycle which busts up the WotN meta. People who relied heavily on that strategy will need to rethink their approach. The Indom nerf also makes it harder to use on 2Handers.
Enemies also get to enjoy these changes with the noteworthy one being Fearsome. Fearsome enemies will now impart a hefty RES penalty on your units when they damage you, making RES more important than in the past, and making Mind a more enticing pick by extension.
⊱ New enemies: Nomads, Gilded, and new Beasts
We have more flesh enemies. Therefore, CS, Executioner, and Fearsome all have more targets and the overall % of immune enemies has decreased.
Nomads have a strong debuff ability in their sand throw. You can avoid this with good use of Adrenaline and/or Relentless. Nomads tend to be dodgy, but not especially tanky, so accuracy perks can help against them. They are overall stronger than Brigands, and have dangerous elites.
The backbone of the Gilded are their Nimble Conscripts. Bear in mind Nimble’s weaknesses when you seek to counter them. The key to Gilded fights is to remove the Gunners, so formulate your strategy accordingly. The Gilded weapons are more threatening to Nimble units than Forge units.
⊱ The Arena: Some perks do better in small battles
You often have Fat to burn so Adrenaline or other activated skills can do well. Alternatively, Dodge and Overwhelm are both good. Fearsome is great. Taunt can do well if you bring a tank. Things like Bags, Recover, Berserk, Frenzy, etc. tend to be less impactful here.
⊱ Potions and grenades
The new potion mechanics can give you strong buffs for challenging fights. The new grenades are all very useful and give more things to use with Bags and/or QH. The Smoke grenade makes Rotation/FW a bit worse.
⊱ Sunken Library
The Library is our newest legendary fight. CS/Executioner/Fearsome don’t work here. The length of the fight and desert terrain promotes Recover and Pathfinder. Lone Wolf can do well, and Resilient can ward a nasty debuff. QH and Polearm Mastery are great also.
Guide BD Changelog
Here I will list some of the changes to the guide since BD’s release. This is just going to be the initial release notes. Subsequent changes will be detailed in the History section at the bottom of the guide.
There have been minor edits/changes overall throughout the guide. Every section has been modified slightly, wordings changed, things added or removed, etc. It isn’t worth pointing out every instance of this, just assume minor edits throughout.
⊱ Game Mechanics
→ Updated Relentless interaction with Initiative
→ Added decimal calculation mechanics
→ Added ranged hit chance mechanics
⊱ Fast Adaptation
→ Updated mechanics/charts for the change to 10% stacks
→ Added mentions of Handgonne
→ Added Confidence/Lone Wolf mechanics
→ Added slightly to some Use Cases
→ Updated Fast Ad. Vs. Chosen calc reference
⊱ Crippling Strikes
→ Added two bullets in Mechanics
→ Added CS usefulness against Nimble enemies
→ Updated Shamshir Use Case
⊱ Colossus
→ Added note on Forge section regarding Adrenaline/Indom nerfs
→ Updated enemy units with Executioner
⊱ Nine Lives
→ Added analysis on new BD buffs
⊱ Bags and Belts
→ Added mentions of new grenades
⊱ Pathfinder
→ Added new terrain types
→ Trimmed some content in the main section
→ Added note about enemy units with Pathfinder
→ Added Use Cases about camps, Adrenaline, and the Library
⊱ Adrenaline
→ Revised Discussion section considerably as much of it was about describing the cycle
→ Revised some Use Cases
→ Added a few more Use Cases
⊱ Recover
→ Removed reference to Adrenaline cycle
⊱ Student
→ Added Manhunter origin Mechanics
⊱ Executioner
→ Slight edits regarding new enemies
⊱ Bullseye
→ Added Handgonne mechanics
→ Fixed an error in the Hexe Use Case
→ Added Anti-Gunner into Use Cases
⊱ Dodge
→ Added points about Nomads/Distracted and Gunners
⊱ Fortified Mind
→ Added Banner/Lionheart mechanics
→ Revised main section slightly
→ Added Fearsome Use Case
⊱ Resilient
→ Removed reference to Adrenaline cycle
→ Split Discussion section into two pieces and added a bit
→ Added Relentless Use Case
⊱ Steel Brow
→ Updated calculation reference link
→ Mentioned Assassin armor set in Nimble section
⊱ Quick Hands
→ Added mention of 2H Mace into Qatal
⊱ Gifted
→ Edited comparison to Mind/Brawny slightly
⊱ Backstabber
→ Added note on Manhunter origin
→ Updated surround mechanics as per stunned/ranged enemies change
⊱ Anticipation
→ Added some Mechanics
→ Added/revised some Use Cases
→ Revised some content as per the new 10 RDF minimum effect
⊱ Shield Expert
→ Slight edits, mentioned Blacksmith Retinue member
⊱ Brawny
→ Revised example numbers and expected value as per change to 30%
→ Removed or revised references to Adrenaline cycle
⊱ Relentless
→ Added new sections regarding the change to negate the “wait” penalty
⊱ Rotation
→ Mentioned Smoke Bombs in the Use Cases
⊱ Rally the Troops
→ AP changed to 5
→ Added Alp, Pathfinder, and Fearsome Use Cases
⊱ Taunt
→ Added Ifrit Use Case
⊱ Weapon Masteries
→ Added new weapon skills introduced in Blazing Deserts
→ Added related discussion to new BD weapons
→ Added Sword Mastery effect on Gash
⊱ Reach Advantage
→ Removed references to the Adrenaline cycle
⊱ Overwhelm
→ Minor edits, added Arena Use Case
⊱ Lone Wolf
→ Added some Mechanics
→ Trimmed main section and some slight edits
→ Revised most existing Use Cases somewhat
→ Added several more Use Cases
⊱ Underdog
→ Added Serpents Use Case
⊱ Footwork
→ Added kiting Use Case
→ Added Anti-Mortar Use Case
→ Mentioned overlap with Smoke Bombs
⊱ Berserk
→ Removed reference to Adrenaline cycle
⊱ Head Hunter
→ Revised almost entirely as per the new effect
⊱ Nimble
→ Updated calculations and references as per calculator changes
→ Updated Nimble weaknesses in the Discussion section
→ Edited Use Cases with new armor and attachments
⊱ Battle Forged
→ Updated calculations as per calculator changes
→ Added 350/350 calculation to show famed armor value
→ Removed refences to Adrenaline cycle
⊱ Fearsome
→ Revised almost entirely as per the new effect
⊱ Duelist
→ Updated Duelists vs. Chosen reference link
→ Updated 3H Flail Use Case
→ Updated Dagger Use Case with Qatal
⊱ Killing Frenzy
→ Slight edits
⊱ Indomitable
→ Removed references to the Adrenaline cycle
→ Revisions as per the 5AP change
→ Added a few Use Cases
TIER 1


Fast Adaptation (FA)
“If at first you don’t succeed, try, try again.”
Description
Gain an additional stacking +10% chance to hit with each attack that misses an opponent. Bonus is reset upon landing a hit.
Summary
+ Improves highly valuable accuracy
+ Helps weak to average characters contribute offensively
+ Provides more help in bad situations
− Low return with high base hit chance
− Can be outclassed by Gifted/Backstabber
Mechanics
⊱ Returns are inversely proportional to hit chance
The following tables show the expected hit chance gain (EHCG) from FA for a base hit chance (BHC).
| BHC | EHCG |
| 20% | 13.8% |
| 30% | 10.9% |
| 40% | 8.4% |
| 50% | 6.4% |
| 60% | 4.7% |
| 70% | 3.2% |
| 80% | 2% |
| BHC | EHCG |
| 58% | 5% (∽ Backstabber) |
| 64% | 4% (∽ Gifted Ranged) |
| 72% | 3% (∽ Gifted Melee) |
⊱ Area of effect (AoE) & three-headed flail (3HF) attacks are limited to one stack, removed on hit
FA will check all hits on the AoE and adjust your hit chance accordingly for each hit. However you cannot gain more than one stack during the process regardless of when you gain it. Any hit during the AoE will remove stacks as you would expect. Below are some examples of how it works. This logic also applies to the Handgonne.
- Hit (lose stacks) -> miss (gain stack) -> miss (no stack)
- Hit (lose stacks) -> hit -> miss (gain stack)
- Hit (lose stacks) -> miss (gain stack) -> hit (lose stacks)
- Miss (gain stack) -> hit (lose stacks) -> miss (no stack)
- Miss (gain stack) -> miss (no stack) -> hit (lose stacks)
⊱ Miscellanea
≻ Mechanically it adds to Skill, even though your stat card won’t show it. This occurs before things like Morale, Lone Wolf, Nightime, Injuries, etc., meaning those effects will modify the stack value up/down from the base 10% yield.
≻ A missed arrow that scatters into a nearby target is counted as a ‘hit’ and will remove stacks even if the arrow ‘hits’ an obstacle such as a rock or tree
≻ Hitting a shield is treated as a miss as you would expect and you gain a stack
≻ A buff bubble will appear in the left of the screen where you can see how many stacks you have
Discussion
⊱ FA reflects on hit chance, not raw Skill
The % values above in the charts are provided for hit chance and not a bro’s base Melee Skill (MSK) or Ranged Skill (RSK). Since hit chance is calculated with both your Skill and the enemy Defense, FA is more useful against dodgy enemies like Shield Wall spamming Footman/Ancient Dead/Conscripts, Goblins at range, etc. and less useful against low defense Orcs.
As an accuracy perk, FA often gets compared against Gifted and Backstabber. On skilled bros, it is usually worse than them. Gifted provides a flat +10 stats always and Backstabber is usually at least +5 accuracy. Gifted/Backstabber don’t fall off at high Skill levels in the same way that FA does. FA will win out however, when your hit chance is low like against Shieldwalling enemies, and when you can’t surround. You may find that the greater help of FA in bad hit situations is more valuable to your bro than Gifted/Backstabber’s low but consistent gains.
If you would like to see how helpful FA is with 80 MSK against some Chosen, refer to this forum post.
⊱ FA value scales with the number of attacks
FA tends to work better on weapons that can attack multiple times per turn or with AoE as this allows you to immediately follow a miss with a boosted chance to land your second hit. Weapons that only attack once per turn have less time/action efficiency to capitalize on stacks gained.
⊱ FA helps average recruits
It is a common sentiment in the community that any bro who might want FA should just be fired and a better bro found, but this misses the point. You don’t need superstars to beat the game. You can clear the crises just fine with average guys using FA. You can bring FA users into legendary locations.
FA is all about reliability. It isn’t going to make a bro standout, but it will certainly help increase his consistency and ward against poor luck.
Use Cases
⊱ Early game: FA performs better
FA is better in the early game due to the nature of all of your bros being weak and accuracy being highly desired. However it does have to compete with other valuable early game perks. Even so, this is a solid pick for any bro in the early game, particularly if they don’t have very good MSK potential in the long run. An unassuming bro with FA, Gifted, and Backstabber can be viable through end game. Specifically, early game Stun or Lash spammers can benefit a lot here.
⊱ Archers: FA for Quick Shot
Since ranged units cannot use Backstabber there is less perk competition for accuracy assistance leaving just Gifted and FA. Gifted is probably the better of the two but there’s plenty reason to use both. Archers are notoriously bad at low levels due to the high stat demand to use bows effectively. FA can really help them through the growing pains of the early levels.
It is still useful later on as well since Goblins all have high Ranged Defense (RDF) and Anticipation. For example, a 100 RSK archer only has a 35% chance to hit an Ambusher at 7 tiles with Quick Shot. Usually it is better to shoot the closer Skirmishers instead but they have decent RDF and Anticipation as well.
It isn’t just useful against Goblins. 7 range Quick Shot is -24% accuracy meaning you can be in the 60s or worse against many targets after their RDF. 100 RSK archers are also very hard to find and lesser archers will of course benefit more. FA is never a bad pick here.
Crossbows/Aimed Shot won’t benefit as much due to their higher innate accuracy and lower rate of fire.
Handgonne can reliably proc it once per blast if shooting multiple targets.
⊱ Hybrids: FA helps with both MSK & RSK
Hybrids are a stat demanding build that runs into some trouble looking for accuracy help from perks. Backstabber won’t help your range. Gifted is fine still but it does take two of the rolls. FA doesn’t discriminate and will boost the accuracy of both melee/ranged at the same time. Due to the high stat demand of hybrids, FA can help you make it work if you need accuracy support.
⊱ Duelist, 2H Cleaver or AoE: Accuracy is essential to damage dealers
It might seem strange to some to consider FA on a damage dealing build because people usually don’t associate bros with lower skill with a high damage option. Sometimes you find a bro with great defense and other stats but his skill isn’t great. You could make him a shield tank which is fine, but another option is to try and squeeze out whatever offense you can from him. Take away common offensive perks like Berserk/Frenzy/Executioner and use FA/Gifted/Backstabber instead and you can make this work. In many ways FA is more useful on damage dealers than mediocre shield bros. Helping your weak shield bro deal his weak damage more consistently isn’t very exciting. Helping your high damage bros land their high damage attacks is a lot more useful.
⊱ Counter high defense enemies
Ancient Legion with Tower Shield using Shield Wall will have 50 defense + more if they are lined up together using it. Honor Guard is 55. Footman is 60. This means an 80 skill bro using a Mace without any surrounding help has only a 30% hit chance against Walling Legion. Even 80+ skill bros can find situations where FA can be helpful.
Also good against Swordmasters/Blade Dancers and other dodgy enemies, especially in the Arena where your normal counters and ganking may not be available.

Crippling Strikes (CS)
“Tis but a scratch.”
Description
Lowers the threshold to inflict injuries by 33%.
Summary
+ Improves injury rates and consistency
+ Better against harder to kill enemies
+ Helps set up Executioner strikes
− Injuries are inconsistent in their usefulness
− Killing enemies is preferable to leaving them alive and injured
− Not very useful on higher end weapons against weak/average enemies and some enemies are immune
Mechanics
⊱ Injury Mechanics
Injuries are inflicted by dealing a % threshold of HP damage to a target. Therefore, having higher HP makes a unit more resistant to getting injured. Crippling Strikes (CS) reduces the required threshold by 33%.
| Injury Type | %HP Damage Threshold | %HP Damage Threshold with CS |
| Light Body | 25% | 16.67% |
| Light Head | 31.25% | 20.83% |
| Heavy Body | 50% | 33% |
| Heavy Head | 62.5% | 41.67% |
≻ Hitting the heavy injury threshold does not guarantee a heavy injury, you may get a light injury instead
≻ Heavy injuries are not always better than light injuries
≻ There are 3 different damage types − cutting, piercing, and blunt − that inflict different injuries
≻ Some Beasts are unable to receive certain injuries (i.e. because they wouldn’t make sense)
≻ Most likely does not effect Fire Pot initial throw (needs confirmation)
≻ For a full injury list, refer to this wiki page
⊱ Armor Ignoring Damage
In order to make use of CS, we want to injure enemies before having to fully destroy their armor, so understanding this part of the damage formula is helpful.
After an attack damages armor, 10% of the remaining armor reduces the amount of HP damage that would be taken. See the Game Mechanics section if you need further clarity on this.
The main takeaway here is that heavier armor helps prevent injuries by reducing the amount of AID that we can deal, and weapons with a high AID are going to be much better at dealing injuries (Crossbows) than a weapon with low AID (Swords).
Check this wiki page to know more about damage calculation.
Discussion
CS is a niche perk that suffers from a number of problems. Let’s address the negatives before we get to the positives.
⊱ Injury value is inconsistent
Some injuries are useful and others are not. More injuries inflicted doesn’t necessarily mean that you will get good ones. The heavy injuries aren’t necessarily better than light injuries either so the higher likelihood to deal heavy injuries isn’t necessarily an upside. For blunt injuries it is good but for piercing injuries it is actually bad as the light piercing injuries are more likely to be useful than heavy piercing injuries.
injuries that debuff enemy FAT aren’t very impactful as most enemies recover 20+ per turn by default and have large pools. Injuries that debuff enemy HP can be good if procced on an early hit, essentially dealing extra damage as their HP pool is cut, but against already weakened enemies these injuries are wasted.
The ideal injuries are those that debuff enemy Skill or damage. Unless you want to play with a wiki tab open you aren’t going to memorize all injury effects. Generally speaking, hand/arm/shoulder injuries are the good ones, as they tend to reduce Skill or damage.
⊱ A dead enemy is better than an injured enemy
This is a fairly obvious statement but it is worth pointing out. In BB, it’s a much better idea to focus fire your damage on just a few enemies at a time to quickly get kills rather than spreading damage around the enemy party. A dead enemy can’t hit you, so even if you inflict a Fractured Hand on a guy you probably will want to keep attacking him anyway and if you end up killing him before he acts then CS didn’t actually provide value to you (unless the injury was –Defense or you have Executioner on the follow-up). In rare cases, leaving an injured enemy with say a Broken Arm blocking a tile that his buddies behind him can’t fill can be useful, but usually you are better off going for kills.
Killing also triggers both positive morale checks on your side and negative ones on your opponent side, making it attractive to slay enemies as fast as possible.
⊱ Top tier weapons already injure most things reliably or kill things fast
CS usually isn’t needed to injure most enemies once you have top of the line weapons. Most two-handers or good Duelist options already injure most enemies, or will kill them in a few hits regardless. Shield bros probably have better perks to take than trying to deal injuries with their weaker damage.
⊱ Injury immune enemies
Alps, Schrats, Ifrits, Kraken, Dogs, and Undead are immune to injuries where CS will provide no value. Lindwurms while not technically immune are functionally immune because of their 1100 hp pool. Goblins are not immune to injuries, but due to their very small hp pool and weak armor they are already injured by almost any weapon or outright killed making CS of poor value against them, Overseers excepted.
I’ve been mostly negative about CS so far so let’s add some positivity because it isn’t all bad.
⊱ CS is better against harder to kill enemies
CS provides the most value against Orcs and Barbarians due to their higher HP than most other flesh units. Since Barbarians are the most dangerous faction in the game right now, and Chosen are not trivial to injure, this has helped CS carve some niche value. CS is needed if you want to injure Unholds.
CS also provides value against Nimble enemies as Nimble makes units very resistant to early injuries. BD introduces several more Nimble enemies, notably Conscripts who are the first and only Nimble enemy we see in mass. CS is good against them.
The higher durability of these units means that they are harder to kill quickly, which means injuries have more time/likelihood to provide value. Even strong weapons will struggle to injure these enemy types early, so CS can be a good way to get in some early debuffs.
⊱ Early injuries are better
CS makes you more likely to land injuries on armored/Nimble targets which might otherwise avoid injury on early hits. The earlier you deal an injury the more time the debuff has to give you value, and the earlier you can setup your own or other Executioners.
⊱ Premium heavy injuries
Fractured Skull and Concussion are among the best injuries in the game. The Blunt head injury pool is rather small, so CS can really help you land these desirable injuries.
Use Cases
⊱ Early game: More injuries with weak weapons
In the early and maybe into the mid game as well you don’t have top of the line weapons and dealing injuries to Raiders/tougher with low tier shielded one-handers or with low tier ranged weapons isn’t very likely without CS. So in this case CS actually might indeed make a big difference to the number of injuries you are inflicting early on.
Word of caution is that CS and Executioner provide no value against Undead/Ancient Dead. If you know what you are doing then this isn’t an issue, but if you are a new player you may want to stick to more universally helpful perks early on and specialize at higher levels.
⊱ Warbows: Increased consistency of first shot injury
Warbows with CS are a great way to tag multiple enemies early on in a fight with Injuries for later exploitation by Executioner bros (or the Warbow user himself). CS isn’t necessary for injuring some targets but picking it up does increase the reliability of getting first strike injuries against Orc Berserkers, armored Young/Raiders/Footman, etc.
⊱ Crossbows/Throwing: Anti-Chosen specialist
For the most part CS on Crossbows/Throwing is wasted because these weapons already have very high Ignore% with their respective specializations and Duelist for Throwing that makes them very effective at dealing injuries by default.
However, there is a specific use case for CS here and that is as an anti-Chosen mechanism. Without CS you have an 11-51% chance to injure on first shot (Hvy Xbow with mastery) depending on Chosen armor loadout. With CS that goes up to 65-100%. Since Xbows and the Spike Impaler specifically are very good against Chosen this can be worth picking up to set up your Executioner(s) so that you can kill the Chosen as quickly as possible, as well as fish for useful debuffs like Injured Shoulder, Pierced Arm Muscle, or Pierced Hand. Since Chosen are one of the most dangerous enemies in the game, this can potentially be worth a pick. Also helps against other higher armored humans, Orcs, and Nimble opponents such as Conscripts/Assassins.
⊱ Dagger Puncture: Injure almost everything consistently
Because it completely ignores armor, Puncture is a great way to set up injuries and with CS you can injure just about everything in the game, even Orc Warriors. It comes with a hefty FAT cost and -15 Accuracy so you do need a bro with high FAT and Skill to make this work reliably. With Dagger Mastery you can attack three times per turn giving you a pretty good chance at landing some hits and potentially getting useful debuffs like Injured Shoulder, Piercing Arm Muscle, or Pierced Hand. Since Puncture cannot hit the head, these injuries are even more likely.
⊱ Two-Handers: CS value depends on weapon choice
For the most part CS is wasted on two-handers unless you are trying to Injure Unholds, Orc Warriors, Chosen, or Nimble enemies. For example, the 2H-Mace and Hammer are capable of injuring Orc Warriors on the first hit with CS on their single target strikes, but against other enemies it is certainly overkill to have CS here. Weapons with lower Ignore% like Greatsword, Billhook, and Warscythe can benefit from CS, though Warscythe AoE may struggle to injure even with CS.
⊱ Duelists: CS value depends on weapon choice
Depending on your weapon of choice, CS has differing value for Duelists. Duelist Orc, Mace, or Hammer are already very good at injuring most targets without CS. With CS they will even injure Chosen consistently and headshots are more likely to get Concussions or Fractured Skulls which are some of the best injuries. Lesser Dueling options like regular Axe/Cleaver/Sword/Flail/Spear will benefit more from CS as their lower innate Ignore% makes them less capable of injuries against armored targets as the former weapons. However, Duelists are fairly perk starved and CS is a bit of a luxury that can be hard to fit in.
⊱ Shamshir: CS Shamshir has some pros and cons
Yes the Shamshir Gash attack does stack with CS. With Sword Mastery (BD) and CS, Gash can inflict injuries with just 1/12th of opponent’s HP (8.3%). As exciting as that sounds, the Shamshir itself is a rather poor Duelist option due to its low base Ignore% and low armor damage. For example, CS Duelist Mace/Hammer deal much better damage, achieving similar injury rates with just normal attacks as the CS Duelist Gash Shamshir due to their innately higher damage output. Gash also costs a hefty 15 FAT per swing compared to Mace/Hammer 10/11. Shamshir is also slightly weaker than a Noble Sword, trading 10% armor damage and Riposte for the ability to Gash.
CS Shamshir does have some advantages. Gash comes with +10% hit chance, and the cutting injury pool got buffed in BD, and is the best injury pool. It also works great against Unholds, as Double Gripped it reliably injures unarmored Frost Unholds (600 HP). With some luck, you can deal injuries that cut HP by a % on the first attack and potentially deal a lot of free damage. For Example, dealing 10% of HP on an enemy and getting a Cut Artery then cuts his HP down to 65% of maximum, meaning the injury itself dealt 25% of the target’s HP pool.
It isn’t necessary (or feasible) to spam Gash of course. Regular attacks can be used on softer targets and Gash as an opening move on heavier units like Chosen. Mastery CS Duelist Gash has a 25-100% chance to first hit injure a Chosen, depending on their armor.
⊱ 3-Headed Flail: Split damage is awful for dealing injuries
Because it is hitting multiple times, the 3HF is a terrible weapon for inflicting injuries even with CS. The main problem lies in its inability to deal any meaningful armor ignoring damage due to each individual attack being so weak and due to the way that remaining armor reduces the amount of HP damage taken. So that leaves the 3HF almost entirely incapable of injuring. If you want to use CS with a Flail then use the regular Flail with Duelist, not the 3HF.
⊱ Spearwall: Low damage makes injury very unlikely
Due to Spearwall halving your damage and Spears also having poor Ignore%, it is extremely bad at inflicting injuries to anything that is remotely armored. Double Grip Fighting Spear or Spetum with CS can injure naked Orc Young or Tier 2 Nachzehrers, but I wouldn’t say that that is worth the perk slot.
⊱ Turn order: Faster bros with CS can setup slower bros
You don’t actually need to have “high” Initiative per say, but any Nimble bro with CS can tag an enemy with an injury that Forge units with Executioner can take advantage of later in the turn order. That’s not to say that CS should only be used on Nimble units. I’m just illustrating an example where you can use the turn order to your advantage even without really worrying about the Initiative stat. Another order based strategy would be to have your fastest Archer have Crippling to spread injuries around and your slower range units have Executioner to capitalize.
⊱ Misconception – CS is better the more bros that have it
I’ve seen this a few times and I’m not entirely sure why. I guess if you deal more injuries to the same target you are more likely to find the useful ones, but if an enemy has been injured multiple times he is probably close to dead anyway. CS is not an all or nothing perk.
⊱ Misconception – CS is needed for Executioner
No. You can deal Injuries plenty enough without CS to make fine enough use of Executioner. They are not a package deal.
⊱ Misconception – Executioner is needed to capitalize on CS
No. You can use CS and not use Executioner. They are not a package deal. However having some Executioners in your party can help gain more value out of injuries that are dealt.
⊱ Misconception – I can’t use CS because I want to fight Monolith/Library
No. You can clear Monolith/Library with a few dead perks. You don’t have to base all of your builds around it.

Colossus
“Provides +1 trade routes and increases the amount of gold gained from trade routes. Requires coast.”
Description
Hitpoints are increased by 25%.
Summary
+ Amazing with Nimble
+ Solid on Forge
+ Helps protect against injuries (sparing medicine for healing)
+ Returns more raw stat levels than most other stat perks
− Not as valuable if Forge + Indom spam
Mechanics
≻ Does not round, so you get +1 HP for every 4 points of real HP your bro has. So 60 base HP gets +15 and 63 base HP also gets +15
≻ Higher maximum HP makes you more resistant to injuries
≻ Updates along with maximum HP (also influenced by injuries and traits like Fat or Old)
Discussion
Colossus is a lot stronger than you might expect since most backgrounds start with ~60 HP and that just isn’t a comfortable number to stay at. How you evaluate Colossus is going to depend a lot on whether you plan on going Nimble or Forge later on.
⊱ Nimble: Colossus, a natural fit
Colossus and Nimble go hand-in-hand to the point where it is almost an auto-pick. Nimble wants as much HP as possible because it is a multiplicative boost to a brother’s overall staying power based on their HP stat, and Colossus is a multiplicative boost to a bro’s HP stat. The synergy is obvious.
Unless you want to get greedy, every Nimble brother you expect to be seeing danger (front liners) should be taking Colossus whether the guy’s got 50 or 100 HP. It is the best passive perk that a Nimble brother can take to increase their durability. Back liners can skip Colossus if you want to be more aggressive, but the insurance can be nice to have on them as well.
⊱ Forge: Colossus protects against armor ignoring damage (AID)
Colossus and Forge is not as straightforward as Nimble. The value of Colossus here is going to depend a lot on how dependent you want to be on Indomitable to survive dangerous high AID attacks such as from Chosen.
If you look at a lot of old guides, some will tell you that you only need 60 HP on your Forge units. Some will say 70. Both are bad advice, unless they also advise that you take Indom. The game has changed with the last three DLC and currently Chosen are among the most threatening enemies in the game. Their weapons (particularly the Mace/Hammer) come with extremely high AID and damage, and Chosen can come in hordes. They are very capable of killing a 300/300 Forge bro despite his armor.
To illustrate the danger low HP Forge units can find themselves in, please refer to the following table. Test case is a Chosen with Spiked Mace vs. a Forge bro. Note that Additional Fur Padding (AFP) attachment reduces the amount of AID you take. Also note that the part about heavy injuries is the chance that you reach the heavy injury threshold, but you may still get a light injury instead.
The table shows the mean hits to death (MHtD), the chance to die in two hits (%2HD), the chance to get injured on the first hit (%1HI), and the chance to meet the heavy injury threshold on the first hit (%1HHI).
| Setup | MHtD | %2HD | %1HI | %1HHI |
| 68 HP, 300/300 Forge | 2.43 | 57% | 100% | 68.9% |
| 68 HP, 300/300 Forge (AFP) | 3.48 | 6.4% | 28.5% | 22.7% |
| 85 HP, 300/300 Forge (Colossus) | 2.9 | 9.9% | 100% | 23.7% |
| 85 HP, 300/300 Forge (Colossus + AFP) | 3.96 | 6% | 24.9% | 13.3% |
So other than a glowing endorsement of AFP, what is going on in this table? 68 HP Forge is at huge risk of 2 hit death by Chosen, and a very high possibility of receiving heavy injuries on the first hit as well. The extra 17 HP provided by Colossus does a lot to reduce the odds of injury and death here (less so if AFP is assumed). The point is that low HP Forge is very vulnerable in Chosen fights, which leaves you with a few options: use Indomitable, raise your HP, or minimize contact.
If you are spamming Indomitable then raising your HP becomes a lot less meaningful due to the way Indom works in the damage calculation (see the Indom section). Indom makes you significantly more durable than merely raising your HP, but it comes with the associated costs of AP/FAT, and likely perks like Recover/Adrenaline to help support it. You are also vulnerable to things like Daze or Broken Nose (from Chosen Mace) which could prevent your next Indom. So another option for your Forge guys could be to take Colossus, raise your HP, and that makes you less dependent on Indom to survive and frees up your AP/FAT/perks to do other things.
There are also other enemies that having a higher hp count will help you against such as Crossbows/Unholds/Schrats/Goblins/etc.
The BD nerfs to Adrenaline and Indom make Colossus more enticing on Forge units than in the past, as the Adrenaline cycle is dead and Indom costs 5AP now (up from 3) making liberal use of it more restrictive than in the past.
⊱ Colossus yields a high stat return
At only 60 HP Colossus is already +15, which is 3.75 level ups worth of max hp rolls (4). So with little or no investment into HP Colossus is already outpacing the other raw stat boosting perks in terms of raw numbers. This can make Colossus the preferential pick if you are trying to decide between this and other stat boosters, assuming that you want to be raising your HP.
⊱ Injury avoidance
Colossus helps you avoid injuries and this effect should not be underappreciated. Injuries are not just really annoying, but some enemies have Executioner to further punish your injuries. Better not to give them that boost.
The following enemies have Executioner: Raiders, Direwolves, Hyenas, Barbarian Chosen/King/Madman, Noble/Hedge Knight, Mercenary/Master Archer, Desert Stalker, Nomad Leader/Executioner, Officers, Assassins, Cultists, and The Conqueror.
Injuries can also disable or at least severely handicap a character for several days. An opportunity and financial cost that can set you back.
Use Cases
⊱ Early Game: value first pick
Colossus is one of the best picks as a first perk. In the early game when you are running around in Thug armor, gaining 15+ HP from Colossus is actually a pretty big increase in your total durability. Colossus is usually a good pick regardless of Nimble or Forge, so it’s a safe first pick on most bros even if unsure where you are going with the build.
The value of Colossus here goes beyond just the raw durability. You are much more resistant to injuries with 80-90+ HP than with 60 HP. Injuries are big a problem in the early game because you don’t have reserve bros to sub in and because you really don’t want to be spending your little money on Temple healing, Medical Supplies, or replacement bros. Too many injuries early on can end a campaign.
The extra HP also makes you more resistant to Brigand Marksmen which tend to give new players some headaches. Furthermore, Raiders and Direwolves have Executioner so running around with injuries early on makes them more dangerous to your already fragile bros.
⊱ Nimble: increased efficiency
Colossus is fantastic with Nimble. No amount of HP is too much HP for Nimble. Use Colossus if you expect your Nimble bro to be seeing danger.
⊱ Forge: a safety net
60-70 HP isn’t safe for Forge in the post DLC climate. Colossus can help you reach a comfortable level. If you are going to be using Indomitable with your heavy armor then you can get away with a lower HP count as Indomitable + armor does a wonderful job at mitigating armor ignoring damage, but without Indomitable a low HP count is risky.
⊱ Miasma: extra choking time
Miasma will sap your HP each turn so having more is obviously better. Having a high HP count is important in the Monolith where you have a long battle and multiple Priests to contend with. Also good in the Library.

Nine Lives (9L)
“And now the true test… hold fast, or expire?”
Description
Once per battle, upon receiving a killing blow, survive instead with a few hit points left. Also clears any damage over time effects and increases stats when triggered.
Summary
+ Better against high damage enemies
+ Useful for sacrificial decoys
– Does nothing for you if you aren’t dying
– Doesn’t solve the problem if you are dying; high possibility you die anyway
Mechanics
≻ When it procs, saves your life with 5-10 HP returned
≻ Can be proc’d by DoT effects like Bleeding/Miasma
≻ When it procs, will clear any existing Bleeding/Poison stacks
≻ When it procs, grants +15 MDF/RDF/RES/INI until bro’s next action
Discussion
⊱ 9L doesn’t help prevent the problem it protects against
9L has a fairly low reputation in the community because most of the time people would rather choose defensive perks that are always helping rather than a perk that might save you when things are going badly. Taking 9L is like buying insurance. You pay up front (a perk point) in exchange for an insurance policy that only rewards you during a bad event (death). There’s a clear downside here in that the perk does nothing to prevent bad situations from occurring, it only gives you a chance to salvage those situations if they do occur. Most players prefer more proactive perks.
⊱ 9L leaves you crippled and at death door
While 9L may save your life once, it doesn’t solve whatever problem is occurring that caused your life to drop so low in the first place. The enemies are still there and your brother is still in danger. So unless 9L gave you just enough time to solve the problem, odds are your bro is going down next turn or worse later in the same turn order (BD buffs help alleviate this issue). If you’ve been pummeled into 9L activation there’s a very good chance you’ve got some injuries too and if one of them cuts your defense then you are in big trouble. Furthermore, enemies like to focus on bros with low HP, so your injured and dying 9L bro is going to take a lot of aggro and likely die. You want to avoid/prevent these situations in the first place.
⊱ 9L is better against dangerous enemies
Statistically speaking, 9L is actually pretty good, especially against the more dangerous enemies in the game that can kill even high leveled brothers in a few hits. As nice as that sounds, you are usually better off taking a perk that is going to help protect you from damage and injuries during the fight rather than hoping 9L saves you in the end.
With all of those points in mind, people usually pass on 9L in favor of defensive perks that are more consistently helpful, and/or to use escape perks such as Rotation/Footwork. There are enough good defensive perks in the game that it is hard to find room for 9L.
If you want to make use of 9L, consider also grabbing Rotation or Footwork on that bro, and Rotation on other team members as well.
⊱ Blazing Deserts buffs make Nine Lives more consistent
Blazing Deserts added the effect for 9L to remove existing DoT stacks when it procs. This is a great change, preventing the rare but incredibly frustrating case where your 9L procs and then you immediately die to Bleed anyway. This removes 9Ls old weakness to Cleaver enemies.
BD also added an effect where you gain extra stats until your next turn when 9L procs. Notable here is a hefty chunk of 15MDF. The extra defenses, Resolve, and Initiative all help increase the chance that your brother actually lives long enough to get an extra turn where he can perhaps try to save himself, or be saved by another bro.
These changes won’t make 9L incredible, but they are welcome changes to improve the consistency of 9L usefulness. They lessen the chances of immediate death-after-proc scenarios, and thus give you more time to salvage the situation and save your bro. Simply put, these changes increase 9L consistency in actually giving you a chance to save your bro.
Use Cases
⊱ Early game: High return on durability
In the early game when your armor/hp are low, 9L actually offers the greatest durability boost of the row one perks. It has to compete with other good defensive perks like Colossus, Dodge, Gifted, etc. which scale better later into the game, but if raw durability right now is what you most want then you can pick up 9L.
⊱ Designated Martyrs
This isn’t a strategy that I am much of a fan of because I think it is needlessly costly, a waste of XP, and not necessary. However some people like to hire trash units like Beggars or other cheap classes and send them into suicide positions to protect better units. If these guys survive long enough to level up, 9L is a pretty good pick to allow them to distract for an additional hit. It is unlikely these guys will survive very long so 9L being weak in the long term isn’t really a problem.
Any disappointing recruit can also take up this role instead of being outright dismissed. Kiting enemies away from the group or baiting them to strategic positions and protecting more valuable team members from dangerous opponents.
⊱ Low HP backgrounds: 9Lives can help
Some backgrounds start with very low HP (sub 50). While I would recommended that you raise that aggressively and use things like Colossus so that you aren’t injured by the enemy sneezing, 9L can help alleviate the risk of having low HP levels if you are concerned about durability.
⊱ Rotation/Footwork can help save your bro
As dying bros attract a lot of aggro, you want to get your 9L bro out of danger as quickly as possible. It is recommended you give one of these perks to any bro with 9L so that he can potentially save himself on his next turn. It also helps if this bro has high FAT (or low FAT intensive build) so that he may actually afford to use Rotation/Footwork even late into the battle after taking a lot of damage. Having Rotation(s) in the backline is also a good idea.
⊱ Anti-Barbarians: Chosen hit hard
Barbarians are the most dangerous faction in the game right now because they like to swarm you with a bunch of dangerous 2Handers that do a lot of armor ignoring damage. Since Barbarian two-handers are capable of 2-4 shoting most bros that aren’t using Indomitable, 9L actually has a better chance than usual to be meaningful here. Just keep in mind that Chosen have Crippling Strikes so even if you do survive you are going to get injured.
⊱ Anti-Hexe: 9L protects against death by damage sharing
9L can make Hexe fights a little easier. If there is a damage sharing hex on one of your bros but they have 9L then you can still attack the Hexe with impunity because 9L will save you. Just make sure your bro isn’t in danger of Beasts before you wreck his health attacking the Hexe.

Bags and Belts (Bags)
“You aren’t a real adventurer unless you are carrying a hundred things that you will never use.”
Description
Unlock two extra bag slots. Items placed in bags no longer give a penalty to maximum Fatigue, except for two-handed weapons.
Summary
+ Increases the range of tactical options
+ Saves FAT (and INI)
– Additional bag slots are not always needed or justified
Mechanics
≻ Items stored in the bag normally cost half as much FAT (favorably rounded down). Bags eliminates this cost (except for two-handed weapons)
≻ INI scales with current FAT, so the reduced FAT cost increases INI
Discussion
⊱ Are two additional bag slots needed?
Usually, the answer would be negative. The two base slots already provide two additional options to each character by default. That represents a total load-out of three to four weapons, shields or accessories times twelve or sixteen (Peasant Militia origin). Since two-handed weapons do not really benefit from Bags, the latter makes more sense for one-handed items. To duelists wanting to carry many weapon types, Bags will give more versatility and act as a little Brawny.
Pure weapon throwers may need Bags for really long fights where fifteen throwing weapons might not be enough for various reasons (lack of heavy throwing weapons, of the Duelist perk, of damage dealers in the team). But otherwise, pairing those with another ranged weapon should address any ammunition problem (see the relevant section below). If needed, additional stacks can also be carried and dropped by allies. In the Black Monolith and Sunken Library, legendary locations filled with Undead resistant to piercing damage, being able to carry more Throwing Axes would prove especially useful. Utility builds like the net or flask thrower can also make good use of Bags.
⊱ Bags saves Fatigue
Bags does spare FAT for carrying items besides two-handed weapons and this can add up to a meaningful amount of FAT. For example, carrying a Heater Shield and a one-handed weapon in the bag is going to come to around 12 FAT depending on the weapon. That’s comparable to Brawny with two more bag slots on top. But if those items aren’t really used in combat then Bags is basically wasted.
⊱ Bags gives versatility
In addition to saving FAT, Bags unlocks additional bag slots and at least as much tactical options. Characters will benefit from Bags as long as the extra given tools are being used. They include impactful accessories like nets, grenades or consumables, weapons granting reach, control (Whip or Mace) or shields for protection.
Blading Deserts added three new grenades (Fire Pot, Flash Pot, Smoke Pot). Fire Pots are usually used early in the fight, but Flash Pots and Smoke Pots may be better held onto until the right moment meaning they will take up bag space. Bags can help you carry these new potions and they are all quite good.
Hybrids, especially of the duelist kind, tend to like Bags the most but they are also starved for perk points.
Use Cases
⊱ Archers & Throwers ─ Base ammunition should suffice
Some players favor Bags on archers. But archers rarely if ever need more than a total of two quivers of arrows (twenty shots) or one quiver of bolts (ten shots). For that reason and because quivers do not cost any FAT, Bags brings nothing to pure archers.
Likewise, to the exception of the Black Monolith and Sunken Library, it is unlikely a thrower will ever need more than fifteen throwing weapons. It can also prove difficult to find enough good throwing weapons (heavy ones) to fill all slots. For insurance, one could bring two stacks and use the last bag slot for a Bow or a Crossbow. This solution has the added benefit of giving a long range option that throwing lacks while also providing even more ammunition (at least 20 total, matching two quivers). Furthermore, it doesn’t cost a perk point since Bow or Crossbow Mastery can be picked instead of Bags.
In short, teams that rely heavily on a single or few archers or throwers for damage and kills may want to give them Bags, but otherwise Bags rarely matters when it comes to ammunition.
⊱ Shield Bearers ─ Backup shields
Barbarians and Orcs tend to smash shields and this can be taken advantage of. Every turn they spend doing so is a turn bros themselves aren’t smashed. B&B can help a bro carry a backup shield or two for replacement mid battle.
Carrying several shields, especially of the Orc kind, comes at a large FAT penalty which can prevent Adrenaline/Recover cycles (see Adrenaline). Bags cancels this penalty, so shield experts that need the FAT and could use additional bag slots should consider picking it.
⊱ Utility Throwers ─ He’s got some tricks up his sleeve
There are a number of consumable items that can provide valuable impact in battle. Nets root a target in place, preventing it from moving or being rotated while applying powerful DEF and INI debuffs to it. Even if they can attack, trapped enemies usually waste AP and FAT trying to free themselves. In summary, nets can turn the tide of a challenging battle. Blazing Deserts introduces three new grenades which are all good. Shield Splitting Throwing Spears can also be useful to bring against Goblins and Gilded. Acid flasks are more rare, but another option you can carry.
While Bags is not necessary to use any of these tools, they are good options to have somewhere on the team, and can be good options to use with any extra bag slots you have.
⊱ The Everyman ─ A multi-purpose character
This is a front line bro carrying different one-handed weapons, possibly a shield and control or utility tools. High FAT is recommended for lack of weapon specializations. A possible set could include a Warhammer for armor removal, a Flail for head hits, a Whip for disarms, a Cleaver for regular damage, and a Spear for zone control, or a backup shield and even a net.
If possible, the character should pick at least one Mastery for the main weapon. Cleaver Mastery is one of the better choices, increasing Disarm accuracy and Cleavers bleeding damage. Named weapons can cost less FAT to use, essentially reducing or even removing the need for specialization. Quick Hands is a must-have and Duelist could be worth considering as well.
⊱ Front line Duelist Hybrid ─ Valuable bag slots
Bags is not absolutely necessary in that case, but helps resolve FAT issues and tactical option limitations. Without Bags the duelist would be limited to two throwing weapon stacks and a melee option, or to one throwing weapon stack, a melee option, and a utility. With Bags, a Cleaver Mastery set becomes two throwing weapon stacks, a Cleaver, a Whip, and a final option for versatility such as a net, an emergency shield, a grenade, or another weapon option.
⊱ Back line Hybrid ─ Back and forth
Bags is not necessary in that case either but increases one’s options. A possible set could include a Crossbow, a Billhook, a one-handed weapon, a Heater Shield, and a Whip. Without B&B, the one-handed weapon and the Shield would probably have to be disposed of. These additional tools can certainly help a character going in or being rotated to the front for off-tanking.

Pathfinder
“It’s over Anakin! I have the high ground!”
Description
Action Point (AP) costs for movement on all terrain is reduced by -1 to a minimum of 2 AP per tile, and Fatigue cost is reduced to half. Changing height levels also has no additional AP cost anymore.
Summary
+ Amazing in rough terrain or maps with hills
+ Can save a lot of Fatigue
∽ Better with some weapons than others
− Not doing much in flat maps
Mechanics
⊱ Movement costs
| Terrain Type | Normal Cost | Pathfinder Cost |
| Dry Steppe/Road | 2 AP + 2 FAT | 2 AP + 1 FAT |
| Grass/Steppe/Tundra | 2 AP + 4 FAT | 2 AP + 2 FAT |
| Desert | 2 AP + 6 FAT | 2 AP + 3 FAT |
| Forest/Snow/Muddy Earth | 3 AP + 6 FAT | 2 AP + 3 FAT |
| Shallow Water (Oasis) | 4 AP + 12 FAT | 3 AP + 6 FAT |
| Murky Water (Swamp) | 4 AP + 14 FAT | 3 AP + 7 FAT |
≻ Changing terrain elevation increases AP cost by 1 and FAT cost by 4. Pathfinder eliminates the extra AP cost and does not reduce the extra FAT cost (i.e. changing height on snow is 10 normally and 7 with Pathfinder).
≻ Plains, Forest, and Snow have elevation but Swamps do not
≻ Athletic/Clubfooted effects take place after Pathfinder for calculating FAT movement costs
Discussion
Pathfinder is notorious among the community for being loved by some and ignored by others. I recommend you give it a try and decide for yourself whether or not you think it is worth the slot. Personally I take it on everyone now and recommend it at least on some builds, but I also played the game for over two years never using it at all. You don’t have to be that extreme about it, It isn’t all or nothing. Some weapons/builds benefit more than others.
⊱ Pathfinder makes a huge difference in annoying terrain
Refer to the chart in the Mechanics section to see how Pathfinder effects movement values. In abnormal biomes Pathfinder allows units to move an extra tile (3AP -> 2), and in the case of elevated Forest/Snow you can move two extra tiles (4AP -> 2). This is because you subtract one AP for the biome and also cancel the elevation change cost, making Pathfinder particularly useful in Hill/Snow maps. It is also very good in Oasis/Swamp.
⊱ Pathfinder saves Fatigue
Also not to be forgotten is the halved FAT cost of movement. On flat normal terrain this isn’t too noticeable but in other biomes this starts to save you a lot of FAT. In some ways this is similar to weapon specs as far as saving FAT goes, but of course it depends on how much you move. Pathfinder is a FAT perk as well as a mobility perk. Taking Pathfinder makes it easier to skip Recover for example, depending on build of course.
⊱ Pathfinder isn’t as good in some cases
The biggest downside to Pathfinder is going to be the inconsistency in the value that it provides. Generally speaking it is far better to let the enemy come to you than for you to run towards them. So in battles where you don’t end up moving or repositioning much, Pathfinder isn’t really helping you. It also doesn’t do much in flat normal terrain because you can already move freely there anyway.
However, Pathfinder is so nice to have in rough terrain that it can be worth taking even if it has low value sometimes. Ancient Dead, Goblins, Nomads, Barbarians (as of BD), and most Beasts all have Pathfinder, which will put your team at a disadvantage if you don’t have it. This can be especially troublesome in tricky swamp or hill maps.
Pathfinder is good on any unit. The use cases are going to point out specific weapons that particularly appreciate not losing their movement.
Use Cases
⊱ Polearms: Mobility is one of their main advantages
Since Polearm Mastery lowers the AP cost of Polearms to 5 they are able to move 2 tiles per turn, even change elevation and still attack. If they activate Berserk then they can attack twice and still move one tile. This mobility is a huge advantage for Polearm users and one of the reasons why Polearm Mastery is so good. Therefore it really hurts when terrain or height changes block your Polearm’s mobility advantage. Pathfinder helps Polearms maintain this advantage in all battles.
⊱ Crossbows: Can move once after shooting & reloading to reposition
Crossbows can shoot and reload for 7 total AP, leaving them 2 AP left to move. This mobility allows them to reposition a little bit each turn to try and claim high ground tiles, stay in cover, or get clear shots. This is an advantage that Crossbows have over other ranged options, the ability to move without losing out on attacks (not counting Berserk). Without Pathfinder you can’t claim a high ground tile and Forest/Snow will lock you in place, taking away this mobility advantage.
⊱ Two-Handers with mastery can move & attack even when capped on Fatigue
Using a two-handed weapon single target attack with mastery costs 12 FAT. Pathfinder on normal flat terrain drops the cost of movement from 4 to 2. Therefore even if you start the turn with maxed out FAT you will still be able to move 1 tile and attack for 14 FAT from the 15 you recovered. This is not possible without Pathfinder (unless you are Athletic). This also works on flat forest/snow/desert/mud allowing you to move for 3 Fatigue and swing for 12. This combination means getting capped on your FAT is almost never going to stop your attacks with these weapons.
Pathfinder also allows two-handers to move in a Oasis/Swamp tile or elevated Forest/Snow and still attack whereas without Pathfinder these terrain types cost 4AP, preventing them from moving and attacking.
⊱ Tanks: Claim important tiles
Tanks usually want to grab a position and then hold there, so they may not benefit as much from Pathfinder as others. However, grabbing a crucial tile in-between the lines or running up a hill to secure space for your team can be important.
Pathfinder works especially well there in conjunction with Adrenaline to reach the enemy back line.
⊱ Athletic/Clubfooted
They stack and Pathfinder applies first. This means on flat normal tiles Athletic + Pathfinder can move for free. For Clubfooted, they cancel out on flat normal tiles, and on other terrain types the combination is still better than a non-Pathfinder normal unit.
⊱ Assaulting camps
The new camp mechanics in BD sometimes leads you having to attack into a camp that the enemy is defending. Pathfinder helps here, especially in the cases where the camp is elevated above your starting position.
⊱ Adrenaline support
Adrenaline costing 1AP makes Pathfinder more enticing on Adrenaline users, as there are many cases where not having Pathfinder can mess up your Adrenaline tactics.
⊱ Kraken is in a swamp
The Kraken fight is in a swamp. Moving around in a swamp without Pathfinder is a real pain. If you plan on fighting the Kraken then Pathfinder is recommended. It has been beaten without Pathfinder however, so don’t feel like it is forced.
⊱ Goblin City is in a mountain
The Goblin City spawns on a mountain tile which means there is a decent chance the map generation will be disgusting. Pathfinder can help here.
⊱ Sunken Library requires a lot of movement through sand
Although sand tiles only cost 2AP, they cost 6 FAT. You need to move a lot in the Library, and Pathfinder will save a ton of FAT over the fight.
⊱ Misconception – Pathfinder is all or nothing for your team
No. There’s nothing wrong with having it on just some guys as some builds benefit more than others. That being said there is indeed a value to acknowledge in having it on everyone as it guarantees team cohesion on any terrain type, but that’s a high teamwide cost in perks so you can make the call if you think that it is worth it.

Adrenaline
“It’s one hell of a drug.”
Description
Unlocks the ‘Adrenaline’ skill which puts you first in the turn order for the next round.
Summary
+ Turn manipulation is very strong
+ Can lead to decisive opening turns, clutch timing pushes, or double moves
∽ Relatively more useful the slower your bro is normally
− Expensive to use
Mechanics
≻ Costs 1 AP and 20 Fatigue
≻ A buff bubble appears on the left side of the screen when active
≻ If multiple characters use Adrenaline then Initiative will determine their turn order
Discussion
There’s a lot to talk about Adrenaline because it enables a lot of different strategies. The 20 FAT cost is not cheap but sometimes just one or two rounds of Adrenaline can ‘win’ you the fight. There’s also incredible synergy with Recover to help offset the FAT cost in longer battles.
⊱ Adrenaline gives you very strong opening turns or timing pushes
The most straightforward use of Adrenaline is to spend your first turn and round ‘waiting’. Most enemies will move several tiles toward you and end their turn. Then on your second turn phase you move toward them and attack and then use Adrenaline. Next round starts and you attack again giving you 1-2 rounds of attacks in before the enemy can retaliate or defend themselves. Alternatively, use your first move to move around the edge and use Adrenaline. Then start the next turn by jumping into the enemy backline which works very well against Goblins and other ranged enemies.
Of course you can use Adrenaline beyond the early turns as well for clutch timing control. There are too many possibilities to point them all out. Sometimes you just ‘need’ to go before a critical enemy and having Adrenaline available for those situations can turn things around.
Attacking before an enemy can provide more benefits than just trying to get well timed killing blows. A damaged enemy could very well get injured or drop morale from taking that damage which may weaken their ability to hurt you if they do get their turn. You can also use weapons that have their own debuffs or control abilities, where going first may be crucial.
Adrenaline can be seen as a utility or control tool, opening up your list of options in battle. It doesn’t have to be something you activate every turn for it to be good, and activating every turn will be too expensive to sustain for long.
⊱ Better on slower bros
The slower you bro is compared to the enemies that you are facing the more you gain from Adrenaline. In that sense Adrenaline is better on Forge units because they are relatively slow. Nimble bros even without INI investment will naturally outspeed heavy enemies like Warriors and Ancient Dead so there is a bit less enemies to jump ahead on with Adrenaline. That’s not to say you can’t use Adrenaline with Nimble, just that it is slightly better on Forge to help counter the low Initiative inherent with heavy armor.
Forge bros can use their slow speed to get two turns out of activated skills when using Adrenaline. For example, on turn 1 you Adrenaline and go first. Turn 2 you can use a skill such as Indom or Spearwall and “wait.” This holds all of turn 2. Then on turn 3 you should go last because you are a slow Forge unit, meaning your Indom/Spearwall/Reach/etc holds through turn 3 as well, allowing you to get two turns out of one use of the skill. This was a core interaction of the Adrenaline cycle and is still applicable, just not infinitely as it was in the past.
⊱ Legacy info: 1AP Adrenaline and the death of the cycle
BD nerfed Adrenaline to 1AP (from 0). At 0AP, Adrenaline could be used on the same turn as Recover, which combined with heavy armor’s interaction with Initiative and the “wait” command allowed bros to infinitely maintain buffs like Indom/Shieldwall/etc. at all times without running out of Fatigue or having to deal with Recover’s normal drawback of losing a turn of defense. This combo defined the WotN “meta.” With the nerf to 1AP, this is no longer possible.
Use Cases
⊱ Early game: Battles are short and units are fragile
Because early fights are short you have plenty of Fatigue to burn, you could reasonably cast Adrenaline several times. Both your bros and the enemies are very fragile so getting an extra turn of attacks in can make an enormous difference offensively and defensively. Adrenaline is good against the common early game Brigands and Beasts you will be fighting.
⊱ Arena: Battles are small and short
Similar to the early game, Arena battles are small affairs and you can reasonably cast Adrenaline several times. Unlike the early game however, the Arena can feature some highly dangerous enemies. Turn manipulation can be helpful to get the upper hand early.
⊱ Early turn blitz – Win the fight quickly
Use Adrenaline to go all in on the first few turns in an attempt to gain a decisive opening that aims to win the fight quickly. This tactic works better the more bros on your team have Adrenaline and the lesser enemies are faced, but it can still be effective with just one or a few bros using it. Barbarians try doing this to you and it is terrifying. You can do it to your enemies as well.
⊱ Heavy armor is slow
Adrenaline is great for negating the natural slowness of heavy armor, provided you are willing and able to spend the Fatigue.
⊱ Stagger/Daze/Control (2H Hammer/Mace/Polearm/Whip/etc.) abilities want to go first
Stagger and Daze are both handy debuffs that will knock the enemy down the turn order or mitigate their damage output. Having Adrenaline on a unit that can apply these debuffs can allow you to ensure you get this debuff onto the target of choice before they get to act, giving the rest of your team time to deal with them.
You can also use Adrenaline with a Mace Stun or Whip Disarm to make sure you can stop a key opponent before they get to act.
You can also use Adrenaline to set up Overwhelm stacks, though the FAT cost of using Adrenaline is prohibitive to Overwhelm in later turns. Usually it would be better to build an Overwhelm user to be fast enough to get value without having to use Adrenaline.
⊱ Polearms cost little Fatigue and have perk space to use Adrenaline
Backrow Polearm units tend to have more perks to spare and Polearms don’t cost much Fatigue (aside from the Warscythe) giving you two reasons that you might want to consider picking up Adrenaline here as a utility option for them.
⊱ Super tanks: Set up two-turn Indom + Shieldwall
If you want your tank locked down and sturdy for two turns, you can use Adrenaline to setup a two turn Indom + Shieldwall as described in the main section. Without the cycle you have to be a bit smarter about your positioning because you likely won’t be able to do this again once it falls off due to FAT issues, but two turns gives you some time to solve the problem, and after a turn on Recover you could reasonably set it up again.
Tanks are also a great candidate to Adrenaline flank the enemy backline to spook enemy range units into running around instead of shooting.
⊱ Spearwall with Adrenaline can allow the wall to hold through turn 3
Without Adrenaline you usually have to pop Spearwall on turn 1 because enemies will out speed you on turn 2 and close the ranks before you get your chance. Putting up the Wall on turn 1 means that it will deactivate at some point in turn 2 and if you’ve been breached then you can’t re-enable. With Adrenaline you can use Adrenaline on turn 1, start the Spearwall on turn 2 and use ‘wait turn’ to slow your Initiative for turn 3. With heavy armor you will likely be slow enough to go last on turn 3. This means your Spearwall is active all through turn 2 and 3 even if you get breached (assuming Mastery). This gives you an extra turn of Spearwall guaranteed compared to not having Adrenaline.
⊱ Anti-Barbarian: Adrenaline the Adrenaline users
Beat Barbarians at their own game by using your own Adrenaline to try and outspeed their Adrenaline. You will need more Initiative than them to pull this off though so Nimble is recommended if this is your plan.
Note that Barbarians will often “wait” turn which gives them the 25% INI penalty for next turn. Try and pay attention to this and be careful about using “wait” turn yourself if you are trying to outspeed them with Adrenaline. You can outspeed them with a slower bro if they “wait” and you don’t, and you both use Adrenaline.
If you can outspeed them and hit them with a Stagger ability (i.e. Hammer) then you can essentially negate their Adrenaline. Be wary, as they can do the same to you.
⊱ Anti-Goblin: Blitzkrieg
Goblins’ main strategy is to pin you down with Nets/Roots and slowly chip you to death from range. Goblins are also very fragile. Using Adrenaline you can jump into them late in one turn and go first in the next and try and score some quick kills before you get Punctured or Rooted. Goblins are weak enough that many AoE skills can one shot them.
A tank doing this can jump into or near the Ambushers, forcing them to waste time moving around instead of shooting. A couple of damage dealers doing this can make short work of whoever is unfortunate enough to be in their way. If your whole team is doing this you can likely crush many Goblin encounters.
Be cautious about Shaman Flies however, if you are only sending one bro forward and he isn’t a tank. The more bros you can send forward the stronger and safer this strategy becomes, but even just one or a few can give the rest of your team a lot of breathing space and swing the battle in your favor.
⊱ Anti-Hexe: Adrenaline can pseudo negate one turn of Charm
Hexe fights are a lot about timing and Hexe have 100 INI (and no penalty) making it difficult to out speed them. Getting a Mace bro near her and using Adrenaline can be a great way to try and get a Stun in which can potentially win the fight. Even if you miss your Stun you can use ‘wait turn’ and there’s a pretty good chance the Hexe will go for you since you are right next to her. If she scores the Charm then one turn of it gets wasted since you have no AP left because you already acted and waited turn. If you have Resilient as well then the Charm will wear off without ever actually doing anything. Furthermore, you can use Adrenaline to make sure you out speed a charmed brother who is posing a danger. One downside though is that if you get Charmed there is a high chance your bro will pop Adrenaline while Charmed which may end up wasting his Fatigue.
⊱ Status avoidance and anti-Nomads
Similar to the Hexe Charm described above, using the “wait” function can allow bros to shave a turn off of status effects if they get hit after they acted and “waited.” As such, you can go first with Adrenaline, do your turn, and “wait.” Then if you get hit with a status one turn is removed when you actually end turn. With Resilient as well you can completely avoid status like this.
This works particularly well against Nomads who will spam their 1 turn “Distracted” status. Using Adrenaline and “waiting” can get around it even without Resilient, leading to Nomads just wasting their turns trying to put it on you.
⊱ Anti-Kraken: Save a brother or get back into formation
Adrenaline can be good in the Kraken fight since the fight is largely about making sure you don’t get dragged around by the Tentacles. This process is dependent on understanding the turn order and who is going to get dragged and when. Adrenaline can help you rescue another brother from getting dragged. You can also use it on yourself after you got dragged to try and get back into formation before you get grappled again.
⊱ Misconception – I must use Recover to use Adrenaline
No. With the cycle dead the synergy has gotten worse. Recover can help support Adrenaline spamming, but if you just need to use it once or twice in a battle to gain an advantage then you don’t necessarily need Recover for it

Recover
“I’ll sleep when I’m dead.”
Description
Unlocks the ‘Recover’ skill which allows for resting a turn in order to reduce accumulated Fatigue by 50%.
Summary
+ Crucial for some builds to function
+ Fuels other strong skills
+ Probably mandatory for the Kraken*
− Not needed on many builds in majority of battles
− Costs a whole turn to use
Mechanics≻ Costs 9 AP
≻ Rounds odd numbers up in favor of the user. As in, using Recover on 51 FAT returns 26 FAT
≻ Can be used after a 4 AP attack that procs Berserk
≻ Recovers on current FAT, not maximum FAT
≻ Lowering current FAT will raise current INI by an equal amount
Discussion
⊱ Recover fuels other strong skills
Recover is a well-respected perk in the community, dare I even say overrated. It is easy to see why. Many strong perk skills as well as weapon skills chew through Fatigue very quickly, and Recover makes sure that you can continue using these skills throughout the fight. Recover is the fuel one needs to keep spamming expensive skills.
Wanting to spam skills like Adrenaline and Indom are the biggest reasons why you might want to be using Recover. Most weapons can function well enough on a normal FAT pool, but using these skills multiple turns a fight on top of weapon usage will drain FAT extremely quickly, making Recover handy to continue usage.
⊱ Recover isn’t for everyone
However, some players seem to slap Recover onto every bro assuming that it is going to be necessary or perhaps as a safety net. The truth is that many builds don’t need Recover at all. Unless you want to fight the Kraken (where you are very likely going to want 12 bros who have Recover), you could reasonably clear every other encounter in the game, including the other legendary locations, without using Recover at all. Again, some builds really want it, many don’t need it.
In some cases, Recover is a win-more perk. For example, by the end of a 20+ zombie fight you are probably pretty Fatigued, but do you really need Recover to mop of what is left? Probably not. Most fights are decidedly won in the first few turns, and your bros should have enough FAT to operate for a few turns without needing to Recover. Using Recover at the end of the fight is unlikely to matter, and may even slow you down. Make no mistake, spending a whole turn on Recover is a huge cost. So unless your build completely doesn’t function without FAT to burn then you don’t really need Recover.
How much you care about Recover is going to depend a lot on your builds and playstyle. If you are highly aggressive then fights can usually be won before Fatigue becomes a problem. If you like a slower and more defensive team then Recover might be more useful for you.
Use Cases
⊱ Early game: Recover usually isn’t needed
Two builds that might want early Recover however are dedicated disablers (Mace/Whip) and Flail Lash spammers. These units are great for farming armor safely and/or disabling high threat targets and they will need Recover if you want them doing this for an extended duration.
⊱ Berserk synergy: Kill into Recover
Recover costs 9 AP. Berserk regains 4 on a kill. Landing a kill with a first 4 AP attack means you can Recover after Berserk which is an efficient use of AP/Fatigue. Duelists/2H Cleaver/Bows/Throwing are the most likely to benefit as they really want enough FAT to attack twice per turn and they have the damage output to more reliably activate Berserk. That being said you can run these without Recover as well, so while this synergy is great, don’t feel like Recover is an auto-pick for these builds. Of these, Orc Duelists and 2H Cleaver are more interested in Recover than others, given their high Fat costs.
⊱ Initiative builds
Because INI drops as you gain FAT, Initiative builds that tend to accumulate a lot of FAT can appreciate having Recover to help reset. For example, an Overwhelm Warbow or 1Hander might appreciate Recover here, but a more FAT neutral 2H Mace wouldn’t benefit as much.
If using Dodge and having high FAT, Recover also helps you gain some Dodge value back.
⊱ Fencers
Fencers enjoy spamming Lunge constantly and Lunge does more damage at high Initiative (low Fatigue). Fencers can also easily activate Berserk for Recover efficiency.
⊱ 2Handers can deal high damage on capped Fatigue
2Handers generally do not need Recover unless you are pairing it with some other expensive skill (i.e. Adrenaline, etc.). AoE attacks are expensive yes, but you should have enough of a FAT pool to use them a few times after which you can switch to single target attacks. Since 2Handers cost 15 to single target (12 w/ Mastery), you will always be able to attack with your natural 15 recovery. The single target attacks also do more base damage than the AoE attacks. So using Recover just to use more AoE is actually not that impressive when you consider you give up a whole turn just so that you can hit 2 or 3 enemies next turn with a weaker attack when you could have just taken those two turns using two single target attacks. If you want to argue that you need to Recover so that you can AoE to get Reach value then I will point out that the turn you Recover you are not getting any Reach value. Recover can help 2H builds but it is by no means a necessity.
⊱ Tanks usually want Recover
Tanks like spamming Indom and Shieldwall, maybe Adrenaline, Taunt, Rotation, Shield Bash, Mace Stun, Spearwall, Destroy Armor, etc etc. 1Handers are more expensive than 2Handers for their two swings, and defensive skills are expensive. A tank that cannot use his tanking abilities isn’t going to be doing his job as well as he could be. Shieldwall + Indom is the best defense you can get in a turn, and you will need Recover if you want to do this more than once or twice per battle.
⊱ Dagger specialist – Puncture
3x Puncture spam is extremely expensive, costing 45 Fat per turn with Mastery. Recover is a must for this build to continue Puncturing.
⊱ Legendary locations feature long battles
The legendary locations are long fights that will test your endurance. I’ve beaten most of them without Recover but it is a good skill to have in these fights. Kraken is a different story because not only is the fight long but you will repeatedly be forced to try and free yourself from grabs (15 FAT) and its in a swamp. If you can’t get out of the grabs then you will die. Recover might well be a must-pick for this fight.
Reddit user MrDadyPants has beaten Kraken without Recover. Info here.
⊱ Indomitable/Rotation/Footwork/Shieldwall/Adrenaline/etc.
There’s a lot of useful and expensive skills that you can get. Spamming these skills will likely need Recover to support it. However if it something you might use once or twice a battle then Recover shouldn’t be necessary.
⊱ Pathfinder makes it easier to skip Recover
Pathfinder saves FAT over the course of a fight and can make a big difference to the viability of a fully Fatigued unit still operating decently without Recover. See the Pathfinder section for details.
⊱ Rally doesn’t need Recover
You might think Recover is an auto-pick for your Bannerman so that you don’t cap and miss on a Rally. In my experience he doesn’t need it and I’ve run sub 60 FAT Banners. Swinging his Banner (12) and movement is unlikely to accumulate FAT. Rally is one of the only things that will cause him to FAT up and even with a poor FAT pool he can cast Rally several turns in which for you to solve the problem. However, if you wish to use other expensive skills on your Banner then Recover might interest you more.
⊱ Misconception – Recover is a must-pick for late game
No. With the probable exception of the Kraken, every fight can be beaten without Recover.

Student
“It’s leviOsa, not levioSA.”
Description
Gain additional 20% experience from battle. At the eleventh character level, you gain an additional perk point and this perk becomes inert.
Summary
+ Helps new recruits catch up in level
+ Gain level up stats faster, and reach bottom tree perks faster
+ Raises the minimum perk tier bar ‘for free’
+ Doesn’t count as one of your 10 perks
− Not a good choice in the short term
− Students will be functionally down 1 perk for most of their leveling compared to non-students
Mechanics
≻ Students need 17% less experience to reach the next level compared to a normal bro.
| Level | Normal | Student | Difference |
| 2 | 200 | 167 | 33 |
| 3 | 500 | 417 | 83 |
| 4 | 1000 | 833 | 167 |
| 5 | 2000 | 1667 | 333 |
| 6 | 3500 | 2917 | 583 |
| 7 | 5000 | 4167 | 833 |
| 8 | 7000 | 5833 | 1167 |
| 9 | 9000 | 7500 | 1500 |
| 10 | 12000 | 10000 | 2000 |
| 11 | 15000 | 12500 | 2500 |
≻ Students will never be two levels above a non-student assuming equal XP gains
≻ Therefore, Students will spend much of their leveling functionally one perk behind a non-student
≻ Becomes disabled at level 11 (including the XP bonus), and refunds its perk point
≻ Allows you to skip a tier of perks if your level 11 bro wants a bottom heavy perk lineup
≻ For Indebted backgrounds in the Manhunters origin, Student will refund at level 7 for Indebted bros, as they are capped at level 7. This also allows Indebted to reach the bottom line of the perk tree which is otherwise unreachable for them without Student. On other origins, Indebted backgrounds work as per normal with Student at level 11.
Discussion
Student is unique in that it technically doesn’t cost a perk slot in the long run. Therefore, you don’t have to compare it to other perks except in the short term, but that short term cannot be fully ignored. Students will always be equal or behind in real perks compared to a non-student.
Student’s only combat value is faster levels which means you get stat gains a little bit sooner. A small benefit that is certainly weaker than taking a real perk in its place. Don’t take Student in the early game if you are having any difficulties.
Student can also help you rush to higher tier perks which can be more powerful than lower tier perks. Nimble is an obvious example that makes an enormous impact on a bro’s durability. If you wish to get Nimble asap then Student can help you get there faster at the cost of a weaker early game.
It is worth noting that one factor in enemy composition scaling is the strength of your party and your bro’s levels do factor into that. So leveling up faster with a “dead” perk is going to do you a very slight disservice here.
Use Cases
⊱ Early game: Student is not advised if you are struggling
If you are having trouble in the early game then you should not be using Student. Early game perks are very impactful to your weak bros and skipping on them for Student is a greed play that you should not be making unless you are comfortable with the game.
⊱ Student helps rush bottom tree perks
If you want to get to things like Nimble, Duelist, Indom, etc. as quickly as possible then Student will help you get there faster, but it will make you weaker in the short term.
⊱ Later hires: Student is great
Student shines later on when you are trying to get new recruits to catch up to your veterans. Your veterans should be able to keep your fresh blood safe in battle so the short term loss of missing a perk isn’t as big a deal.
⊱ Delaying decision making or reaching further down the perk tree
Since Student is technically a free perk, choosing it allows you to delay making an actual decision regarding your build. This can be useful if you are indecisive, or are trying to wait to see how the stat level ups go, or if you can find a famed weapon to build around.
Student also lets you reach further down the perk tree without committing to a real perk above. This is great if you want to skip the first perk line or if you want to take a large number of perks from the bottom half of the tree.
⊱ Veteran levels
Technically speaking, even though the XP bonus turns off at level 11, reaching 11 faster does mean you will be reaching veteran levels a bit sooner than non-students. The impact of this is marginal at best. You should never be counting on veteran levels to matter on your builds. By the time you are gaining veteran levels you should have already built a party that can clear most or all of the game.
TIER 2


Executioner
“Works well with Dragonslayer.”
Description
Inflict additional 20% damage against targets that have sustained any injury effects.
Summary
+ Good for damage dealers
+ Better against harder to kill enemies
− Requires setup
− Not very useful against weaker enemies. Some enemies are immune
− Usually third fiddle to Berserk/Frenzy
Mechanics
≻ Deals bonus damage to both armor and hp
≻ For a list of injuries, refer to the wiki
≻ Debuffs like Stagger/Daze or DoT like bleeding are not injuries
≻ Damage modifiers stack multiplicatively, favoring stacking
Discussion
⊱ Executioner vs. Berserk/Frenzy
Executioner is a damage oriented perk which means that it is going to be compared to other damage perks. While many would agree that it is generally worse than Berserk and Frenzy, it doesn’t mean you can’t use all three, and Executioner itself is a fine offensive addition that got better with the addition of the Barbarians, Gilded, and Nomads. While Executioner suffers from many of the same problems as CS (see CS section), it is a better perk overall. Damage dealing builds will enjoy having it if you have the space.
On bros with low Fatigue, Executioner like KF can make more sense than Berserk as the value is not contingent on having enough Fatigue to capitalize on Berserk.
⊱ Executioner usefulness is inconsistent
Executioner value is going to be tied into the injury system. If you need a reminder on how injury mechanics work then go back to the CS section. Executioner needing an injury to gain value might seem like a big problem, but it isn’t really that hard to set this up. One example is that it is pretty easy to spread injuries with ranged weapons for other Executioners to capitalize on. The biggest issue on Executioner is not the setup, but rather the many injury immune enemies. As a reminder from the CS section, Alps, Schrats, Ifrits, Kraken, Dogs, Undead, Lindwurms, and Goblins are all targets that are either immune to injury or will die in two hits anyway (Goblins) regardless of Executioner (except Overseer).
Another downside to Executioner is the potential for it to be a win-more perk. If an enemy dies in X hits without Executioner and dies in X hits with Executioner then it didn’t actually help you. However, given the chaotic nature of the battlefield, multiple brothers contributing damage, and damage rolls being variable, it is hard to predict how often Executioner helps or does not help. You can reasonably assume that Executioner will increase consistency in kill rates, even if it doesn’t always speed up kill rates, but it depends on each weapon/enemy case.
⊱ Executioner is better against certain enemies
Despite the large number of targets where Executioner doesn’t help, it can do very well in Barbarian and Orc battles and since Barbarians are the most threatening faction in the game right now it is definitely worth considering using a perk slot to help against them. Barbarian Chosen are too dangerous to leave alive for long so it becomes a damage race. Executioner helps you kill them faster which is very welcome. They have it too by the way.
Executioner can provide decent benefit against other human factions as well. As BD added two new human factions, Executioner has more battles that it can be useful in than prior. Conscripts are notably tanky, and if you can land early injuries then Executioner will be great. CS can help there.
Being smart about your targeting and injury delivery will help you get more value out of Executioner. Use ‘wait turn’ to your advantage if you need to setup, and pay attention to who you are attacking.
Use Cases
⊱ Early game: Executioner is the only early game direct damage boost
I usually recommend taking defensive or accuracy perks early on, but if you want more damage then Executioner is the only damage perk early in the tree (disregarding that accuracy perks are indirectly damage perks). The early game is largely spent fighting Beasts and Brigands and Executioner can help you deal extra damage here. You will want weapons that are capable of dealing injuries though as low tier spears/swords are not going to be dealing injuries to get your Executioner online. Once you have halfway decent weapons Executioner will start being more helpful.
⊱ Warbows
Warbows are all about damage and are pretty good a dealing injuries to softer targets like opposing archers. Executioner can sometimes save you a shot against enemy range units or against Orc Young/Berserkers/etc. Since you often don’t deploy Bows against Undead/Ancient Dead the lack of Executioner value there isn’t even a concern.
⊱ Crossbows/Throwing:
Crossbows/Throwing can be scary with Executioner given their high innate armor ignoring damage. Everyone knows how annoying enemy Marksman/Arbalester are. Be thankful that they don’t have Executioner. While Crossbows/Throwing are great at dealing injuries to set up their own Executioner, they like it even better if a Warbow user or another bro can set up the injury first. Crossbows/Throwing are great against Chosen both for dealing injuries and killing Chosen faster, and you want to kill them as fast as possible.
⊱ Duelists/2Handers/Polearms
Any damage dealing build is going to appreciate more damage. While the value may be lost on weaker foes, it will help in harder battles (yep, Chosen). Melee bros can also capitalize on injuries distributed earlier on by your range units. Duelists such as Orc/Mace/Hammer Duelists are very good at injuring allowing them to get an immediate boost on their second hit. Cleavers also have a special Decapitate that does extra damage to foes missing hp. Injured foes by nature are missing hp. So Decapitate buffed by Executioner works very well.
⊱ Dagger specialist – Puncture
Puncture builds benefit a lot from Executioner since they can usually deal injuries on first hit and can attack three times per turn. With CS as well you can also injure Chosen and Warriors reliably. Puncture builds also tend to spend a lot of time using Recover, so Executioner can make more sense than Berserk/Frenzy here.
⊱ Multiplier stacking: The more the better
Damage modifiers stack multiplicatively, meaning if you have Frenzy up already then Executioner is worth +25% instead of +20% because Frenzy is also multiplying it. This also applies to things like Huge, Drunkard, Mushrooms, etc. Executioner is inherently better on bros with other damage modifiers.
⊱ Turn order: Slower bros with Executioner can capitalize on prior injuries
Executioners can benefit by being slow. This can allow your faster bros to get first strikes on enemies and hopefully land some injuries to allow your Executioner to capitalize. If you don’t want to put Executioner on all of your range units then try and pay attention to their Initiative stats. Having your slower range units with Executioner to capitalize on injuries dealt by the archer in front of him is a good way to get value.
⊱ Misconception – CS is needed for Executioner
No. You can deal injuries plenty enough without CS to make fine enough use of Executioner. They compliment each other, but they are not a package deal. Against relatively tanky enemies like Chosen/Conscripts, having CS can help setup injuries, but isn’t strictly necessary.
⊱ Misconception – I can’t use Executioner because I want to fight Monolith/Library
No. You can beat Monolith/Library with a few dead perks. You don’t have to build your whole team around it

Bullseye
“Nailed it!”
Description
The penalty to hit chance when shooting at a target that has no clear line of fire is reduced from 75% to 50% for ranged weapons.
Summary
+ Doubles accuracy when shooting into cover (25% → 50% of base hit chance)
− Making use of Bullseye means intentionally halving your accuracy
− Half accuracy is still not reliable enough to justify shooting into cover
− Shooting into cover means more missed shots than just not trying to use Bullseye in the first place
Mechanics
≻ A target is in cover when standing behind another unit or obstacle (like a rock/tree)
≻ You can tell when a target is in cover when aiming at them if you see a red/orange shield icon appear on the object in front of the target
≻ The 50%/75% hit chance penalty is multiplicative
≻ Without Bullseye, shooting a covered target when you would normally have an 80% hit chance gets dropped to a 20% hit chance
≻ With bullseye in the same scenario, we would have a 40% hit chance
≻ The game technically rolls obstruction separately, and then if you pass the obstruction check it rolls your actual shot as per normal. The combat log only shows the normal shot and will look as if no obstruction was present
≻ A missed shot that scatters into an unintended target has a -15% flat accuracy penalty and deals 25% less damage if it hits
≻ The Handgonne ignores conventional cover mechanics and gains no benefit from Bullseye
Discussion
Bullseye is a perk that most players automatically think is good and just pick it up on their ranged units without really thinking about it. I used to do it too until someone pointed out to me that the perk is bad. Let’s really think about Bullseye, why I think it is a trap, and why you should consider skipping it.
⊱ Are you really sure you want to be halving your accuracy?
Let’s start with cover mechanics and how they affect accuracy. Refer to the example in the mechanics section. We have an 80% hit chance to an uncovered target and he moves behind a another enemy. We drop down to 20% without Bullseye and 40% with Bullseye.
So the immediate reaction would be that Bullseye just doubled your accuracy in this situation. That’s great right? Well… yeah, technically it is, but instead of shooting the guy in the back at 40% (with Bullseye), why not shoot the guy in the open at 80% instead like you should be doing? Or you spend a turn repositioning to get 80% shots on the guy behind. That’s the main problem with Bullseye. Yes it makes it easier to shoot covered targets, but you shouldn’t be shooting covered targets because you are choosing to half your accuracy when there are probably plenty of guys out in the open you could be shooting at with high accuracy instead. Bullseye doesn’t make shooting guys in cover reliable enough to make me want to actually try shooting them (best you can get is 47.5% chance, i.e. half of 95%). So I recommend not using it at all and just take the open shots you have and free up a perk slot.
Another way to think of shooting at half accuracy is that you are halving your expected damage output. You don’t want to half your damage output, right?
⊱ But what about those pesky Hexe/Marksman/Necromancer/etc.?
Yeah I hear you. This is where you need to decide for yourself whether it is worth cutting your accuracy in half to try and shoot these targets vs whatever is guarding them. Personally I don’t think it is worth the accuracy loss. Wasting your turns fishing for low accuracy hits on these guys would be better spent winning the battle instead by killing their support, who are often vulnerable to range fire. These guys aren’t a threat without the units accompanying them. So kill the units accompanying them.
⊱ Scatter mechanics, and why they disfavor Bullseye
One defense people will give for Bullseye is that if you miss the intended target you have a good chance of hitting the guy in front of him so that’s fine right? Scatter mechanics are complicated but there are a few takeaways to consider. A scattered shot has a penalty to hit chance against the new tile/target (flat -15% drop). A scattered shot also does 25% less damage to the new tile/target. So sure while your missed Bullseye shot might hit something else, the chance to hit and damage is reduced significantly. Instead of hoping for value on missed shots you should instead be going for shots that are likely to hit in the first place. If you don’t have any clear shots then move to a better position rather than shoot at half accuracy. You don’t want to be shooting at half accuracy.
Shooting targets in the front can still lead to scatter shots, but they are less likely since you will be less likely to miss in the first place.
Use Cases
⊱ Anti-Hexe: Fish for wins
This is maybe the most common defense I see for Bullseye. After all, downing the Hexe on turn 1 with your archers is extremely satisfying and will outright win the fight immediately if she was the only one. However, this is a very luck-based strategy, and as the loading screen likes to tell us — “if your plan relies on luck then maybe it isn’t a good enough plan.” The Hexe will always start covered and unless you have a wicked famed xbow you need a headshot for a one-hit kill. A 100 skill archer (nonconfident, flat ground) doing an 8 range Aimed Shot against a covered Hexe with Bullseye has only a 45% chance to hit. That’s not completely terrible by itself but you have to hit twice per Hexe unless you get a headshot. The odds of hitting with a Headshot, in that case, would be 11.25%. Frenzy nor Xbows change that evaluation. Even if you had multiple 100 skill Bullseye archers (which you don’t let’s be honest) this strategy still isn’t reliable. Instead, your archers should be mowing down the Hexe’s escort as everything besides Schrats that she can pair with are very vulnerable to Bows. Once the ads are dead the Hexe herself isn’t really a threat.
⊱ Anti-Necromancer: Fish for faster wins
I personally don’t recommend bothering with Necromancers at all. While he lives he is going to draw 1-3 zombies to block for him which is fewer enemies fighting your party. Rather than fish for low chance shots on him, you can instead just kill his escort after which you can safely walk over and finish him off. He can only revive once per turn with his Possession skill or twice per turn with no Possession. Your team should be capable of slapping down zombies faster than he can pick them up. If you are going to die without Bullseye shooting the Necro multiple times then you should not be taking the fight to begin with.
⊱ Anti-Marksman/Arbalester/Gunner
A lot of the time these guys stand out in the open anyway giving you free shots. When they are covered you are better off shooting the guys in front of them so that you can free up a melee unit or dog to go pin them. The Billman or Raider with a Pike/Longaxe/2Hander are probably more threatening anyway and often easier to shoot.
Gunners are an exception, being the only fragile unit Gilded will field and they are highly dangerous. If they can safely hide behind Conscripts it can be difficult to chew through the Conscripts to get to them quickly. Gunners make for one of the better Bullseye targets.
⊱ Goblin Shaman/Overseer
As annoying as these guys are, with high RDF and Anticipation and decent enough health to take multiple shots, shooting them in cover is a really bad idea. Shoot the much easier to hit Skirmishers instead to start morale problems and give your frontline some freedom to move forward.
⊱ Misconception – Bullseye makes it safe to shoot past my brothers
Calling this a common misconception is an exaggeration, but I have seen people say things like Bullseye makes it less risky to hit your own guys as a defense for it. You shouldn’t ever be taking shots that have a risk of hitting your own guys in the first place whether you have Bullseye or not.

Dodge
“If you can dodge crossbow bolts you can dodge a ball.”
Description
Gain 15% of the character’s current Initiative as a bonus to Melee and Ranged Defense.
Summary
+ Provides a ton of MDF, which is highly valuable
+ Very strong on builds with low Fatigue generation
+ Better in the early, more dangerous parts of fights
∽ Benefits slightly from INI investment, but does not require it
− Value drops during the fight
− Poor on heavy armor and/or Fatigue guzzlers
− Vulnerable to drop-off from various status effects that lower INI
Mechanics
≻ Value depends on current INI, not starting/max INI
≻ Current INI updates in real-time as you accumulate FAT during the battle
≻ Heavier armor/weapons reduces your starting INI
≻ Using the ‘wait’ command reduces INI by 25% next turn but this is only for turn order and does not factor into Dodge in any way
≻ Debuffs like Stagger/Daze/Distracted/Nets/etc. reduce INI and thus, your Dodge value
≻ Relentless halves INI loss from Fatigue gained, thus reducing the rate of Dodge loss
≻ Recover halves current FAT, thus gaining back some Dodge value
≻ Ex.: 100 INI gets +15 Defenses. 60 INI gets +9 Defenses
≻ Each 1 point of INI is worth 0.15 Defenses, so leveling +5 INI is worth 0.75 Defenses
≻ A buff bubble will appear on the left side of the screen where you can check your current Dodge value
Discussion
⊱ MDF is important
Before we get into it, it is important to understand how MDF offers increasing returns the more you have. Please refer to the explanation in the Game Mechanics section if you skipped past it.
Dodge is a very strong and oft misunderstood perk by the community. Due to the increasing returns from high MDF, Dodge is potentially extremely strong when used on a bro with already high MDF. Dodge can offer more raw MDF than any other perk in the game aside from 4-5 stack Reach Advantage or 4-5 surround Underdog. Because of these increasing returns, Dodge is a pretty good to amazing pickup on really any Nimble front line build that isn’t immediately guzzling their Fatigue. MDF is arguably the best stat in the game and Dodge gives you a lot of it. You should be using this perk if you are looking for survive-ability and your build allows for it to work for you. You can never have too much defense.
One mistake players sometimes make is that they think Dodge is a substitution for proper Melee Defense, they spend all of the their level ups on Initiative and leave their defense stat at base. Then they die and decide Dodge stinks. This is not what you should be doing. Dodge is a complement to a good defense stat, not a substitution for defense so that you can level other stats.
On a bro with low Initiative after his gear and/or who generates Fatigue very quickly Dodge won’t be as useful, but otherwise it is usually worth a consideration due to just how strong Melee Defense is as a stat.
Dodge is mainly about getting more MDF while the extra RDF isn’t a huge value. Nimble back liners have little to fear from enemy range attacks so for them it doesn’t mean much (can help against Gunners though). Nimble frontline however can appreciate the bonus RDF as enemy range units really like targeting Nimble front liners even if they are harder to hit than Forge front liners. You don’t need Dodge to run a Nimble front liner, but they can actually enjoy some “free” RDF in the opening turns whereas usually the stat is irrelevant.
⊱ Should I be leveling Initiative?
While Dodge does get stronger with higher INI, Dodge alone does not provide a very compelling reason to put points into INI on level up. A +5 in INI equates to +.75 defenses which is still worse than even just a regular +1 in MDF unless you have some other reason to want the INI .
So rather than thinking you need to be leveling INI to gain Dodge value, what you should be looking at is your base INI stat, where it lands after gear, and how fast you are going to accumulate Fatigue. Most backgrounds have an average base INI at 105. After -15 Nimble armor and a weapon you are going to be around 70-80 which means you start the battle at +10-12 defenses. That is a huge chunk of defense for one perk and you didn’t put any points into INI for it. That’s almost a Round Shield’s worth of defense, and it isn’t hard to find some bros with base INI even higher.
⊱ But Dodge value drops off over the fight
Dodge haters are usually quick to point out that the value decreases over the fight but this sort of misses the point and also assumes you max your Fatigue immediately somehow. Some builds and weapons hardly accumulate Fatigue at all, allowing you to maintain high Dodge value easily. You gain back 15 FAT per turn naturally. There are a lot of weapons that can function for equal or less than that per turn. Even if you run 20 FAT per turn (many 1Handers with Spec) you are only slowly accumulating and only slowly losing Dodge value.
⊱ The start of the fight is the most dangerous
Although you will likely accumulate Fatigue over the course of the battle, the first couple of turns are generally the most important and decisive. Therefore, Dodge protects you the most during the earlier and most dangerous part of the fight where all of the enemies are still alive. Even as you do start to tire, it doesn’t take much INI to still be getting +5 out of Dodge and that is equivalent to Shield Expert and Underdog most of the time. By the time you are tiring, some or most of the enemies should be dead anyway.
⊱ Watch out for status effects
Something to watch out for is enemy Mace users who deal extra FAT damage with each attack (and therefore INI) and can Daze (2H version). Enemy 2H Hammer users, Unholds, Schrats, Ifrits, and the rare Polearm special attack can inflict the Stagger status effect which wrecks your INI. Goblin Nets/Roots/Poison will also lower your INI.
The Nomad faction in its entirety will spam their Throw Sand skill and provide the Distracted status (-35% Damage/INI). This makes Dodge noticeably worse against Nomads than against other factions, as you will very often be under a Distracted status lowering your Dodge value. Fortunately, Nomads tend to attack first and debuff after, which isn’t the smartest ordering of their actions.
Use Cases
⊱ Early game: Dodge excels
Dodge is one of the best perks in the early game for a number of reasons. You have both weak and light armor and weapons meaning you have less FAT penalty coming out of your gear. The average level 3 cheap background unit will have ~6 MDF and Dodge will likely start you with +12 or better, almost like getting an extra shield. Your weak armor and lack of defensive/durability skills makes avoiding attacks extremely important. The RDF is a nice buffer against annoying early Marskman (and Poachers or Throwing Weapons). Many of your early game team is likely destined for Nimble so Dodge will still be useable later. Finally, battles are usually small and short so Dodge getting weaker over the battle isn’t really a problem because battles end quickly.
You can use the extra defense to stack with a shield for 30+ defense by level 3 which is of course wonderful against common early game threats. You can also use the extra defense to be aggressive and double grip a 1Hander or go for an early 2Hander (I don’t recommend this if you are a new player and still learning). Even though Dodge is technically a defensive perk, you can translate that extra defense into offense if you want to.
⊱ Assassin/Thief/Gambler/Ratcatcher: High INI base makes Dodge better
These cheap and common (except for Assassin) backgrounds start with higher INI than most generic backgrounds and except for Ratcatcher they also start with extra defense. These backgrounds combined with Dodge can reach high defense scores at a low level.
⊱ Fencer: High INI frontline build is going to want Dodge
Fencer is an obvious build that appreciates Dodge. Investing heavily into INI for Lunge is going to leave you stat starved in other areas like HP and MDF. Dodge can help make up for that and it isn’t uncommon for Fencer’s to start the battle with +20s from Dodge. Fencers do generate Fatigue quickly but they also want to have Relentless anyway so it isn’t much of a problem. Fencers do still want to invest in regular MDF in addition to their Dodge value. Remember, the more MDF the better.
⊱ Single target 2Hander (not 2H Cleaver): High damage, low FAT cost
Single target 2Hander has the best damage per Fatigue spent ratio in the game. With weapon spec they only cost 12 to swing and since you recover 15 per turn you will not accumulate Fatigue without Berserk or other skills or getting hit. Therefore, it is entirely possible to maintain near full Dodge value through an entire fight. The bonus Dodge defense also makes it easier to safely ditch the shield so that you can use these weapons. This makes Dodge a great pick for Nimble builds using 2Handers. Polearms are the same way but backliners have less need for defense boosts so you may skip it if you want to be more aggressive.
Because single target 2Handers take little FAT and can benefit greatly from Dodge, it makes them one of the least stat demanding damage dealing builds in the game.
⊱ Ranged units: Dodge isn’t needed
I personally do not like Dodge on range units but some people do so I will talk about it. Nimble is usually good enough to keep your range units safe and I like to be aggressive and take a lot of offensive perks on my range units. Dodge can admittedly help you avoid some opening shots by enemy range units, but usually enemy range units will target your frontliners instead. Dodge can help against enemy Gunner spraying into your formation.
Archers generate FAT quickly so the Dodge bonus will drop off quickly and probably be low or gone by the time your archer is being engaged in melee (which he shouldn’t be at all). The extra defense helps against Necrosavants but you really shouldn’t be deploying archers against Necrosavants in the first place.
Hybrid backliners may appreciate Dodge more, if you expect them to hold the back flanks and expect them to see danger.
⊱ Dodge + Shield: Stacking MDF is strong
Shields are heavy and shield bros often like using expensive support/defensive skills, but combining Dodge and a shield can get you to a very high level of passive defense, which due to increasing returns from defense can allow for very dodgy bros. Works better on shieldbros who plan on attacking as that is cheaper than casting defensive skills. Relentless can also help.
⊱ Going shield-less: We need more defense
The extra Dodge defense can help your bro safely go without a shield. I mentioned 2Handers already but of course you can use it with Duelists as well (not Orc Duelists). If you want to be aggressive in the early game then Dodge is one of the best perks to take to help you survive without a shield and without other defensive staples like Nimble and Forge. Later in the game it is still very strong due to increasing returns from defense.
⊱ Synergy with Pathfinder, Recover, Relentless, Weapon Mastery
While none of these perks are necessary for Dodge to be good, they do help in small ways by lowering your FAT accumulation and INI penalty. I will say that taking Relentless just for more Dodge value isn’t very compelling, more on that in the Relentless section.
⊱ Anti-synergy with Adrenaline, Rotation, Footwork, Indomitable, Taunt
While none of these perks make Dodge bad, liberal use of these skills will fill your FAT quickly and lower your Dodge value. If your build wants to spam these skills then Dodge will not be as useful to you. If your build just wants these skills for tactical flexibility and just-in-case scenarios then it won’t hurt Dodge much.
⊱ Blazing Deserts: Gunners are dangerous
The extra RDF of Dodge is helpful against the new Gilded Gunners, who will AoE spam your party with ranged damage. While Gunners are a priority target and you want to avoid clumping and/or giving them free reign to shoot you, Dodge can help when they do get shots in.
⊱ Misconception – Dodge requires you to level Initiative to get good value
No. The majority of your Dodge value is going to depend on your base INI and how fast your build generates FAT. You can get a lot of value at base INI and spending level ups on INI doesn’t actually help Dodge that much.
⊱ Misconception – Dodge is married to Relentless/Overwhelm/Nimble
No, you can build a Nimble unit without Dodge, and you can build a Dodge unit without Relentless or Overwhelm. Think about why you are using each perk and don’t fall into the mistake of lumping things into automatic package deals.
⊱ Misconception – Dodge is bad because the value decreases over the fight
No, the early part of the fight is the most important. You should be solidly in control or outright winning by the time your Dodge value is waning. Even if it falls low to something like +5 then consider that +5 is the passive benefit of Shield Expert and inner formation Underdog.
⊱ Misconception – Using Dodge means I don’t have to level defense
No. Dodge is a compliment to proper defensive investment, not a substitute for it.

Fortified Mind (Mind)
“Deus Vult.”
Description
Resolve is increased by 25%.
Summary
+ Auto-pick on your Bannerman
+ Helps against specific enemies like Hexe, Geists, Mortars, Priests, and Warlords
+ Protects from stat loss via morale drops, and helps gain stats via Confident morale
− You can usually reach acceptable Resolve levels without Mind
Mechanics
≻ Does not round, so you get +1 RES for every 4 points of real RES your bro has
≻ Ex.: 40 base RES is +10 and 43 base RES is also +10
≻ Updates as your bro levels and gains more points
≻ Modifies after traits like Brave/Fearless
≻ Modifies Resolve gained from Trophies or the Sash
≻ Modifies Resolve gained from the Banner aura and Lionheart Potions
≻ Refer to this link to see various Resolve checks/modifiers
Discussion
⊱ Is more Resolve better than a different stat booster?
As a raw stat perk, Mind is going to have to be compared to the other raw stat perks. While the DLC have made Resolve more important than prior (Hexe, Fearsome), it is usually feasible for most backgrounds to achieve a decent Resolve score without resorting to this perk for help.
How valuable Mind is compared to the other stat boosters is going to depend on what your comfortable Resolve target is.
Going from 40 to 50 RES using Mind is the equivalent of 2.5 level ups. Mind also multiplies the Banner, so it is fairly safe to say that Mind is usually worth 3 extra RES than your out-of-fight stat card will show (from a +12 Banner). That would bring our Mind gain to 3.25 levels. Compare that to Colossus which is already providing 3.75 levels of hp at only 60 HP, Gifted gives 3 level ups but gives SKL/DEF which are better, and Brawny gives 4.5 level ups to a non-famed 300/300 armor set. If your Resolve target is 60 (going from 48 to 60) then you are getting 3.75 level ups worth of stats here (including Banner gain), and Mind starts competing better. Generally speaking, trying to level your Resolve naturally with a couple +4 rolls and maybe a Trophy is more efficient than using a perk point to fix a bro’s Resolve problem.
Of course you can use multiple stat boosters and a bro using Colossus, Mind, Gifted and Brawny is still completely viable despite a large perk investment into stat help, but if you are trying to get away with fewer stat boosting perks then Mind may not be giving you the highest returns compared to the others.
Mind does boost the gain provided by Resolve trinkets, Lionheart Potions (for tough fights), and the Banner, so keep that in mind when you are evaluating it.
⊱ Mind helps maintain higher morale levels, which means better stats
Mind helps protect against morale drops which would penalize your stats. It also helps you gain and maintain Confidence status which boosts your stats. In this manner, Mind is indirectly a boost to your other stats by protecting their loss from morale drops and helping gain Confidence. It is hard to put concrete value on how often this is factoring to compare against other perks, but is good to be aware that Mind’s value extends beyond the raw RES gain, which can help it compete with the other boosters. This is especially helpful against Fearsome enemies, and enemies who directly attack your Morale such as Priests.
A higher base RES will also make a bro more likely to succeed a Rally check from your Bannerman (see Rally for details).
Use Cases
⊱ Bannerman: You want Mind
Obviously, the Bannerman wants as much Resolve as possible both for his Banner aura and for Rally. Mind is an auto-pick here. Your Bannerman should have the Sash too and that also gets multiplied.
⊱ Lone Wolf: You need high RES to safely LW
The LW perk encourages you to run off by yourself which often leads to getting surrounded which leads to a lot of morale checks. If your morale drops then you’ve basically negated your LW buff and if you drop to Fleeing then you are dead. For these reasons a high Resolve score is a must for anyone looking to LW. By high I mean 70+ before LW is what I would recommend and it is very hard to get there without Mind.
Standing next to adjacent friendly bros grants +3 hidden RES bonus for each bro. Standing next to enemies grants -3 hidden RES debuff for each enemy. Therefore a LW is giving up his free RES from his buddies and probably the Banner as well which leaves him at much higher risk than you would otherwise suspect, especially if he gets himself surrounded by a bunch of enemies.
⊱ Super Tank: Holding dangerous positions will lead to more morale checks
Dedicated tank units will want a high Resolve score if you plan on putting them into situations where they are going to be surrounded and taking a lot of hits and especially if they are leaving formation. If you stay in formation you probably don’t need Mind. There are a lot of good perks for super tank builds so it can be tough getting Mind in.
If you are bringing a super tank as a core piece of your Monolith strategy then Mind can be helpful due to being surrounded by a large number of Ancient Dead being a quick path to Fleeing even with the Undead Trinket to protect from the Priests. I’ve had 60 Resolve tanks drop to Fleeing just from Ancient Dead walking into his zones at the start of Monolith.
⊱ Anti-hexe: Avoid Charms
Hexe are one of the more dangerous enemies in the game. Resolve can help you dodge the ever dangerous Charm status. A common strategy to fight Hexe is to have a bunch of Maces on your team to Stun your Charmed brothers (and the Hexe herself). If you have dedicated Mace units for this job then they might appreciate having Mind to make sure that they don’t get hit by Charm themselves.
It will also be good in the Witch Hut where you face 4 Hexen and a bunch of incoming Charms per turn. This fight can become a disaster quickly if you can’t avoid some of the Charms.
You get two chances to resist each Hexe Charm (you have to fail both checks) so each point of RES gets two chances to help you resist a Charm. A 50 RES bro who is alone (no adjacent allies or enemies, no Banner) has a 72% chance of getting Charmed. A 60 Resolve bro in this same scenario has a 56% chance of getting Charmed. Each adjacent ally is a hidden +3 Resolve and each adjacent enemy is a hidden -3 Resolve so actual Charm chances are not going to be so static. A 50 RES bro with a +10 Banner buff surrounded by 4 other bros (+12) and no enemies has a 40% chance of being Charmed.
⊱ Anti-Geist
Geist screams will generate 4 morale checks against all of your brothers in 3 range. This means that each point of RES you take gets 4 chances to be helpful to you for every scream.
⊱ Anti-Undead Priest: Resist morale drops and Stuns
Undead Priests are rare and usually only come one at a time, but in the Monolith you will be fighting 3 and they will be spamming you with morale drops and Horrify Stuns. Having more than 50 RES will certainly have value in Monolith. A 50 RES bro (with no adjacency modifiers or Banner) will have a 65% chance to drop morale on Horrify and a 55% chance of getting stunned (checks rolled separately). Each point of RES reduces these chances by 1%. If your morale gets dropped then you take a RES penalty as well which will make you more vulnerable to further Horrify spam.
⊱ Fearsome: Synergy with it and defense against it
The BD Fearsome changes allow it to scale with your RES. Using Mind will thus improve a bro’s ability to get Fearsome value.
It also helps defend against enemies using Fearsome since it is actually a threat now. Ancient Dead for example will get a -12/-16/-20 Fearsome penalty to your RES (depending on their tier) compared to prior. Fallen Heroes get -20, Warlords -18, Gunners -14.
This is very noticeable, especially on Nimble units who will take a lot of Fearsome chips. Mind can help counter this threat.

Resilient
“Many fall in the face of chaos; but not this one, not today.”
Description
Any status effect with a finite duration (e.g. Bleeding, Charmed) has its duration reduced to 1 turn.
Summary
+ Very good against Hexen
+ Status effects can be crippling/annoying, and less damage from bleeds
∽ Better on Nimble who tends to be more bothered by status than Forge
− Status effects are fairly rare
− Status effects are usually not too bothersome to devote a perk
− Less bleeding damage is not good enough reason to take Resilient over another defensive perk
Mechanics
≻ Effects include Bleeding, Poison (Webkneckt/Goblin), Charm, Stagger, Acid (Lindwurm), Flies (Shaman), Daze, Shellshocked (Mortar), Withered (Lorekeeper), and 2 turn Mace Stun
≻ Reduces the effects to 1 turn. ‘Waiting’ will not count as an ended turn and effects will persist until you specifically end the bro’s turn
≻ Goblin Poison, Shellshocked, and Withered will start in their weakest debuff state
≻ If a bro acts and uses all of his AP and then ‘waits’ and is then hit by a status effect, it will still disappear when he officially ends turn, even though he technically already acted before the status occurred. You can use this to almost completely avoid status effects if the timing works out. This can fully avoid Charm for example.
Discussion
⊱ A whole perk just to counter status is a high cost
Resilient is a perk that would be nice to have but is hard to fit it in because other perks are often better. The problem is that there aren’t really that many status effects for Resilient to mitigate (see the mechanics section).
It might seem like there are a lot of status effects but most of those are rare (Flies, Daze, Shellshocked, Withered, 2 turn stun). Acid should never even hit you because you shouldn’t be fighting Lindwurms in melee.
Stagger is less rare (2H Hammer, Schrat, Unhold, Ifrits, Serpents) but Forge doesn’t mind Stagger much. Forge also doesn’t care about Bleed/Poison because heavy armor already does a very good job at preventing those. So all that really leaves for Forge to care about is Hexe Charm. Nimble can appreciate the reduced Bleeding/Poison/Stagger duration but it is hard to justify the perk slot here unless you want help against Hexen, because another MDF boosting perk will usually be more helpful for you and also provide status avoidance.
⊱ Resilient is the best counter to some dangerous effects
The main draw of Resilient is of course the reduced Charm duration. Hexe are one of the more dangerous enemies in the game and Resilient makes them significantly easier because being Charmed for 1 turn instead of 2 is a huge difference, and you can even negate the Charm entirely with good timing. I’ll talk more about this in the use cases.
Shaman Flies can be another selling point for Resilient, as the harsh penalties last for 3 turns and can reasonably spell death for a bro if he is afflicted in a bad spot. Shaman usually prefer casting Roots over Flies so it is rather rare, but your Goblin Trophy wearer is immune to Roots. This makes him a prime target for Flies, so Resilient can be a good pick for your Goblin Trophy bro if he is critical to your Goblin strategy.
Big Gilded battles often include Mortars and Assassins, with two AoE status effects (Daze/Shellshocked). Resilient can help in these fights, and Shellshocked starts at only -5% instead of -15%.
Overall Resilient is often low impact/situational, but it does protect against some highly dangerous effects, and you may decide that despite the rarity of those effects that protection from them is worth having compared to a more consistently useful, but less situationally meaningful perk.
Use Cases
⊱ Anti-Hexe: Resilient on just one or a few bros can neuter Hexe
Resilient is great here. Unless you really hate Hexen then you probably won’t be taking Resilient on all of your bros. The trick then is getting the Hexe to target your Resilient bro(s) instead of your other bros. This is actually pretty easy to do because they like to target bros that are closer to them.
So the idea is to send your Resilient bro(s) forward and let them take the Charms. If they get hit then they will spend their turn trying to move back toward your line and then immediately flip back to your control without doing you any harm. Even better, if you can out speed the Hexe naturally (she has 100 INI and no equipment penalty) or by using Adrenaline then you can act first and move forward and “wait turn.” The Hexe then Charms you but you have no AP left because you already moved. Then when your second move comes around you stand still and then flip back to your control, negating the Charm entirely.
Having one or more bros capable of doing this does a very good job at keeping the Hexe distracted while the rest of your team clears out the mobs. If the Hexe decides to ignore your Resilient guy then he can try and make his way over to stun her.
Having even just one Mace unit with Resilient can make Hexe fights a lot easier, and I highly recommend you do this if you find Hexe battles challenging.
Witch Hut: 4 Charms per turn is very dangerous
Witch Hut is a unique fight against 4 Hexe and a nasty entourage of Beasts and is one of the harder fights in the game. This is also one of the more rng based fights in the game given your vulnerability on turn 1. Fortified Mind and Resilient are two of the best perks for this fight, and decrease danger to poor rng.
Goblin City: Multiple Shamans means Flies are more likely, and Ambushers will wear you down
With multiple Shamans it is far more likely than usual that they will cast Swarm of Flies onto you which can take a brother out of the fight for three turns, if it doesn’t outright get him killed. This is especially troublesome for your Goblin Trophy user as he is immune to Vines/Nets but not the Flies, so if you wanted him to go hunt the Shamans he is going to want Resilient or else get ruined by Flies.
In normal battles, Ambusher Poison isn’t usually a big problem, but the length of the City fight and the number of attackers means you will get worn down, which means you will start getting poisoned at some point. Ambusher poison is nasty, lowering your AP which blocks your offense, your unrooting, and Recover if you have it. Nimble is much more vulnerable to this problem here than Forge.
Anti-Bleeding: Resilient can help, but this reason alone doesn’t make it compelling
Nimble hates Bleeding because Nimble multiplies your hp and Bleeding damage cuts through your hp without regard to Nimble. So taking 10 Bleeding damage on a Nimble bro is more like taking 25+ damage as your raw hp is multiplied by Nimble. Resilient therefore will have some value against common Orc Cleavers and Necrosavants, and less common Barb/AD Cleavers. It is hard to justify the perk slot for this reason though when there are plenty of other good defensive perks to choose, and they all provide better returns on survivability than Resilient does, even against Cleaver enemies.
Bleeding/Poison will apply on any attack that deals 6 or more hp damage. Since heavy armor does a good job of protecting your hp, Forge units have little need for Resilient to protect them from Bleed/Poison. Nimble on the other hand relies on its hp stat to tank and is very likely to be hit by Bleeds, so Resilient is slightly more useful on Nimble than on Forge.
Dodge support
You certainly do not need Resilient to make use of Dodge, but there are a number of status effects (Stagger/Daze/Poison/Flies/Distracted/Shellshocked/Withered) that will reduce your Initiative and kill your Dodge value. Resilient gives you a bit of protection here.
Relentless and “wait” synergy
As Resilient works well with the “wait” command, it can combo nicely with Relentless so that you can “wait” every turn while maintaining high initiative. They are not a package deal of course.

Steel Brow (Brow)
“Being thick-headed is a good thing right?”
Description
Hits to the head no longer cause critical damage to this character, which also lowers the risk of sustaining debilitating head injuries.
Summary
+ Provides passive durability
+ Helps protect against injury
− Effect isn’t actually very strong
− Outclassed by Colossus
− Obsolesced if used with Indomitable
Mechanics
≻ Headshots by default do 1.5x damage but only to HP (not armor)
≻ The headshot modifier is the very last thing to apply in the damage formula. This makes headshots weaker than expected, which disfavors Brow. See the Game Mechanics section for clarity
≻ Brow always reduces the headshot modifier down to 1x. This means that Brow cancels out (negates) the modifiers from the 1H Axe and the Brute Trait
≻ Taking reduced damage lessens the chance of head injuries. Because head injuries have higher thresholds to injure compared to body injuries (see CS), Brow does a better than expected job of mitigating head injuries
Discussion
⊱ Brow is a situational Colossus
When you boil it down, Brow is basically just a worse version of Colossus. Brow essentially increases your effective HP count, but only against headshots while Colossus increases your effective HP count against everything. Since you are only going to be getting headshot ~25% of the time it makes more sense to take Colossus which is always helpful. Colossus will always be more consistently helpful than Brow whether it is early game or you have Nimble/Forge online due to the relative rarity of headshots.
If you already have Colossus, what if you wanted to double down on the passive durability and grab Brow as well? Just like in the Colossus section, I am going to separate the discussion here based on whether you want to go Nimble or Forge.
⊱ Nimble: 40/160 Brow line beats other 40% Nimble lines
Nimble does a wonderful job of mitigating the occasional headshot that you might take, but Brow does allow for a unique armor line to be used that takes advantage of how Nimble works.
Because Nimble gets huge mitigation to HP damage taken it is capable of face tanking with its HP stat. This makes it entirely possible to ditch your hat and focus on more body armor. Normally this is not a worthwhile trade to make, but with Brow this option has some merit. Noble Sergeants do this (though not in the smartest way). The way to go is Necromancer/Assassin Hat (40) and Noble Mail body armor (160) preferably with Bone Plate attachment. This gives you standard 40% Nimble with a few advantages. You have higher body armor to help against the far more common body hits, and the rare headshot is shrugged by Nimble/Brow.
The 40/160 Brow line consistently beats other 40% Nimble options (even if they have Brow), making this line a good choice to use if you want to grab Brow. However, the gains compared to non-Brow 40% Nimble lines are not especially high, so the perk point might be better off spent elsewhere. Blazing Deserts introduced the new Assassin set (140/120/-15) which is roughly par with 40/160 Brow without needing Brow. This makes the Brow line less appealing than in the past, as even with Brow you would be better with the Assassin Set than the 40/160. Assassin armors are rare/hard to acquire, however.
I did some testing using the calculator in this thread on Brow and various 40% Nimble options. Those tests seemed to suggest that Brow was worth about 15hp which is 3 level ups (Colossus assumed) of hp. That would put Brow in about a similar position as many of the raw stat boosters. Other interesting points of note is that the Brow Nimble line had the best injury avoidance, and that Brow was relatively more useful on lower hp units and lower defense units.
Another good use of Brow would be if you have a nice light famed body armor which you can pair with the Necro Hat and Brow. Basically it would just a better version of the Necro/Noble line.
Overall, Brow isn’t incredible on Nimble, but if you want a bit of extra passive durability and injury avoidance then you can pick it up.
⊱ Forge: Brow helps against high Ignore% attackers, but isn’t doing much otherwise
For the most part, Brow is poor on Forge units except against specific enemies. One reason being headshot damage applying last in the damage formula (see Game Mechanics). The majority of attackers in the game aren’t going to penetrate past 300 helmets to deal meaningful hp damage.
The only reason Forge might care about Brow is to help offer some passive (non Indom dependent) protection against high Ignore% attackers like Chosen Mace/Hammer, and Heavy Crossbows. Please refer to the Colossus section if you need a reminder on how easily Chosen can threaten Forge units. I will say again that Colossus is better than Brow on Forge units and you should only use Brow after Colossus is already taken. The following are a few example enemies against an 80hp 300/300 Forge bro using AFP attachment, and with or without Brow. Enemies have their respective perks/weapon skills in play.
Bladed Pike (Legion/HG):
- Normal: Death in 7.98 hits.
- Brow: Death in 8.12 hits.
Heavy Crossbow (Arbalester):
- Normal: Death in 7.06 hits. 10% injured on first shot. 30% injured by 3rd shot.
- Brow: Death in 7.88 hits. 1% injured by 3rd shot.
2H Spike Mace (Chosen):
- Normal: Death in 3.8 hits. 6.4% Death in 2. 16% chance of hitting heavy injury threshold in 1.
- Brow: Death in 4.11 hits. 8.2% Death in 3. 6% chance of hitting heavy injury threshold in 2.
What’s the takeaway here? Against Bladed Pike and most weapons Brow is very underwhelming because your helmet is already doing its job to protect you. Against Heavy Crossbows Brow offers a decent chunk of survivability and very good injury avoidance. Against Chosen we avoid the unfortunate 2 hit death possibility and also eliminate the possibility of getting a heavy injury such as Fractured Skull on the first hit. Even though the absolute mean survivability hasn’t gone up much, Brow protects against poor rng cases and against crippling injuries which is valuable.
Against the majority of enemies Brow isn’t helping Forge very much at all, but in a few cases like heavy Crossbows and Chosen it can offer some meaningful passive defense. If you are worried about those types of enemies then Brow can help a bit. If Indom is being used then Brow is basically useless here, as the order of damage calculation heavily favors Indom and not Brow (see Indom).
Use Cases
⊱ Early game: Double down on passive defense with Colossus
Early game your bros are weak, have little defense/armor, and that makes them vulnerable. Brow has to compete with other strong early game picks like Colossus, Dodge, and Gifted, but it can be useful here to boost your durability.
⊱ Nimble/Forge
See discussion section for detailed thoughts on these. Nimble Brow has some advantages compared to regular Nimble. Forge Brow only helps against specific enemies but it could be worth a look if you aren’t Indom spamming just because of how dangerous Chosen are. It is not particularly strong in either case.
⊱ Injury avoidance: Head injuries can be particularly nasty
The head injury formula favors Brow, making Brow fairly good at helping you avoid head injuries, especially heavy head injuries.
⊱ Mitigate poor rng
Brow may not be strong in absolute terms, but as a defense to unlucky rng cases, you may find it reassuring to have. It is better against the most dangerous enemies, which is a nice trait to have.
⊱ Anti-Head Splitter/Necrosavant/Blade Dancer/Master Archer/Desert Stalker
Orc 1H Axe has the extra headshot damage from 1H Axes, and the others have Headhunter. Brow helps more than usual against these enemies. Nimble benefits more here than Forge.

Quick Hands (QH)
“If the mercenary life doesn’t work out, become a street magician.”
Description
Swapping any item in battle except for shields becomes a free action with no Action Point cost once every turn.
Summary
+ Offers a ton of tactical flexibility
+ Can be used offensively and defensively
+ Indirectly grants +4 AP per turn
− Carrying extra items to QH to costs FAT
− Doesn’t work with shields
Mechanics
≻ If a shield is involved in the swap whether to your hands or off of your hands then QH will not work
≻ A buff bubble will appear on the left of the screen when your QH is still available
Discussion
⊱ QH increases flexibility
QH is one of the few ways in the game to get extra AP (indirectly). The ability to swap items for free opens up plethora of options only limited by the player’s creativity and the number of items in the game. Without QH it can be difficult to make meaningful use of your two bag slots which isn’t really a problem, but if you want to carry multiple weapons or items then QH will help you use them.
QH has a lot of obvious offensive uses, allowing the bro to switch between weapons depending on the circumstances, or even swapping weapons mid turn. It is also useful for defensive utility such as swapping to a Whip or Nets. You can do these things without QH but it will be less efficient.
If you take Bags then you are also probably going to want QH to make use of those slots, but you don’t need to take Bags to make use of QH. There is plenty you can do with your default slots.
Keep in mind the added FAT cost of carrying around multiple weapons/items. Each item in a bag slot costs half of its FAT cost to carry. This can add up to a fair chunk of FAT if you are carrying multiple 2Handers for example.
There isn’t much nuance to discuss here. If you want to use multiple weapons then QH is a good pickup. Otherwise you don’t need it. The use cases will have many of the common ways to take advantage of QH.
⊱ Legacy info: QH was nerfed
QH received a significant nerf in WotN, no longer allowing the free swap of shields, which had the intended effect of killing the ubiquitous QH defense being used at the time. Even so, the perk remains as a powerful tool for the amount of flexibility it offers. If you see references to QH shield defense in older guides/videos/posts then understand it is a legacy effect and no longer applicable.
Use Cases
⊱ Hybrids
Hybrids want to be able to use melee and ranged weapons at the same time depending on need and want to be able to switch between them freely in order to do this job well. QH is great here.
Throwing + Melee hybrid can maybe get away without it if you don’t mind giving up half a turn to switch to melee and you don’t plan on going back to Throwing after. That’s up to you.
Crossbow/Bow + Polearm wants QH. Since Polearms only cost 5AP with Spec, you can swing your Polearm and QH to Bow for a 4AP shot allowing you to get two attacks every turn that is stronger than just pure Bow. Crossbow is the same except every other turn you will have to only attack once and spend the other AP reloading.
You can also do Throwing + Polearm but that’s actually weaker than just pure Throwing without offering any real range advantage like Bow/Crossbow do.
⊱ Throwing
QH is pretty good here. Since you only have 5 shots per stack you are going to end up switching stacks once or twice. I also recommend you pair Throwing with a long range option (Bow/Xbow) so having QH is good to be able to switch between your long range option and your short range Throwing as needed.
⊱ Bows
Using QH just to swap arrow stacks is a very poor use of a perk point. The battle is usually “won” by the time you need to swap arrows, and missing half a turn isn’t horrible. Unless your Bow user has something else they need to swap to (such as Throwing or melee) then you really don’t need QH just for ammunition refilling.
⊱ Polearms (and other 2-tile reach weapons)
The 5AP cost of Polearms allows them to be combined with other 4AP cost attacks to make the full use of your 9AP. I already touched on Hybrids, but you can also make a melee build that combines a Polearm with a 1Hander, 2H Cleaver, Warbrand, Whip, or a Net(s). The advantage here is that the Billhook does better armor damage than all of those except Warhammer. Going for a Billhook followed by a Crypt Cleaver is some of the highest damage you can get out of a turn. Whips are also a great follow up for a Polearm unit since it can also hit at 2 (or even 3) range giving you a use of your remaining 4AP if you don’t need to move.
Those synergies aside, any non-shielded melee unit will enjoy having access to a 2 range weapon (especially in the Library) even if they primarily use a different weapon as this vastly opens up the amount influence/reach they can exert. The Longaxe/Polehammer are also good weapons to use with QH, particularly for units that are already picking up Axe or Hammer spec for their main weapon.
Polearm back liners also enjoy having a stronger melee weapon to swap into should they get jumped on by a flanking enemy or Orc Warrior. For example, you can easily use a 2H Mace without mastery which is far stronger than a Billhook. 2H Cleaver is another popular choice since you may already want to have a Whip and Cleaver Mastery anyway. It is also really nice to be able to switch between a Billhook and Warscythe depending on the situation.
⊱ Whips
Whip Disarm is a great control ability that is nice to have available for your team, but the Whip itself is a very weak weapon. This makes it a great candidate for QH so that you have the Disarm available if you need it but you can use a better weapon when you don’t.
QH is also a counter to opposing Disarms (Nomads/Beastmasters), as you can swap to an alternate weapon to use instead. QH enemies can do this against you as well.
⊱ Banner
A common complaint about the Banner is that it is weaker than most weapons you will be using later in the game. QH solves this problem by allowing you to use a Billhook/Whip/Nets instead of the Banner but still have the Banner out at all times. For example, you start the turn with the Banner out, QH to Hook/Whip/Net, do the thing (4 or 5 AP), and then use the remaining 4 or 5 AP to bring the Banner back out allowing you to maintain the Banner buff that you want to have while also having the ability to use other weapons/items. Doing this does prevent the Bannerman from moving that turn however.
⊱ Using multiple 1Handers
If you want to use multiple 1Handers then QH is nice to have to efficiently swap between them. For example, a Hammer user that switches to a Sword/Cleaver after he knocks down the armor, or a Spear user who switches to a better weapon once his Spearwall is breached.
⊱ 2Hander + Dagger with Mastery
2Handers cost 6AP and Daggers with Mastery cost 3AP. With QH you can get the two attacks in. Works especially well with the 2H Mace and the Qatal Dagger to immediately capitalize on a Daze with a Deathblow.
⊱ 2Hander + 1Hander + Berserk + Recover
Recall the synergy that 4AP attacks have with Berserk/Recover. 6AP 2Handers can try and take advantage by adding a 1Hander and QH to switch to on a turn where you want to Recover, provided that there is a kill set-up for you to take advantage of.
⊱ Nets
Nets are great. QH allows you to throw them more efficiently, but it does depend on your loadout. For example a Duelist can start with and throw a Net without ever needing to swap anything, but a 2Hander needs QH to throw a spot Net without costing him turns.
⊱ Grenades
Acid, Holy Water, and the new bombs in Blazing Deserts. If you want to throw these then QH is handy.
The Smoke Bomb in particular is great, essentially giving any QH user access to a Footwork at the cost of a bag slot. Unlike FW, you can throw the Smoke bomb elsewhere to save other bros as well.

Gifted
“Don’t let it go to your head.”
Description
Instantly gain a level up to increase this character’s attributes with maximum rolls but without talents (stars).
Summary
+ Increases SKL and DEF, the best stats
+ Never a bad choice, as more SKL and DEF is always good
+ Flexibility to choose stats depending on your needs
− Flexibility can also be a downside, as maybe you want a more specialized perk for your needs
Mechanics
≻ Grants a spendable level up screen like a normal level up where you choose 3 stats, but with every stat getting a max roll without regarding stars. So HP/FAT gets +4, INIT +5, DEF +3, and so on
≻ This is an extra level up in addition to a bro’s standard 10 level ups
≻ Does not increase your bro’s actual level, just grants a level up screen
≻ If you reset your perks using a Potion of Oblivion, your Gifted perk gets refunded but you get to keep the stats you gained from it. This isn’t as strong as it sounds as by the time you can craft one of these you’ve likely already cleared the entire game
Discussion
⊱ Gifted competes well against other stat boosters
Gifted is a lot stronger than some people in the community give it credit for. More stats is always a good thing, and Gifted gives you the flexibility to grab stats in whichever stats you need. Gifted often gets compared against other stat perks in the game, let’s see how it compares.
Gifted is 3 max rolls of stats so that’s our baseline. Mind only equals in value if you are at 48 or higher Resolve (after Banner buff). Brawny beats it regularly on non-famed 300+ armor but once you have famed armor, which is almost always lighter, then Brawny and Gifted start to be closer. Gifted loses to Colossus which will easily give you more than 3 max rolls worth of HP.
So yes, Gifted is outclassed by Colossus and often Brawny/Mind as well in terms of raw returns, but SKL/DEF are better stats than HP/FAT/RES, so you may prefer Gifted over the others. It depends really on your build and what you want for your bro.
You can translate your Gifted gains into other stats. For example, let’s say you want to get your Resolve up and you want to put at least three levels into it. If you take Mind at 40 RES (after Banner buff) you get +10 RES. Alternatively, you can take Gifted for a +4 and then use the other Gifted gains to allow you to skip rolls elsewhere later on to take more +4’s in RES. In this way, you can loosely translate your Gifted gain into +12 RES. This works better on bros with poor stars, where you are more likely to be ok with skipping low rolls in SKL/DEF to level other stats.
Not all stats are created equal. SKL and especially MDF are more meaningful than the other stats. Gifted and Lone Wolf are the only perks in the game that raise both your accuracy and your defense. You can almost never have too much accuracy and you can never have too much defense due to increasing returns of high defense (see Game Mechanics). In this way, Gifted is actually very strong on a bro with 40+ MDF already.
⊱ Gifted competes against other perks as well
There aren’t very many ways to gain accuracy. Fast Adaptation isn’t super strong. Backstabber is usually only worth +5 and sometimes +10 or better. +10 Backstabber is pretty good, but +5 Backstabber is pretty easily worse than Gifted. Gifted’s boost is also unconditional, unlike Backstabber.
On the defensive side, Shield Expert is +5 MDF or +10 while Shieldwalling. Underdog is +5 in the interior of the formation and more otherwise. Reach Advantage is +5 per hit but worth nothing if you miss. Gifted provides only 3 defense but it is always worth 10 pure stats or again 3 max rolls. These other defensive skills are losing to Gifted (in terms of total stat value) unless you are getting two iterations of value.
My point here is that that there are quite a few perks that deal in raw stats and Gifted is usually competitive with them. Disregarding it as “just stats” is misunderstanding the point. A lot of perks can be boiled down to “just stats.”
⊱ Is Gifted bad in the long-term?
No. The common argument against Gifted almost always has to do with Veteran levels. People say that since you slowly gain stats in Veteran levels that Gifted must be bad, but if that’s the argument then all of the other perks I’ve compared Gifted to must also be bad right? It just doesn’t work that way. A level 14 unit with Gifted will still be 3 rolls ahead of a level 14 unit without Gifted. I highly doubt your brother has too much skill and if you have high defense then Gifted is even stronger, potentially extremely strong. Going from 47 defense to 50 defense is a massive increase in overall durability due to increasing returns from defense. Finally, veteran levels are extremely slow and miss the point of the game. By the time you clear the crisis (around day 100 let’s say), you might have a level 12 or 13 guy. You are also capable at this point of beating 95% of encounters in the game. If you want to play until day 1000 and have level 25+ units then sure skip some stat perks and get something else, but the game isn’t designed for such long play and you’ve long since become unkillable whether you used Gifted or not. Saying Gifted is bad on day 500 is a pointless argument.
Use Cases
⊱ Early game: Your bros stink and Gifted really helps
Gifted is a great perk in the early game. You have a lot of cheap and weak bros who can’t hit anything, have no defense, and don’t have enough durability to take hits to begin with. Gifted helps to alleviate these problems. More skill to hit things, more defense to avoid damage, and more hp to avoid injuries (or another stat of course). Colossus into Gifted is a good opening that can help you if you struggle in the early game. Since most cheap backgrounds will appreciate multiple stat boosters you can’t really go wrong with Gifted here.
⊱ Bannerman: More Resolve
The Banner wants to stack as much RES as possible to improve his Rally consistency and increase the party wide buff that the Banner grants. Gifted is worth 5 RES with Mind assumed, plus two other stats dependent on what your Bannerman needs.
⊱ Range units: Long distance shooting takes high RSK
Range units, especially archers, really enjoy having accuracy assistance to help with the penalties of long distance shooting. Even 100 RSK archers will appreciate Gifted.
⊱ Nimble: Gifted is better than usual
Nimble loves having a high hp count. Gifted gives hp. With Colossus assumed, Gifted is worth 5 hp and 3 defense which believe it or not is a respectable defensive boost for a Nimble bro, and potentially a large defensive boost if your base defense is already high.
⊱ Increasing returns from Melee Defense
Going from 47-50 defense is magnitudes stronger than going from 7-10 defense. See the Game Mechanics section if you are unclear on this. This makes Gifted a very good perk on bros who have naturally high defense. The more the better. This also makes Gifted a good compliment to other MDF boosting perks.
⊱ Any bro who wants more stats
Really. Nothing special here, you want more stats? Use Gifted. You can’t go wrong.
⊱ Misconception – Gifted is bad beyond the early game
No. This idea usually has something to do with Veteran levels or talented recruits like Hedge Knights. I’ve said it enough in this section already, but more stats are always better, especially with MDF. In this regard, Gifted is even stronger on talented bros or bros with many Veteran levels, not worse.
⊱ Misconception – Gifted is only worth using on bad units
No. Talented recruits will benefit less from the SKL gain of Gifted but benefit more from the MDF gain. I’ve heard people say things like “any unit who needs Gifted should be fired” which doesn’t make any sense. Even Hedge Knights can enjoy having Gifted, especially for stacking more MDF.
TIER 3


Backstabber
“Et tu Brute?”
Description
The bonus to hit chance in melee is doubled to +10% for each ally surrounding and distracting your target.
Summary
+ Increases highly valuable MSK
+ Can yield more MSK than Gifted/Fast Adaptation (FA)
+ Safe pick for any damage dealer
− Not as good on bros with naturally high MSK
− Most common case is +5 MSK, which is a low yield compared to other stat perks
Mechanics
≻ Surrounding formula accuracy boost: (Number of adjacent units engaged – 1) * 5 (10 with Backstabber)
≻ Ex.: 1v1: (1 – 1) * 5 = 0 surround bonus.
≻ Ex.: 3v1: (3 – 1) * 5 = 10 surround bonus (20 with Backstabber).
≻ The formula is from the perspective of the defender, not the perspective of the attacker
≻ As per the above, Polearm units do not get extra Backstab bonuses compared to a normal melee unit. This is because from the defender’s perspective, the Polearm unit is not adjacent to him, and therefore not factored into the surrounding formula even though he is the one attacking. It is very common for new players to misunderstand this, refer to the following picture for clarity
⊱ Polearms and melee units derive the same benefit from backstabber
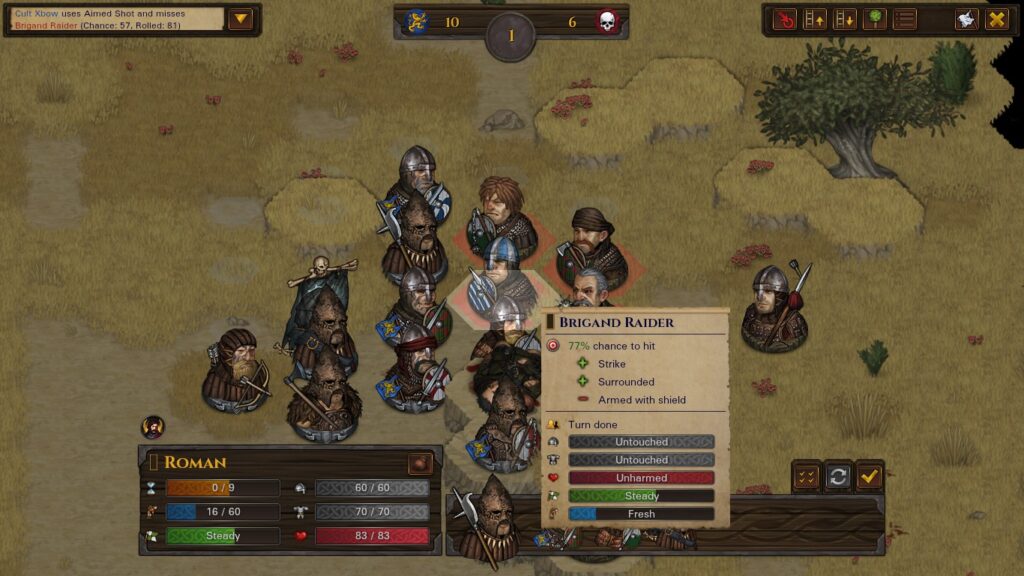
Roman is the attacker and he is adjacent to the blue hat Raider along with 2 of my other bros with Swords. This is a 3vs1 adjacency so all three of these bros get 2 surround bonuses. My Banner is also capable of attacking Blue Hat here. This is the important part. My Banner also only gets 2 surround bonuses, not 3, even though there are 3 other bros adjacent from my Banner’s perspective. This is because from Blue Hat’s perspective, Blue Hat is only fighting 3 of my bros (so 2 surround modifier), regardless of who is attacking him and from where. Backstabber in this scenario is worth +10% to any of the 4 bros who can attack Blue, and not extra (i.e. 15%) for the Banner.
≻ Polearms/Whips can gain Backstabber bonuses but they themselves do not factor into the formula unless adjacent (see the points above)
≻ Friendly ally units and your own Dogs will count toward your surrounding and Backstabber
≻ Ranged or Stunned units will not count toward surrounding
≻ Underdog/Backstabber cancel each other out, yielding normal 5% surrounding returns
Discussion
⊱ Accuracy is important and Backstabber offers the most
Backstabber is a solid perk because it is hard to have too much accuracy and compared to FA and Gifted, Backstabber can give the largest amount of skill. This makes it an enticing choice for any bro that needs accuracy help which is most cheap bros without stars. Even talented bros will appreciate the bonus hit chance for increased consistency. Finally, Backstabber is really easy to get value out of as you are naturally going to be getting surround bonuses every battle anyway. For these reasons Backstabber is generally a safe pick for most bros.
In most cases Backstabber is going to be worth +5. This is the common case where you maintain a consistent frontline. The enemy will engage into you and there will be two of your bros to each enemy bro getting you 1 surround bonus. You can try to manipulate the formation so that you can get more surrounds but you also run the risk of the enemy getting more surrounds on you by doing so.
Backstabber starts adding up toward the end of the battle as the enemy team crumbles and you can more easily stack more surround bonuses. I don’t put a huge value into this as in many ways this is a win-more effect to an already won battle, but it can speed things up especially if daggering down the last guy for armor.
⊱ +5 MSK isn’t overly impressive compared to other perks, but +10 or better is good
Backstabber’s biggest competition is going to be FA and Gifted where of the three, Backstabber offers the most accuracy. Backstabber’s next competition is going to be other raw stat perks in general where it is less clear on how well Backstabber fairs. +5 skill isn’t very good compared to other stat perks while +10 is good (comparable to Gifted) and +15 is great. Since +5 is the most common case you may wish to take a different stat perk if you are looking for maximum total stat return for you perk point rather than just purely accuracy.
Use Cases
⊱ Early game: You have many low skill bros
Accuracy is highly desired early into the game and you probably have a lot of unskilled bros which makes Backstabber enticing. It also helps when daggering down enemies. Since Backstabber is rarely ever bad it is a pretty easy pick up if you are looking for accuracy early on and it will still be good later. Of course compare it to other stat based perks and make the choice that makes the most sense for your needs.
A good early game build is a unit with high FAT making use of Mace Stun to control dangerous enemies and farm armor or Flail Lash for easily killing the fairly common Raiders that don’t have a hat. Backstabber can help these guys do their job and make decent use of a high FAT but lower skill unit.
⊱ Peasant Militia and Manhunters origin: More bros, more surrounds
Peasants get to field more bros and lose access to the skilled expensive backgrounds. Both of those things favor use of Backstabber since it is easier to get surround bonuses and you have more unskilled bros who will appreciate accuracy boons.
Manhunters are similar, getting extra bros on the field. However, with Indebted capping at level 7, perks are at a premium, and the Whipped status already grants a large SKL bonus, making Backstabber harder to justify compared to other options.
⊱ Dagger Puncture
Aside from just daggering for armor, a dedicated Dagger bro with Mastery using Puncture will really appreciate accuracy help to make up for Puncture’s -15 accuracy penalty.
⊱ Any bro who isn’t extremely skilled
Unlike FA which loses value as you get more skilled, Backstabber still does fine on highly skilled units. For example, a unit with 85 skill using a 2H Hammer is skilled enough that he can function well without Backstabber but not so skilled that Backstabber has become bad. Again, decide for your needs whether or not more accuracy is worth your perk slot in these cases or if you would rather have a different perk. Gaining skill does become less helpful the more you have though, so lower skill units will benefit more than higher skill units.
⊱ The +10 Dog drop
Dogs count for surround bonuses which also means that they work with Backstabber. Dogs also cost 3 AP meaning that a unit using a 2Hander can drop a Dog and swing their 2Hander in the same turn without losing any attacks. So if you give this bro Backstabber then he can drop a Dog for an instant +10 hit chance for his upcoming attack. Dogs in general are great for getting more surround bonuses and more Backstabber value.
⊱ Anti-Footman/Ancient Dead/Conscripts
Shield Wall spamming enemies can be very difficult to hit especially when they are bunched up for adjacency bonuses. Backstabber can help crack these guy’s defenses.
⊱ Misconception – Backstabber is better on Polearms
I see this a lot and I believe that it often comes from a misunderstanding on how surround bonuses are calculated. It isn’t uncommon that I see people say that Backstabber is an easy +10 accuracy for Polearms but this isn’t the case. A front liner and a back liner will get the same value out of Backstabber. Please go back to the mechanics section if you are unclear on this.
That aside, Polearm units have more perk space than other bros and since they only attack once per turn they really don’t like missing. They also have good Dog synergy and good mobility. So there are plenty of reasons why Backstabber is a good pick on Polearm units, just understand that they don’t get extra surround bonuses.

Anticipation
“It’s like Christmas.”
Description
When being attacked with ranged weapons, gain 1 + 10% of your base Ranged Defense as additional Ranged Defense per tile that the attacker is away. Provides 10 RDF at minimum.
Summary
+ Can provide a lot of RDF
+ Can encourage enemies to shoot a different bro instead
− Redirecting enemy ranged attacks doesn’t technically solve the problem
− Stacking high RDF isn’t impactful, as enemies will have already stopped targeting that bro
− RDF is a weak stat
Mechanics
≻ Only counts on your base RDF, not defense modified by Shields/Dodge/etc.
≻ Does factor after Morale/Lone Wolf modifiers, meaning those can increase/decrease returns
≻ Will count decimals
≻ Will round any remaining decimal down
≻ Always provides at minimum 10 RDF
≻ With 10 RDF at 6 tiles (Xbow), you gain 12 RDF
≻ With 16 RDF at 6 tiles, you gain 15 (15.6) RDF
≻ With 20 RDF at 6 tiles, you gain 18 RDF
≻ Has no effect on Mortars as they automatically hit
Discussion
⊱ Do you need more RDF when you aren’t the one getting shot?
In terms of raw stat value, Anticipation has the potential to offer a huge amount of levels worth of stats. As can be seen in the last example above, we get 4.5 levels worth of +4 RDF and that is going to be even higher at 7 or 8 tiles range. At worst we get +10 RDF which is modest.
The problem with Anticipation is that enemies aren’t stupid. They aren’t going to shoot your guy with 20 RDF whether he has Anticipation or not, they are going to shoot the weakest link. In order to get high Anticipation value you need to devote limited level ups into RDF, but if you already invested heavily into RDF then you don’t need Anticipation. In this regard, Anticipation suffers terribly from a win-more problem. Even though RDF has increasing returns just like MDF does, it is difficult to actually make use of it because the enemies will just shoot somebody else. If I have 20 RDF then I certainly don’t need Anticipation because I’m already not getting shot at. If I have 10 RDF I’m still not getting shot at.
Even if you do invest in RDF and pick up Anticipation, it doesn’t solve the problem that is enemy ranged attackers. They will just attack somebody else instead and putting a ton of RDF on your entire team comes at a high opportunity cost.
⊱ So you are saying that I don’t need RDF?
Yes, that’s exactly what I’m saying. Most enemy range units actually have fairly poor RSK, and by the end of turn 1 or on turn 2 you can have your frontline in cover behind the enemy’s frontline forcing their range units to try and shoot past their own troops or move forward.
You can beat Goblin City with units that never put points into RDF. Nimble or heavy armor already give you all of the security against ranged attacks that you will ever need, so devoting level ups and a perk point into Anticipation is just not generally worth the cost compared to taking better stats or perks.
You do want to be smart about it though. Don’t have your 70 HP, 3 RDF Nimble archer stand out in the open against 12 Ambushers. You want him standing behind a Kite Shield bro.
⊱ Legacy information: Anticipation used to be good
Prior to the B&E DLC, Nimble was terrible which made heavy armor the only viable option to not be at risk of immediate death all of the time. However, archers could not wear heavy armor due to the vision penalties. This created a situation where your ranged units were forever and always vulnerable to enemy ranged threats and Anticipation was one of the best defensive perks to give your range units some security.
However, now that Nimble has changed, you don’t need Anticipation. With Nimble, enemy ranged units should never be a threat to you (unless you go stand out in the open for multiple turns in a row for some reason). I’ve brought back liners into Goblin City with Nimble as their only defensive perk, with only 70 HP and less than 10 RDF, and they were ok.
Older guides may recommend leveling RDF and taking Anticipation on the back line but this is outdated advice. Later in the game the enemy range units are going to be far more likely to be shooting your 2Handers or Duelists on the front line rather than trying to shoot into your covered back liners anyway, and if they do they face a 50% accuracy penalty from cover mechanics.
Use Cases
⊱ Early Game: Insurance against Marksman
You don’t get Nimble until level 7 and you are going to run into Marksman before then. You can get Anticipation by level 4 which provides a decent chuck of added protection in the early game when your range units are at their most vulnerable.
⊱ Frontline: You’ll be in cover by turn 2
Anticipation on front 2Handers/Duelists has a few problems. You likely have multiple of them and if you take Anticipation on one then the enemies will just shoot the others. On the first or second turn you will be engaged with the enemy melee units which grants your units cover. As distance closes, you will get dropped to the base +10 RDF gain.
⊱ Diving: Charge into enemy backline
A decent anti-Goblin strategy is to have a diver who swings around into the Ambusher backline. This bro will draw ranged ire as the Ambushers scatter around, so the base 10 RDF of Anticipation can help as you charge them. Goblin Trophy and Resilient are recommended due to Shamans. Lone Wolf can be good here and can increase Anticipation returns as well.
⊱ Frontline: The “Arrow Magnet”
An interesting use case for Anticipation comes from understanding enemy AI tendencies. I said before that enemies aren’t stupid… except that they can be. For example, if you field 5 Forge and 1 Nimble in the Frontline then the Nimble bro is very likely to take most of the range fire, even if he has more RDF and/or Dodge and/or Anticipation compared to the Forge bros. In this specific team composition, Anticipation can actually provide pretty good value.
⊱ Fatigue support and arrow diversion
If you want to be sure that someone is not going to get shot at then you can take Anticipation. Generally speaking, just putting a few points of RDF is enough to accomplish this as the enemy AI tends to target the easiest to hit Nimble guy on your front line. Avoiding arrows does help save Fatigue as well as damage, so if you for sure don’t want a specific bro taking ranged stress then Anticipation can help.
⊱ Anticipation lets you worry less about unit placement
Although Nimble will do a fine enough job to protect your backline in most cases. If you leave a low HP/RDF archer in the open he can get peppered. Anticipation can let you get away with being less careful about your positioning. An Anticipation archer left in the open may even draw arrows away from other units, which may be advantageous.
⊱ Heavy armor doesn’t care about ranged attackers
Anticipation is poor on a heavy armor user for two reasons. Reason one is that heavy armor already does a great job at protecting you from ranged fire. Reason two is that enemies understand reason one and they will prioritize shooting Nimble units instead because they don’t understand that Crossbows are bad against Nimble units. If you are worried about Crossbows attacking your Forge units you would be better off taking Colossus instead since that is helpful for a number of other reasons as well.
⊱ Anticipation on everyone: High cost for ranged mitigation
At a high teamwide cost in perks, you could use Anticipation on everyone (or at least all Nimbles). Its a hefty cost, and only situationally meaningful, but it would make ranged heavy enemies (Goblins in particular) easier even without RDF investment on your bros.
⊱ Anti-Goblin
Goblins are the only enemy type that can output enough ranged fire to legitimately threaten Nimble units. Blazing Deserts also buffed Ambusher’s Boondock Bows. If you want to play it safe and/or struggle with Goblins then Anticipation can help.

Shield Expert
“I can do this all day.”
Description
The shield defense bonus is increased by 25%. This also applies to the additional defense bonus of the Shieldwall skill. Shield damage received is reduced by 50% to a minimum of 1. The ‘Knock Back’ skill gains +15% chance to hit.
Summary
+ Provides highly valuable MDF
+ Helps keep your shield intact
+ Easy pickup for any dedicated shieldbro
− Shield characters have poor offense
− MDF returns are poor without Heater or famed
Mechanics
≻ Shield gains are not rounded, so you get 1 defense from every 4 natural defense of the shield
≻ Round Shields gain +3 Defenses (from 15)
≻ Heater Shields gain +5 MDF (from 20)
≻ Kite Shields gain +6 RDF (from 25)
≻ Famed Shields with higher bases will have those higher bases get boosted
≻ Shieldwall will double the bonuses gained
≻ Shield damage reduction essentially doubles durability against Split Shield attacks. Regular attacks that hit the shield only do 1 damage regardless of Expert
Discussion
⊱ MDF is a crucial stat
Shield Expert is a decent to strong perk that combines a number of bonuses into a nice package that overall adds up to make it a pretty easy pick for any bro who is going to have his shield out at all times. Recall that melee defense has increasing returns (see Game Mechanics), and Shield Expert + Heater Shield makes it very easy to achieve high defense scores.
The extra defense granted by Shield Expert is the most important point and I’m going to focus on the bonus to the Heater as any dedicated tanking bro is going to be using a Heater Shield. 5 MDF for a perk slot is not super compelling by itself (certainly not bad), compare that to Dodge or Gifted for example, but there is more going on here. The bonus goes to +10 when Shieldwalling and that is quite good, even if you probably won’t be Shieldwalling all of the time unless it is a super tank build that never attacks. Still, 5-10 MDF is a good bonus, very similar to Underdog most of the time. I don’t value the Kite Shield bonus very highly as unless you are fielding an entirely shielded frontline, enemies will just shoot your non-shield guys instead anyway regardless of using a Heater or Kite. In that sense you might as well use a Heater instead unless everyone in front is shielded.
⊱ Shield durability is important
Not to be underappreciated, the shield damage reduction part of the perk is actually quite nice in encounters with Orcs and Barbarians. The obvious reason is that if your shield breaks then you no longer have its protection and the perk value is lost. The less obvious reason is that every turn they spend trying to break your shield, is a turn they aren’t trying to kill you. Any shield smash cannot hurt you and getting more wasted enemy turns is great. That being said, even with Shield Expert they will still break eventually (even quickly). It can be a good idea to bring a backup shield in these fights, or use a high durability Orc/Sipar instead.
⊱ There’s still more benefits
Lastly, the +15% hit chance on Shieldbash is likely not something that you will use very often, but it is nice to have when it comes up. One scenario where you may want to use Shieldbash is to knock a guy off of a high ground tile so that you can take it for yourself. Whiffing on a Shieldbash is extremely annoying because it prevents you from taking that high ground tile. Even if you try a second time and land the hit, you are at the mercy of the turn order and if an enemy gets the next move there is a very reasonable chance he takes the newly unoccupied high ground tile. Extra hit chance is appreciated here, even if it isn’t used very often.
Famed shields have a high appreciation for Shield Expert. Famed shields are entirely at risk of being shattered (and they cannot be repaired if they are unless you have the Blacksmith in your Retinue). Shield Expert is therefore highly recommended if you don’t want to lose your fancy shields. Famed shields that roll with higher defense values also get better yields from the passive defense bonus of the perk.
Use Cases
⊱ Early game: You have a lot of shieldbros
You tend to use a lot of shield users in the early game due to having poor defense and durability. While the effect on Round Shields is fairly weak (compare to Dodge or Gifted), an early Heater Shield buy with Shield Expert and some other defensive perks can make just about any bro respectably durable.
⊱ Tanks: Shield Expert is an easy pick
Kind of obvious but since using a shield prevents you from using a 2hander/Duelist it leans in favor of a more defensive unit whose job is to hold dangerous positions rather than to deal damage. Whether you go for a more defensive oriented super tank who rarely attacks or for a more balanced tank, Shield Expert is going to be good.
⊱ Famed shields: You don’t want them breaking
To prevent your fancy shield from breaking and to further multiply shields with extra defense, you’ll want Shield Expert.
⊱ Anti-Orc/Barbarians: Your shield won’t last long without Shield Expert
Orcs and Barbarians have dangerous axes and 2Handers. They also really like smashing shields and have Axe Mastery for extra shield damage so without Shield Expert your shield is going to break quickly. The more time they spend breaking your shield is more time that they are wasting. It can even be a good idea to bring Orc Metal Shields or Sipar Shields to these fights even though they are worse than Heaters, just for the extra durability. If you use Heater Shields I recommend bringing two if you have enough of them and don’t mind the FAT cost of carrying a spare.
⊱ Riposte: Value hinges on dodging
Riposte retaliates with an attack for every time you dodge. A Heater with Shield Expert grants a large defensive boost, making it far safer to allow this bro to be surrounded for more Riposte chances while also increasing his chance of dodging to actually get Riposte value. Can also be paired with Indom for a tanky offensive build.
⊱ Spearwall support: Knock enemies back out
If your Spearwall gets breached and you want to re-enable it and there is only one enemy currently zoning you, you can smack them away with your shield and then Spearwall up again. This is very expensive on Fatigue and you should really try to either kill that enemy or smack him away with a different bro, but if you want your spearman to have his own ability to do so then this is an option.
⊱ Dagger Puncture: Puncture doesn’t get Double Grip
When building a Dagger bro who is going to be spamming Puncture, you can use a shield without any offensive penalty since Puncture cannot gain Double Grip effects anyway. This is a unique case for a damage focused build to also be able to main a shield. This build is a good way to make use of a unit with high MSK and FAT but maybe has poor MDF as the shield can compensate.
⊱ Defensive Polearm: Shield swap shenanigans are possible
Since Polearms cost only 5 AP with Spec they can operate similar to the pre-nerf Quick Hands builds but without QH. You can attack (5 AP) and swap to a Heater (4 AP). Then next turn you let the enemies attack into your Heater and then switch back (4 AP) and attack (5 AP). This can allow for a defensive Polearm build that is capable of having a shield out 100% of the time while still attacking every turn. The downside is that moving messes this up and it doesn’t synergize well with Berserk if you have it. You can run this kind of build without Shield Expert, but if you want to lean into the defensive ability of the build then it can help. This build could also reasonably run Dodge since you are just doing a 12 Fat attack once per turn, allowing you to further stack up MDF.
⊱ Anybody who mains a shield
Again, this is pretty straightforward, if you are going to be using a shield a lot then consider grabbing this perk. Otherwise, you don’t need it.

Brawny
“This technique has been passed down the Armstrong family line for generations!”
Description
The Fatigue penalty from wearing armor and helmet is reduced by 30%.
Summary
+ Provides a good chunk of FAT
+ Helps equip heavier/better armor
− Usually you would enjoy being able to skip this if you can get away with it
− Less useful on famed armors
Mechanics
≻ Calculates on the helmet/body separately, rather than combining them and doing one reduction
≻ Always rounds up in your favor regarding value gained by the perk. This technically occurs by rounding the FAT cost down
≻ Ex.: A -8 hat goes to -5.6, which rounds down to -5 cost, meaning Brawny value rounded up to 3
≻ Ex.: A -10 hat and -20 armor will provide 9 FAT (3 from hat, 6 from body)
≻ Ex.: A -11 hat and -21 armor will provide11 FAT (4 from hat, 7 from body)
≻ Ex.: A -13 hat and -23 armor will still provide11 FAT
≻ Ex.: Maxes at -19 from 300/320/-62 armor. 300/300/-58 armor is -18
≻ Saves +1 Initiative for each point of Fatigue saved
≻ Updates as you change your armor around
≻ Will count (and reduce) the additional Fatigue cost of attachments if they push your body armor into the next threshold
≻ Will provide less value if combined with an armor using Light Padding Replacement (LPR), but they do stack. LPR will reduce FAT cost first, also rounding up in the same way. Then Brawny will apply after, rounding up again
≻ Ex.: Coat of Plates (-42) drops to -33 with LPR, which then drops to -23 with Brawny
≻ Does not effect Nimble% despite lowering cost of armor
Discussion
⊱ Brawny value vs. other stat perks
Brawny is another flat stat perk. When using top of the line non-famed armor the value caps at 18-19 Fatigue which is 4.5-4.75 levels worth of Fatigue which is a pretty good value. This is the ceiling for Brawny value. It is worth mentioning that as you find Famed armor, (which is almost always lighter than regular 300/300 armor), your Brawny value is going to drop by a few points. You might say “who cares, I want the Fatigue anyway” and that’s fine, but if you are trying to decide between Brawny and a different stat boosting perk then you may want to consider that Brawny gets weaker with Famed armor.
Famed 300 armors have a wide range of FAT costs that will impact Brawny value. With the lightest 300 famed armors Brawny value could be as low as 11 FAT, or only 2.75 levels worth. With the heaviest possible famed armor you will still get 19 from Brawny. Focusing too much on famed armor is a bit of a min-max mindset, as there is no guarantee you will find a lot of famed armor or that it will roll particularly well or that you will find it early. If you just want the dang FAT regardless of what the future might hold then just take Brawny and don’t worry about it so much.
Brawny is going to end up being about 4 levels worth of Fatigue generally, which is competitive with most of the other stat perks. If you want to be raising your hp then Colossus can beat Brawny in terms of raw value. You can of course use both. Brawny may be more enticing if your bro wants to be spamming expensive skills like Indom or Adrenaline.
⊱ How valuable is more FAT for this bro?
It isn’t all that uncommon to see people in the community claim that Brawny is an auto-pick for Forge units and I think that this is shortsighted. It really depends on the build and what your comfortable FAT level is. Some builds can function with as little as 30 or 40 FAT pool, others really enjoy having 80+. If you can skip on Brawny then you can obviously take a different perk instead, so think about what is more valuable to you (perk/statwise) rather than just assuming Brawny is needed.
Despite existing early in the perk tree, Brawny won’t actually start giving good value until you get your hands on some heavy armor which tends to take some time. If you grab it at level 4 with some Raider armor you are going to get about 6-7 FAT out of it which is really weak compared to other perks you could be grabbing instead. Gifted for example gives 4 Fatigue + other stats. If you do want Brawny, grab it later once you have your heavy armor and it makes more sense.
Although Brawny also technically grants Initiative as well, it is hard to say how useful this is. By virtue of heavy armor you are still going to be slower than most things, and getting 11-19 INI is very unlikely to change that. Rather you may want to grab Adrenaline if you want your Forge unit going fast, which Brawny can help support by giving you more FAT.
Use Cases
⊱ Heavy armor users that want more Fatigue
Brawny is pretty straightforward, if you want more Fatigue and your armor is heavy enough to get good value out of the perk, then consider picking it up.
⊱ Adrenaline/Indom: Strong skills but expensive
There are many strong activatable skills you can be picking up and Brawny can help you use them more often. With the Adrenaline nerf to 1AP, you can no longer cheese Fatigue requirements using the Adrenaline cycle. Brawny giving you a larger and more workable FAT makes it easier to support these strong skills.
⊱ Recover support
The larger your Fatigue pool is, the more that you can get back with Recover.
⊱ Light armor/Initiative: Brawny is not your pick
You should not be taking Brawny on an Initiative build just because it gives Initiative. With common Nimble armor lines you are going to get 5 FAT and 5 INI from Brawny. That’s a poor value for a perk point. Nimble builds can take Relentless if they want INI support, and Gifted if they just want more stats.
⊱ Misconception – Brawny is an auto-pick for heavy armor users
No, decide for yourself if the FAT gain is worth the perk cost. You can wear heavy armor without this perk.

Relentless
“Death comes for us all.”
Description
At all times your Initiative is reduced only by 50% of your accumulated Fatigue, instead of all of it. Also negates the 25% Initiative penalty from “waiting.”
Summary
+ Provides a lot of Initiative if you burn through Fatigue
+ Assists going earlier in the turn order, which Initiative builds can appreciate
+ Can provide a small defensive benefit if used with Dodge
+ Negates the “wait turn” penalty, which can allow for double moves and status avoidance
− Doesn’t do much if you aren’t guzzling Fatigue
− Not as useful unless you have a good reason for wanting to go fast
Mechanics
≻ INI loss per FAT loss is reduced from 1 per 1 to .5 per 1. So if you have 80 accumulated FAT, you only lose 40 INI instead of 80.
≻ Does not reduce the INI cost of equipping armor/weapons.
≻ Eliminates the INI penalty for using the ‘wait’ command (-25% INI for the next turn order)
Discussion
⊱ Gotta go fast: Relentless supports Initiative builds
Relentless is a niche perk that supports Initiative focused builds by reducing the amount of Initiative loss you sustain over the course of the fight. How useful Relentless is going to be depends on how quickly you accumulate Fatigue and how important it is for your bro to go early in the turn order.
An INI based build doesn’t necessarily need Relentless. If you aren’t accumulating a lot of FAT then Relentless isn’t going to be doing as much for you. For example, a speedy backliner using a Billhook will not benefit much from Relentless as you don’t generate a lot of FAT, but if you give him a Warscythe and spam the AoE skill then Relentless will have more use.
⊱ Can’t slow down: Relentless negates the “waiting” penalty
The main reason to use Relentless is to support builds that want to go first consistently.. Supporting Dodge value is a nice side effect, but not the main reason to use Relentless. With some INI investment and Relentless you can attempt to achieve a state of permanent Adrenaline. Unless fighting Goblins, it is entirely possible to build a bro capable of going first every turn if his INI is high enough. Going first or early in the turn order is valuable as acting before enemies can allow you to kill or debuff them before they get to act.
As of Blazing Deserts, Relentless also negates the “waiting” penalty, which is great so that you can “wait” if needed without tanking your INI next turn. You can wait for the enemies to act, then move at the end of the turn, and then move again at the start of the next turn because of your speed, just like Adrenaline. As with Adrenaline, you can also lessen/negate status effects with good timing (see Use Cases).
⊱ Relentless and Dodge: Dodge alone does not make Relentless good
When combined with Dodge, Relentless becomes a weak defensive perk in addition to supporting your Initiative. Taking Relentless just for the sole purpose of maintaining high Dodge value is not very compelling. For example, with an 80 FAT pool fully filled Relentless will save you 40 INI which translates to 6 defense from Dodge. 6 defense isn’t bad by any means, but most of the time you will not be capped on your FAT. So Relentless offers 0-6 defense over the course of the fight. Compare that to other defensive picks like Shield Spec, Underdog, Reach, Gifted, or even against other stat perks. An 80 FAT pool is high, and the maximum defensive benefit of Relentless can often be 5 or even 4.
Relentless is in a way the opposite of Dodge in this case. Dodge starts strong and gets weaker over time. Relentless starts with nothing and gains some value over time. Due to the nature of increasing returns from defense you may decide you want Relentless anyway just for additional defense stacking and that’s fine if you deem that worthy of your perk point, but it is by no means necessary or even particularly strong to use Relentless just to support Dodge.
Use Cases
⊱ Fencing: Relentless increases Lunge damage
Fencers deal more damage the higher their INI so Relentless doubles as a damage perk in this build. Fencers also guzzle FAT so Relentless will start providing good value quickly. Most agree that Relentless is a core pick on Fencing builds. Fencers also want to have Dodge so Relentless is offering some defensive benefits as well.
⊱ Overwhelm: You must outspeed your opponent to get value
Overwhelm needs to go fast in order to work at all and Relentless can help you maintain that speed. How useful Relentless is here is dependent on how fast you gain FAT and which enemies you are trying to outspeed. For example, Overwhelm Warscythe and Warbow will appreciate the help, but Overwhelm Sword might not need it.
⊱ Stagger/Daze: Debuffs are better if they land early
Stagger and Daze are strong debuffs that are far more useful if they land before the enemy acts this turn. Relentless can help you achieve this goal without having to resort to Adrenaline. 2H Hammer benefits more because of the AoE eating FAT and Stagger immediately updating the turn order. A bro like this can act as a setup man and skip on perks like Berserk/Frenzy since he is focused on knocking enemies down the turn while dealing good damage so that your slower bros can more easily get the kills. If you are just going to be using single target attacks then your FAT generation is low and Relentless won’t be as strong here.
⊱ Defensive 2handers: Stack a bunch of MDF perks
People usually like being aggressive with their 2handers, but you can instead stack defensive perks since your base damage is going to be high anyway. Picking up Dodge/Relentless/Underdog, maybe also Gifted/Reach/Overwhelm can allow for even units with poor stats to effectively wield 2handers and achieve a good degree of passive durability due to increasing returns from defense, while still dishing out decent damage.
Note that single target 2Handers like 2H Mace don’t gain much benefit from Relentless if you are just doing your one 12 FAT attack once per turn, but if using AoE skills, especially with Berserk, then you will accumulate FAT.
⊱ Duelists: No special interaction with Initiative
For maybe thematic reasons, some people seem to think that Duelists are supposed to be fast and dodgy. However, there isn’t really any unique synergy between Initiative and Duelists. Not that having more Initiative is bad or anything, but it also isn’t uniquely better on Duelists.
⊱ Status avoidance: Smart use of “wait” turn can lessen/avoid status
Similar to Adrenaline, going first can allow you to use all of your AP early in the turn, and then “wait”. Then if you are hit by a status before your second turn action, that status will have its duration reduced by one turn when your second action comes around, even though you have no AP to do anything with anyway. You can do this without Relentless as well, but it is hard to maintain the speed to pull this off without it (or Adrenaline) due to the “wait” INI penalty.
A great example of the value of this is against Nomads who like to spam their sand and Distracted status. You can act first debuff free, “wait”, eat the sand, then get cleared of the status on your second pass and act freely again next turn. Relentless can hard counter their tactics and cause them to waste turns trying.
Combined with Resilient, you can completely avoid status effects with good timing.
⊱ Misconception – Dodge is married to Relentless
No. I explained this above. While Relentless does support Dodge slightly, that isn’t a very compelling reason to select it by itself, even with increasing returns from defense. Dodge is often perfectly fine without Relentless.
On the flip side, you can use Relentless without using Dodge. For example, an Overwhelm Warscythe or Warbow might never be in danger to need the Dodge defense, but can appreciate Relentless helping them dole out their Overwhelm stacks to better support the team.

Rotation
“Teamwork makes the dream work.”
Description
Unlocks the Rotation skill which allows two characters to switch places while ignoring zone of control as long as neither character is stunned, rooted or otherwise disabled.
Summary
+ Saves lives by bailing out yourself or other endangered bros
+ Provides tactical flexibility and security
+ Can be used offensively
− Expensive to use, you may not have enough FAT when you most need it
− With smart play and good positioning it usually isn’t needed
Mechanics
≻ Costs 3 AP and 25 FAT and ignores Zone of Control
≻ Can be used to swap with NPC units such as Dogs or allies
≻ Can be used multiple times per turn if AP/FAT allow
≻ Cannot be used by or with bros who are rooted or disabled (stun/vines/net/sleep/etc.)
Discussion
⊱ Rotation saves lives
Rotation is a well-respected perk in the community and for good reason. It is one of only a few ways to ignore Zone of Control which gives you a lot of tactical flexibility.
Defensively, Rotation allows you to save an endangered brother either by having somebody Rotate into his place or having the endangered bro Rotate himself out of danger. It isn’t uncommon to lose bros who get into an unfortunate situation despite the rest of the battle going well and your team being mostly healthy. Rotation can save the day here. Rotation can very well save lives in a way that no other perk can compete with (Footwork kind of). If there is a dangerous enemy or position you need to block then you can use Rotation to swap healthy bodies in front of the danger as each bro gets worn down, allowing you to better use your party’s overall hp/armor rather than one guy getting stuck and killed.
⊱ Rotation can provide other benefits
Offensively, Rotation allows you to manipulate your formation once everyone gets locked down to either focus fire dangerous enemies or line up AoE attacks, or just better position yourself.
Rotation can also help with mobility. For example you can move 5 tiles in one turn by having someone rotate a bro forward and then that bro moving 4 tiles. Situations where this matters are rare, but no other skill in the game lets you move 5 tiles in a turn (except Lunge + Berserk). You can even move 6 or 7 if you really wanted to by having multiple people Rotate chain the same guy forward.
Rotation allows you to swap with NPC units, so that dumb Billman who jumped into the frontline can be saved (if you want), or that Footman trying to steal your Knight kill can be removed. It also lets you swap with dogs you drop, allowing you to use a very expensive pseudo Footwork if necessary, or allowing you to swap your dog out if he’s biting down that armor you are trying to knife for.
Rotation can allow you to better maneuver around tricky or tight terrain. For example, if you have an interesting choke point funnel or hill that you can make use of but there aren’t very many useful tiles for you to stand on behind it, then you can use Rotation to sub fighters in and out.
⊱ Rotation is not a silver bullet
Rotation isn’t perfect however. 25 FAT cost is expensive and sometimes you may find yourself in danger without enough FAT to use Rotation to bail out. If you position your team poorly and end up with a very vulnerable bro, say a guy surrounded by 4 Orcs, then Rotation can save the guy in danger but it doesn’t solve the Orc problem. In this case you’ve put a new guy in danger instead and spent a lot of AP/FAT doing so. So while Rotation can definitely buy you some time, you do still need to be able to handle threats and position your team in a smart way. If a bro is dying and his only options to Rotate in his place are your archers then you have another problem. Rotation is more useful and reliable if your backline is capable of taking some heat. Lastly, with a good understanding of the game and how to properly position your team and formation, you often don’t need Rotation at all.
Rotation is often compared to Footwork and most agree that Rotation is better. Footwork can only save yourself but Rotation can save yourself or save your buddy which makes it a lot more enticing. Depending on a bro’s role, he may prefer one of the other (or neither). Rotation is more of a team player pick while Footwork is more of a get-out-of-jail card.
Use Cases
⊱ Early game: Keep good bros alive
Rotation is excellent in the early game when you have a bunch of weak and fragile scrubs that can’t take more than a few hits. You want to keep your talented prospects alive and Rotation can help, whether it is on the talent itself or on lesser bros.
⊱ Martyrs
I don’t like designated martyrs personally, but if you are into that and the guy survives for awhile then he may find some use in Rotation to save other guys who are more important.
⊱ Tanks: Get in and out of danger
There are three good reasons that Tanks may want Rotation. One is that they tend to put themselves in danger, so having an out is good. Two is that it is their job to defend less durable bros, so being able to Rotate in for others is great. Three is that tanks aren’t your main damage dealers, so if they spend their Fatigue and AP Rotating then you aren’t missing out on much.
Smart positioning of your tanks may make Rotation not as relevant, but the utility can be nice to have to help other bros when things go wrong.
⊱ 2Handers: Good AP synergy with Rotate
Since 2Hander swings cost 6 AP and Rotation costs 3, they synergize well. You can use it offensively to get into a better place for your big swings or as an escape tool in case you get in trouble. 2H Mace can particularly enjoy having Rotate in order to have more options on who you can Daze with your attack and also because by itself the 2H Mace doesn’t use very much FAT which makes it easier to support Rotation’s cost.
Some people have run large companies of 2Hander + Polearm bros with QH and Rotation. The frontline can spam expensive AoE attacks and then when their FAT is full the backline guys can Rotate in and switch to their 2Handers and continue the assault. The original frontliner can then continue in the back with a Polearm or use Recover so that he can Rotate back in with more AoE attacks.
⊱ Backliners: Durable backliners make the best Rotate users
Having backliners, preferably with respectable durability and defense, is one of the best ways to make use of Rotation. Your frontline is at much higher risk of having FAT problems than your backline and that can block them from trying to Rotate themselves out. Since Polearms require very little FAT to use, it nearly guarantees that your Rotation will be available when you need it.
Since the backline isn’t zoned, they also have the freedom to move around to wherever the Rotation is needed as well. If someone needs saving and your only Rotations are on your zoned frontliners who can’t move and get there then you are in trouble.
Finally, your back line is unlikely going to take any significant damage in a fight. Having Rotations whether they are on your frontline or backline can be a great way to help distribute damage across the whole party instead of putting the full brunt of it onto the frontline. If a frontliner gets into trouble then he can swap positions with a fresh backliner.
⊱ Smoke bombs steal some of Rotation’s thunder
The Smoke bombs introduced in BD can allow any QH user to save an endangered bro with a well timed Smoke. Although this treads over Rotation’s niche to some degree, having some Rotations on the team is still a good idea.
⊱ Misconception – Rotation is mandatory on frontliners
Rotation is a good perk, but you certainly don’t need it on everybody. You don’t even need to use it all and you can still be completely fine. It is certainly a good option to have somewhere in the party, but you don’t have to be taking it on everybody unless you like to do so.

Rally the Troops
“As brothers we fight. As brothers we die.”
Description
Unlocks the ‘Rally the Troops’ skill which can rally fleeing allies, and raise morale of all nearby allies to a steady level. The higher the Resolve of the character using the skill, the higher the chance to succeed.
Summary
+ Auto-pick on your Bannerman
+ Needed to safely fight certain enemies
∽ Nobody else needs it
− Is a dead perk in the majority of battles
− Isn’t completely reliable
Mechanics
≻ Costs 5 AP and 25 FAT and has a range of 4 tiles
≻ If check is successful, will raise morale of allies by one level or two (if fleeing), up to a maximum of Steady morale. You cannot gain Confidence from Rally
≻ Formula: Target’s current RES + 40% of Rally user’s RES – 10 * distance from user. Fleeing brothers ignore the distance penalty. The target(s) make the morale check(s), not the Rally user
≻ Being at lower morale imparts a RES penalty, which makes it harder to pass the morale checks to get your morale raised by Rally. If Fleeing then you ignore the distance penalty which helps pass the check
≻ As an example, a Fleeing brother who has 40 current RES after his morale penalties and any other modifiers (such as Banner/adjacency/etc.) will have a 88% chance to Rally from a 120 RES Rally: (40 RES + (.4 * 120))
≻ As per the formula, raising the RES of your team as a whole as well as raising the RES of your Rally user will both increase the chances of Rally succeeding
≻ A bro can only be Rallied once per turn
≻ Assumption – Max chance to succeed is probably 95%
≻ Rally will not work on your Dogs or friendly allies
≻ Will wake any Sleeping bros in range (Alp fights)
Discussion
There’s not a whole lot to say about Rally. You are going to pick it on your Bannerman no questions asked. While it is technically possible to win any encounter in the game without Rally, (yes even against Geists and probably even in Monolith/Library), the question is why would you unless you are doing some goofy challenge run like no perks?
Most of the time Rally isn’t going to do anything, but it is an insurance policy against disaster that you are going to want regardless. There are some enemies that will specifically attack your morale and Rally is important in these fights.
It is important to understand the formula. Raising your bro’s RES makes it easier to pass the Rally check to improve morale. This means that you do still need decent RES on your team and can’t just run a bunch of clown Deserters at 30 base RES and expect to get away with it just because you have a good Bannerman with Rally. When you are Fleeing you get a 30% RES penalty which will make it harder to pass the Rally check. Non-Fleeing brothers face a distance penalty of 10 per tile, which can make it somewhat unreliable trying to raise Wavering brothers 3 or 4 tiles away.
Use Cases
⊱ Bannerman
Your Bannerman should be leveling RES every level and using buffs like Mind/Gifted, and the Sash. He’s the natural and best candidate on your team to have Rally. You don’t need to use it on anybody else.
⊱ Anti-Geist/Priest/Warlord
These enemies all have AoE skills that reduce your team’s morale. Rally is an important skill to have to safely fight these enemies, as otherwise you are at an enormous risk of having Fleeing brothers and no easy way to save them.
⊱ Anti-Alp
Rally will wake your whole team (if in range) which can improve action economy in Alps fights.
⊱ Pathfinder can help guarantee mobility
As Blazing Deserts dropped the AP cost of Rally to 5, Pathfinder can be useful to help make sure you can actually move your two available tiles before casting Rally.
⊱ Protect against Fearsome
As per the buff in Blazing Deserts, Fearsome is actually meaningful now, making enemies like Ancient Dead/Fallen Heroes/etc. far more capable of dropping your Morale. Having Rally can help in case they drop a bro to Fleeing.

Taunt
“Too weak. Too slow.”
Description
Unlocks the Taunt skill which makes opponents take offensive actions instead of defensive ones, and attack the taunting character over another potentially more vulnerable one.
Summary
+ A good control tool for your tank units
+ Can help protect weaker units from attacks
− Can struggle in larger battles where you are outnumbered
− Has to compete with other strong defensive skills
− Suffers from very rare but annoying inconsistency issues
Mechanics
⊱ Basic mechanics and control abilities
≻ Costs 4AP, 15FAT, and has a range of 3 tiles
≻ Target enemy gains the “Taunted” status until their next action.
≻ Be mindful of enemies who have “waited” (i.e. Barbarians), as Taunting them will be wasted if they have no AP left for their second action.
≻ Will not prevent enemies from using AoE skills but it does encourage them to put the Taunt user into the AoE arc
≻ Will prevent Warrior pushing and Unhold throwing
≻ Will prevent skills like Shieldwall, Riposte, and Rotation from being used
≻ Will not prevent the above skills unless those targets are engaged with the Taunt user. For example, Taunting an Unhold 3 tiles away fighting a different bro will not stop the Unhold from throwing (the Taunt will have no effect at all in this case)
≻ Will not prevent Split Shield from being used
≻ Using Taunt on an enemy that cannot reach the Taunt user in any capacity will have no effect
≻ If an enemy is Taunted but then his or your position gets altered by something like Rotation and you are no longer in reach of each other then the Taunt will be ignored
⊱ Understanding AI nuance
≻ Will not make enemies brainless, and Taunt may be ignored if other AI factors outweigh it
≻ Does not work on Hexe
≻ Does not work on Beastmasters
≻ Will not prevent Ifrits from combining
≻ Will encourage enemies to engage into the Taunt user’s ZoC if there is an unobstructed means for them to do so, they are not already zoned, and they have already committed to fighting (meaning that if the enemy team is camping because they have ranged advantage, Taunt will not convince enemies to leave their line to go fight you)
≻ By extension, a unit like a Necromancer/Priest will not jump into your ZoC because you Taunted him. A non-dumb enemy will not jump into your Spearwall because you Taunted him
≻ Taunting a Billman 3 tiles away will not stop that Billman from just staying where he is right now and hitting somebody else if he is able to, but if the Billman has to move anyway then he will move toward and attack the Taunt user if there is space to do so
≻ If you Taunt a Schrat from one side but give him a nice juicy 3 bro line on the other side then the Schrat will ignore your Taunt and go for the juicy 3 hit attack
≻ Will cause Necrosavants to warp onto the Taunt user assuming other Savant AI factors do not outweigh the Taunt. For example, Savants hate being surrounded, so if the only way to engage your Taunt user is to get surrounded then Taunt will be ignored. In rare cases a Savant may warp onto your Taunt user but then attack someone else instead
≻ Will work on enemy range units who happen to be in 3 tiles range even if they have to shoot past their own units to try and hit you, but it may be ignored if you leave a juicy target out in the open elsewhere
≻ Will be ignored in some rare cases
Discussion
As the lengthy mechanics might suggest, Taunt is a perk that will take some practice to get the hang of. It can be a good control ability but you have to understand how it works and how it can help you. Please refer to the mechanics if you skipped them..
⊱ Taunt offers control and utility for your team
Taunt can be a good perk to have on your tanks if you want the additional control option, even if it isn’t something you are always using. Taunt works best on bros who rarely ever plan on attacking because if you can’t hit anything anyway then you might as well use your AP/FAT protecting your teammates instead. In this regard, you can make a super tank who never levels skill because he isn’t planning on attacking. It is common to find a cheap background early in the game who has terrible skill but good defensive potential. Making them a tank with Taunt can make sense. Taking Taunt on a skilled unit doesn’t make much sense because you could be spending your time killing instead of Taunting.
Taunt is another control tool for our arsenal. You can use it to block annoying displacement abilities, save a bro in danger, protect damage dealers, control Necrosavants, and much more. In loose ways Taunt is similar to a Stun. Although the enemy does get to attack still, presumably your tank should more than capable of avoiding or absorbing the hit. Taunt can protect other frontliners so that they can deal their damage in peace, or taunt can babysit dangerous enemies.
⊱ Taunt has some limitations
Despite the utility that Taunt offers it suffers from two problems that lead to it commonly being disregarded by the community. Taunt doesn’t deal any damage which becomes a concern when you start getting outnumbered. Not to be misunderstood, it is completely fine to have one/few dedicated tanks that never deal any damage. However, tanks often want to use Indom and/or Shieldwall. If you are Taunting then you are giving up on one or both of these skills. Good positioning of your units can make Taunt not as useful.
Use Cases
Early game: Taunt does better
Taunt can be great early on for a few reasons. One, you can use it to help protect valuable brothers you want to make sure stay alive to a high level. Two, it can help you farm for armor much more easily by controlling priority targets like Leaders while your team mops up their escort and later daggers them down. Three, battles tend to be small and evenly matched, so a Taunt user controlling one or two enemies can give your team a good advantage. An early Taunt user is going to want a Heater Shield purchase and defensive perk support.
Martyrs
If you are into martyrs then you can give them Taunt to help protect teammates.
Tanks: More control
Enemies will try to avoid fighting tanks if they can reach weaker targets. Smart positioning can only get you so far for your tank. Taunt can help them exert control over the battlefield and better support the team.
Hexe fights: Control charmed bros
While Taunt doesn’t work on the Hexe herself, it is good to have in order to control your own charmed bros, and keep them from smacking your more fragile archers. Unlike Stuns, Taunt cannot miss and so is more reliable here.
Anti-displacement
Taunt blocks Warrior pushing and Unhold throwing. Indom does a better job at this but it is unlocked further into the tree as is more expensive. Taunt is a much earlier and cheaper option if you are looking for control against these enemies.
Anti-Ifrits
Tier 3 Ifrits hit hard. Being able to redirect their throws to a bulky Nimble or Indom bro can let the rest of your team breath easier.
Anti-Necrosavant: Control Savant movement
Although Savants have a rare chance of ignoring Taunts, it is a very good ability to control their movements and protect more vulnerable brothers. You can also manipulate Savants into wasting turns this way. If a Savant moves then he can only attack once so it is in your favor if they move around. Savants will often try to warp off of your tank if you don’t Taunt them to go after weaker bros. You can use this to your advantage to get the Savants warping back and forth reducing the number of attacks they deliver.
Anti-Polearm: Tanks can struggle to draw Polearms without Taunt
Polearm hordes (Ancient Dead) are highly threatening to your damage dealers and it is difficult for a regular tank to exert his influence over these enemies. Taunt can allow you to control two per turn, FAT allowing, giving your damage dealers some breathing room to move in.
TIER 4

Weapon Masteries
“A jack of all trades is a master of none.”
Description
Skills build up 25% less Fatigue. Other effect dependent on Mastery type.
Summary
+ Saves FAT, usually worth it for this alone
+ Provides additional boons of varying strength
∽ Some Masteries are more impactful to their weapon class than others
∽ Some builds don’t need one. Some builds can want multiple
− A Mastery isn’t helping if you switch to a different weapon
Mechanics
≻ FAT reductions do not round, so for every 4 FAT normally spent, you get 1 FAT subtracted
≻ FAT reduction calculates after addition/subtraction by Orc/Famed items. This means more help for Orc weapons and less help for Famed items that have cheaper FAT costs
≻ Saving FAT also helps you maintain higher INI
≻ In addition to saving FAT, all Masteries come with some other weapon specific benefit
≻ Hybridized weapons (such as Goedendag) benefit from Mastery depending on which skill they use. For Goedendag, Mace Mastery will only effect Knock Out while Spear Mastery will only effect Thrust
DiscussionI’m going to be lumping all of the weapon masteries into one section. Each Mastery will get an individual sub section here, but I’m not going to deep dive into these in the same way that I did for the other perks as this is not a weapon’s guide and a lot of discussion on Masteries can be combined together. I’m going to be talking about the value gained by the perks themselves rather than talking about the efficacy of the various weapon classes in general.
⊱ Mastery saves a lot of FAT
Most bros are going to want to grab a Mastery because they are usually worth it for the FAT benefits alone. The other secondary effects of Mastery range from not very relevant to extremely good, so some Masteries are more impactful than others.
Your build will play a big role into how useful Mastery is for you. For example, a super tank that never cares about attacking anyway doesn’t need a Mastery. An Orc Duelist needs Mastery to not be out of FAT in two or three turns.
Single target 2Handers are most able to get away with skipping Mastery. This is because they swing for 15 FAT normally and you recover 15 per turn, allowing you to always swing if you don’t move. Pathfinder + Mastery can allow you to swing for 12 and move for 2-3 most of the time, allowing this build to become FAT neutral on most terrain types and still move + attack even when capped on FAT.
⊱ Mastery encourages specialization, but it doesn’t lock you in
Taking a Mastery doesn’t mean you cannot use other weapon types. For example, a Warhammer bro would be better with a Sword in a regular Unhold fight even if he has Hammer Mastery, so give him a sword for that fight. A bro could QH to a reach weapon for some extra flexibility without having the Mastery for that reach weapon. You can even skip Mastery entirely and just change your equipment around depending on matchup if you don’t desire a specific Mastery effect or FAT benefit.
As I go through the various masteries I’m not going to be talking much about Fatigue. The FAT benefit is usually a good enough reason to grab a Mastery by itself and I don’t want to repeat that a dozen times. Instead I will be talking about other aspects of the Mastery.
Use Cases

Mace Mastery
“If the [brothers] must be soldiers, they will be good soldiers.”
⊱ Fatigue
- Bash: 13 → 10
- Knock Out: 25 → 19
- Cudgel: 15 → 12
- Crumble: 15 → 12
- Knock Out: 30 → 23
⊱ Additional
- Stun skills go from 75% success to 100% assuming target is not immune.
⊱ Discussion
75% Stun chances are annoying. You don’t want to spend extra FAT and lower your damage and still fail your Stun because it is only 75%. Mastery is important for the reliability which makes it more exciting on 1H Mace which is better for Stunning than 2H. If you don’t care to Stun or care about FAT then you can skip Mastery here.
Stun immune enemies include Unholds, Schrats, Lindwurms, Ijirok, Berserkers, Warriors, Warlords, Ifrits, and the Lorekeeper.
A notable enemy that isn’t immune is the Conqueror, making Stunning a great way to limit him.

Flail Mastery
“Does more damage the less hp you have.”
⊱ Fatigue
- Flail: 13 → 10
- Cascade: 15 → 12
- Lash/Hail: 25 → 19
- Pound: 15 → 12 (Orc: 20 → 15)
- Thresh: 35 → 27 (Orc: 40 → 30)
⊱ Additional
- Lash and Hail also ignore the defense bonuses of shields.
- Thresh gains +5% chance to hit.
⊱ Discussion
Lash is a good ability for Flails that is both expensive and is missing the normal Flail accuracy bonus against shields. Mastery makes it a lot easier to use Lash and is worth 15-25 accuracy against shielded enemies which is huge. Ignoring the shield value does not count Shieldwall bonuses.
2H Gains a little accuracy on the AoE which is hard to use, and no help to regular attacks except FAT, making Mastery more skippable unless using the Berserk Chain.

Hammer Mastery
“Can’t touch this.”
⊱ Fatigue
- Batter: 14 → 11
- Destroy Armor: 25 → 19
- Demolish Armor: 35 → 27
- Smite: 15 → 12
- Shatter: 30 → 23
⊱ Additional
- Destroy/Demolish Armor deals 33% more damage against armor (multiplicative boost – goes from 1.5x modifier to 2x modifier).
- Shatter gains +5% accuracy.
- Polehammer no longer gets -15% accuracy penalty for attacking adjacent targets.
⊱ Discussion
Destroy armor gets a lot stronger with Mastery, and lowers the expensive cost making it much more worth using. 2Handers get some accuracy help. Good pickup for all Hammer users.

Axe Mastery
“I’ll try spinning, that’s a good trick.”
⊱ Fatigue
- Chop: 13 → 10 (Orc: 18 → 14)
- Split Man/Strike: 15 -> 12 (Orc: 20 → 15)
- Round Swing: 35 → 27 (Orc: 40 → 30)
- Split in Two (Bardiche): 30 → 23
- Split Shield: Varies
⊱ Additional
- Split Shield damage to shields increased by 50% on Axes only.
- Round Swing gains +5% accuracy.
- Loneaxe no longer gets -15% accuracy penalty for attacking adjacent targets.
⊱ Discussion
Splitting shields is usually not a worthwhile strategy because it takes a lot of time (AP) and FAT to do so, you give enemies a buff (Double Grip) when you break their shield, and you force them to attack you (they can’t Shieldwall). It isn’t a practical idea to be splitting everyone’s shields and most annoying shield enemies have Shield Expert which makes their shields more durable.
The extra shield damage can help against Schrats, and Conscripts lack Shield Expert meaning a most 1H Axes with spec and one shot their shields, but otherwise shield breaking is not usually worth your AP/FAT.
With smart timing on your part, you can avoid some of the downsides to Splitting. Splitting one or two shields in the Footman/AD/Conscript line can help your team breakthrough.

Cleaver Mastery
“They’ve got curved swords… Curved. Swords.”
⊱ Fatigue
- 1H Cleave: 12 → 9 (Orc: 17 → 13)
- 2H Cleave: 15 → 12
- Decapitate: 20 → 15 (Orc: 25 → 19)
- Whip: 15 → 12
- Disarm: 25 → 19
⊱ Additional
- Bleed damage doubled to 10 per turn for Cleave attacks and 20 for Whips.
- Disarm no longer has a -15% accuracy penalty.
⊱ Discussion
Burst damage is preferred to waiting around for Bleeds to apply, but you can’t always burst everything down so every bit of extra damage is nice to have. The Whip should not be used as a primary weapon but the bleeding can be good against Nimble enemies once their armor is down. +15% accuracy on Disarm is huge, and many people commonly add Cleaver Mastery to their Polearm users just to have improved Disarm utility. Cleavers enjoy FAT support to make Decapitate more accessible.

Sword Mastery
“Master how to remove your pommel and end them rightly.”
⊱ Fatigue
- 1H Slash: 10 → 8
- Gash: 20 → 15
- Riposte/Lunge: 25 → 19
- 2H Slash: 13 → 10
- Overhead Strike: 15 → 12
- Split/Swing: 30 → 23
⊱ Additional
- Riposte no longer has a -10% accuracy penalty.
- Split/Swing gain +5% accuracy.
- Gash goes to 50% reduced injury threshold (from 33%).
⊱ Discussion
If you are just using a 1H Sword and no specials then Mastery is more skippable than usual due to Swords already having lower FAT costs. With Mastery however you are almost FAT neutral (16 per turn) which is great for bros with FAT problems or if you want to maintain high INI.
Riposte focused builds will want Mastery for the accuracy and FAT. Fencers will want Mastery for the FAT which also helps keep their INI higher for stronger Lunges. Shamshir will want the help on Gash.
Greatsword will appreciate the bonus accuracy and FAT reduction for AoE attacks.

Dagger Mastery
“Don’t forget your cloak.”
⊱ Fatigue
- Stab: 7 → 6
- Puncture: 20 → 15
- Deathblow: 10 → 8
⊱ Additional
- Dagger skills cost 1 less AP, allowing for three attacks per turn.
⊱ Discussion
Dagger Mastery is one of the more impactful Masteries, allowing for potentially a 50% damage boost as well as the assorted mobility advantages of being able to attack for less AP. Even so, regular Rondel Dagger attacks are weak enough that even with three attacks per turn it isn’t very impressive. Qatal on the other hand can output decent damage, and very good damage with Deathblow if setup. Three attacks per turn also synergizes well with things like Overwhelm and Fearsome.
Puncture is a strong attack, and a skilled bro (to handle the -15% accuracy) with high FAT (to handle the 15 FAT cost per Puncture) can do pretty well for himself. This build can also freely use a shield since Puncture can’t get Double Grip anyway. This build appreciates other high Ignore% attackers such as Duelists, 2H Mace, Crossbows, or other Puncture users assisting as the goal is to kill enemies without bothering much or at all with their armor.
With 3AP attacks you can swing a 2Hander for 6AP and QH to a Dagger for 3AP. Investing in Dagger Mastery (and even QH if you weren’t already using it for something else) is usually not worth the cost of a perk for a bit of extra damage when you aren’t getting a Berserk proc. The Qatal and 2H Mace can combo well together doing this.

Polearm Mastery
“I’m cool playing second banana.”
⊱ Fatigue
- Impale/Strike: 15 → 12
- Repel/Hook: 25 → 19
- Reap: 30 → 23
- Rupture: 12 → 9
⊱ Additional
- AP cost of Polearm actions reduced from 6 AP to 5 AP.
- Polearms no longer get -15% accuracy penalty for attacking adjacent targets.
- Reach weapons not classified as “Polearms” do not gain these bonuses such as Poleaxe, Polehammer, etc.
⊱ Discussion
Polearm Mastery is one of the better Mastery effects. Going from 6AP to 5AP is a huge deal, vastly improving the mobility and utility of the weapon class. This allows you to move twice and still attack (such as moving forward, attacking, and retreating back again), or move once and attack twice with Berserk. Moving twice with a two range weapon lets you reach enemies 4 tiles away, and often being unzoned in the back gives Polearms some of the best flexibility to move around and influence the battlefield wherever they are needed. The two movement also lets you more easily get around your own bros when you are trying to find tiles you can attack from. Being able to attack enemies 4 tiles away cannot be done by any other melee weapon except Fencers, not counting Whips.
The 5AP cost also opens up many good options to pair with QH such as to combine with a 4AP attack such as 2H Cleaver, or a Whip attack. You can also use the extra 4AP to throw a Net or Grenade. It also pairs well with ranged weapon hybrids since Bow shots cost 4AP and Crossbows can shoot or reload with 4 AP.
There’s a reason why things like the Longaxe and Polehammer feel so clunky. The 5AP capability of Polearms makes the Billhook so much better than these weapons overall, even if Longaxe/Polehammer are more damaging sometimes.

Spear Mastery
“I said GOOD DAY Sir!”
⊱ Fatigue
- Thrust: 10 → 8
- Spearwall: 30 → 23
- Prong: 15 → 12
- 2H Spearwall: 35 → 27
⊱ Additional
- Spearwall no longer disables when enemies breach into your Zone of Control.
- Spetum no longer gets -15% accuracy penalty for attacking adjacent targets.
⊱ Discussion
Spearwall is the main selling point of spears (aside from accuracy). Mastery makes Spearwall significantly better by allowing it to continue working even as you get breached. Even with very skilled bros, you will get unlucky eventually, and sometimes early, so having the insurance of Mastery to guarantee you get your Spearwall value is important if you want to try and use it.

Crossbow/Firearm Mastery
“Oh please. Bianca can handle this herself!”
⊱ Fatigue
- Shoot Bolt: 5 → 4
- Fire Hangonne: 5 → 4
- Ignite: 5 → 4
- Reload: 20 → 15
⊱ Additional
- Increases Crossbow Ignore% stat by 20% additive.
- Reduces Reload cost for Hangonne from 9AP to 6AP.
⊱ Discussion
Mastery is very good for Crossbows, increasing Ignore% from 50% to 70% (Heavy Crossbows) which is extremely helpful for Crossbows doing what they want to do, which is dishing out injuries at will, and killing things through their armor. It is very similar to Duelist.
As an example, let’s look at a bro vs. some Chosen. Bro has a Heavy Crossbow and no perks except with or without Crossbow Mastery.
Vs Light Chosen (145 hat, 140 body):
─ No Perks: 5.17 shots to kill on average. 0% injury on first shot. <4% injury before shot 4.
─ Mastery: 3.9 shots to kill on average. 51% injury on first shot.
Vs. Heavy Chosen (190 hat, 230 body):
─ No Perks: 7.05 shots to kill on average. 0% injury on first shot. <1% injury before shot 6
─ Mastery: 4.79 shots to kill on average. 11% injury on first shot.
As you can see, Mastery makes a huge difference to the damage and injury potential of Crossbows. You should not skip Crossbow Mastery.
For the Hangonne, Mastery is needed if you want to make it even remotely useable more than once per battle. A 9AP cost is stifling. Mastery allows you to shoot every turn, assuming you don’t have to move.

Bow Mastery
“And you have my Bow.”
⊱ Fatigue
- Quick Shot: 15 → 12
- Aimed Shot: 25 → 19
⊱ Additional
- View range and maximum firing range increased by 1.
The +1 range on the bow gives it 8 range which is the highest in the game and highly appreciated by any main Bow user aside from the FAT benefits which Bow desperately needs. The +1 vision is needed to actually get the +1 range, and does not allow you to wear a -1 vision hat without penalty. Easy pickup here.

Throwing Mastery
“The reason Lances/Axes are better than Swords, because they have easy/cheap access to 1-2 range.”
⊱ Fatigue
- Throw Javelin/Axe: 15 → 12
⊱ Additional
- Damage increased by 40% when at 2 range.
- Damage increased by 20% when at 3 range.
- Also reduces Fatigue cost of Nets/Grenades.
⊱ Discussion
Throwing Mastery is a ludicrous damage boost for Throwing, which when combined with Duelist, which also works with Throwing, allows for very high damage. As an example, Duelist + Throwing Mastery Heavy Javelins at 2 range out damages non-Orc melee Duelists. Throwing Mastery is very good.
TIER 5


Reach Advantage (Reach)
“Personal space.”
Description
Each hit with a two-handed melee weapon adds a stack of Reach Advantage that increases your Melee Defense by 5, up to a maximum of 5 stacks, until this character`s next turn.
Summary
+ Provides highly valuable MDF
+ Very strong if you gain multiple stacks per turn
+ Still ok if you only get one stack
− Value is conditional and inconsistent
− Does nothing when you miss, which compounds a bad outcome
− Not as good on weaker recruits
Mechanics
≻ AoE attacks can gain several stacks at once
≻ Swapping weapons will lose all current stacks
≻ Stacks last until the start of your next turn
≻ Caps at 5 stacks, which is +25 MDF
≻ Provides no value on misses
≻ Works on all 2Handers, including things like Spetum Spearwall, Polearms, and Warbrand
≻ Hitting your own bros or allies will grant you stacks
Discussion
⊱ Reach helps stack MDF
Reach is a good option to consider for any frontliner who primarily wields a 2Hander and is consistently able to land his hits. Due the nature of increasing returns from MDF (see Game Mechanics), Reach has potential to be very strong on bros who already have high defense and/or who are capable of consistently getting multiple stacks per turn.
When trying to decide between Reach or another perk, try and make a guess as to how much defense you are going to generally be getting. We can reasonably expect that Reach will be granting at least 5 defense on average (for AoE or Cleaver) which makes it a fine perk already because of how important defense is. If you can consistently get around 10 defense per turn then it is looking really good.
⊱ There are three ways to get more value out of Reach
The first is to increase your bro’s skill. If your bro is missing his attacks then Reach is not helping you. Reach will work better on units with naturally high skill, and can benefit from the bro having other accuracy perks to assist in hitting. This also means that Reach will be easier to use against easy to hit enemies like Orcs, and will be worse against an Ancient Dead established Shieldwall.
The second way to get more Reach value is to attack more times per turn. Hits or misses aside, more attacks means more chances to hit. As such, AoE capable weapons like Greatswords can gain a lot more stacks per turn than single target weapons like 2H Maces. Berserk is great to get more attacks per turn.
The third way is to have high base MDF. With high defense, each stack gained is more valuable. One mistake players sometimes make it thinking that Reach can let them get away with low defense and this is a bad idea. Try and get high defense and then use Reach to further complement it.
⊱ Reach suffers from some problems
First is a win-more problem. Reach is stronger the higher your skill and defense, making it exceptional on strong recruits who are probably already going to be crushing the game. Further, if you kill an enemy and get some stacks but there are no other immediate threats then your stacks are wasted. Second problem is a lose-more problem. A weaker recruit will have less consistency getting Reach stacks up and have less defense to stack it on. Further, when you miss you are now stuck facing a healthy enemy and have no value from your defensive perk.
Third problem is that enemies can attack you before you get a chance to attack them depending on battlefield conditions, meaning you have no Reach value on their opening strike. Fourth problem is that if you spend a turn using Recover so that you can continue spamming attacks then you’ve spent a turn without gaining any Reach value. Finally, Reach is unreliable in the value that it provides. Sometimes it is great and other times it fails you. Compare to other perks where you always know what you are getting.
Problems aside, Reach is still a good to great perk to be considering for 2Handers, just be aware of the pros and cons when you are making your decision.
Use Cases
⊱ Greatsword, Bardiche, Hammer: AoE gets more stacks
These are your go-to AoE weapons as their AoE attacks are easy to make use of without risking hitting your own troops. Frontline Warscythe can enjoy this as well. Backline Warscythe likely doesn’t need the defense.
⊱ 2H Flail, Greataxe: AoE attacks are awkward
The spin-to-win AoE attacks are far harder to make use of but can gain huge value from Reach if you manage to get yourself surrounded by large groups of enemies. Generally speaking this should be avoided, but with some clever positioning and the right build/bro you can deal enormous damage with this playstyle.
⊱ 2H Cleavers, Warbrand, Rhomphaia: Attack twice
These 2Handers are unique in that they attack for 4AP instead of 6, allowing you to get two attacks per turn and multiple chances to gain Reach stacks.
⊱ 2H Mace or other single target strikes: Not as good for Reach
Although not the greatest for gaining Reach value, defense is still highly valuable. Reach can still be used on single target 2Handers for some extra defense if you desire, but other defensive perks might make more sense. Dodge for example is very good on single target 2Handers. You can of course use both.
⊱ Polearms: Backline is safer
Unless you are frontlining with your Polearm, you usually don’t care for a defensive perk like Reach on the backline where you shouldn’t be getting attacked.
Spetum: Reach builds while Spearwalling
Spearwalling with a Spetum does grant stacks, making it very easy to gain 25 MDF while you have Spearwall going. This can allow bros with poor defense but high skill to pretty safely Spearwall. If anybody manages to breach then you can enjoy your added defense until your next turn. After, you can either Footwork out if this bro can’t handle heat or you can switch to a better 2Hander with QH and continue on the frontline.
If you use Adrenaline on turn 1 and have heavy armor, then turn 2 you can Spearwall and “wait” (to slow you down next turn). This way you will have your Spearwall online for all of turn 2 and 3 regardless of if you get breached. This is a long commitment to make for your Spetum bro so the extra Reach defense can be appreciated if multiple enemies manage to get through.
If the enemies fail to breach and attack you then Reach didn’t actually help you here, so you may skip it on this build in favor of other perks if you desire.
⊱ Berserk synergy: Attack more
2Handers can easily proc Berserk due to their high damage, and more attacks means more chances for Reach stacks.
⊱ Anti-Orc
Orcs are both easy to hit and durable, both of which favor Reach to both gain stacks and survive the counterblows from the surviving Orcs.
⊱ Misconception – Reach is an auto-pick on 2Handers
No. It’s a good perk, potentially exceptional, but understand the pros and cons and make the choice that works best for your bro and needs.

Overwhelm
“The creature leaps upon its target, pinning it to the ground and attacking repeatedly.
Very dangerous. If your healer gets hit with this it is probably a reset.”
Description
With every attack, hit or miss, against an opponent that acts after you in the current round, inflict the ‘Overwhelmed’ status effect which lowers both Melee Skill and Ranged Skill by 10% for one turn.
Summary
+ Effect is strong, similar to having more Defense
+ Supports other teammates as well
+ Better against harder to kill enemies
− You must out speed your opponent to apply it
− Discourages usage of the ‘wait’ command, which is awkward
− If the enemy dies before attacking then Overwhelm did nothing
Mechanics
≻ You must out-speed your opponent to apply Overwhelm
≻ Still applies stacks even if you miss
≻ Lowers skill by 10% per stack, which is ~6-8 skill for most enemies
≻ There is no stack cap, meaning 100% SKL loss is possible (5% minimum hit still applies)
≻ Can only apply one stack per attack action per enemy
≻ As per above, the 3H-Flail will only apply one stack per swing, not three
≻ AoE attacks can apply Overwhelm to multiple targets
≻ If a ranged attack misses and scatters to another target then both the original target and the scatter target will gain a stack
≻ Will reduce a unit’s ability to break out of Nets as Net breaking is based on MSK
Discussion
⊱ Overwhelm is akin to having more MDF
Overwhelm is a good debuff but the perk itself suffers from something of an identity crisis. It is a defensive perk that requires you to attack (offense) but also not kill the enemies you are attacking. This is somewhat similar to CS although with a more focused effect. Overwhelm can help protect other teammates. This makes Overwhelm a team support perk that is better used against bulky enemies.
The effect that Overwhelm applies is quite good. I’ve talked extensively about the high value of MDF and Overwhelm is essentially an increase in defense (by decreasing opponent’s skill). Putting two Overwhelms on an enemy is usually about 12-16 extra avoidance, which is a huge value for one perk. Another upside is that your entire team enjoys this benefit. The downside is that you won’t be able to Overwhelm all threats each turn, so you still need good MDF.
Because Overwhelm affects enemies, it gets around the 50 MDF softcap, making it enormously strong on high defense brothers. Frontline shield tanks supported by Overwhelm from elsewhere are extremely durable.
Although the effect is good, Overwhelm can be awkward, and there’s some issues to be aware of.
⊱ You have to out-speed your opponent
This is not always a trivial task. Against slow enemies like Ancient Dead/Orc Warriors you can easily out-speed them without any INI investment. Large Beasts aren’t very hard to out-speed either. Most humans will need you to invest into INI to reliably start out-speeding (100+ after gear is recommended), and Barbs can cheese past you with Adrenaline. Goblins are very hard to out-speed. To be clear, you do not need to be able to Overwhelm every enemy for the perk to be good, but you do need some stat investment (which is an opportunity cost) if you want to be able to use it against more foes.
⊱ Poor synergy with the ‘wait’ command
The ‘wait’ command is a powerful tool at your disposal that gives you more tactical options. Overwhelm forces you to attack on your first action if you want to get value. Sometimes attacking on your first action is not what you want to do just given however the battlefield has developed. This can make Overwhelm awkward.
Furthermore, ‘wait’ command gives you a 25% INI penalty for the next turn order which means that if you wait once it is going to be harder to Overwhelm on the next turn. So Overwhelm very much wants you to attack on your first action and immediately end turn and not ‘wait’. This reduces your tactical flexibility. Relentless negates this issue.
⊱ A dead enemy is better than a debuffed enemy
A dead enemy cannot hit you, and if you kill an Overwhelmed enemy before he attacks then Overwhelm didn’t help you. Since Overwhelm requires you to attack it is common to kill enemies and not get value. This makes it worse against the common weak/squishy enemy types.
Despite the awkward parts of Overwhelm, it can still be a good perk for certain bros or builds to provide general team support because again, the effect is strong. Understanding the weaknesses of the perk can help you know how to use if effectively.
Use Cases
⊱ Anti-slow and heavy units
Units like Warriors, Schrats, Ancient Dead, etc. are slow and often bulky, meaning you can out-speed without INI investment and they may not die easily, removing several of Overwhelms’ problems. Overwhelm can limit these enemies.
⊱ Lower skilled bros: Less likely to kill
Low skilled bros are less capable of getting kills which means they are more likely to be able to get stacks to provide value. However, if a bro has no skill may instead prefer Taunt to protect teammates. Overwhelm can help bros who want to attack with their AP but aren’t the best at killing.
⊱ Fencers
Overwhelm may seem good on a Fencer. It is true that Fencers will out-speed most enemies, but Fencers are also really good at killing, enjoy the “wait” command, and are highly perk starved. You can use it, but skipping it is fairly common by players.
⊱ Polearms/Warscythe
A well positioned Warscythe can sweep across the enemy frontline and provide good damage for your team while also providing good Overwhelm support across multiple engaged targets. INIT investment and Relentless can really help this build.
Backliners have an easier time leveling INIT and picking up support perks due to being in less danger. Being unzoned and highly mobile also helps them find good targets.
⊱ Whips
Whips are commonly combined into Polearm builds for Disarm utility. You can Polearm (5AP) and Whip (4AP) on the same turn with QH, allowing you to throw Overwhelms around at range.
⊱ Dagger Mastery
Daggers/Qatal can attack three times per turn with Mastery which means three Overwhelms. This does not work well with Puncture however due to the very high cost of Puncture spamming.
⊱ Warbows
The community seems to like Overwhelm archery but it has some problems. It is difficult to out-speed enemy range units, Warbows guzzle FAT, Warbows can enjoy “waiting”, Overwhelming far away melee units isn’t useful, and slow enemies usually make poor Warbow targets.
Just because scatter shots can apply stacks to multiple enemies does not make it good because that means you are missing. You should not be trying to miss to get extra stacks.
Overwhelm archery appreciates a high base INI and/or Relentless to work against more targets.
⊱ Set-up bros
Not every bro needs to be a killer. You can build a fast bro who goes early in the turn order to weaken enemy units so that your other bros can get the kills. You can combine this with other debuff skills like Stagger/Daze, or just use it on a fast Warhammer guy (as an example) who Batters down armor for other bros while applying Overwhelms.
⊱ Arena value
The small scale of the Arena makes Overwhelm better there, especially against dangerous high tier enemies.
⊱ Relentless
You can Overwhelm without Relentless, but it does help support it a lot, especially on weapons that eat through FAT. Weapons like Warscythe and Warbow would appreciate the help. FAT neutral builds not as much. Negating the “wait” penalty is great though.
⊱ Nets
Nets work well here because they lower INI, and Overwhelm makes it harder to break out of the Net.
⊱ Anti-Ijirok
Ijirok gets completely owned by Overwhelm.

Lone Wolf (LW)
“Leeeeeroooy Jenkinnsss!”
Description
When no ally is within 3 tiles of distance, gain a 15% bonus to Melee Skill, Ranged Skill, Melee Defense, Ranged Defense, and Resolve.
Summary
+ Provides a ton of stats
+ Multiplies after gains from external factors and perks
− Very dangerous to use, can easily get you killed
− Usually not worth leaving formation to gain this buff
− Being alone leads to RES and FAT problems
Mechanics
≻ A buff bubble will appear on the left of the screen when this effect is live
≻ The RES portion of this buff will multiply +RES Trophies, Lionheart potions, and the Banner buff
≻ Acts like Morale effects, in that it applies after most external factors/modifiers
≻ As such, will multiply gains by shields, Shieldwall, Dodge, Reach, Fast Ad., Fortified Mind, etc.
≻ Occurs before Anticipation in calculating for Anticipation value
≻ Remaining decimals round down
≻ Updates in real time as bros move
≻ Dogs/Allies will not disable LW
Discussion
⊱ That’s a lot of stats, but at what cost?
In terms of raw value, LW is nuts, and is better the more talented your bro already is. For example, if you have 80 MSK / 20 MDF / 50 RES you get +12/3/7 out of LW. If you have 100/40/60, then you get +15/6/9.
That’s a huge chunk of stats, and will be even higher when you count other gains from perks/shield/Banner/etc. However, those stats don’t make your bro un-killable which presents a bit of a problem, because if he’s off Lone Wolfing and gets into trouble then he is very hard to save. Worse yet, attempting a rescue will turn off LW.
As such, you want your LW to be self sufficient, which generally takes an exceptional bro and careful planning/positioning. Otherwise, LW is quick ticket to the obituary.
⊱ LW’s need a lot of Resolve
Going alone has some problems that might not be immediately obvious. Namely, Resolve is a huge concern. Even with LW’s +15% you still need a very high base RES to safely LW without constant risk of morale drops just from enemies walking up to you. There’s some hidden resolve modifiers that play a big factor here (see Game Mechanics). Your LW forgoes his adjacency support and can face a lot of enemies at once for more penalties. In addition, without some clever positioning on your part, the LW is also going to be missing the Banner buff which is another 10+ RES he’s missing compared to normal. I’ve had 60 base RES LW’s drop to Fleeing just from people walking up to them. You really cannot ignore it. 60 minimum, 70+ before LW is recommended which usually means that you are going to have to pick up Mind. You can perhaps get away with a lower base if you don’t mind using Lionheart Potions for harder encounters. If your morale drops then you’ve basically negated your LW bonus.
Your LW will really appreciate if you can position your Banner four tiles away. If you can consistently do this then it does wonders for the RES problems and you can even Rally if there is trouble. However, it isn’t easy to keep the Bannerman in perfect range safely.
Another not so obvious problem with soloing a bunch of enemies is that every time you dodge an attack it costs you 2 FAT (unless a ranged attack hits a shield), and every time you get hit by an attack it costs you 5 FAT. If your LW is fighting many enemies by himself then his FAT is going to go up really fast just from incoming attacks.
⊱ LW builds are perk starved
LW appreciates many perks.. too many. You likely want Mind as already mentioned. Underdog is important as you are going to get surrounded. Defensive and/or escape perks/tools would be good. Recover if needed. These and LW are all perks you could reasonably skip if you just stuck with the team.
Generally, LW just usually isn’t worth the risk associated with trying to make use of it. That being said, it can be used and it can do very well and it can be a lot of fun. I do not recommend playing Ironman when you are first practicing with LW. It will take some practice to know when you can and cannot safely make use of it. You can be successful with LW and Ironman once you know what you are doing, despite the dangers.
Use Cases
⊱ Spin-to-win Greataxe
Normally the 6-tile AoE of the Greataxe is very difficult to use, but this can be a great weapon for a LW who can punish everybody arrogant enough to engage him. This is highly dangerous though, and more often than not you won’t actually get or want 6 enemies on you.
⊱ Riposte: Enemies have no other target
Whether Duelist or shielded, when enemies can only attack you then it guarantees Riposte value. You want a very dodgy bro to make this work, and given Swords’ low damage vs. armor you will need some backup Swords or a different option against heavily armored foes. This is a much safer LW build than the Greataxe.
⊱ Flanker: Harass enemy archers
It is already an effective strategy in some fights to have one of your bros dive into the enemy backline (Adrenaline or Relentless can help). This usually sends the enemy ranged AI into disarray. LW can be a good addition to this build. This build can work very well in Goblin fights with the Goblin Trophy to prevent rooting (and Resilient to protect from Flies).
⊱ Pre-battle formation
You can set-up LW from the start of the fight by putting all of your units on one side and the LW on the other. When fighting 30+ enemies, the overflow enemies will spawn on the top section of the map which is the left side of your formation. Position your LW accordingly on the left if he is to deal with that, or the right if he should be away.
⊱ Wars and ally units
Your own Dogs and ally units will not turn off LW, so in the Noble/Holy War and sometimes in the other Crises you can get LW value with much greater safety by hanging around a friendly squad.
⊱ Super tank: Distract large portions of the enemy team
This is one of the easier ways to make use of LW. LW multiplies shields/Shieldwall gains as well. Super tanks want to be engaging as many enemies as possible to help ease pressure on teammates. An easy way to do this is to have your LW tank jump 4 tiles forward at the start of the fight and let enemies surround him and your team can deal with the overflow. Then when the rest is mopped up your team can go ‘rescue’ your tank. A build like this can do well in Monolith to stall the northern enemies, though the LW will probably die there unless the rest of your team is fast.
⊱ LW should have an escape/defense plan
Whether it is running away through FW, or QH Smoke Bomb (Recover recommended), or hunkering down under a shield, LW’s should have a plan in case things go bad in order to buy time for a rescue.
⊱ DEF stacking: LW multiplies last
LW can achieve crazy defense scores because it boosts after Shield Expert, shields, Dodge, Reach, etc. It is a good idea to use these if they can work on your build.
⊱ The Lion: Glorious Resolve makes LW easier
The Lion (Gladiator origin) is a great candidate for some LW fun, as his stats are great and his trait negates any Resolve concerns without needing Mind, freeing up a perk slot.
⊱ Sunken Library: Phylactery buster
The Library encourages spreading a few team members out to go bust the Phylacteries. Having LW can help when dealing with Skulls or Apparitions. LW can even help an archer shoot elevated Phylacteries.
⊱ Archers: LW is awkward
Although the huge RSK buff might seem exciting, it is pretty hard to get good value here on an archer. If you position him off left/right to start with the buff then he is rather exposed, so he will need to be able to take care of himself when he gets jumped. This means he probably needs to be a hybrid, which is stat/perk demanding enough without needing to deal with LW’s dangers. LW can help you skimp on Skill for more defensive/Resolve investment, but doesn’t that defeat the purpose of using LW on the archer to begin with?

Underdog
“Your overconfidence will be your downfall.”
Description
Any defense malus due to being surrounded by opponents no longer applies to this character.
Summary
+ Indirectly provides highly valuable MDF
+ Very good on bros on the edge of your formation
+ Still decent on interior bros
+ Stronger the more danger you are in
− Provides no value in 1v1 situations
Mechanics
≻ Normally, each case of surrounding provides a +5% chance to hit. See Backstabber if you need to see how surrounding works
≻ Underdog and Backstabber cancel each other out, giving normal surround effects when both are in play
≻ Worth 5 avoidance against two opponents, 10 avoidance against three opponents, and so on
≻ Does not provide extra benefit against enemy 2-range Polearm strikes compared to direct melee attackers. Again, see Backstabber if you don’t know how surrounding works
Discussion
⊱ Underdog value is easy to get
Underdog is a good pick on any frontliner due to increasing returns from defense (see Game Mechanics). Out of all of the MDF perks, Underdog is the one with the least strings attached. You will find yourself against multiple enemies all the time and Underdog will be consistently useful. How useful does depend on where your bro is in your formation.
If you run a standard connected frontline then your interior lineman will never be facing more than two enemies at a time (unless you break formation). In this scenario Underdog is going to be providing you only 5 defense because you can only ever be engaged by two enemies. 5 defense for a perk point is still valuable just because defense is so strong, but you may want to compare this to other defensive perks like Dodge/Reach which can beat 5 defense, or even Gifted which is only 3 defense but gives other stats as well. There is nothing stopping you from using multiple or even all of these to just stack your defense as much as possible, but if you are tight on perk space then Underdog may not be your best pick here so long as you maintain formation.
You can’t really go wrong with Underdog because defense is so valuable. A unit that is surrounded by multiple enemies is exactly the unit that wants to have a bunch of extra defense to survive that dangerous position. In that regard, Underdog gives more value the worse the position becomes, and that’s a nice trait to have.
⊱ Underdog shines on the edge
Edge bros however really enjoy having Underdog. Depending on how you deploy your formation, your edge bros can face three or four enemies. That would be 10 or 15 defense from Underdog which is huge. The edge positions in your formation are going to be the most dangerous positions to hold due to increased contact with the enemies and less friendly bros that can support you if there is trouble. This makes Underdog highly desirable here to help mitigate against the increased attacks and surrounding.
Unique formations can provide more opportunities for good Underdog value. For example, you can run a four front – eight back formation where none of the frontliners are connected. This means every frontliner can be engaged by four enemies. The advantage of a formation like this is that your frontline has a lot of freedom to do AoE attacks, and enemies that jump into the pockets between your frontline are also going to be very vulnerable. The disadvantage of this formation is that your backline range units can get zoned from the front and your four frontliners take a lot of pressure.
Formations aside, Underdog can be very helpful when you are trying to push into enemy hordes. You can’t always just stand around and let the enemies walk into you. When pushing into enemy lines it is very nice not to have to worry about giving the enemy extra accuracy. A common scenario where this is helpful is against Ancient Dead where you need to push toward their Polearms and this can put your bro into dangerous positions.
⊱ Are there any downsides?
Underdog’s only real downside is that compared to other defense perks, it doesn’t provide any value in 1v1 situations. Early in a fight before all of the units bunch together or late in a fight when there are less enemies remaining Underdog may not be providing any value. Compare to perks like Dodge/Gifted/Shield Spec which will always* be providing value.
Inner formation Underdog is usually only worth +5 defense, which can be beat by other perks if you are tight on space.
Use Cases
⊱ Tanks: You want to hold dangerous positions
Underdog is an easy pickup here. Tanks want to hold down dangerous positions so that other teammates don’t have to. They want to be surrounded so that they can draw in more attacks. They want Underdog to help protect them when they do get surrounded.
Further, Tanks can very easily get over the 50 MDF soft cap (see Game Mechanics if you don’t know what that means). Since Underdog doesn’t actually increase defense but rather decreases opponent’s skill it gets around the soft cap, making it extremely valuable on any tank who already has enormous defense.
⊱ Edge bros
Underdog is far more valuable on the edge. You should know who on your team wants to hold the edges and who on your team wants the safety of the interior rather than just randomly placing your frontliners around.
⊱ 2Hander AoE: 3+ hit AoE requires being surrounded
The three tile AoE sweeps from the Greatsword/Hammer and the six tile sweeps from the Greataxe/Flail require you to be engaged by 3+ enemies to get full value on. If you are engaged by 3+ enemies than Underdog is worth 10+ defense. This makes Underdog a great pick for AoE bros that want to make the most of their AoE skills.
⊱ Fencers: More security on Lunging
Fencers are rather perk starved and you can run them without Underdog for sure, but having it is nice for the extra security, and it means you don’t have to be so careful about where you are Lunging around. Depending on how you want to play your Fencer, Underdog might be very good for you.
⊱ Lone Wolf: Underdog is an easy pick
If you are trying to Lone Wolf then you are very likely going to get surrounded by multiple foes and will very much appreciate having Underdog’s defensive support.
⊱ Anti-Serpents: Defend against their core strategy
Serpents want to grab bros and pull them into bad surrounded positions. They also have Backstabber. Underdog is good to help counteract their plans so that your grabbed bros have a better chance of surviving.
⊱ Misconception – Underdog is an auto-pick on every frontliner
No. Now I’m not saying this is a bad idea because the perk is good and consistently useful and it is nice to not have to think about surrounding, but interior lineman may benefit more from other perks.

Footwork (FW)
“Float like a butterfly…”
Description
Unlocks the Footwork skill which allows you to leave a zone of control without triggering free attacks.
Summary
+ A handy escape tool for vulnerable brothers
+ Can be used offensively in creative ways
+ Can allow you to be more aggressive, knowing that you have an out
− Expensive to cast, you may not have enough FAT when you most need it
− With smart play and good positioning it usually isn’t needed
− Unlike Rotation, only saves yourself rather than being able to save others
− Similar effect achieved by QH with a Smoke Bomb
Mechanics
≻ Costs 3 AP and 25 Fatigue
≻ Can be used multiple times per turn, AP/FAT allowing
≻ Can move up or down one height elevation
≻ Ignores Zone of Control
Discussion
⊱ Footwork provides insurance and peace of mind
FW is a nice escape tool to have on fragile bros that may find themselves in danger if you aren’t confident in your positioning game. If you have a good understanding of positioning and how the AI works then you can skip on FW for better perks.
Generally speaking, people like to put FW onto their range units. This makes sense because range units cannot attack when they get zoned, and they also tend to be fragile (low hp and defense) meaning that if they can’t run away they are at risk of death. If you are worried about keeping your range units alive then FW is definitely something that can give you some peace of mind.
⊱ Some tips for keeping your backline safe without FW
There are a few enemies in the game that are of higher threat to your ranged units than most. Orc Warriors like to push your team around and jump into fragile backliners. There are a number of ways to control this. A tight formation is a good defense here. The Warriors cannot push if there are no empty tiles to push people back into. This means a tight formation cannot be pushed around except through the edges, and your archers should be in the interior back. Indomitable, Taunt, and/or Nets will prevent Warriors from pushing and should be used to control the edges. You can also use Spearwall to delay the Warriors contact. Understanding Warrior control is the biggest step to safely skipping on FW. If you aren’t confident in your Warrior game then don’t get greedy and just use FW.
There are other enemies like Unholds, Wolfriders, and Necrosavants that could potentially reach your vulnerable units, but there are means to control these enemies as well and you shouldn’t even have archers deployed against Necrosavants.
Understanding how the AI works makes FW less relevant as a panic button because you will get better at preventing those panic scenarios from happening in the first place. Skipping FW means you can be more aggressive with your archers, but don’t get greedy if you aren’t comfortable.
⊱ FW can enable aggressive playstyles
FW allows you to be more aggressive in some cases. Knowing that you have it as a safety option means that you can take more risks. Without FW, if a Warrior is threatening to get around then you need to deal with it somehow. If you have FW then it puts less burden on your teammates to solve your problems which can be valuable.
You can be very aggressive with 2Handers and/or Polearm users that have poor defense by having Footwork to get out of any halfway dangerous situations. You can do this with other weapons as well but the AP synergy isn’t as good. Polearms enjoy having great mobility already, and FW adds to that arsenal.
Essentially, rather than thinking of FW as a panic button, you are thinking of it as a justification to hold your ground because you can always get out if needed.
Use Cases
⊱ Escaping danger
Any unit that you think might be getting themselves into danger and you want an escape ability can make use of FW. This can include frontliners. Getting stuck in a bad position is the highest cause of death. FW can let you get away.
⊱ Frontline Throwing: Bounce back and Throw
If you want to use a frontline Thrower who isn’t also a melee hybrid then FW can be a way to get him out once the enemy makes contact. Rotation can also work here.
A very FAT expensive means of fighting Chosen is to have Throwing and FW. Non-Cleaver Chosen cannot move twice and still attack. You can use this to your advantage. If you are in contact with a Chosen then you can FW back, throw a Javelin at him, and then move 1 tile back (Pathfinder recommended) for 9AP. This ends your turn 3 tiles away from the Chosen and he cannot hit you. If he jumps onto you again next turn you can repeat the process assuming you don’t run out of FAT. Be careful of the Chosen having Adrenaline though. You do not want to use this strategy expecting you will never get caught with an attack.
⊱ Kiting: Make enemies chase you across the map
Polearms are already a good kiting weapon due to the their reach and 5AP costs. Add FW into the mix and you can reasonably kite enemies around. Pathfinder is recommended, of course. People have run full Polearm teams capable of clearing fights without taking damage by careful positioning and kiting.
⊱ Repositioning: Ignoring ZoC can let you improve your position and/or flank
Rather than escaping, you can use FW to dance around a mothball of units ignoring ZoC and getting into more favorable positions to reach certain enemies or use AoE skills. A flanking unit can use this bounce over to a Necromancer or vulnerable backliners such as Gunners. 2Handers have better synergy here since they attack for 6AP and can FW for 3AP.
⊱ Spearwall: FW can let you reset
If your Spearwall gets breached and you have enough FAT, you can FW back and put the Spearwall back up. With Recover and Adrenaline in the mix you can easily keep up a permanent Spearwall like this. You might want a backup Spear in case your first one starts breaking.
⊱ Fencing: FW is not very practical
It might seem like FW is a good idea on Fencing to setup Lunges, but the cost in AP/FAT makes doing so very impractical and it will just make you Fatigue out faster and weaken your Lunges. You would be better off just doing two regular slashes than a FW into Lunge. You can use FW if you want some extra safety insurance for your Fencer, but using it to setup Lunges is impractical.
⊱ Anti-Mortar: Escape the target zone
As Mortars give you a clear visual indicator of where they are going to land, you want to get away if possible. This can be difficult if you are zoned, and you may not have time to “wait” for other bros to help. Footwork gives you an easy out.
Mortars do pretty low damage, so while you could just eat the Mortar, you would like to avoid the morale check and the Shellshocked status if you can.
⊱ Smoke Bombs: Anyone can Footwork now
The new Smoke Bombs step on FW’s shoes as an escape tool. Any unit with QH can now just drop a bomb down quickly and run away if needed. Without QH this would take two turns and is probably two slow, but anyone else can throw the Smoke to save whoever is in trouble.
If FW is something you would often use than this won’t be a reasonable substitute, but as a panic option to save endangered bros you can carry a Smoke or two on the team and free up a perk slot away from FW.
⊱ Misconception – All backliners should take Footwork
No. Your Polearm bros can be built to take some pressure if necessary, and you can protect your archers well enough without FW if you know what you are doing. Use FW if you like it, but you shouldn’t feel like it is forced.
TIER 6


Berserk
“You won’t like me when I’m angry.”
Description
Once per turn, upon killing an enemy, 4 Action Points are immediately regained. Characters can not regain more than their maximum Action Points and no more than 4 for a single attack.
Summary
+ One of the best perks for your damage dealers
+ Does better in the larger/more dangerous encounters
+ Can use the extra AP for defensive skills or mobility as well
− Need Fatigue to make use of the extra AP
− Can be wasted if there are no targets, FAT, or useful things to do with the AP
Mechanics
≻ Effectively allows you to have up to 13 AP, which is enough for three 1Handed strikes or two 2Handed strikes
≻ Can only proc once per turn, even if you kill multiple enemies at once
≻ Does not proc on opportunity attacks against fleeing enemies
≻ Can be followed by Recover if you get back to 9 AP
Discussion
⊱ Berserk is the premier offensive perk in the game
The nature of the game really favors Berserk for two big reasons. One, later in the game you are consistently outnumbered by larger enemy parties. Two, most enemies can be killed quickly by high tier weapons. This combination makes Berserk one of the best perks in the game for fighting the large and difficult battles you will find later on. Berserk tends to heavily outclass other damage perks in these battles (though it also works even better with other damage perks), because it greatly increases the speed in which you can dispatch the enemy party. Faster killing means less danger for your team.
Most enemy compositions will feature plenty of easy to kill enemies with maybe a few elites to go along with them. Since elite enemies generally aren’t scary without an entourage to back them up, mowing down their less durable troops essentially wins the battle.
The extra AP from Berserk can be used for more than just extra attacking. You can use it for mobility or repositioning for next turn. You can use it to swap a weapon for next turn. You can use it to cast Recover for next turn. You can use it to cast defensive skills like Indomitable or Shieldwall. AP is the lifeblood of your turn, and Berserk lets you get 44% more turns in a loose sense.
⊱ There are some weaknesses to be aware of
There are a few things to keep in mind on Berserk however. It does not do very well in certain battles where you face a small number of durable enemies. For example, in a fight against six Schrats it is not very helpful except to clear out the saplings. Similar deal against Unholds and Lindwurms. Not that Berserk is bad in these fights, but there are limits.
Berserk also burns through your FAT faster. If your FAT is capped out then you will not be able to attack with your Berserk AP.
There is diminishing returns on Berserk across the party. There are only so many enemies that you are going to be capable of killing each turn so if you have 12 Berserks then you will not be able to proc all of them.
Finally, Berserk depends on being able to consistently hit and kill things. Bros with lower skill might be better served with accuracy boosting perks than Berserk.
Use Cases
⊱ Damage Dealers: Berserk greatly increases damage dealing
Berserk allows 2Handers to attack twice per turn instead of once, potentially doubling your damage output. 2Handers also have no trouble getting kills.
Duelists are another of your primary damage dealers and really enjoy Berserk. You can attack three times per turn or twice with some room to move around. If you use Recover then you can Berserk into it for greater efficiency.
All forms of ranged units are very good at dealing damage and enjoy having Berserk, except for the Handgonne where the AP and targeting is clunky which can make it difficult to capitalize on Berserk gain. If you begin the turn loaded and get a kill you can do a double blast which is pretty good, but if you are unloaded at the start the AP can only be used for repositioning.
Polearms can attack twice and move one tile with Berserk, giving them a large amount of flexibility and ability to find targets to take advantage of the extra AP.
⊱ Shield bros: Berserk is not a priority
While you can technically use Berserk with shields, it isn’t really the role of your shield guy to be getting kills, so he probably has batter perks he can be taking instead.
⊱ Legendary locations: Berserk shines
Monolith, Goblin City, and Sunken Library are the largest fights in the game. It is good in the other fights as well with the exception if Ijirok where it is useless. There are also a lot of large camps like Sea of Tents where Berserk shines. Berserk is better in many of the hardest fights in the game.
⊱ Killing Frenzy synergy: They proc on the same condition
Both Berserk and Frenzy proc on a kill, so it makes sense to use both together. The Berserk AP allows you to immediately attack again with a Frenzy buff.
⊱ Anti-Overwhelm synergy: Their value condition is at odds
Not that they cannot be used together, but to get Overwhelm value you need to have not killed your target and to get Berserk value you need to kill your target so they are at odds with each other. One exception is that Berserk + AoE Overwhelm can let you dole out multiple Overwhelm stacks while still nabbing a kill.
⊱ Recover support: Berserk into Recover
With 4AP weapons you can nab a kill and then use the Berserk AP to user Recover, which is an excellent use of a turn if your FAT pool is capped out. You can of course use Berserk without Recover, but if you are worried about this bro running out of steam then this combos nicely.
⊱ Misconception – Berserk is an auto-pick on every damage dealer
No. Due to diminishing returns from Berserk across the party as well as its other limitations that I described, it is completely fine to skip Berserk on some bros. For some bros it just doesn’t make a ton of sense to use Berserk such as bros with very poor FAT, shield bros, Overwhelm bros, or setup bros who are designed to help other bros proc Berserk rather than proc it themselves. An example would be a speedy Hammer guy who smacks enemies down the turn order with Stagger while stripping their armor so that your other bros can grab the kill and Berserk.
You will likely have a lot of damage dealers with Berserk, but it doesn’t have to be the whole roster.

Head Hunter (HH)
“One shot. One kill.
Description
When you hit the head, gain a Head Hunter stack. With the next attack you are guaranteed to hit the head if you hit. Stack is removed whether you hit or miss.
Summary
+ Increases damage output
+ Better against lightly armored enemies
+ Guaranteed headshots allow for precision targeting for high value
− Can actually make your bro worse at dealing damage
− Headshots are weaker than you expect
− Value is mitigated by Steel Brow enemies
Mechanics
⊱ Effective Headshot% gained from HeadHunter
| Base Chance | Mean w/ HH | Eff Increase |
| 25% | 39.6% | 14.6% |
| 30% | 45.9% | 15.9% |
| 35% | 51.6% | 16.6% |
| 40% | 56.9% | 16.9% |
| 45% | 61.9% | 16.9% |
| 50% | 66.6% | 16.6% |
Base chances by weapon:
- 25% ─ Base chance for most weapons.
- 30% ─ Base Juggler, most 2-tile reach weapons, 2H Swords, Throwing Axes.
- 35% ─ Base Killer on the Run, 1H Flails.
- 40% ─ 2H Flails, Juggler/Killer with other weapon bonuses, Famed items.
- 45% ─ Juggler/Killer with other weapon bonuses, Famed items.
- 50% ─ Killer with 2H Flail, Famed items.
⊱ AoE and 3HF mechanics: Can only gain one stack per action
HH works same as FA here. Your action can only gain HH once, regardless of when that happens. When HH is gained, the next target will be guaranteed to headshot (if it hits) and the stack will then be removed either way. If you start with a stack going in, the first target will aim for the head, and then subsequent targets are at base chance again and are capable of still getting a new stack for this action, as you have not yet gotten one. This logic also applies with the Handgonne.
⊱ Other mechanics
≻ A buff bubble will appear in the left side of the screen when you have a stack primed
≻ Does not stack upon itself. Hitting the head with the stack will remove it and bring you back to normal chances
≻ Missing will consume the stack
≻ Stack persists through use of QH
≻ The headshot modifier is the very last thing to apply in the damage formula. This makes headshots weaker than expected, which disfavors HH. See the Game Mechanics section for clarity
≻ The normal headshot modifier is 1.5
≻ Brute increases the headshot modifier by .15
≻ 1H Axe increases the headshot modifier by .5
≻ Is not effected by the secondary hit of Split Man from 2H Axes, but the primary hit follows normal HH logic
≻ Ifrits do not have heads to damage and have Brow (if that even matters), so HH is functionally irrelevant against them
Discussion
⊱ HH is a respectable damage perk now
HH got reworked in BD and is no longer as dubious/weak as it was in the past. Now it can serve as a damage perk that should be considered with and against the likes of Executioner and Frenzy.
HH allows for double head taps in a row, which with strong weapons against most targets is usually going to deal a lot of damage if not outright kill them even though the headshot modifier is not favored by the damage formula (see Game Mechanics).
Generally speaking, you want to kill enemies either through repeated body hits or repeated head hits, and not a combination of both. Normally the rarity of headshots can make them prohibitive to actually killing enemies as they have a healthy helmet to absorb the blow. HH allows bros to hit the head twice in a row which helps get around this problem.
The best weapons to use HH are going to be those with high armor ignoring damage (AID). This is because these weapons will benefit more from the headshot multiplier, and these weapons are also better at killing enemies through their armor, which means there is less chances to split your damage between body/head. Weaker weapons are negatively impacted by having HH.
To illustrate, the following are some example bros vs. Chosen. Score is mean hits to kill with an without HH. No other perks are in play unless mentioned. Unique weapon logic is in play.
Bros vs. Light Chosen (145/140)
| Loadout | Baseline | HH |
| Winged Mace – Duelist | 6.28 | 6.12 |
| Head Splitter – Duelist | 5.69 | 5.39 |
| 2H Flanged Mace – Cudgel | 2.66 | 2.53 |
| Greatsword – Overhead | 3.19 | 2.96 |
| Heavy Xbow – Mastery | 3.9 | 3.71 |
| Warbow – Quick Shot | 7.07 | 7.18 |
Bros vs. Heavy Chosen (190/230)
| Loadout | Baseline | HH |
| Winged Mace – Duelist | 7.88 | 7.6 |
| Head Splitter – Duelist | 7.11 | 6.7 |
| 2H Flanged Mace – Cudgel | 2.94 | 2.75 |
| Greatsword – Overhead | 4.39 | 4.2 |
| Heavy Xbow – Mastery | 4.79 | 4.48 |
| Warbow – Quick Shot | 10.79 | 10.82 |
Chosen wouldn’t exactly classify as a weak enemy in terms of durability, but we still get HH value on most of our test weapons here. Warbow is looking sad, but you generally aren’t shooting Chosen with Warbows anyway. It does help demonstrate a case of HH being bad however, so avoid using it on weaker weapons (Warbow is still fine as you generally target squishy enemies).
⊱ HH allows for smart targeting for high value
Calculator tests aside, BB is a dynamic game, and we can be smart players. Since having a HH stack guarantees that you will hit the head on your next strike (if you hit), you can purposefully alter your targeting to get the best value out of the stack, and actively avoid attacking enemies who have large helmets still. In this regard, HH can be a lot more valuable than a sandboxed calculator test can show. Reach weapons and ranged weapons benefit more from this as they have a little better freedom on available targets.
⊱ HH can make your bro worse: Splitting damage between head/body is not good
Weaker weapons can still actually be hurt by HH, as a double headshot is not enough for them to deal enough damage and they struggle punching through armor (i.e. shieldbros). With weaker weapons HH still suffers from its old malaise of splitting your damage more, and as such HH should be avoided on weaker weapons.
Heavily armored enemies can also neuter HH’s effectiveness. Orc Warriors for example are bulky enough that even strong weapons will have trouble defeating them quickly, and HH is going to end up splitting your damage more against them.
⊱ HH appreciates high skill: value is lost on miss
Missing wastes your HH stack, which can lead to more split damage which s the opposite of what you are trying to achieve. This makes HH better on bros who have high skill to reliably land their two consecutive shots. Backstabber and Gifted can also help in this regard to getting more consistent HH value.
⊱ HH is mitigated by Brow
Another problem with HH is Steel Brow, and a decent chunk of enemies have it. Brow negates headshot bonuses and this makes it harder to get your quick kills and HH value.
The following enemies have Brow: Ancient Dead (all except Savants), Unholds, Schrats, Kraken, Tentacles, Ijirok, Ifrits, Bannerman, Sergeant, Zweihander, Swordmaster, Master Archer, Wardogs, Nomad Blade Dancer Stalker, and Executioner. It is worth noting that Dogs and Sergeants have no hat so HH is still good there. Master Archers can have no hat or a Hunter Cap so it is fine on them as well.
Head Hunter (continued)Use Cases⊱ Damage perk stacking
HH enjoys damage bonuses such as Executioner and Frenzy to further lay in the damage.
⊱ Ranged weapons: Easier time finding good targets
Ranged weapons have the luxury to choose targets easier than melee units can, meaning they can better use HH to bully the enemies that deployed with crummy hats.
Crossbows and Heavy Javelins have high Ignore% with their respective Mastery (and Duelist for Javs). HH is great on these weapons.
Warbows are less clear. HH is useful against Goblins, low armor or naked Orc Young/Berserker, most human range enemies, and the not too uncommon human melee units who deploy with weak hats. These are all priority targets for Warbows so HH makes some sense here.
HH can be irrelevant to detrimental against armored targets, but Warbows generally don’t want to be shooting armored targets anyway, so this may not concern you much.
HH is not very good on the Handgonne, given your general lack of control on the AoE and the Handgonne’s poor AID.
⊱ Sling: Daze memes
The Sling can apply ranged Daze status when it gets headshots. As HH guarantees a headshot, you can use that to swap in a Sling for a ranged Daze.
⊱ 2-Tile teach weapons: More options to target
Similar to ranged weapons, reach weapons have some flexibility on who they are able to target. Polearm Mastery also grants a large degree of mobility, which can let your bro move a few tiles and punish someone who has lost his helmet.
⊱ 2H Mace: High damage and high AID
2H Mace has probably the highest AID in the game and is even capable of one shooting Raiders/Footman depending on their armor loadout. HH can work here.
All endgame 2Handers have the damage potential to gain HH value.
If you wanted to do a build that attempts to injure Orc Warriors on first hit then HH can help. With a stack primed for a headshot and CS, you would have a 66-100% chance of a first hit injury on Warriors, depending on their armor loadout. If Frenzy is up it is guaranteed.
⊱ Duelists: Damage perk stacking
High AID Duelists like Mace can make use of HH. Fighting Axe and Head Splitter gain a slightly larger boost from HH than other Duelists. Low AID Duelists like Swords should not use HH.
It is worth nothing that Winged Mace with HH still tends to outperform Fighting Axe with HH, even though the Fighting Axe derives more benefit from the perk.
⊱ Brute: HH is not automatically good here
HH can help capitalize on the Brute modifier, but Brute also lowers accuracy which can lead to more wasted stacks. Use it if you can (and it makes sense for your bro/weapon), but be mindful of your accuracy.
⊱ 1H Flail: HH is fantastic
The Flail can use Lash to setup HH stacks, after which you can use the regular attack and thus always be hitting the head without having to pay Lash’s 19 FAT cost every attack. Flail Duelists will benefit a lot from this.
The Flail can also be used to setup much more powerful weapons with HH stacks. You use Lash to setup your stack and then QH to a different weapon to capitalize. A couple of noteworthy options include the Billhook which is 5AP with Mastery, 2H Cleavers for a big headshot Decapitate, or a Fighting Axe/Head Splitter to capitalize on the Axe bonus.
You can also save the stack for next turn and use it for a big 2H Mace shot, but this usage is more cumbersome than the prior options.
⊱ 3HF and AoE: HH is awkward
The 3HF cannot do the same shenanigans as the regular Flail, because the 3-hit combo makes Hail unable to prime your stacks, as the stack is gained and lost before Hail finishes yielding no stack. HH is quite bad on the 3Head even though the 3Head really wants to spam Hail constantly, because it just doesn’t work for it.
AoE can be awkward as well, as the group targeting can make it difficult to get the target you want to hit with the stack while the stack is primed.
⊱ Injury delivery: HH increases injury rates
HH on appropriate high AID weapons tends to increase first injury rates with or without CS considered, compared to the same weapon/build that doesn’t have HH.
⊱ High base headshot chance: HH compliments it
Having a higher base headshot chance via background, weapon, or famed weapon works well with HH (usually). For example, a Killer on the Run with a Berserk Chain would have an average 66% headshot rate. The higher your base headshot chance, the more relative gain (to headshot chance) that you get from HH.
Having a higher innate headshot chance helps you prime more stacks for guaranteed headshots and continue to feed into itself throughout the battle.
You do still want to be using a weapon that makes sense for HH. Just because you got a famed Spear with +13% headshot chance doesn’t mean HH is good on it.
⊱ Anti-Goblins: Goblins are vulnerable to one hit kills
Goblins have low armor and low HP which makes them especially vulnerable to one hit kills compared to other factions in the game. HH is good against Goblins and can increase the odds of one hit kills for many weapons.
For example, Warbow can benefit a lot here. The %chance of a one shot kill vs. an Ambusher with Quick Shot goes from 23% to 43% with HH. Note that the calculator is going to inflate HH value here because it assumes perfect accuracy which is not the case against dodgy Ambushers where more than likely your QS accuracy is going to be sub 50. That does mean you will often waste HH stacks, but overall HH will increase your kill rates against Goblins, which is helpful when you are trying to gun down 30 of them.
⊱ Accuracy perks can help improve HH consistency
As stacks are lost on missing, picking up Gifted and/or Backstabber can increase your returns on HH by reducing your odds of missing. Fast Ad. doesn’t help HH much as by definition you must have hit something to have gained a HH stack, meaning you won’t have any FA stacks to support the next strike.
⊱ Smart targeting: Specifically target enemies with poor headgear and avoid high armor
To reiterate from the main section, smart targeting can go a long way to improving HH value.

Nimble
“Don’t answer to twinkle toes, it’s not manly!”
Description
Hitpoint damage taken is reduced by up to 60%, but lowered exponentially by the total penalty to Maximum Fatigue from body and head armor above 15. The lighter your armor and helmet, the more you benefit.
Summary
+ Grants large passive damage mitigation
+ Provides resistance to injuries
+ Enables late game light armor builds
+ Nimble armor is cheap and easy to loot
+ Protects against burst damage and damage going through armor
− Vulnerable to focus fire and damage over time (DoT)
− Sustained burst damage is less common than repeated attacks
Mechanics
≻ Formula: 0.4 + (FAT penalty above 15)^1.23 × 0.01
▹A 20 FAT penalty gives: 0.4 + 5^1.23 × 0.01 = 0.472 (displays as 47%)
▹For 15 or less FAT penalty, Nimble value is 40% (60% reduction)
▹For 43 or more FAT penalty, Nimble offers no protection
▹Nimble value drops off exponentially, rewarding low FAT penalties close to 15 (see table below)
≻ Only mitigates HP damage
≻ Nimble damage reduction is more valuable because it occurs early in the damage calculation, before the 10% reduction from remaining armor and before the critical multiplier
≻ A left screen tooltip displays the Nimble value
≻ Neither the Brawny perk nor the Strong and Fat traits affect Nimble but armor attachments that alter FAT penalties do
≻ Nimble does not reduce damage from DoT effects, but may help avoid sustaining them since bleeding/poison can only be inflicted with attacks that deal 6+ hp damage
≻ Does not mitigate Miasma or Fire Pot damage

Discussion
⊱ Nimble makes late game light armor builds viable
Nimble used to be hard to play with but since the B&E DLC it has been reworked to give light armored characters a fair chance at survival even up to the late game. Without it, light armor wouldn’t provide enough protection and heavy armor, as in the past, would dominate.
⊱ Nimble is economical and has an immediate impact
Nimble characters only need early Raider equipment which, unlike heavy armor, isn’t expensive or difficult to get and repair. Since only very heavy armor can compete with Nimble, and it takes a long time to acquire heavier armor, Nimble is one of the strongest perks in the midgame. Because light armor stinks without Nimble, Nimble has one of the highest returns on perk point investment.
⊱ Nimble extraordinary HP damage reduction is tied to FAT penalty
Nimble reduces the amount of HP damage received. For example, an unarmored character with 40% Nimble (60% reduction) effectively has 2.5 more HP (1 ÷ 40% = 2.5). To put that in perspective, Colossus is a good perk and it is only worth 1.25x HP.
This reduction also takes place before the 10% remaining armor mitigation and the critical multiplier, effectively decreasing HP damage taken even further than advertised:
- Heavy Crossbow with Mastery (Arbalester) vs. 105/95 (Head/Body)
- max armor damage roll of 53 (70 x 75%) & max HP damage roll of 49 (70 x 70%)
- ⇾ no reduction: 44 damage (49 – 4.2) or 65 critical ((49 – 5.2) x 1.5)
- ⇾ 40% Nimble: 15 damage (49 x 40% – 4.2) or 21 critical (((49 x 40%) – 5.2) x 1.5)
Final damage always rounds down.
In this example, the effective Nimble value is closer to 33% than 40%! As armor is lost the value will slide back up to 40%.
Since Nimble reduces incoming HP damage, increasing it with perks like Colossus and Gifted will improve a character’s staying power. In that regard, aggressively leveling HP and grabbing Colossus will go a long way to make Nimble better for you. How much you care will depend on the bro’s role. A front liner expecting to see a lot of danger would like as much HP as he can reasonably get. A safe back liner can get away with less.
Nimble gets exponentially worse the higher the FAT penalty, so best keep close to the 40% value. Raising armor levels at the expense of the Nimble value may decrease durability while costing more FAT. As a general rule, the higher the HP the better 40% Nimble gets.
⊱ Nimble can almost double a bro’s staying power
The following table shows the simulated mean hits for a mix of thirty five enemies to kill a character with various HP and common 105/95 (head/body) armor (no attachment), with and without Nimble.
| HP | Default | Nimble | Diff. | Diff% |
| 80 HP | 3.43 | 6.05 | 2.62 | 76% |
| 100 HP | 3.82 | 6.93 | 3.11 | 81% |
| 120 HP | 4.18 | 7.79 | 3.61 | 86% |
This example illustrates how strong Nimble is for light armored characters, with the returns increasing the higher your hp. The difference in power between a level 6 character without Nimble and a level 7 (when it can first be picked) character is huge. Only Indomitable can achieve such results but not passively.
⊱ Compared to heavy armor/Forge, Nimble is weak to spam damage, DoT, Split Man and Fearsome
Repeated weak attacks being more common than single heavy ones, Nimble tends to be, on average, slightly less durable than 300/300 Forge.
When facing Goblins, for example, Nimble will provide excellent protection against the occasional heavy bolt or puncture but it will not perform well against a rain of arrows and Bolas. Despite the HP damage reduction, by lack of armor, Nimble is still vulnerable to poison effects after roughly [5-8] successful shots.
DoT effects like bleeds from Cleavers and Webknecht poison deal fixed HP damage over a certain amount of turns. This duration can be reduced with Resilient but the damage itself cannot be resisted by Nimble (only Indomitable). Since every HP point is worth more with Nimble, DoT particularly hurt it. Bleeds can be inflicted not only by Cleavers but also by Whips, Jagged Pikes and Irrlicht (Kraken) attacks. Ancient Priests Miasma and Assassin Firebombs are also not mitigated.
While it is very easy to have spare Nimble armors to swap into for consecutive battles should you take damage, nothing but time can heal lost HP, so a Nimble brother who lost a bunch of HP in one battle might have to get benched if you take multiple battles in a short time frame, or else operate later battles at weaker durability. Usually this isn’t a big issue, but some contracts (i.e. Undead Siege) don’t give you much breathing time between battles.
The BD Fearsome buff is a concern for Nimble, who tend to get chipped for small hp damage through armor early. Nimble bros will face more Fearsome checks than forge bros.
Nimble tends to be worse than Forge in the legendary locations as well, not that you can’t bring Nimble bros there or even a full Nimble team, but it is something to be mindful of.
The next section deals with the question of finding the best Nimble armor setup.
Use Cases
⊱ Mid game ─ a power spike
Nimble has a tremendous impact on light armored characters and it can reasonably be accessed by day [30-40]. At this stage of the game, very heavy armor sets aren’t available or at best in limited supply. Nimble makes do with cheap gear offering immediate return on the investment and beating most of the then available heavy armor options.
High HP Nimble stays competitive throughout the whole game.
⊱ Armor attachments ─ Bone Platings preferred
Arguably, the best armor attachment for Nimble is Bone Platings (BP).
◦ BP do not add to the FAT penalty and completely absorb the first sustained hit.
◦ Durability attachments usually aggravate the FAT penalty and, by reducing Nimble effectiveness, do not actually increase a character’s staying power.
◦ Light Padding Replacement (LPR) can improve Nimble value with heavier armors, but it’s usually better to wear a lighter armor with BP instead.
◦ Unhold Fur Cloak (UFC) is the best choice against Goblins, especially when facing the hordes of the Goblin City, but the crafting materials compete with AFP, which Forge really wants.
◦ Hyena Pelt Mantle is great for INI focused builds.
◦ Direwolf Pelt Mantle makes a great early game choice.
⊱ Efficient armors ─ the most durability for the FAT
Nimble benefits much from efficient armors. Here are some of the common picks:
◦ Head
› Necromancer Dark Cowl (40/-0)
› Sallet Helmet (120/-5)
› Assassin Metal Mask (140/-6)
› Zweihander’s Helmet (160/-7)
› Barbute Helmet (190/-9)
◦ Body
› Necromancer Dark Rugged Surcoat (60/-4)
› Assassin Robes (120/-9)*
› Leather Lamellar Armor (95/-10)
› Basic Mail Shirt (115/-12)
› Noble Mail (160/-15)
⊱ Characters with high HP
The higher the HP, the better Nimble performs. It solves the problem of character with low amount of FAT who would otherwise struggle wearing heavy armor. Usually, base FAT is sufficient for Nimble characters so leveling their HP instead should be a priority. Even with both low or average HP and FAT, Nimble can still make sense.
⊱ 40% Nimble ─ the go-to
When in doubt, better stick to 40% Nimble setups:
◦ 120/95 (Sallet/Lamellar) or if lacking a Sallet, 105/95 (Nasal/Lamellar) are good/cheap options.
◦ 190/65 (Barbute/Gambeson) performs better than 120/95 with higher HP and BP, assuming a couple critical hits.
◦ 40/160 (Cowl/Noble) should not be used without Brow but with it, wins over the other two options.
◦ 140/120 (Assassin Metal Mask/Robes) is easily the best option, but are rare/difficult to obtain.
Refer to this discussion for a more detailed analysis of 40% Nimble lines.
⊱ Brow and Gifted
The aforementioned discussion also analyzes the impact of Brow and Gifted on Nimble.
Gifted provides an additional 3 Defense and 5 HP (Colossus) which particularly benefits Nimble. Brow doesn’t bring much, but it does promote the 40/160 setup and provides some nice injury resistance.
⊱ Better armor for less Nimble ─ worth considering with lower HP
Going above 40% Nimble is better in some cases and worse in others.
Generally speaking, 40% Nimble is recommended with high HP.
For HP values of 80 or less, more durable armor performs slightly better, as long as it is still efficient.
◦ 120/115/42% (Sallet/Mail) makes a good starting basis.
◦ 120/160/47% (Sallet/Noble) sometimes wins, sometimes loses, so Noble Mail is not a must buy.
◦ Assassin Robes are generally preferred if available.
As a rule, the higher Nimble value options do slightly better against weak fire (from Goblin Ambushers, for instance) and weapons causing bleeds, while the 40% Nimble setups get the edge against heavy attackers like Chosen.
Note that Indomitable favors having more armor (see Indom), so if you are using Indom then the Noble Mail lines will benefit from it slightly more than the 40% lines.
Refer to this discussion for a more detailed analysis of higher value Nimble lines.
⊱ Named armor ─ efficiency first
Some named armor types are always a good fit, like the Wolf Helmet. Others must be efficient and get a favorable durability per Fatigue ratio. For a detailed analysis as well as more Nimble vs. Forge comparisons down the comments, refer to this discussion. Use this wiki page for a list of named armors and their possible values.
⊱ Dodge, Overwhelm, Relentless, Initiative ─ a natural fit
Let’s stress that Nimble does not need to use any of these to perform. However, since heavy armored characters cannot really benefit from them, you’ll want to use Nimble if you want to make use of any of these.
⊱ Ranged units ─ light helmets do not restrict vision
Bowmen with reduced vision lose range. Crossbowmen, having one less maximum range, can afford one less vision by day. Since neither can wear heavy helmets without suffering range penalties, light armor and Nimble make a prime choice. Well protected archers could even rely entirely on it to defend themselves against the occasional hit.
Heavy archers are more resistant to focus fire. They trade protection for range and even though they must get closer to the enemy line they gain increased accuracy in the process.
⊱ Back line ─ solid protection for little cost
Characters in the back line are mostly safe from harm, but they can still be targeted by ranged attacks and Nimble offers good enough protection against those. They must stay vigilant against enemies who can disrupt or ignore the formation and reach the back line, like Necrosavants or Orc Warriors. While heavy armor may offer a better chance of surviving dire situations, Nimble demands very little to shine, which may allow you to grab other stats if you prefer.
⊱ Injury avoidance
Because Nimble highly reduces HP damage and encourages high investment in HP, Nimble characters are usually highly resistant to injuries.
⊱ Armor ignoring damage counter
Nimble counters enemies who otherwise deal huge amounts of AID like Unholds, Schrats and dangerous attacks from weapons such as 2Handers, Crossbows, Daggers.
⊱ Misconception – Nimble isn’t viable in the late game
No. This is silly. Every fight can be won with a full Nimble team.
⊱ Misconception – Nimble builds are worse than Forge builds
It depends. Nimble beats Forge until it’s set with 300/300. Even then it still wins in some cases. Using a mix of both light armored and heavy armored characters is recommended. Nimble usually performs better against weapons with high AID such as two-handed weapons or Crossbows, while Forge excels against repeated weak attacks.
⊱ Misconception – Nimble can’t be used on the front line
No. Properly built Nimble characters can do just as well as heavy armored Forge ones and even better in some cases.
⊱ Misconception – Nimble is all about Initiative, Dodge, Duelist, Footwork and flankers
This is a trope. Nimble does support Initiative builds, but by no means relies on them. Nimble characters can wield two-handed weapons, shields or other tools to great effects. There is no inherent synergy with Nimble, Duelist, flanking, or things of that nature. Any build type could be done with Nimble.
⊱ Misconception – the character armor got destroyed in a couple of hits so Nimble is bad
No. Beginners start to panic when a character armor is gone because it meant certain death in the early game. With Nimble however, HP is armor so as long as there’s life, there’s hope!

Battle Forged
“Giants… Giants… Giants… Become unstoppable.“
Description
Armor damage taken is reduced by a percentage equal to 5% of the current total armor value of both body and head armor. The heavier your armor and helmet, the more you benefit.
Summary
+ Improves heavy armor effectiveness
+ Scales favorably with named armors
+ Strong against repeated weak attacks
+ Saves armor and tools
− Low impact on armor ignoring damage
− Requires hard-to-get very heavy armor
Mechanics
≻ Formula: 1 − 5% x (current head armor + current body armor)
▹300/300 → 70% Forge (1 − 600 x 5%)
≻ Forge value updates with current (≠ maximum) armor and so diminishes over the course of battle as more damage is sustained
≻ Armor gained from attachments counts towards the value
≻ Only reduces armor damage taken
≻ Can indirectly reduce incoming HP damage with improved mitigation from remaining armor
≻ A left screen tooltip displays the Forge value
Discussion
⊱ Forge improves heavy armor effectiveness
Forge is not as impactful as Nimble because heavy armor itself, being challenging to acquire, grants levels of protection that light armors can only provide thanks to Nimble. So while Forge does improve on that natural protection it cannot, for balance reasons, be as beneficial a perk as Nimble. Even though heavy armor doesn’t need Forge as much as light armor needs Nimble, and even though Forge does require at least heavy armor to start mattering, as a defense and survival oriented perk, Forge offers great value.
⊱ Forge reduces armor damage taken
Forge mitigates armor damage received based on total current armor. Essentially, it acts as a multiplier on total armor durability.
- Fighting Axe expected armor damage vs. 300/300 (70%) Forge
- ⇾ no reduction: 45-71 armor damage (35-55 x 130%)
- ⇾ 70% Forge: 31-50 armor damage (35-55 x 130% x 70%)
- ⇾ 80HP, 300/300 Forge vs. Fighting Axe gains ~115 total armor from Forge
Final damage always rounds down.
HP damage received is reduced by 10% of remaining armor, so taking less armor damage will slightly reduce armor ignoring damage (AID).
Because Forge value updates with current armor durability, very heavy armors that can maintain a high value even after being damaged benefit more.
⊱ Forge scales with armor durability and low damage levels
The following table shows the simulated mean hits for a mix of thirty five enemies to kill a character with 80 HP and various armors (head/body), with and without Forge. No attachment.
| Armor | Base | Forge | Diff. | Diff.% |
| 210/210 | 5.48 | 6.08 | 0.6 | 11% |
| 250/250 | 6.38 | 7.31 | 0.93 | 15% |
| 300/300 | 7.58 | 9.07 | 1.49 | 20% |
| 300/320 | 7.95 | 9.6 | 1.65 | 21% |
| 350/350 | 8.81 | 11.05 | 2.24 | 25% |
The gains going from 210/210 to 300/300 are substantial (almost a one hit difference). Very heavy named armors benefit even more.
Forge protects better against the more common weak attackers. The following tests retain only the twenty five strongest, most damaging enemies.
| Armor | Base | Forge | Diff. | Diff.% |
| 210/210 | 3.84 | 4.24 | 0.4 | 10% |
| 250/250 | 4.44 | 5.04 | 0.6 | 14% |
| 300/300 | 5.32 | 6.28 | 0.96 | 18% |
| 300/320 | 5.56 | 6.64 | 1.12 | 19% |
Gains are lower against heavy attackers.
Even though Forge doesn’t improve heavy armor as much as Nimble does light armor it still provides a decent amount of durability making it a valuable, if optional, perk.
⊱ Forge has little impact on armor ignoring damage and heavy armor is expensive
While heavy armor offers good protection, especially against repeated weak attacks, it is vulnerable to high armor ignoring damage (AID) and Forge does not solve this problem.
Let’s find the mean hits to die of a character with 80 HP and 300/300 base armor (no attachment) against a Goblin Ambusher (Ambusher) using a Reinforced Boondock Bow, an Honor Guard (Guard) using an Ancient Bladed Pike, and against a Barbarian Chosen (Chosen) using a Two-Handed Spiked Mace. Expected armor saved thanks to Forge is shown in the last column.
| Attacker | Base | Forge | Diff. | Diff.% | +Armor |
| Ambusher | 17.57 | 21.64 | 4.07 | 23% | 108 |
| Guard | 6.45 | 7.71 | 1.26 | 20% | 121 |
| Chosen | 2.62 | 2.84 | 0.22 | 8% | 78 |
Forge impacts weak and medium attacks far more than high damage threats that heavy armor is vulnerable to. Against Chosen, Forge does reduce the chance to die in two hits from 38% to 16%, which is helpful, but just not good enough on its own to make it safe to go stand in front of a bunch of them.
Buying and finding very heavy armor takes time which is why Forge, unlike Nimble, does not perform well in the early to mid game with mostly 200 durability armors. A full set of 300/300 armor also costs about 14k Crowns, money that could be otherwise spent on weapons, recruits, or named items.
Since Forge requires very heavy armor, character builds should plan for 300/300. Characters with low FAT can still go heavy with single attack builds. Otherwise, Nimble should be considered.
Use Cases
⊱ Armor attachments ─ Additional Fur Padding preferred
Arguably, the best armor attachment for Forge is Additional Fur Padding (AFP).
◦ AFP addresses heavy armor weakness to AID while providing valuable injury resistance
◦ Bone Platings (BP) is a worthwhile but unreliable option and Nimble characters want this attachment
◦ Light Padding Replacement (LPR) can be considered if FAT is an issue, but it doesn’t directly impact durability
◦ Attachments granting +40 durability offer the best value against weak to medium attacks, but do little against dangerous AID. Heavy armor performs well enough by default in the former case, so using another attachment like AFP if available is recommended
⊱ High FAT characters can better support the cost of heavy armor
Heavy armor logically costs more FAT to wear. Backgrounds with natural high starting FAT like Wildman and Farmhand or characters talented in FAT thus make better recipients for heavy armor and the BF perk, being able to use costly abilities without having to recover every other turn.
⊱ 300/300 vs. 300/320: Is +20 armor worth −4 FAT?
Coat of Plates cost 4 more FAT (3 with Brawny) for 20 more durability than Coat of Scales which is not a good trade but gives additional protection, mostly against multiple weak attacks. It does also save a few points of HP against attacks hitting through your armor, which is welcome. It is better to use the 320 piece if you don’t mind the cost.
⊱ Named armors made even better
Because Forge gets better the more durable the armor, it works especially well with very heavy (300+ durability) named armors.
⊱ Colossus and Brow, on the importance of HP
For heavy armored characters, Colossus, though weaker overall, can actually do better than Forge against some enemies. They can be combined for additional protection against injuries and AID. Getting to safe HP levels (roughly 80+) usually requires Colossus or a few level-up points investment in the case of particularly tough backgrounds like Hedge Knight and Wildman.
Brow is similar in purpose but weaker than Colossus. It gives a passive damage reduction which helps avoid serious head injuries.
Indomitable can compensate for low HP, which would otherwise be risky. It also makes Brow irrelevant when active (see Indomitable). However, the activation cost may be prohibitive to your bro’s build, and you may need to seek more passive means of protection.
⊱ Indomitable ─ A protection against high AID
Indom is heavy armor’s best defense against its AID vulnerability. Due to the way damage is calculated, it combines extremely well with heavy armor and Forge (see the Indomitable section for details). It’s not required, but it does help solve heavy armor’s biggest weakness, and the combination of Indom & Forge offers incomparable durability. Without Indom, you want to have a healthy HP stat on your Forge units, and attachments like AFP will really help.
⊱ Adrenaline ─ An answer to low Initiative
Heavy armor severely lowers Initiative, but Adrenaline almost guarantees turn initiative which comes handy in a pinch, if enough FAT is available.
Heavy armored characters usually go late if not last in the turn order. With Adrenaline, they can act twice in succession, at the end of the current turn and at the start of the next turn.
You can use this principle to setup 2-turn activated effects such as Indom or Spearwall. See Adrenaline section for details.
⊱ NimbleForge ─ Meme or supreme?
Given that both Nimble and Forge power relies on extreme specialization, using them in conjunction rarely makes sense. There isn’t a single regular armor combination in the game where going NimbleForge is advantageous (rather than specializing), even with LPR.
However, efficient named armors can make it possible. The ideal would be a perfect Noble Mail and Steppe Helmet: 250/200 armor for a mere −16 FAT. A perfect Wolf Helmet and Alloy Plate (175/350), and many other options between would also work.
Ultimately, NimbleForge is a niche combination that can potentially be great depending on luck with named armors but it’s not a strategy that can be relied on and Nimble characters can already make use of efficient armors.
⊱ Misconception – Heavy Armor + Forge = Safe
No. Many attacks from dangerous enemies such as Chosen, Unholds, Lindwurms, Two-Handers, Crossbowmen can pierce through armor.
⊱ Misconception – HP is unnecessary for heavy armored characters with Forge
No. This is legacy from when there were few enemies dealing high AID. In the current state of the game, 60 HP 300/300 Forge can die in a couple heavy hits. Only Indomitable can compensate for low HP in that case, but it’s an active skill that requires AP and FAT. You want your characters to be able to survive without being wholly dependent on Indom.
⊱ Misconception – Heavy armor & Forge needs Indomitable against Chosen
No. While Indom gives the best possible defense against Chosen, constantly using it and relying on it has its own costs. A healthy HP count, AFP, and even Brow if you are worried can all help a bro survive a few more hits, as can debuffs like Daze on enemies. Team support, good positioning and tactics can also go a long way to limit or even prevent Chosen from attacking.
⊱ Misconception – Defense is not necessary with heavy armor
No. Armor and Forge are great, but if a character can’t avoid incoming hits then he’s going to get worn down quickly and die. A good (Melee) Defense complements armor nicely.
⊱ Misconception – Forge is required to beat the late game and legendary fights
No. Every single fight can be beaten without using Forge.
⊱ Misconception – Forge builds are better than Nimble builds
It depends. Nimble with base equipment beats Forge until it’s set with 300/300. Even then it still wins in some cases. Using a mix of both light armored and heavy armored characters is recommended. Nimble usually performs better against weapons with high AID such as two-handed weapons or Crossbows, while Forge excels against repeated weak attacks.
TIER 7


Fearsome
“Now I am become death, the destroyer of worlds.”
Description
Any attack that inflicts at least 1 point of damage to hitpoints triggers a morale check for the opponent, as opposed to only if at or above 15 points of damage. Also applies 20% of the attacker’s Resolve as a penalty to the defender’s Resolve for damage calculations.
Summary
+ Dropping enemy morale is good
+ Allows for additional morale checks and increases their success chances
+ A Fleeing enemy is essentially a dead enemy
∽ Benefits slightly from RES investment, but does not require it
− Enemies already suffer some degree of morale issues without this perk
− Some enemies immune
Mechanics
≻ Normally, a morale check is proc’d when you deal 15+ HP damage
≻ Fearsome allows a morale check when you deal 1-14 HP damage
≻ Will display a Fearsome icon when enemies are damaged, if they aren’t unbreakable
≻ Applies a penalty to the target’s RES equal to 20% of your RES in damage based morale check calculations, presumably this rounds up in favor of the Fearsome user by rounding down target’s RES
≻ Ex. 60 RES puts a -12 penalty on your target’s RES for damage based morale checks.
≻ Your RES for purposes of the Fearsome penalty includes the Banner buff, Lone Wolf, etc.
≻ The chance of a morale drop when taking damage depends on your current modified RES and % of missing hp (after subtracting damage taken). Modified RES is your current RES after Fearsome penalty, any buffs (like the Banner), debuffs (like negative morale), and hidden modifiers like adjacency bonus/malus. See the formula below.
≻ Formula: %Chance to drop morale = 100 – (ModifiedResolve – 40 * (1 – CurrentHP/MaxHP))
≻ Ex: 200hp Orc Warrior with base 75 RES and no modifier takes 10 HP damage
- %drop morale = 100 – (75 – 40 * (1 – 190/200))
- %drop morale = 100 – (75 – 40 * .05)
- %drop morale = 100 – (75 – 2)
- %drop morale = 27%
≻ Ex: Same Orc Warrior with 50hp left would have a 55% chance of morale drop
≻ The above examples didn’t factor our Fearsome Resolve penalty, if our bro has 50 RES, we apply a 10 RES debuff to the Warrior on our checks, so actual morale drop chances would be 37% and 65%
≻ The Fearsome penalty caps at 100 RES which is a -20 penalty
≻ Ancient Dead have penalties of -12,-16, and -20 respectively
≻ Fallen Heroes have -20, Warlords -18, and Gunners -14
≻ 3Head Flail: Only one morale check can occur at 1-14 damage per 3-hit. However, all 3 hits can apply checks at 15+ damage, and all checks benefit from the Fearsome penalty
≻ Split Man: Only primary hit can use the 1-14 damage effect, both hits can apply checks and both benefit from the Fearsome penalty
≻ AoE: Each hit of the AoE is capable of procing Fearsome
≻ Undead and Ancient Dead are immune to morale checks
≻ Enemies with monster Resolve (Lindwurms, Schrats, Unholds, etc) are either immune or mostly immune to Fearsome’s effects, as their RES is so high that even the penalty doesn’t bring them above minimum drop chances
≻ Assumption: The minimum %chance to drop morale is likely 5%
Discussion
⊱ Legacy info and Blazing Deserts buffs
Fearsome was historically a weak perk, but received two changes in BD that addressed two of its biggest problems. First being that old Fearsome did nothing for you if you dealt 15+ damage. Second being that morale drops with Fearsome were too unlikely to occur. As such, Fearsome generally felt irrelevant in battle.
Now, Fearsome applies a penalty to the target’s RES equal to 20% of your RES and this effect occurs whether you deal 1-14 damage like old Fearsome or even if you deal 15+, meaning Fearsome is never a waste (except against immune enemies), and you no longer have to try and deal less damage or use weak weapons in order to get value out of it as before.
The new Fearsome is a powerful debuff perk deserving of its bottom-of-the-tree status.
⊱ Negative morale is a nasty debuff
Fearsome helps drop morale, and every level of lost morale is -10% to global stats including RES, which makes it then easier to get further Fearsome drops. To some degree, this puts Fearsome in league with things like CS and Overwhelm, as you are attacking an enemy to give them debuffs. As negative morale lowers all stats, Fearsome gives both offensive and defensive support for you and your team.
If an enemy drops to Fleeing then he is essentially dead, so Fearsome can let you “kill” enemies without actually having to kill them which in a way turns it into a damage perk. Furthermore, an enemy dropping to Fleeing status yields a morale check on his team, and an enemy dying yields another morale check on his team, so dropping enemies to Fleeing first before killing them helps increase the panic wave spreading to their teammates.
⊱ Fearsome dramatically increases your morale checks and drops
Fearsome does this in two ways. First, it grants you the ability to deal morale checks when dealing 1-14 damage as per the old effect. How meaningful this is depends on the weapon. Most 2Handers and Duelists can easily deal more damage than this and thus not benefit too much except against beefy enemies like Warriors. Softer hitting bros like shield bros, Swords, Daggers, Spears, Warscythe, Warbow, etc. can often find themselves hitting in this window, and will therefore enjoy a lot of extra checks with Fearsome.
Second, Fearsome grants a malus to the target’s RES score equal to 20% of your RES score. This is regardless of dealing 1-14 or 15+ damage. It is worth noting that this is based on current RES and not base RES, so things like the Banner aura, Lionheart Potions, and Lone Wolf will boost the Fearsome penalty. This caps at 100 RES. You do not need to pump RES into your bro to get value here. Even regular levels of 50 or 60 RES (with Banner buff) will grant a -10 or -12 Resolve penalty on your foes. This penalty is more significant than it might seem and will lead to a lot more morale drops.
For example, in a vacuum, if we deal 10 HP damage, we have a 27% chance to drop morale on Orc Warriors on first hit, and 13% against Chosen. A -12 Fearsome penalty would bring us up to 39% and 25% which in absolute terms may seem small but in relativistic terms is a 44% increased success rate against Warriors and a 92% increased success rate against Chosen. Tricky math aside, the point is that the Fearsome penalty will make it a lot easier to get morale drops and the cumulative effect of many attacks with this penalty over the course of battle will be noticeable. Recall that once enemy morale drops it lowers their RES, making it easier to get more drops. New Fearsome helps get that ball rolling and continue to feed into itself. You can further support this with things like the Direwolf attachment and/or Cursed Crystal Skull.
⊱ Fearsome downsides: Morale checks will naturally occur and some enemies immune
Just damaging and killing enemies normally will often cause morale problems on the enemy team at some point. You don’t need Fearsome to accomplish this. Fearsome however, will make a difference into the speed and consistency of enemy morale drops, giving your team a quicker edge.
Some enemies are immune to Fearsome. Notably Ancient Dead and some large Beasts because their RES is too high. In this regard, Fearsome suffers in the same way as CS and Executioner. That by no means makes it unusable or even bad, but it is something to be aware of. It can also be of poor value against really weak enemies who just die immediately (i.e. Goblins).
Use Cases
⊱ Daggers: 3 attacks per turn
Fearsome is better the more attacks you can deliver as you can deal more checks. Daggers attack three times per turn and both Puncture spam or Qatal Duelists can appreciate dealing a bunch of morale checks each turn.
⊱ Handgonne: Up to 6 targets for checks
Enemy Gunners have Fearsome for a reason. It works great with the Handgonne’s ability to hit six target’s at once. Heavily armored enemies may avoid checks early on due to the Gonne’s poor armor ignoring damage, but overall the Handgonne can deliver a lot of checks against most enemies.
⊱ 3Head Flail: Up to six checks on one target
Fearsome’s interaction with the 3-Head is a bit unique.
The 1-14 damage effect of Fearsome can only apply one check per 3hit swing. Therefore if the first hit does 5 damage you get a proc, and if the second/third hit then does 7 and 8 damage those do not get procs. Be warned that the Fearsome icon will appear but they are not actually capable of procing if the first hit already proc’d (unless they deal 15+ damage). If the first hit deals 15+ damage, then the second hit deals 5 damage, the second hit gets the proc, and the third cannot unless it also deals 15+ damage.
That effect aside, the 3-Head is capable of dealing three checks per swing as all 15+ damage strikes will count for morale checks, and all three strikes benefit from Fearsome’s second effect for the RES penalty. With the BD buff to the 3-Head damage as well, it is now a great weapon for dealing a lot of morale checks with Duelist and/or against enemies with poor armor. Direwolf attachment recommended.
⊱ AoE attacks: More targets, more checks
Regular AoE attackers like Warscythe or Greatsword can do well with Fearsome, as they can sweep into multiple enemies for more checks.
⊱ 1Handers and 2H Cleavers: Two checks per turn
Although having not as high of a ceiling as the above options, these weapons still attack plenty enough to deal a bunch of checks.
⊱ Warhammer: 10 HP minimum damage
1H Hammer is guaranteed 10 HP damage minimum, and Destroy Armor is 10 HP damage fixed. Thus, shielded Hammers can consistently proc Fearsome on armored targets.
⊱ Warbow: Throw debuffs at range
Warbow is weak enough against armor to get value out of the 1-14 damage window for Fearsome. Having two attacks at range and the ability to target high priority targets before they reach your line can allow Warbows to fish for drops early and often. Unlike Overwhelm Warbow, these debuffs will actually persist past the turn as well, and aren’t contingent on you outspeeding the enemy.
⊱ Shield bros: Fearsome gives them support utility
Shield bros deal low enough damage that they can appreciate Fearsome’s low damage morale check effect. They are also not very good at actually killing enemies, so Fearsome can give them a meaningful way to debuff or even “remove” enemies by dropping their morale.
⊱ Spearwall: Damage is usually too weak
Spearwall is usually too weak to deal chip damage through armor and get procs. Shielded Fighting Spear will only proc on very light Young. 100 armor Young will need to hit the wall 5+ times before they reach the Fearsome window.
However, Spetum and Duelist Fighting Spear are capable of getting procs on Orc Young consistently right away. Given the high volume of Young bouncing into your Spearwall you can get a lot of morale drops here. Don’t expect anything on the Warriors though as you won’t deal any damage through their armor.
Can also put in work against Nachzehrers, and other beasts that mindlessly charge Spearwalls.
⊱ Fortified Mind: More Fearsome value
It is not necessary to use Mind or invest heavily into RES to benefit from Fearsome’s second effect. However, pumping RES has other benefits, and can help keep your morale Steady or better so that you don’t lose RES (and Fearsome value) through dropped morale. With Fearsome, you can translate that pumped RES into some offensive debuff pressure on your foes.
Mind also multiplies the Banner buff, and the Fearsome penalty counts that too, so it benefits you to have the Banner out often/always.
Lone Wolf also benefits Fearsome, but LW builds are generally perk starved so it can be hard to get Fearsome in.
⊱ Bannerman: He should have 100+ RES
Your Bannerman should hit 100+ RES to reach the Fearsome penalty cap of -20. Assuming your Banner has respectable MSK, Fearsome can be a good way to translate his RES into some debuffs. QH is also popular on the Banner, so you can pack a Warscythe and do some AoE sweeps for Fearsome value, and then swap back to the Banner all in the same turn.
⊱ The Arena: Small battles, and counter elite enemies
The small battles of the Arena means every attack counts, and Fearsome is excellent here. That Swordmaster isn’t all that scary when he drops to Fleeing while his health is still near full.
⊱ Orcs: Most vulnerable to Fearsome
Orcs already suffer from morale problems not because their RES is bad but rather because they have a lot of health so they tend to drop morale a few times before dying which makes it more noticeable than other enemies who just tend to die quickly instead. Warriors have enough armor that most weapons will have a Fearsome window against them. Out of all of the factions, Fearsome works best here, and is great in Sea of Tents battles.
⊱ Anti-Nimble: Many weapons fall into the 1-14 Fearsome Window early[/b]
Nimble does a great job of protecting your HP while your armor is in tact. As such, most weapons will have a Fearsome window where they can benefit from the perk’s first effect. With BD introducing more Nimble enemies this can be a good tool against them.
Also be warned that your own Nimble bros will need to be more concerned about eating Ancient Dead attacks and other Fearsome enemies for the same reason. Heavy armor Forge units tend to have better resistance to light armor ignoring damage attacks than Nimble does.
⊱ Barbarians: They have a lot of RES
Reavers have 80 RES and Chosen have 90. This makes it normally pretty difficult to get morale drops on them. Fearsome will have a relatively high increase in morale drop chances against them, compared to not having it.
⊱ Misconception – I can’t use Fearsome because I want to fight Monolith/Library
No. You can beat Monolith/Library with a few dead perks. You don’t have to build your whole team around it.

Duelist
“My name is Inigo Montoya. You killed my father. Prepare to die.”
Description
With the offhand free, an additional +25% of any damage ignores armor.
Summary
+ Provides huge damage gains for 1Handers
+ Makes 1Handers competitive with 2Handers
+ Duelists can be preferable to 2Handers in some cases
~ Better on some weapons than others
− Costs a perk point that a 2Hander wouldn’t have to spend
− Provides no value against unarmored enemies (ie Unholds)
Mechanics
≻ Adds +25% to a weapon’s Ignore% stat. So a Warhammer goes from 50% Ignore to 75% Ignore
≻ Works with a consumable in your offhand (such as a Net or Grenade), but consumables do turn off your Double Grip
≻ Does not work with shields or 2Handers
≻ Works with Throwing weapons, including the single use Throwing Spear
≻ Throwing cannot gain the Double Grip buff so they can freely carry a Net here
≻ Works on secondary skills like Decapitate, Spearwall, etc
≻ Works on the secondary Ignite skill of Firelances
Discussion
⊱ Duelist drastically increases damage
Duelist is a strong enough perk that it enables an entire build style that would otherwise be completely ignored without it. I’m talking of course about using a 1Hander without a shield. Before someone calls me out on it, you can use a 1Hander without a shield and appreciate your Double Grip bonus without Duelist, but if this is your main plan for this bro then there is no reason not to use Duelist.
What makes Duelist so strong? Well that +25% Ignore damage is a lot stronger than you might expect it to be. Combined with higher innate Ignore% weapons like Mace and Hammer you can get very high armor ignoring damage, enough so that you will very often kill enemies before their armor is destroyed, similar to other high Ignore% weapons like 2H Mace and Xbows. Killing an enemy by Ignoring their armor is a lot stronger than having to wear down their armor first. For this reason, Duelist tends to work best on weapons with higher innate Ignore%. The greater Ignore% is a pure damage upgrade against anything armored, and also has the added benefit of helping you deliver early injuries.
The high AID potential of Duelists make them especially strong against armored but low hp enemies such as Ancient Dead and most humans.
⊱ Test example of Duelist impact
The following is a test of Winged Mace vs. 30 enemies and adding the total mean hits to kill each enemy. It isn’t the perfect test, but it can help show the relative value of Duelist vs. various enemies. Our brother has no other perks here. Score is average hits to kill an enemy from the test group.
— Winged Mace – Shielded: 9.62 hits on average.
— Winged Mace – Double Grip only: 7.42 hits on average.
— Winged Mace – Duelist: 5.64 hits on average.
As you can see, ditching our shield and going Duelist makes an enormous difference to the offensive output of the Winged Mace, and other 1Handers will follow suit.
⊱ How does Duelist compare to 2handers?
It is pretty clear that Duelist is very strong when we are ditching our shields. The less obvious question is how to evaluate going for a Duelist vs. a 2Hander. The short answer is that both are strong and you should use some of each. Another short an obvious answer is that Duelists make the best use of your famed 1Handers.
The longer answer is that there are pros and cons of each. 6AP 2Handers have better AP synergy with skills like Rotation/Footwork, but Duelists have better AP synergy with Indom. Single target 2Handers have greater damage per FAT efficiency, and AoE 2Handers have nice AoE skills. Duelists however have better mobility and can attack multiple times per turn which means that missing is less painful and there is less wasted overkill damage on weakened enemies. 4AP attacks also have Berserk/Recover synergy if you use both of those. Generally, Duelists just feel more flexible with 4AP attacks instead of 6AP attacks.
What about 2H Cleaver? Again, both have pros and cons. 2H Cleaver doesn’t cost a perk (don’t need Duelist), are better against low or unarmored targets, and can use Reach if you wanted. Duelists however can sometimes out damage the 2H Cleavers, cost less FAT to hold and swing (unless Orc), and are much better at dealing injuries.
Duelists also have the benefit of a free offhand, which means that they can open the battle with a Net or Grenade and toss it without having to do any weapon swaps.
Maybe the biggest downside to going Duelist vs. a 2Hander is that Duelist is something of a perk “tax” that 2Handers don’t have to take. That by no means makes Duelists bad or that you shouldn’t use them, but it is something to be aware of. Duelist also doesn’t provide any value against naked enemies. Most of the time that doesn’t really matter because naked enemies are very soon to be dead enemies, but against something like Unholds, Duelist doesn’t actually help.
Not all Duelists are created equal. Some of the weapons perform far better than the others. I will go over this in the use cases.
If you are interested, check out this thread where I tested various Duelists vs. Chosen.
Use Cases
⊱ Famed weapons: Duelist shines
Duelist gets stronger the higher your base damage and Ignore%. This makes it extremely good on famed weapons with damage/Ignore% buffs.
⊱ Duelist Orc
The Head Chopper/Splitter are the strongest 1Handers in our arsenal, but they are very heavy and come with additional FAT penalties on swing. Make no mistake, these weapons make for your best Duelists, but the extra FAT demand cannot be ignored, and you will either need an exceptional recruit to support this for an extended period, or resort to using Recover to support it. The Chopper tends to be better than the Splitter if you are deciding between the two, but it does depend on Bleed and Decapitate value to win.
⊱ Mace and Hammer
The best non-Orc Duelists tend to be Mace and Hammer. Mace has innate 40% Ignore and Hammer has 50%. With Duelist these go up to 65/75% which is huge. Hammer tends to tie or beat Mace against enemies with even somewhat low armor, but the Mace is a more balanced weapon overall. Mace also costs 1 less FAT to swing,
Neither weapon will be using its special very often as Duelists because they want to be dealing damage. Stun is a nice option though in a pinch. Destroy Armor is usually bad on Duelist Hammer because it fixes the hp damage dealt to 10. With a 75% Ignore stat you are almost always doing way more than 10 damage so Destroy Armor makes you worse against most foes not named Orc Warrior or bigger.
The nice part about these Duelist options is that they deal consistently good damage without having to resort to special attacks or Orc penalties to do so. Cleavers can sometimes out damage here with Decapitate, but that requires some setup and extra FAT.
Mace/Hammer are also extremely good at delivering injuries due to their high Ignore% and two attacks per turn.
⊱ Fighting Axe
Fighting Axe lands in an awkward position where it usually isn’t as good as Mace/Hammer and it isn’t really providing any niche benefit to try and stand out. The extra damage on headshot does not save it here. It can beat Mace in some matchups, but their kill rates tend to be similar overall while Mace is better at dealing injuries.
⊱ Military Cleaver and Khopesh
Cleaver Duelists can do well in two conditions. One, you aren’t overly concerned with burst damage and give Bleeds time to tick. Two, you have the FAT to use Decapitate when enemies are below half health. On a per hit basis they do less damage than the above options, but with Bleed damage and Decapitate added in they can out dps Mace/Hammer in some matchups, notably against Nimble enemies like Conscripts.
The downside here is that burst damage is usually preferred rather than waiting around for Bleeds, and Decapitate is expensive and requires setup. They are also far worse at dealing injuries than the above options. Cleavers make for good to great Duelists potentially, but there are strings attached.
⊱ Flail
Flail Duelists tend to be a good deal weaker than the above options, but they have some advantages that can make them worth considering.
One, Lash is very strong with Duelist, and judicious Lash spam will make the Flail as strong as the Mace on average with the added benefit of more head injuries. Realistically, you won’t be using Lash every attack as it is too expensive, but you don’t need to either. Having the option to Lash against specific enemies depending on their armor situation gives the Flail some flexibility. Lash can also fish for the desirable Fractured Skull or Concussion injuries (CS would help here).
Two, Flails ignore the defense bonus of enemy shields. This can be anywhere from 15-25 extra accuracy against shielded enemies and is especially useful against Footman/Ancient Dead who love their shield spam and are highly vulnerable to Duelist given their low HP.
The extra accuracy and option of Lash can make Duelist Flail a good option for a unit with a bit lower skill that would appreciate accuracy support who also has a good FAT pool to make use of Lash. If you are wondering about Brute, it is only ever so slightly more useful on Flail Duelists than on other Duelists, so Brute alone shouldn’t necessarily make you think you should use Flail. Brute does however lower your skill, and that can be a good point in favor of Flail.
⊱ 3H Flail
After the BD buff, 3H finds itself in an interesting place. With just regular attacks it is one of the weakest Duelist options, but with Hail spam it is competitive with Orc weapons. In this regard it is a more extreme version of the regular Flail where you definitely want to be using Hail constantly. 3H is abysmal at dealing injuries though, even with Hail and CS, so don’t take CS for 3H or Executioner (unless you are good about having teammates setup for you). Recover is a must, and Fearsome can do great.
⊱ Noble Sword
Duelist Sword is one of the weaker picks you can do for your Duelist due to the low Ignore% and low armor damage. However, Swords have a lower FAT cost than the above options and a bonus +10% accuracy. You can reasonably skip Mastery for an extra perk as well. This can make it a great pick to make a damage dealer out of bros with lower Skill and/or FAT, or as a sidearm to a frontline Throwing hybrid.
⊱ Shamshir
The main draw of the Shamshir is that it can deal injuries better with its Gash. However, given the low Ignore% and low armor damage Shamshir is actually only similar Mace/Hammer at injury deliver while costing more FAT to Gash. Gash does have +10% accuracy however and the cutting injury pool is the best, so there’s some positives here.
⊱ Fencers
Duelist is an auto-pick for any Fencing build. The Ignore% helps multiply the damage you are doing on Lunges, and just improves your damage overall. You want this.
⊱ Fighting Spear
Fighting Spear is a weak option for Duelist given the low damage. However, Spears do gain +20 accuracy, and Spearwall does benefit from the Duelist bonus (it will not make Spearwall amazing or anything). One option could be to have a Duelist start with Spearwall and then switch to a better Duelist option afterward, or to give a Thrower a backup Spear.
⊱ Dagger
Duelist Qatal is passable in normal circumstances, and monstrous with Deathblow setup, out-damaging Winged Mace while attacking three times per turn. Duelist Rondel is rather poor and should instead stick to Puncture spam and leave the dueling to the Qatal.
⊱ Throwing
Yes Duelist works with Throwing and it is very good. Heavy Javelins at two range with Mastery/Duelist will outdamage melee Duelists (not Orc). Heavy Axes are noticeably weaker but can be ok as a means to bring Throwers into Ancient Dead fights.
⊱ Injury delivery
Given the higher Ignore% of Duelists and multiple attacks per turn, they can be very good at delivering injuries on first hit to most enemies, even without CS.
Chosen are among the harder enemies to injure early. Duelist Mace has a 5-27% chance of a first hit injury without CS depending on their armor, and a 40-88% chance with CS. Hammer has a 0-12% without, and a 26-98% chance with. Frenzy boosts it further.
⊱ Anti-Ancient Dead
Ancient Dead have up to 210 armors on Honor Guards and very low hp (55 Legion, 65 HG). This makes them vulnerable to high AID attacks such as those from Duelists. Duelists also have an easier time getting through Savant 9Lives (than 2Handers do).
⊱ Misconception – Duelist should be used with Nimble/Dodge/Initiative/etc.
I assume this is some kind of myth derived from gaming/fantasy culture. There is nothing about Duelist that favors it going for Nimble vs. Forge. Both can use Duelist effectively, and Nimble Duelists do not necessarily lean toward using Dodge and/or Initiative either.
⊱ Misconception – Duelists are best with Sword/Cleaver
No. There are reasons you may want to use those, but they tend to be beat out by other options like Mace/Hammer.

Killing Frenzy (Frenzy)
“Play of the game.”
Description
A kill increases all damage by 25% for 2 turns. Does not stack, but another kill will reset the timer.
Summary
+ Provides a large global damage increase
+ Does better in larger/more dangerous encounters
+ Synergizes well with Berserk
− Requires setup
− Buff can be wasted if you miss
Mechanics
≻ The 2 turn timer starts right when the kill is made, which means that it counts this current turn. Frenzy will turn off at the end of next turn if you don’t get another kill
≻ A buff bubble will appear on the left side of the screen when active
≻ The damage bonus effects both hp and armor damage
≻ Damage bonus stacks multiplicatively with other damage modifiers (such as Executioner)
≻ Can turn online mid AoE swing if a kill is made
Discussion
⊱ More damage − More killing
Frenzy is a pretty straightforward perk. It is a global damage increase (and quite a large one) after you get a kill, which means if you can consistently be getting kills then you are consistently doing extra damage without really any strings attached except for getting it online in the first place and keeping it going.
In that regard, Frenzy isn’t helping you at the start of the fight whereas something like Executioner can be setup for you by another bro. Unlike Executioner though, Frenzy just works once you have it online even against fresh enemies, which can mean dealing earlier injuries or even one hit kills. Also unlike Executioner, Frenzy works against Ancient Dead.
The majority of battles later in the game feature large enemy parties that often have a number of weaker enemy types in the deployment which usually makes it very easy to get kills to put Frenzy online. Frenzy helps feed itself, giving you extra damage to keep the killing going.
Frenzy can help increase the consistency of one hit kills with some weapons against some enemies. Goblins are most vulnerable to this, but even some human foes are at risk of getting one shot by the higher tier 2Handers, and Frenzy can improve the consistency here.
⊱ Limitations of Frenzy
There is a diminishing return on the number of Frenzy users in your party just like with Berserk. There are only so many kills you will be getting each turn, so it is ok to have some damage dealers who do not have Frenzy who can setup the kills for the Frenzy bros. Frenzy also depends on being able to hit things to get value. Your Frenzy buff goes to waste if you just whiff on your next turn, so having higher base accuracy and/or accuracy boosting perks is helpful. Frenzy also won’t help much in battles with few but strong enemies like Lindwurms.
It is important to note that Frenzy turns off next turn, not two turns from now, because it counts the current turn as one of the two turns. This means that if you turn Frenzy online this turn but have no AP left to do anything, then you only actually got one turn of value (next turn).
Compared to other damage perks, Berserk is usually better, but Berserk’s faster damage output does cost more FAT while Frenzy’s does not. People generally consider Frenzy to be better than Executioner since it is more universal (and also 5% more buff), but there are scenarios where a bro might want Executioner and not take either Berserk/Frenzy, perhaps because he has FAT problems. Comparisons aside, damage dealers would certainly enjoy using all three of them, and they all help improve each other.
Use Cases
⊱ Damage modifier stacking: The more the better
Things like Executioner/Huge/Drunkard/etc. stack multiplicatively with Frenzy, so the more of them you stack together, the stronger they all become.
⊱ Berserk synergy: They proc on the same condition
A forum member (don’t remember who, sorry) once said “Frenzy is the jelly to Berserk’s jam” or something to that effect anyway. The perks compliment each other very well. Both perks proc on a kill giving them the same condition for value. Berserk allows you to instantly attack again with your Frenzy buff, allowing you to get more mileage out of it. Having Frenzy up next turn makes it easier to get more kills to get more Berserks and Frenzies later.
Although you can use Frenzy without Berserk, Berserk makes it a lot stronger, and is generally the better of the two anyway, so you’ve probably already got it.
⊱ 2Handers and Duelists
These are your primary damage dealers and they very much enjoy having Frenzy buffs. 2Handers like Mace and Hammer are even capable of one shotting enemies like Footman and Ancient Dead once Frenzy is online.
⊱ Range units
Range units are also good at getting kills, and have plenty of perk space for damage perks hiding in the back line. Throwing is especially strong here since it combines the action efficiency of the Warbow with the damage potential of Xbows when at two range with Mastery and Duelist.
Against Goblins, Frenzy increases the chances of one shot kills which is highly valuable when you are trying to gun down 30+ of them.
⊱ Legendary locations: It’s a damage race
Most of the legendary locations and large camps in the wild feature huge numbers of enemies. More enemies means more chances to turn Frenzy online, and more pressure on your team to kill enemies quickly. Frenzy is good in these fights.
⊱ Shield bros: Not your main killers
Your shield bros probably aren’t getting a lot of kills and they probably have better perks to be using instead of Frenzy.
⊱ Overwhelm and/or setup bros: Frenzy is contradictory
Faster bros can be used to setup kills for slower bros with Frenzy to capitalize. If you are using Overwhelm, it requires you to not kill your target to get value, so its value condition is opposite of Frenzy giving them poor synergy if used together. Warscythe could potentially use both.
⊱ Accuracy perks: Missing is a waste of Frenzy
Frenzy is only any good if you can hit things consistently. Accuracy perks can help you more consistently land your hits to both turn Frenzy online and keep it going after. A unit with lower accuracy might be better off taking accuracy perks instead of Frenzy to improve his damage.
⊱ Misconception – Berserk/Frenzy are auto-picks on every damage dealer
No. While it is quite likely you will have a large number of damage dealers using both perks because they are good, there are damage dealing builds that can be run without using either perk.
You can run a damage dealer that runs all of the accuracy perks and no damage perks. Is he the greatest damage dealer ever? No, but he can work, and instead of the accuracy perks you could instead pickup defensive or utility perks if your bro/team needs those more than the direct killing power of Berserk/Frenzy.
You can have a few setup bros who weaken enemies for your Berserk/Frenzy users to capitalize on, as there are only so many kills you will be able to get per turn. If you don’t have room for both Berserk and Frenzy you can also use just one of them and it can still be good.

Indomitable (Indom)
“You shall not pass!”
Description
Unlocks the Indomitable skill which grants a 50% damage reduction and immunity to being stunned, knocked back or grabbed for one turn.
Summary
+ Provides enormous and unparalleled increases in durability
+ Is favored by the damage formula
+ Provides immunity and control against annoying enemy abilities
− Is expensive to cast
Mechanics
≻ Costs 5AP and 25 FAT and lasts until the start of your next turn
≻ Mitigates both HP and armor damage taken
≻ Stacks with other mitigation abilities like Nimble and Forge
≻ Halves the damage earlier in the damage formula, before mitigation from 10% of remaining armor and before the headshot bonus. This makes Indom way stronger than you would expect.
≻ Halves fixed damage from Bleed/Miasma/etc. and rounds it down in your favor
≻ Provides Stun immunity from Maces, Orc Young, and Unholds
≻ Provides immunity to displacement effects such as Warrior pushing and Unhold Throwing, as well as abilities like Shieldbash, Polearm displacements, and Serpent grabs.
≻ Provides immunity to Kraken Tentacle grabs
≻ Does not provide immunity to tier 3 Nachzehrer swallowing
≻ Does not provide immunity to Priest Horrify, and Horrify status will cancel your Indom.
Discussion
⊱ Unlimited power
In terms of raw power, Indom is probably the strongest perk. This is because the amount that it increases your survivability is unmatched by any other perk in the game, and it works favorably with strong skills like Nimble and Forge which you are likely going to be grabbing anyway.
The reason that Indom is so strong is because the reduction occurs early in the damage calculation rather than at the end. This makes it so that you actually take far less than half damage.
⊱ 50% damage reduction makes you more than 2x durable
Let me illustrate using a 300/300 Forge unit vs. a Chosen Mace. For sake of simplicity we are going to say that our Chosen rolled 80(middle) on his HP damage roll and 90(max) on his armor damage roll. Chosen mace has 60% Ignore armor and 115% Armor modifier. We have a 70% Forge modifier with 300/300 armor.
No Indom:
⇾ Armor damage = 90 * 0.7(Forge) * 1.15(Armor%) = 72.45. Remaining armor = 227.55
⇾ HP damage = 80 * 0.6(Ignore%) – 22.755(10% Remaining armor) = 25.25.
⇾ If Headshot we multiply final hp damage * 1.5 = 37.87.
⇾ All damage numbers round down
⇾ Final damage: 72 armor damage and 25HP damage (37 if headshot).
With Indom:
⇾ Armor damage = 90 * 0.7 * 0.5(Indom) * 1.15 = 36.23. Remaining armor = 263.77
⇾ HP damage = 80 * 0.6 * 0.5(Indom) – 26.377 = 0
⇾ Final damage: 36 armor damage and 0HP damage (0 if headshot).
As you can see from this example, Indom made us take far less than half damage. We didn’t take any damage at all! Not even on a headshot! This is why even though perks like Colossus and Brow can be nice for the extra passive defense and injury avoidance for Forge, if you are using Indom, Brow is almost irrelevant and Colossus isn’t as impactful as normal either.
Here are a few more examples.
80hp, 300/300 Forge bro (no attachment or other perks) against a Chosen with a Mace:
⇾ Mean hits to die normally: 2.84
→ 16% chance of death in two hits
→ 100% injury in one
⇾ Mean hits to die with Indom: 10.23
→ 6% chance of death in eight hits
→ <1% chance of injury by hit 5
Our Indom bro is ~3.6x more durable here, not twice as durable as you would have maybe expected. Injury resistance has increased massively.
120hp, 120/95 Nimble bro in the same scenario:
⇾ Normal: 4.53
⇾ Indom: 10.5
120hp, 120/160 Nimble:
⇾ Normal: 4.35
⇾ Indom: 10.19
Our Nimble bro is ~2.3x more durable and even beating the Forge brother here.
Note: Indom multiplier for Forge/Nimble does not always equal x3.6 or x2.3, it depends on the enemy/scenario. However, Unless naked, you can expect that it will increase durability by more than 2x.
Clearly, the differences between Indom and not are astronomical, with the effect being more pronounced against dangerous enemies that deal a lot of armor ignoring damage. This is due to Indom doing an insanely good job at mitigating armor ignoring damage that no other perk can really compete with except Nimble.
⊱ But wait, there’s more ─ Resist displacement
Indom offers resistances to annoying enemy Stun and displacement abilities. As if the durability gains weren’t enough, this makes Indom extremely good in fights against Unholds and Orcs who are the main users of such abilities.
An Indom user locks down Unholds and Warriors, keeping your vulnerable backliners safe from annoying Throwing and Pushing skills, which makes these battles much easier. Immunity to Orc Young jumping Stun spam is nice too.
⊱ Indom is not a passive effect and expensive to spam
Of course, the downside to Indom is that it is not a passive effect. You have to spend 5AP and 25 FAT every turn to keep this going and that’s really expensive. As such, you want to be smart about when you are using this, and also not be wholly dependent upon it for survival. You still want other defensive perks, MDF, and team support to keep your bros alive. Recover is a good pickup if you intend to spam, but may not be needed if you intend to just have Indom as insurance or an opener.
The nerf to 5AP cost also made Indom harder to use on 2Handers, either requiring you to skip on you attacks or Berserk into it. You can still use Indom on 2Handers, but not freely as in the past.
⊱ Indom is strong, but not mandatory
Should you be using Indom on every frontliner, and also Recover to support it? Well, no, that isn’t really necessary. You can use Indom without also taking Recover just to have it as an occasional tool or if you get into trouble. You can also field frontliners who don’t have Indom at all and they can do just fine with other defensive perks/measures and/or smart play. Indom is probably the strongest perk in the game, but you are not forced to use it on everybody to survive.
There is a danger in relying entirely on Indom to keep your brother safe. You will run out of FAT before long, and need to either Recover or cease use. Either way your Indom will be down at some point, and so your brother needs to be able to survive a turn or more of pressure without using it. Indom does wonders for your survivability, but you should still have decent durability, MDF, and tactics to go along with it.
Indom can be broken by Ancient Priest Horrify, so having high Resolve or the Undead Trophy can be important against Ancient Dead so that your Indom doesn’t get cancelled/wasted.
Use Cases
⊱ Survivability: Indom offers the most
Indom is the best survivability perk in the game. If you want more bulk then Indom has you covered. It is more helpful against the most dangerous attacks in the game, and that is highly appreciated.
⊱ Forge: Indom solves your biggest weakness
Forge does a great job of keeping you safe against most enemies but is extremely vulnerable to high Ignore% attack such as those from Chosen 2Handers. Indom is your best defense against this problem. However, the prohibitive cost of Indom may entice you to seek alternatives.
⊱ Nimble: Indom is still amazing
Although technically Nimble tends to benefit less from Indom than Forge does (relatively speaking), it is still incredibly strong, and Nimble-Indom can beat Forge-Indom in some matchups. Nimble also really enjoys taking less Bleeding/Miasma damage.
⊱ Tanks: Durability and control
Regardless of how else you build your tank, he’s probably going to want the strongest defensive perk in the game both to keep himself safe and to control dangerous enemies.
Recover is recommended for continued tanking, as Indom and incoming attacks will fill your tank’s Fatigue quickly.
⊱ 2Handers: Berserk synergy or insurance button
The nerf to 5AP took away the natural AP synergy that 2Handers used to enjoy with the 3AP Indom. However, 2Handers can still make use of Indom while attacking through popping it off of a Berserk proc.
Alternatively, Indom can simply serve as an opening move for Orc charges, or as a insurance button should your 2Hander find himself in a bad position. You can switch out a shield (4AP) and pop Indom for 5AP in the same turn, converting your 2Hander into a makeshift tank, should he find himself under a lot of pressure.
⊱ Duelists/2H Cleavers: Attacking with Indom
As per the change to 5AP Indom, If you want to attack and put up an Indom in the same turn, then you will need to use these weapons. As exciting as this sounds, the Fatigue cost associated will cap you out quickly, and with the death of the Adrenaline cycle you will need to spend some time on Recover to continue doing this. Berserk can help your Recover turn be more efficient if you have it. The damage potential here is lower than the old Indom 2Handers.
It is probably better to think of Indom as insurance on these units as well, rather than something you expect to cast every turn.
⊱ Orcs: Indom blocks their skills
Orc Young love their jumping Stun spam and Warriors want to push your guys around. Indom helps prevent both of these annoying abilities. Mansplitters are also entirely capable of 2 shotting most bros so Indom can be handy to have in the event that you allow a Berserker or Warlord an opportunity to attack you.
⊱ Unholds: Prevent throwing
Unholds want to throw you around and get at your weaker backliners. Indom locks the Unholds in place and allows you to safely attack them from two range with your weaker units.
⊱ Barbarians: Protect against high damage Chosen
Barbarians field a lot of dangerous 2Handers that pose a huge threat to most bros not using Indom, especially Forge bros. The harder Barb fights will also have Unholds in the mix. Indom helps you survive these dangerous attacks and control the Unholds.
⊱ Lindwurms/Schrats: Protect against dangerous attacks
Unless you are doing some kite cheese, the best strategy with Wurms is to have a super tank stand in range of the head doing nothing but Indom/Shieldwall while everyone else safely attacks the Tail from 2 range. Without Indom, Wurms are very capable of killing even good bros in just a few hits.
As of BD, Tails now have ZoC which makes kiting a lot harder (and more dangerous). Having a few Indom tanks is recommended against Wurms.
Schrats also deal a large amount of Ignore% damage and they have CS, so without Indom there is a very high chance you will be getting a lot of injuries here.
⊱ Adrenaline: Set up a 2-turn Indom
Although the cycle is dead, with heavy armor, you can Adrenaline, start the turn with Indom, “wait” (to slow you down next turn), and then your Indom will persist all of this turn and most/all of the next turn as well as you should go near last. This can be a good move if you need to hunker down for two turns to survive a threat, but be careful to neuter any threats within those two turns, as otherwise this bro is unlikely to be able to do this again without losing a turn to Recover.
⊱ “Wait” command: Extend Indom timing
Indom will last until the start of your next turn, so using the “wait” command to slow yourself down (25% INIT penalty next turn) can be a good way to artificially extend your Indom duration. Doesn’t work with Relentless of course.
⊱ Steel Brow: Indom already protects your head
Steelbrow isn’t an especially strong defensive perk on its own (although it being passive is welcome). If you are using Indom constantly then it becomes nearly useless as Indom often makes you take zero damage anyway, and your helmet will last twice as long.
⊱ The Bear – Indom and Glorious Endurance compliment each other
The Bear (Gladiator origin) unique perk requires you to take a couple of hits to build up stacks and gain damage reduction. Having Indom can help you safely shrug off the opening hits to build up stacks. Indom and a fully stacked Glorious Endurance offers extraordinary durability, and makes the Bear significantly more tanky than any regular bro with the same stats.
⊱ Misconception – Indom allows me to get away with bad MDF
Sort of, it is definitely worth considering Indom if your defense is bad for the extra insurance, but surviving more hits will not necessarily save you if you can’t avoid anything in the first place. You still want good defense.
⊱ Misconception – Indom is dependent on Recover to be good
No. Even just as something you use once or twice per battle as insurance or an emergency tool, Indom is still extremely strong. Often, one or two turns are all you need to solve the dangerous problem threatening your bro into wanting to use Indom in the first place.
⊱ Misconception – Indom is mandatory for late game fights, Orcs, Barbs, Legendaries, etc
No. Myself and other players have beaten every fight in the game without using Indom. It is a strong perk, but the mindset that it is mandatory to succeed is incorrect.
Thanks, References, Changelog, Authors
Thanks
☆ to you reader, for your interest in a guide that took a very long time to write
☆ to the Steam community for the fruitful discussions and knowledge shared in this guide
☆ to the code diggers and wiki editors for their invaluable contribution
☆ to the devs, for making this amazing game that we love
If you have any questions or suggestions, please leave a comment.
References
The following is a list of links, either referenced throughout the guide or given here as useful resources. Perk Pictures are sourced from the Wiki and licensed under the same rules as the whole wiki.
◿ Wiki
─ Main Page
─ Temporary Injuries
─ Damage Calculation
◿ Steam
─ Fast Adaptation, Head Hunter, Fearsome and Overwhelm Mechanics (slightly outdated)
─ HeadHunter Headshot Chance Gain Calculations (updated 8/13/20)
─ Offensive Perks vs. Chosen (updated 8/11/20)
─ Duelists vs. Chosen (updated 8/13/20)
─ Huge + Brute Calculations
─ Nimble Tests with Gifted/Steelbrow (updated 8/15/20)
─ Nimble Tests With Medium Armor (updated 8/15/20)
─ Nimble Tests with Famed Armor (and More) – (slightly outdated)
─ Unhold Fur Cloak vs. Goblins (updated 8/13/20)
─ Guide Release Steam Thread
◿ Reddit
─ Increasing returns from Melee Defense
─ Guide Release Reddit Thread
◿ Google Docs
─ Morale Check Mechanics
─ Enemy Data
─ Background Stat Ranges
◿ Projects by Others
─ Build Planner by Unislash
─ Perk Calculator by EveryCrime
◿ Reviews
─ Battle Brothers Review – A Tactical RPG Gem
Changelog
Version 1
‣ 20/04/11 – Initial release
‣ 20/04/13 – Revised B&B
‣ 20/04/19 – Small edits or additions to Adrenaline, Recover, Student, Resilient, Gifted, Brawny, Taunt, Axe Mastery, Cleaver Mastery, Nimble, Fearsome, Killing Frenzy, Indomitable. Thank you to all who gave us feedback.
‣ 20/04/19 – Added links to the Steam/Reddit release threads in Resources
‣ 20/04/24 – Edit to FA, Fixed FA to Backstabber (was 47%, should be 52%), also added link to Fast Adaptation calculations in References.
‣ 20/04/28 – Fixed Pathfinder terrain values in Forest and changing elevation
‣ 20/05/16 – Fixed Fatigue gain when shielding to only apply to ranged instead of all attacks
‣ 20/06/18 – Added an Anti-Goblin section to Adrenaline. Max Overwhelm stacks to 7 (was 6)
‣ 20/07/14 – Minor edits in Weapon Mastery, Shield Expert, Reach, and Lone Wolf. Thank you to Outryder for pointing these out. See in comments.
‣ 20/07/31 – Added Riposte use case in Shield Expert
Version 2
‣ 20/08/13 – Blazing Deserts launch (see Blazing Deserts section for changelog)
‣ 20/08/15 – Added BD overview subsection under Blazing Deserts main section. Updated Overwhelm maximum stack count (there is none). Updated Nimble and linked calculations as per nerf to Gladiator helmet.
‣ 20/08/25 – Added Taunt use case for controlling charmed bros
‣ 20/09/2 – Added note on QH Whip use case about countering Disarm
‣ 20/09/3 – Added to Student with Manhunter origin mechanic. Clarified how obstructed hit chance is rolled for in Bullseye mechanics and how it relates to the combat log. Added Duelist with Firelance Ignite mechanic. Added Split Man with Fearsome mechanic.
Authors & Credits
This guide was written by turtle225 and Abel and was added with their permission to this blog. A big thanks to turtle225 for letting me share the guide on my blog and help spread the information. Please do check out their other channels.
Authors① turtle225
turtle225 on Steam
turtle_225 on Reddit
turtle225 on Youtube
turtle225 on Github
② Abel
Abel on Steam
VilainJoueur on Reddit
Vilain Joueur on Youtube
Vilain Joueur on the Wiki
LeVilainJoueur on Nexus Mods


Hello guys. And Bye.
neversurrenderboys 😉
Tremendous amount of work! Great job man much appreciated.
Awesome guide in which you obviously put a lot of time and knowledge but what actually killed me are the quotes in the flavor text!
Every time I didn’t know the origin I had to pause and research them and loved each one of them!
Thank you again for the effort 🙂
amazing. just picked up this game and this is EXACTLY what i need to help me understand the perks. thanks for your hard work!!
Thank you!