This guide aims to be a FAQ and a beginner reference for Caves of Qud. The game is very difficult and has a steep learning curve, so having additional information to read up on can be incredibly useful. This guide will also be spoiler-free.
Disclaimer: This guide was written by Dij, please check the Credits-section for more information.
What mechanics are unique to Qud?
Even if you know the basics of what a roguelike is, well, like, there are some things that are really important to the Qud Experience.
Water is currency
You need water to drink, but it’s also used as the money in this game. In reality, salty water makes you even thirstier, so don’t think about bottling up jugs of salty marsh water. It’s gotta be as fresh as wearing a new pair of panties on new years. Water also has a physical weight so you can’t carry a lot on you at once.
Reputation System
There are dozens of factions in Qud. You can press Ctrl + F to get a list of them and your reputation with them. Here are some important thresholds:
| If your Reputation is | Effects |
| Greater than 600 | All faction members are Friendly and will assist you |
| 251 to 600 | All faction members will not attack |
| -251 to 250 | Neutral and Docile members will not attack |
| -601 to -250 | All members will attack except Docile ones |
| Less than -601 | All faction members will attack you on sight |
You can check a creature’s base demeanor by looking at them. If there is no base demeanor listed, that creature is neutral.
These reputation values can be changed by wearing certain gear, water ritualing legendaries (purple and named creatures) or killing said legendaries. Note that if the legendary is hostile to you, you will not be able to water ritual.
What are some helpful hotkeys?
These actions can be remapped by pressing Escape > Key Mapping > press enter at the action you want to bind, and then the button you want to bind it to.
When the game refers to one of the D0-9 keys, it is referring to the numbers that are above the letters. They are not the same as Numpad0-9.
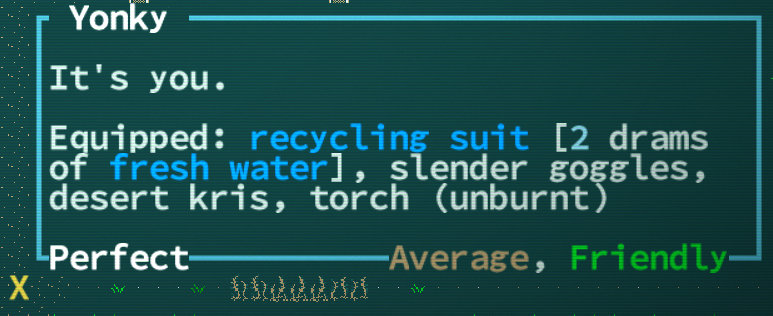
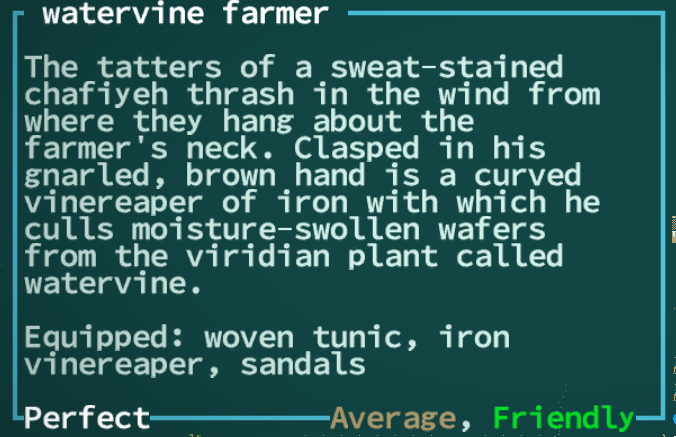
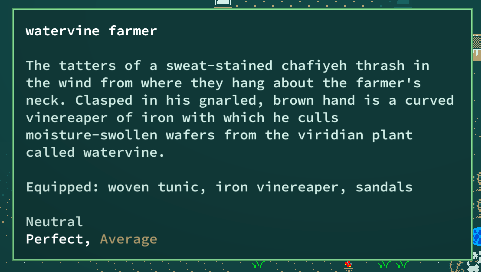
Look. Looking at any monster will give you a brief description, what they have equipped, their basic health status, and their difficulty. In Qud land, “Average” means dangerous even one on one. If you get attacked by two average rated enemies at the same time, I suggest running away if you have no good ranged options.
While in look, F1:
This “unlocks” the look cursor, so it won’t autosnap to creatures. This makes it easier to have finer control on what to look at. Pressing F1 turns it back to the default.
Look and then space on an object:
Opens up the interaction menu. Check out the section in the appendix for detail about all the options in it!
Look and then page up or page down:
If there are multiple things on the same tile, this will scroll through each item. Currently not rebindable for laptop players.
W, then a direction:
Walk. If you have a slower computer, holding down a direction adds way more to the input buffer than you expect. ie, when you let go, you will go farther than you mean to. Walk makes you continue to walk that direction until you see a hostile creature or hit something.
G:
Get. Usually used to get things directly below you.
Ctrl + G(laptop) or Ctrl + Space, then a direction:
Distant interaction. Opens a list of everything in a square nearby. there you can collect, chat, or desecrate to your heart’s desire.
Space:
Use. It’s a general button that does context-sensitive things. Defaults to Chat or petting.
< and > or – and +:
Auto walks you to the stairs.
Numpad0:
Autoexplore. This automatically collects goodies, opens chests, and collects fresh water until you see a hostile creature. Saves a lot of button pressing.
Tilde(~):
Wait until healed. It does what you expect. It’s recommended to go a battle fully healed.
Alt:
Highlights interactable objects. Check out the section about ALT for more info!
Menu Hotkeys
- Ctrl + J: Journal. Lists recipes, quests, and lets you mark noted locations on the overworld.
- I: Inventory
- Q: Quest list.
- E: Equipped
- P: Skills. When you level up, you can spend skill points in stuff. Probably important!
- X: Character, and also the screen you spend your attribute and mutation points. (if you want more info, check “How do I spend mutation/attribute points?” below)
- A: Abilities
- Ctrl + A: Current status. Want to know what being “lovesick” does? This menu gives a brief explanation of any status ailments you’re currently affected with.
- Ctrl + F (laptop) or Shift + F: Factions
- Ctrl + M: Message Log
If you want to play with a mouse as well, check the appendix for Mouse Controls!
Mutated or Truekin?
The differences in game are basically what you get, but the basics:
Mutants focus on the player activating abilities. Their play styles can vary greatly depending on the mutation. Starts out weak at the start, but grows exponentially as you reach mid-endgame. Focuses primarily on leveling mutations to grow stronger.
Truekin focus on passive bonuses and plays closer to a normal roguelike. They have better stats at the start and depending on the calling, start out with some really nice goodies. However, they don’t get stronger as fast as mutants. Focuses primarily on gear and skill points to grow stronger. You won’t get into mutant level shenanigans like growing plants to grab your enemies and then setting said plants on fire, but has a simple play style that stays the same across all builds.
Ultimately, it’s up to you! Choose whatever you think sounds fun! The goal of Qud is whatever you make it to be. Want to go out in the greatest way possible? Do you want to finish the main storyline? Think about that sort of thing when you want to make a character.
What do all these stats do?
Even if you’re new to roguelikes, you probably have a basic idea of stats/attributes.
| Attribute | Purpose |
| Strength | Determines how likely your attack penetrates an enemy’s armor. Also determines how much total weight you can carry. |
| Agility | How accurate your attacks are. High agility also increases the chance to dodge an attack. |
| Toughness | Determines how much HP you gain at level up. Also determines your starting HP and your resistance to poison. |
| Intelligence | Determines how many skill points you gain at level up. Also affects the chance of accurately identifying artifacts and hidden enemies. |
| Willpower | Determines how long abilities need to recharge. The only stat that can increase Mental Armor. (see How does Combat work?) |
| Ego | Determines how much things cost and how much you can sell things. Adds a bonus level to all mental mutations. |
As you can see, all of these all look equally important. You can minmax your character, but it ends up being better to keep most stats balanced. Any stat that ends up ignored will come back to ruin things later down the line. As a suggestion for those starting out, a Toughness of at least 18 is recommended. It’s how long you can survive, and you need to survive.
Attributes VS Modifiers
The numbers on your character sheet are the stats. the (+1) right next to it are Modifiers. These are the numbers that are used the most. Every two extra stat points adds an additional +1 to the modifier.
Some skills also require a certain stat to be at least a certain number.
Saves
There are skills that pit your modifier versus a stat save, which basically is just a comparison to see which is stronger. All saves are rolled using 1d20, or a random range from 1-20. This is checked against the “difficulty” of the throw, and the type of attribute of the save.
As an example, a creature can apply the bleeding debuff that uses a toughness save with difficulty 15. This means that a 20 sided die will be rolled, and the character’s toughness modifier will be added to the result. If this is greater than or equal to the difficulty (in this case 15), the bleeding will be shaken off.
How much should I put into each stat?
(This section brought to you by Tuxedo Catfish’s advice. Thanks!)
Qud is unlike other games where minmaxing during character creation, or making many stats incredibly low to make the rest super high, is much less broken than it actually sounds because of how important every stat is.
Increasing a stat usually takes 1 point during character creation, but increasing it past 18 makes it cost 2 points instead, maxing out at 24. That extra point of strength is costing you two points of another stat that probably really needs it. However, leveling up attributes after creation costs the same.
A common way to die for beginners is “dumping” (make one stat very low) willpower for additional ego and strength, only to lose all of their hp because they ignored that low willpower is also low MA. To avoid this, consider dropping one point in the highest stat and give those two points to willpower. Once you hit level 3, you’re free to put a point back into strength/ego.
TLDR: Generalize in character creation, specialize afterwards.
Recommended Stat Thresholds
These are recommended stats to have during character creation. The only required one is 18 toughness, so feel free to regard/disregard them.
These are all just suggestions if you plan on making a build last! If you just want to get past the early game really fast and/or see how certain skills/mutations work, it’s fine to put 24 in a skill. But overall, maxing out a stat is only for builds that are very focused on what they want to accomplish.
≥ 18 toughness
Everyone in the discord will tell you to take more than 18 toughness. it’s a good amount of starting hp, increases how fast you heal, and helps against bleeding.
≥ 17 intelligence
This is a super high amount of intelligence that most builds don’t usually have, but the high intelligence is good for new players because of the abundance of skillpoints it grants. If you have trouble budgeting or prioritizing which skills to get first, consider playing with high intelligence! Once you’re more confident, you can gradually decrease it down to whatever amount you like. Note that having really high intelligence at the start will not leave you much for the other stats, so this recommendation is highly optional and should be used only if you have trouble with skill point management.
≥ 16 willpower
Willpower gets a bed rap but I, Dij, am here to tell you:
Willpower is not useless
I made it a header because people think that its a useless stat. Here are the main three reasons why it isn’t:
1. It is the only defense against mental attackers for true kin
True kin have no equivalent to mutants’ Mental Mirror. If a true kin has low willpower and they go up against an enemy with sunder mind or confusion, they’re pretty much toast.
2. It prevents the negative effects of witchwood bark
Witchwood bark is the earliest and cheapest form of healing, but has the side effect of confusion. If you have high willpower, this almost never happens, meaning its just a free instant heal
.
3. it makes cooldowns very, very short
It’s underestimated how much willpower decreases cooldowns. Sure, freezing hands taking 15 turns to refresh doesn’t make it not overpowered. But what if it only took 12? or even 7?
You can still dump willpower if you have mental mirror. You’ll live, but it’s still a very powerful attribute to have because of the last two reasons.
Advanced stat planning
The general soft level cap is around 37, so plan those stat points accordingly. Once you get more acclaimed to what level you generally are at during certain key points of the story, you can plan passing certain thresholds once the difficulty ramps up to require them.
Say I have an character with 18 Intelligence. I want to get Tinker II (23 Intelligence) around the same time I’m about to enter a certain dungeon, because that dungeon contains the materials needed for higher level tinker recipes. judging from my past experiences, I enter that area at level 24. This gives me 4 attribute points to spend, and +4 to all attributes. At level 24, I would have 22 Intelligence and 4 points to allocate. This means that I can put one point into intelligence early and put the rest in any other attributes that need it.
However, planning this far ahead is only good if you can consistently get there. Don’t be afraid to build only for the area or levels that you find difficult.
How do I make a Mutant Build?
This isn’t the guide to suggest good builds, and I suggest that you check the dedicated guides for those out! But this section is here to understand exactly what goes into a good build. It is by no means required but makes for an easier time playing. Here are some basic archetypes of mutations.
Hurt Things button–
Some builds focus on this primary mutation to deal damage. Most physical ones will take up an equipment slot, so be mindful of that. I make them required in the build template, but more experienced players do not need one.
Example Mutations: Sunder mind, Syphon vim, flaming/freezing hands, electric generation
Panic Button – Something has gone terribly wrong. This is the ability you use to RUN THE HECK AWAY. There are two main ways to accomplish this.
Force enemy movement:
Example Mutations: Force Wall, slime glands, spinnerets, burgeoning, teleport other, space time vortex
Increase your own movement:
Example Mutations: Multiple legs, Teleportation, Space time vortex, Phasing
Passive Mutations–
Stuff that does things but you don’t really need to activate them:
Example Mutations: Carapace, Multiple Arms, Sense Psychic
There’s a lot of other mutations and their archetypes that aren’t mentioned, but a panic button and a damage move are the most important ones that are near required for a solid build. The other mutations are still plenty useful. The remaining mutations may be your main focus of the build! These recommendations are based on utility, so even with these restrictions you can still create a very varied character.
Some mutations have really good synergy together, but I leave that as an exercise for the reader to think about.
What are Morphotypes?
In game, once you reach 4 mutation points, you have the opportunity to buy a new mutation. These morphotypes limit what mutations you can get. Chimera forces physical mutations(and defects!), and Esper forces mental mutations(and defects). These are not required, and usually not preferred unless you want to play a dedicated esper or chimera.
The odd one out is Unstable Genome – when you level up, it has a chance of changing into a random mutation. It only works once each unstable genome.
Defects
The more points a defect has, the more difficult it is to deal with. -3 is “sucks but managable” and -4 is “will probably be the thing that kills you”. Defects aren’t required to make a build. If defects make the game too difficult, it’s fine to not include one.
The basic vanilla build template
Without defect:
Damage
Panic Button
(wild card)
(wild card)
With defect:
Damage
Panic Button
(wild card)
(wild card)
(wild card)
Defect
How do I make a True Kin Build?
True Kins are a lot easier and harder to talk about, since you can only choose one starting cybernetic. It’s harder because there’s not much else to say. Any basic stat building concepts apply for both mutants and true kin equally. Keep stats balanced. Have at least 18 toughness.
Arcologies
It’s a lot more complicated than it looks, but all these arcologies are broken down into four things:
- Bonus Resist (arcology specific)
- Starting skills
- bonus stats to fit those skills
- (unlisted) what range of artifacts they can start with
My one recommendation is to start as a Horticulturist because they always start with the Bio-Scanning Bracelet, which lets you peak at specific health values, AV and DV or all organic creatures when it’s equipped and powered. Creature stats remain the same across games, so you’ll quickly learn what each enemy is capable of. You can also take the Optical Bioscanner implant which does the same thing, but horticulturalist lets you keep that implant slot free for other things.
Praetorian is also nice because they start off with good combat skills as well as a solid ranged weapon that can carry you through the early game. (My personal complaint about runs with them is that they feel kind of similar but YMMV)
Implants
Instead of mutations, true kin start of with one implant on the body part they choose. The last implant you can select depends on the arcology your character hails from. A note here that true kin’s night vision is much more powerful than mutant night vision: true kin night vision can see the entire screen as if it is daytime, but mutant night vision only has a radius of 5 tiles, which is one tile bigger than a torch. However, true kin night vision tints the screen green. You can disable full screen effects in the options to get rid of the green if you hate it. If you don’t know which implant to choose, night vision is a solid default.
If you choose an implant with a low license point cost like 1, you won’t get “bonus” license points. No matter what implant you choose, you start off with 0 license points. This means that you have a one point bonus if you pick a 2 point implant at the start.
License points
As a true kin, you have access to the becoming nooks scattered across Qud. as long as you have a credit wedge, you can trade them in at these nooks for more license points. These points control how many implants you can have equipped at one time. So even though they’re good weightless trading goods as a mutant, they are infinitely valuable to true kin because it limits their implants.
Where should i place my implants?
The answer is, it usually doesn’t matter because only a few implants are destroyed when removed, and those are usually limited to only one slot anyway. You’ll come across lots of implants that you won’t be able to start with, so keep an eye out for certain implants that are limited to only a few slots and keep those free the next run!
How do I even move?
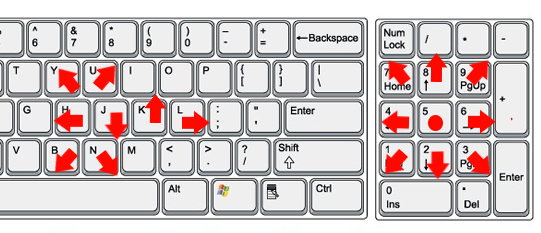
Caves of Qud uses the numpad to go all 8 directions. for those without a numpad, HJKL with YUBN as diagonals.
What’s the dot, you ask? That’s the incredible ~*Wait Button*~. best used when:
- A monster is one square away, so they gleefully run into your fists.
- You’re on fire (which makes you put it out)
On laptop, the wait button is not mapped to anything other than Numpad5, so you will need to map it to a new button.
Gamepad does NOT work with Qud, unless you go into Options > Controls > (prerelease) new input manager. Fair warning, it’s not fully implemented yet.
Attacking
Attempting to walk onto a square occupied by a hostile creature will attack that square instead. If you want to attack something else like a neutral creature or a wall, you need to press Ctrl + that direction or Shift + a direction (laptop) to force an attack.
How does combat work?
The majority of this is covered in the help guide ingame, so this will be a brief summary.
What is this 3d9 1d20 nonsense
This is shorthand for rng range, taken from the sacred ancient ritual known as Dungeons and Dragons. The syntax is:
(number of dice)d(number of sides)
The default damage range is 1d2, so that means one two-sided dice,aka a coin, will be rolled/flipped. A 2d6 longsword will deal 2 rolls of a six sided dice.
A steel axe with 1d6+1 damage will deal a roll of a six sided die, with 1 added to it afterwards.
Armor Value
If the enemy’s penetration value is greater than this, the attack goes through, and the game rolls for damage with the listed damage dice.
Dodge Value
Accuracy is calculated by a 1d20 + Agility Modifier vs a 1d20 + victim’s DV. If the attacking has a higher value, it will land.
Mental Armor
Armor, but for mental attacks like sunder mind.
Penetration Values
The number that has an arrow symbol next to it. The number to the left of the fraction is the current penetration with your strength modifier, and the dimmed out number to the right of the fraction is the max possible penetration value.
Quote ptychomancer from the Qud discord, since I can’t put it better:
“Each round of penetration is calculated by rolling 1d10-2 three times (each one plus your bonus). If any of them exceed the opponent’s AV, you penetrate once. if ALL three exceed the AV, you penetrate once and then repeat the process at -2 penetration.”
This sounds really complicated, but what this really means is that if you have really low AV compared to the attack’s PV, that attack’s damage will multiply by several times in terms of severity. one hit of 1d6 might hurt, but three hits of 1d6 (or 3d6) can instantly kill a level 1 character.
Elemental Resists
The resists listed on the character menu are a percentage of damage blocked of that type. If you have 100 heat resist, you are completely immune to heat damage or being set aflame. Note that there is heat convection in Qud. Standing next to a very hot thing will set you on fire, and being next to something very cold will slow your movements.
Do I focus on AV or DV?
The answer is: both, 90% of the time, but in the early game it doesn’t really matter, just get to 6 AV.
You can’t ignore DV because there are certain skills that ignore AV, and ignoring AV is also dangerous because there’s always a 5% chance for an attack to hit, no matter what. Because of how penetration works(read above section), when that attack hits, it will hit hard. It depends on the area that you’re currently fighting in as well.
In the early game however, it’s good to focus on AV because attacks that ignore AV are very rare at this stage. 6 is the best amount to prevent multiple penetrations for attacks.
So no dodge spam?
You can still make a high DV character, but having some AV is recommended so you don’t get absolutely smashed into paste.
How do I compare two armor pieces?
The early game rule of thumb is that 1 AV = 3 DV. For example, my character is wearing a woven tunic (1AV 2DV) and comes across a leather armor (2AV 0DV). Is this worth losing that 2 DV? Following this system, losing the one AV must mean that the other armor must have greater than 3 DV to be worth it. Since it is only 2, the better armor to equip in this case is the leather armor.
In the mid game, this rule of thumb switches to 1 AV = 2 DV.
I’m actually in the game, what now
Welcome to Qud! There’s already lots of guides here on the main quest line. I recommend checking those out instead, but here is a list of things you should have as soon as you can to survive in Qud: (I have a more fully fleshed out guide about this over here! You can also use inurashii’s mod which does the same thing but cooler.)
- 6 AV– This is the threshold that allows you to survive most early game threats. This can be easily done by filling all of your empty gear slots, and equipping the highest av body slot you can find. This is important even if your build focuses on dodging!
- A powerful ranged weapon– a wooden bow can be ok if you lack the money, but muskets/rifles will be your biggest source of damage in the early game, even if you have a melee oriented build. Some creatures are guaranteed to drop a rifle, so you can kill one to avoid the high price.
- Ammo– Even if you have the worst ego, I buy this on the chance that I find a gun in the wild. Ammo quickly becomes a non-issue once you have the stats to explore in ruins, but in the early game ammo is very important to stock up on.
- A better source of light– Torches are heavy, one use, and have a limited range of light. There are multiple items that fit this description, but the earliest one is the glowsphere that is sold by the warden in Joppa.
- Things for healing in a pinch– Sometimes you get in situations where you have to lose a large amount of hp before escaping. Stock up on healing items to make those more survivable! Witchwood bark is one that is really cheap to buy and easy to harvest.
One of the reasons why I prefer Caves of Qud that I don’t see many other people talk about is that there is little to no preparation involved before going out to explore in the overworld. You don’t need to buy anything besides lead slugs or arrows, because everything else can be easily found lying around, on enemies, or inside chests.
Once you have all of these, it is really hard to kill yourself in the early game barring exceptions like out of depth creatures and suicidal overconfidence.
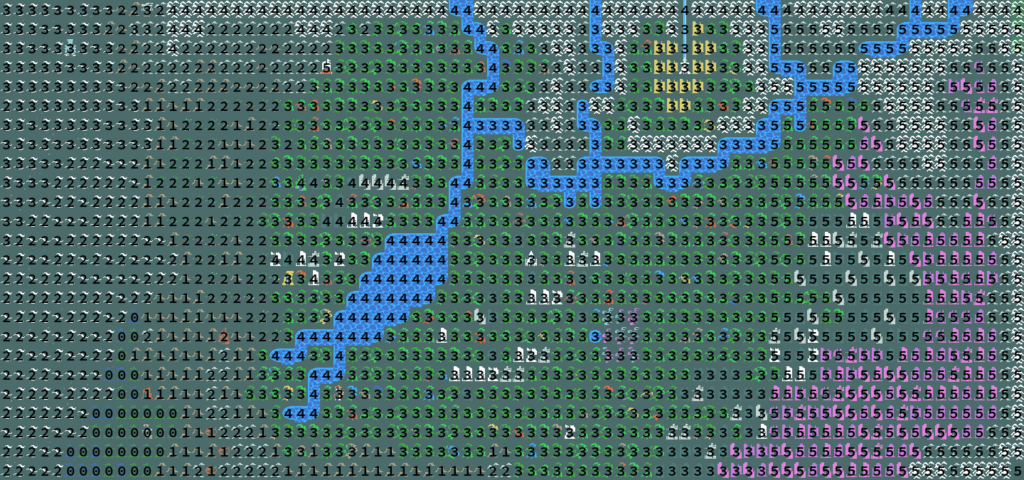
How do I read the overworld map? (also: What’s a Parasang?)
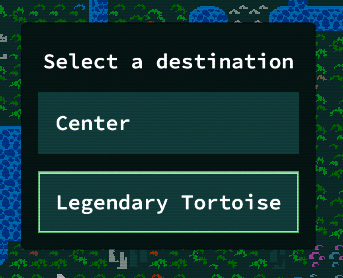
The overworld is the massive sprawling land when you press ‘<‘ on the surface.
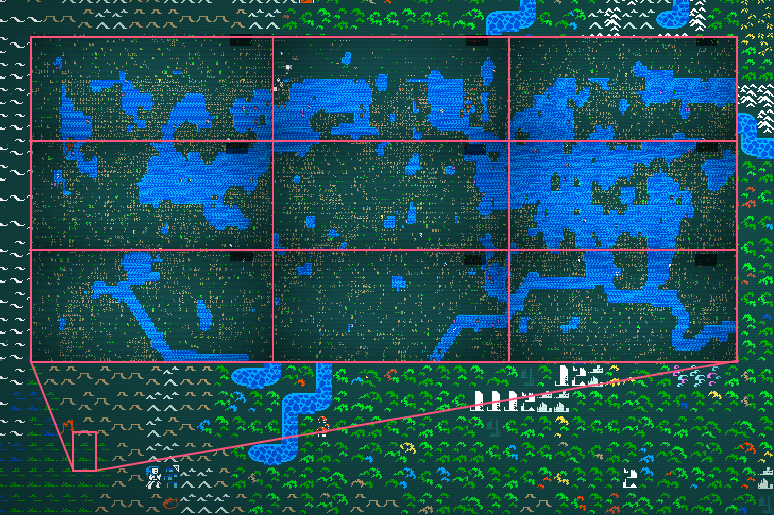
Each overworld tile is called a parasang. Each parasang is divided into 9 screens. By default, you move to the center screen first.
You can also ‘L’ook around to see descriptions of locations under your cursor! If you find any special locations of note, the description will also list it. Parasangs with noted locations will have a white triangle on the upper right corner of the sprite. If that’s too difficult to see, you can mark it using the Journal. (See: How to use the Journal effectively)
How do I spend my mutation/attribute points?
All of this can be done using the character screen, or X.
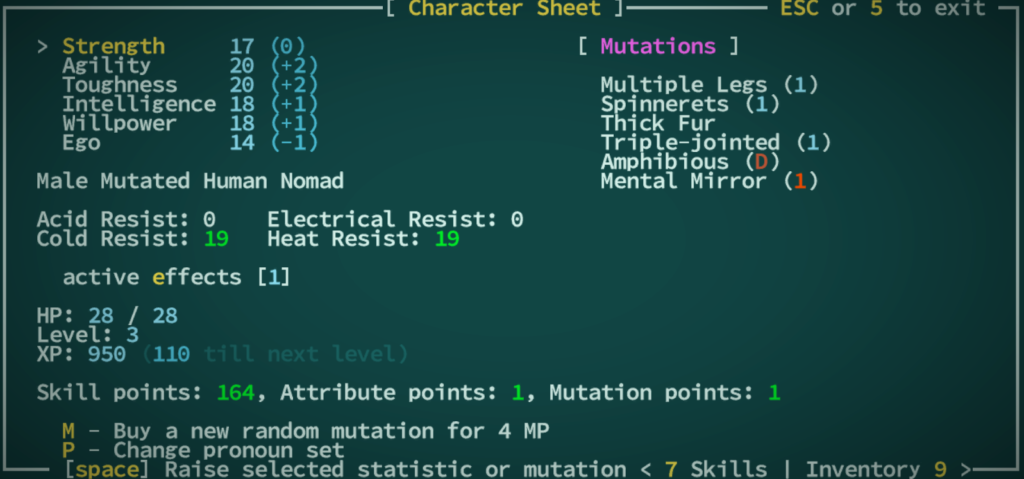
The majority of the screen is straightforward once you understand the basics of stats and resistances. The main reason you’re going to be here though is to level up your mutations and increase your attributes.
- Every 3 levels grants you an attribute point.
- Every 6 levels, all your attributes increase by 1 instead.
- Every level up nets you 1 mutation point if you are a mutant.
To level up your attribute, highlight your cursor (the >) over the stat you want to increase and select it using space. Mutations are leveled up the same way, but you have to move the cursor over to the mutation list by hitting right. Selecting the mutations also gives you an explanation of what they do and what they become when you level it up, even if you don’t have a point to spend.
If you look at Mental Mirror, you can see that the level of it is a red 1. This is because of my character’s ego modifier, which is -1. Mental mirror here is actually at level 2, but became 1 due to being a mental mutation and all mental mutations will have their level affected by their ego modifier. However, you can only manually increase a mutation up to 10.
There’s another limit to your mutations. You can’t level a mutation higher than a half of your level. You could spend it on another mutation, or save it up to buy a new mutation!
Buying New Mutations
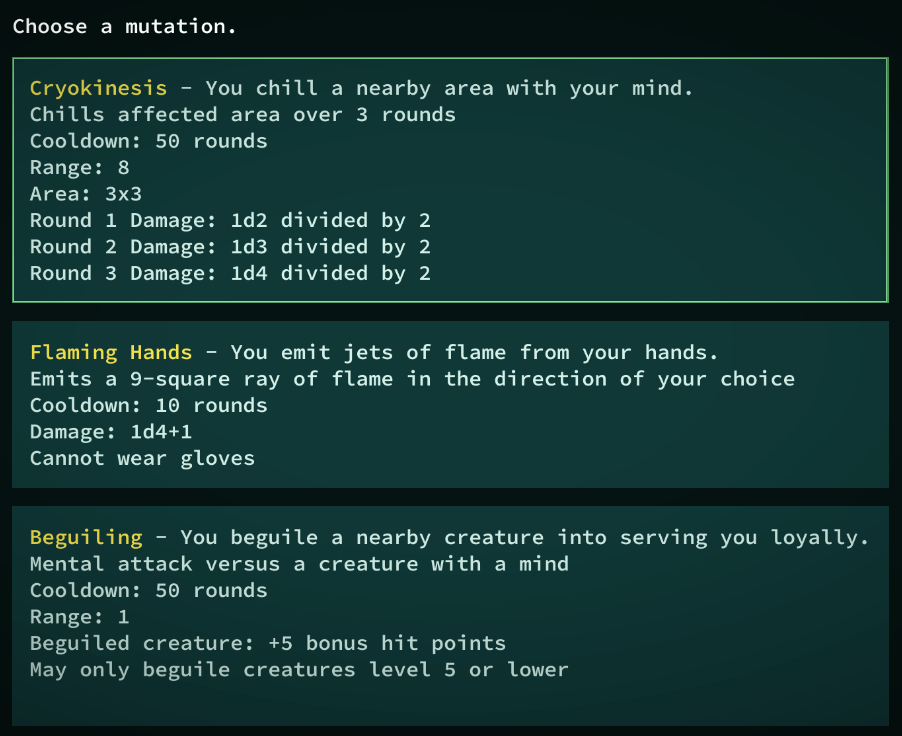
Pressing M on the character screen when you have 4 or more mutations points allow you to buy a new mutation. If you have chimera/esper as a genotype, this is what it affects.
You have to choose between three different mutations that you would normally get on the character select screen, except the 1 point mutations. Deciding what mutation is best depends on your build and playstyle. Think about what would be most synergetic with your build!
Why are my equipment stats red/green?

When you have a mutation that gives you multiple limbs such as multiple legs or two-headed, the AV and DV of anything equipped there and other similar body parts are averaged(rounding down). Red means that the stat is negatively effected, and green is when a negative stat is lessened due to the average. In the case of this image, because Hooks is 0AV 0 DV and Steel Boots are 2AV -3DV, the character gets a total average of 1AV and -2 DV.
This just serves to not give multiple limbed characters twice the amount of AV and DV of their average-number-of-limb friends. This averaging only applies to AV and DV! It doesn’t apply to any additional bonuses equipment have.
Why does my armor say [cracked]?
This happens when you’re fighting an enemy with an axe-type weapon. The last time you fought, you might have seen this pop up:

With “The enemy cleaves through your armor.” in your message log. If you check your equipment you can see that one of your armors has 1 less AV than it should.

Recycling suits have 3 AV normally, and it was cleaved to have only 2.
This status can stack, so your AV can be eventually be whittled down to 0. You can see how this can be very dangerous! Not to worry, though. The status effect goes away after a set number of turns and your equipment’s AV will go back to it’s original number.
I have too much water! What do I do?
Sooner or later you’ll find that water is in fact very, very heavy. After a exploring a couple of ruins you end up with almost 200 drams! You can barely pick up anything else. To make this less of an issue try to remember one thing:
Water is the base unit of currency.
Some math
This means that one dram of water translates to $1 in the trade screen. If you get a full (64 drams) waterskin of water, you’ll end up with $64 for 17# (the game’s weight unit). Not counting the weight of the waterskin, you’re looking at $4 each 1#. If water is getting too heavy, you can swap it with things that are worth more than $4 per #. Here’s two candidates:
Trade Goods

Trade Goods have their own section in the inventory and are marked by a golden $ while all other items have a blue $. This means their value will not change. It doesn’t matter if your ego is terrible or you’re buying it or selling it. These make it very easy to condense your water into objects that are $10 per #, and even more as you get farther into the game. Some trade goods do not have golden $, but have the benefit of increasing in price as your ego grows.
Random Drops
Random drops are much harder to use as trade goods because their price will vary depending on your ego score and they will weigh more than 1# causing you to do a little extra math in your head. Most loot will be worth more than $4 per #, but there are lots that are more weight efficient than others. Eventually you’ll get a knack for what is worth the most, but a decent rule of thumb is to pick up anything that’s equal or less than 5#, and to keep any artifacts or modded equipment.
A simple non-exhaustive list for tldr and quick reference:
- daggers
- bows
- short blades
- most artifacts
- modded gear (has a extra word before the item)
- pretty much anything that weighs less than 5#
What you can and can’t keep very much depends on how much strength, or max carry capacity your character has. Lower strength characters may only find it worth it to carry daggers.
Overburdened in the Moment
This was all preventative stuff, but sometimes you’re overburdened with water and you’re struggling to figure out what you have to drop. This does mean you will end up losing some money, but as the game goes on you’ll find that it is rather easy to make it back up.
- Drop items that have the lowest $ to # ratio
- Reduce certain items to their 0 weight components
- How much is your stuff worth? If your least expensive item is still worth more than a copper nugget, either:
- Drop a copper nugget
- Drop a full waterskin
You can also skip all this by warping someplace else, preferably next to a merchant, and dumping your heavy stuff there and return when you have a lighter load to pick it back up again.
Can I safely leave items in another area?
Yes! The game remembers where every NPC and item is located, and you can leave your items on the ground or in a chest without it vanishing.
So nobody will take it or destroy it?
Only one creature, the beetlebum, takes items on the ground. NPCs only wander on their original screen, so if your stash is on a screen without them, you’re fine.
Another worry is that items can be destroyed with aoe attacks. To counteract this, keep your stash in a peaceful area like a town or an already cleared out area.
Note that if you use a chest that’s already owned (it will tell you it’s not yours if you open it), nearby creatures will become hostile if they see you opening it. For best results, bring your own chests if you plan on storing things in town.
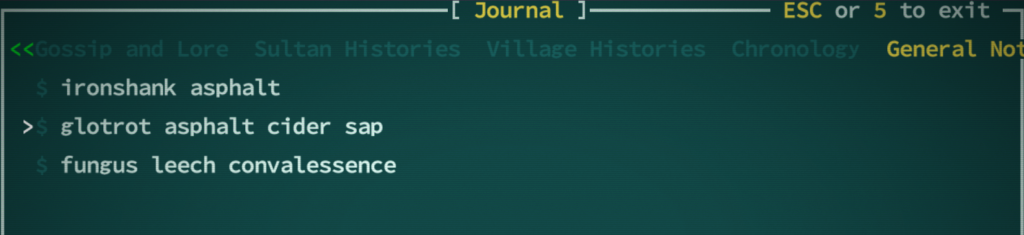
What does the green or gray $ represent in my journal?

The world of Qud is filled with lots of secrets and hidden ruins. The journal keeps track of most of them, and they always seem to have that green $ with them.
This is a quick indicator to show if you shared that secret with anybody via water ritual. Green means that it’s still tradable (but only to those who are interested in it) and gray means that it was already given away, with a foot note indicating which faction it was given to. It’s another type of currency, so be sure to stock up on important relevant secrets if you plan on water ritualing a certain faction.
How do I do alternate start village quests?
If you don’t want to start in Joppa, you’ll start playing in a randomly generated village with two randomly generated quests. Due to the random nature of them, these quests can vary very wildly in difficulty. This section is a bit more walkthrough-y compared to the rest of this faq, but this question has been common enough that I can at least outline the basic strategies of going about doing them.
A big thanks to eva problems in the Qud-Discord for providing most of these strategies!
If you don’t know what a parasang is, be sure to check out the section titled “How to read the World Map”.
Finding the quest givers
For me, this is actually the hardest part of the quest. Starting villages will have two quests, but any later villages you find will have one. Talking with the majority of the villagers will have the “Is there work around here?” which will provide their names which doesn’t really help unless you look at the names of every single villager. As you play more, you’ll learn the naming convention of each faction so it’s slightly easier to find a quest giver by their creature type. However, for those without hundreds of hours under their belt there’s a much simpler way.
- Quest givers will usually be given by the green colored villagers that are named, but cannot be water ritualed. (in beta branch, 2.0.200.0 +, they are yellow instead.)
- The second type of quest giver are the designated “important” people of the village, usually red or purple color. These are the ones you can water ritual with.
- Since patch 2.0.189.0, there are now village tinkers that can also give quests! They are all a cyan color.
- Those are the most common quest givers, but I have seen some rare outliers such as the village merchant, which are usually yellow.
Sometimes these colors can be overwritten due to that creatures mutations or appearance, so always (L)ook to see if the name matches! They also will avoid moving as much as possible.
Should I even be doing these quests?
Due to the random nature, there are quests that just aren’t easy to complete. They can be due to being forced to visit a lair of hostile powerful creatures, or that the difficulty tier in the area you have to search through is too high level. (Look at the Danger Tier section in the appendix. Can be a mild spoiler to those who want to keep the difficulty of biomes a secret!) You can always come back later when you are better prepared.
Parsing the quest
Asking “My services are available if you have work to offer.” or “Is there work around here?” with the quest givers will give you a small snippet of proc gen goodness before asking you if you want to take the quest.
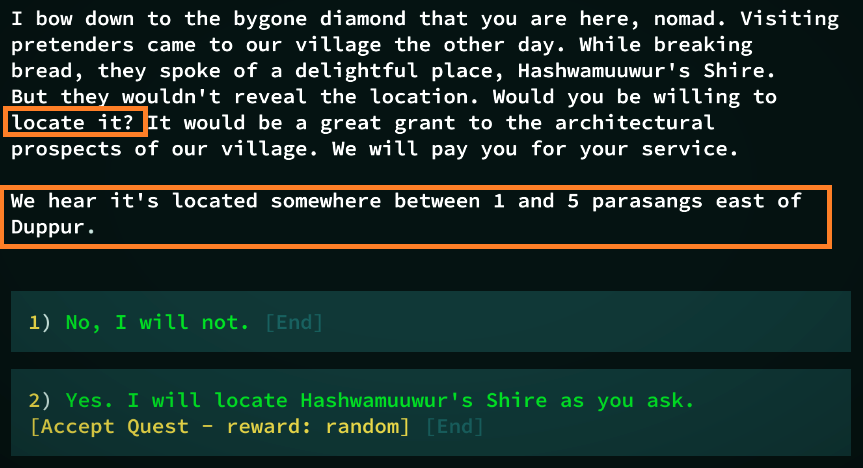
There’s two sentences that are actually important to the quest itself, and you’ll learn to zone in on those.
All these quests boil down to finding a specific location based on a known location, and doing the specified action. Let’s focus on the second box. Sometimes they will tell you exactly where to go, which is the easiest one. You can mark that location in your journal (see Using the journal effectively) and travel there directly. They’re often only 3 or 4 parasangs away as well.
However, often they will provide directional hints like “3 parasangs east of ___”. This is what strategies of finding the location will depend on. To illustrate my point better, I’ll be using some text diagrams to explain possible quest locations.
Legend:
| Symbol | Meaning |
| A | The known location |
| X | Possible quest locations |
| – | Empty screen in a parasang |
| | or _ | borders of a parasang |
“… between so and so parasangs in this direction…”
This is the simpler one to complete. What the game doesn’t tell you is that when they mean “east” they mean directly east from that screen. Let’s say that the quest location B was 1-2 parasangs west from A.
---|---|---|---
---|---|---|---
--X|XXX|XX-|-A-
You would only need to search those 6 screens to find B! So first you’ll have to find the location of A relative to that parasang’s center. Enter the parasang center, and poke around and see which screen has A. Then, you can travel west on the overworld map for a parasang and go to the same location A would be, and continue traveling west until you find your goal.
“…within a parasang…” or “…near …”
This one can be rather tedious to do, especially in the hills and mountains, but they follow a similar principal.
---|XXX|XXX|x--
______________
---|XXX|XXX|X--
---|XXX|XXX|X--
---|XXX|AXX|X--
______________
---|XXX|XXX|X--
---|XXX|XXX|X--
---|XXX|XXX|X--
The possible locations are 2 screens around the location. That means if A is near the edge of a parasang, it will “spill” out into the neighboring parasangs. The strategy here is to explore the area directly around A first, and then spiral outwards.
Quest actions
Some of these are exactly what you think, but I put some unexpected quirks below.
Locate a place
These will complete as soon as you enter the screen. This helps a lot when the location you’re trying to find has a vague name.
Desecrate a shrine
There used to be a bug where (Collecting blood or putrescence will cause the quest to not register you as having that liquid. If the desecrate option doesn’t appear, try pouring it into another container to let you choose the desecrate option.
Drink from a vase
If it’s empty, you’ll have to pour in your own liquid to drink. Note that this is considered a hostile action if it’s owned by a village.
Cook from an oven
Nothing too out of the ordinary
Find an object
These will either be in a bright pink chest, or in someone’s inventory. If in a village, trade with the red colored or blue colored villagers(wardens) to see if they have it. In a lair, it will be in the legendary creature’s inventory.
Sit on/enter/sleep in something
These can be dangerous if you are in an area with hostile creatures. Be sure to clear out the area before you complete these because you will be incapacitated for a while.
Open/close a door
Simple enough. Only thing is that if the door is already open and you have to open it, you have to close it first.
Put something on a table
interacting with the table will open a prompt asking if you want to place something on it. treat it similar to trading and give the table something you won’t miss.
What do the book title colors mean?
You can find books pretty much anywhere in Qud. They have different uses depending on the color of their title:
- Yellow books are prewritten books with guaranteed contents. This does not mean they do not have some form of randomness to them, however. They contain information about the world itself.
- Green books are recipe books which teach the player the recipes within once read. (check the appendix for an overview of cooking!)
- White books are randomly generated. Due to the text being randomly pulled from the entirety of the game’s dialogue, you may find some clues if you look through them. They also have a chance of containing a clue you won’t be able to find anywhere else.
What do I use them for?
They’re a good thing to sell, as they are always 1# and have a decent commerce value. However, the biggest important feature about them is that they can be donated to a certain NPC which then rewards you with experience. If you ask me, free experience that doesn’t require you risking your life is a pretty good deal. Books also give the same amount of experience no matter what. Yellow ones also give you the most!
Why did my companion stop healing?
Companions heal at a slower rate than you, but sometimes it looks like they stop healing altogether. This is a rather common question with a rather simple answer. They’re thirsty! In the interaction menu, (G)ive (or press T or tab while chatting with them), and give them a waterskin full of freshwater.
How do I harvest plants/ butcher corpses?
Harvesting plants and butchering corpses are the main way to gather food and cooking ingredients. (if you want more info on the importance of cooking, check out A light dip into cooking in the appendix) Just make sure that the skill is toggled on in the (A)bilities menu.

Once these are toggled on, walking over a harvestable/butcherable object will do that automatically, as long as there are no enemies near by. You can also use the Interaction menu and press (H)arvest or (B)utcher. If you autoexplore, the pathfinding algorithm will also auto harvest and butcher for you. However, not all plants are harvestable, and not all corpses are butcherable.
Can I wait for a plant to grow ripe then?
No. If they spawn unripe, they will remain unripe no matter how long you wait.
What are the things like <this> to the right of my items? (Tinkering 101)
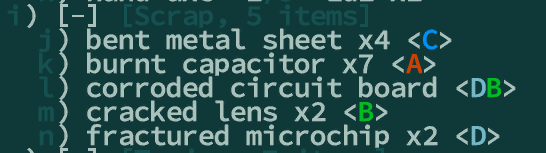
On certain characters, you may find that some items will have colored letters and numbers to the right of their names. These are called “Bits”. These bits are crafting components that can be acquired by learning Disassemble in the Tinkering skill tree. Disassemble takes the most significant bit (the right most one) and has a chance of getting the others as well.
Crafting is done by opening the Tinkering menu (K or Ctrl+K on laptop). If you have the skill to learn recipes, you can use the bits collected to make something new or modify an existing item. It’s a very powerful skill tree to learn!
What do I do if my save is incompatible?
Every Friday (or so) your save has a chance of breaking due to ♥♥♥’s weekly updates and changing infrastructure. It’s annoying, but if you’re on Steam there’s a way to revert back to the build that your save works on so you can keep playing until you’re satisfied.
In your steam library, right click Caves of Qud and click “Properties”. There, go to the “Betas” tab. If you scroll through the drop down list, you see that there are multiple builds that date back several weeks. Choose the build number that you last played your character in, start up the game once it finishes updating, and your save should be perfectly fine!
Something doesn’t work right (Bug Reporting 101)
Because Caves of Qud is an early access title, things can and will break. If it’s a minor thing like an item not showing up or unfairly lost, you can wish it back.
For more complicated bugs and questions or if you don’t know if it’s even a bug, feel free to ask on the steam discussion forums or the official discord’s #bugs channel. However, if it’s a bug that’s too hard to replicate, the members there will tell you to do the same thing below, which is to send a save file and a player log to support at freeholdgames.com. Just so you know, the option to “automatically report it to [the devs]” doesn’t actually work. You have to email it or they won’t know. It won’t fix your current problem but it will help in preventing it from happening again!
Sending a Save file
For more extreme cases like zone building failing (a place is completely empty except for white dots) or error messages, send a save file to support at freeholdgames dot com detailing your issue, how to replicate it, and any local mods you have installed (if the devs are unable to get a hold of all mods you use the save file may not be loadable).
Locations:
Windows: C:\Users\[You]\AppData\LocalLow\Freehold Games\CavesOfQud\Saves
Linux: ~/.config/unity3d/Freehold Games/CavesOfQud/Saves
OS X: ~/Library/Application Support/com.FreeholdGames.CavesOfQud/Saves
The save folder names are unhelpful hashes, but if you look at the contents of the player.sav.info you will see the name of the character and their current location.
If possible, zip the entire save folder to send. However, games that have been played for a very long time (or spam precognition) may be too large to send as an email attachment. Then, just sending primary.sav is fine. Best practice is to send as much of the folder as you can!
Player Logs?
If a behavior/menu suddenly closes out before doing what it should do or walking on the overworld map requires several keypresses before it actually moves a tile, the game is probably encountering several invisible errors. All these errors are actually outputted in a text file called player.log, which logs all outputs sent by the game in one session. There’s also a copy of the outputs of the previous session called player-prev.log if you started the game again before grabbing the log. It looks like gibberish depending on your technical skill level, but is very helpful for the devs in finding where exactly in code something broke.
The location is a level up from saves, so if your saves are located in C:\Users\[You]\AppData\LocalLow\Freehold Games\CavesOfQud\Saves, your player log would be located at C:\Users\[You]\AppData\LocalLow\Freehold Games\CavesOfQud\player.log .
What else I should know to not die?
This is the assorted tips and tricks I don’t know where to put. Some of this is general good practice for any roguelike. Eventually these may be fleshed out into their own sections?
- If you don’t know what something is, [L]ook at it and check it’s difficulty level. These are estimates if you fought them one on one. An average monster can be doable, but having multiple swarming you will spell out death. If you see a “Very Tough” or even an “Impossible”, leave the screen as soon as you can.
- Shields do nothing except lower your DV if you don’t have the Shield skill. Save your arm slots for something else if you don’t have it.
- if an enemy is chasing you, sprint! sprinting will let you get far away enough for you to escape to the world map by pressing <.
- Don’t be reckless- if you die, you die. (unless you turned off permadeath). A coward is better than a corpse.
- Bows and rifles are important for all characters. Just buying the base skill will make attacks much more accurate and will let you kill tougher enemies much faster.
- Having two hostile enemies in melee range causes your missile weapon shots to “go wild”, making them much less accurate.
- Keep 30-50 drams of fresh water on you to prevent dehydration.
- The faster you travel on the overworld, the less opportunities to get lost.
- Travel unknown territory in the day so you can see enemies from far away. If you’re lost at night, press Ctrl + ~ to wait until morning.
- If your HP is about half, that’s cutting it dangerously close. If an attack hits you about a third of your hp, you probably shouldn’t fight that thing.
- Always retreat to known territory.
- If there’s a dangerous screen, you can always walk around it. Or over it on the world map.
- Don’t be ashamed of turning off permadeath! You can also set the debug option to ask if you really want to die before dying if you feel like you died unfairly and want a second chance.
- The fandom wiki is slightly outdated and some information may no longer be correct. Take things with a dram of salt.
- For the squicky, you can disable blood splatters in Options > Debug.
- If the screen tint when using night vision or berserk bothers you, you can turn off Options> User Interface > Disable Full-Screen Color Effects.
Mouse Controls
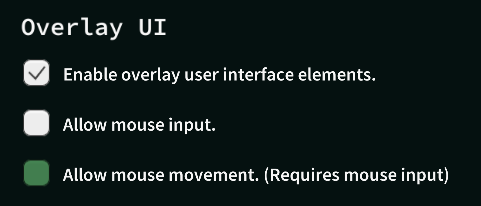
There is one alternate control scheme that can be used in conjunction with the others: Mouse input. By default it is off, but it can be enabled by going to Options > Overlay UI > Allow Mouse Input. (Overlay UI doesn’t need to be checked for this.)
How does it control?
Mouse input allows certain things to be controlled depending on what is checked. If only Mouse Input is checked, only Right clicking on an object will Look at the item. Can be handy if the smart autosnap is too difficult to use and unlocking is too inconvenient.
If Allow Mouse Movement is also enabled, this lets players move to any left clicked square. if the square is nearby, it will be equivalent to pressing space. It will not move if a hostile creature is nearby, making it a safe way to maneuver without worrying about holding a button too long.
If Allow Map to be Zoomed and Panned is on, the player can scroll up/down to zoom in/out on the player. try playing zoomed in for a more cinematic experience!
Intermediate Moving Techniques
Taking a step back
This is a nonexhaustive list of methods of navigating your character to minimize damage. Most of these strategies apply to other roguelikes as well.
So you’ve entered a room full of baddies and they’re all wailing on you. The best thing to do is just to take a step back so only one enemy can attack at a time.
Waiting behind a corner
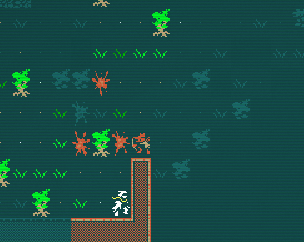
In the early game you don’t have a lot of ranged options and some pesks will keep shooting at you from afar, letting them get some free hits on you as you run up to them. If this creature is able to move, you’ll be able to make that creature move to you instead. Or at least, close enough that they’ll only get one hit instead of three or four.
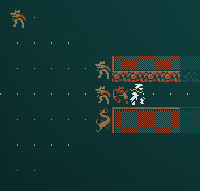
Here’s an example of a snapjaw hunter shooting at me. If I ran towards them, they would be able to shoot at me the whole time. The second problem is what new players don’t realize at first. The ai of some ranged attackers want to stay at ranged as far as possible, and retreat from you. If you blindly continue to chase, you’ll end up in unfamiliar territory and could be blindsided by their murdery friends. So let’s not!
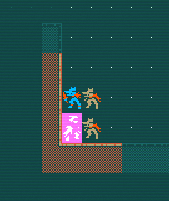
The pink square here is the location i chose to wait. In this spot, you will stay out of the snapjaw’s line of sight (meaning you can’t see them either). Wait a few turns and…
Bingo! You stay in known territory and your weapons have a much easier time reaching them! You can accomplish this using anything that will break their line of sight from you. In Qud, “they can’t see you unless you can see them” actually applies 99% of the time.
Stair Dancing
The greatest way to increase your chances of survival is to avoid getting swarmed by enemies. The first step into a new floor of a cave can be daunting, especially if the room is full of hostile creatures.
When just one can bring down your hp a third, three of them at the same time is definitely going to kill your character. What is one to do? This is when we stair dance. Stair dancing is a technique built around the limitation of rougelikes in that only one creature can stand on the stairs at a time. We just entered the room, so we can back right out by pressing < to move up a floor.

You’ll now be standing on the down staircase. if you wait in that spot, your enemies are still attacking you. Only one of them though: the one currently standing on the stair tile. If you attempt to move back down, you will make a force attack down a floor to the enemy on that tile. The greatest part: only one enemy can attack you at a time thanks to this. However, if you move off the stairs, the monsters will move up a floor to you and you will likely be surrounded again
Edge Hugging
This technique is best suited to more open areas where you can see the whole floor at once. While traversing the overworld, there can be some really dangerous enemies interspersed with the easy ones. If you move into a screen and see a dangerous enemy (tough, very tough), do not move any further! Most creatures have much more limited eyesight than you, and will only see you and attack you if you are less than half a screen away. This means if you stay on the edge of the screen, exiting the screen soon after causes no monsters to attack you (unless they are VERY close). Use this technique if you are lost and in dangerous territory.
These are all very helpful ways to survive in the lands of Qud, but they won’t work all the time. Remember, when things start to look bad, always use your planned escape strategy! This is usually some form of getting far away from the enemies to move to the world map. If all of your options are on cool down, or god forbid you had no plan, just sprinting will get the job done most of the time. Remember to break the enemy’s line of sight!
How to use the journal effectively
The basic controls and sections of the journal are easily understandable. But there are some overlooked features that add an immense quality of life to those playing. It’s my duty to tell these to you!
Custom Location
The journal automatically adds certain encounters to the locations tab. However, there are some places you want to add yourself. While standing in the same screen of the location you want to mark, press ‘+’ on the journals tab. You’ll open up a prompt asking what you want to name your location.
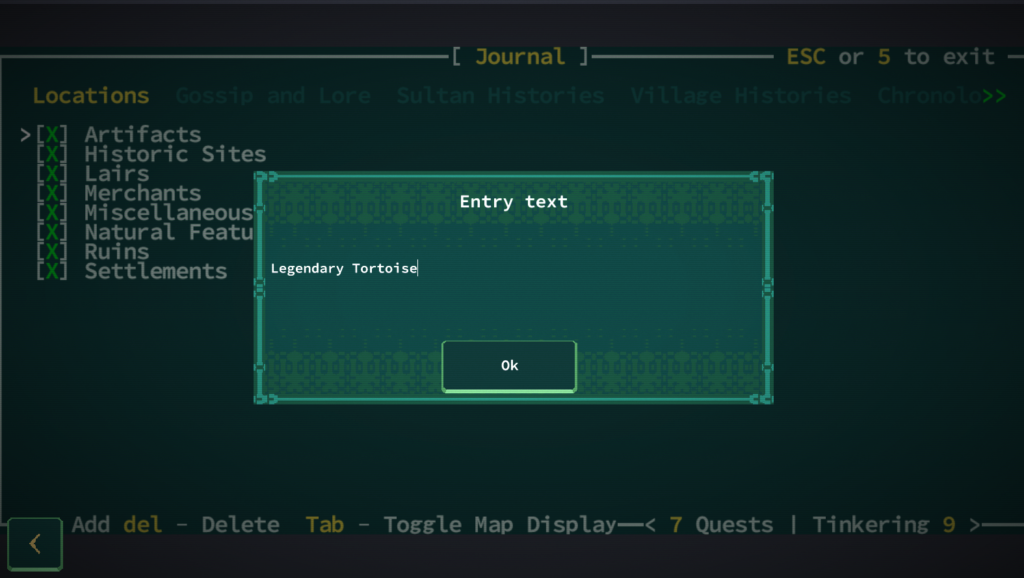
Type whatever info you need, and press enter. You should see a new section in the locations tab labeled “Miscellaneous”, which is where you’ll find your new custom location along with its spot relative to an important landmark. More importantly, you can select that entry and make a green X appear next to it.
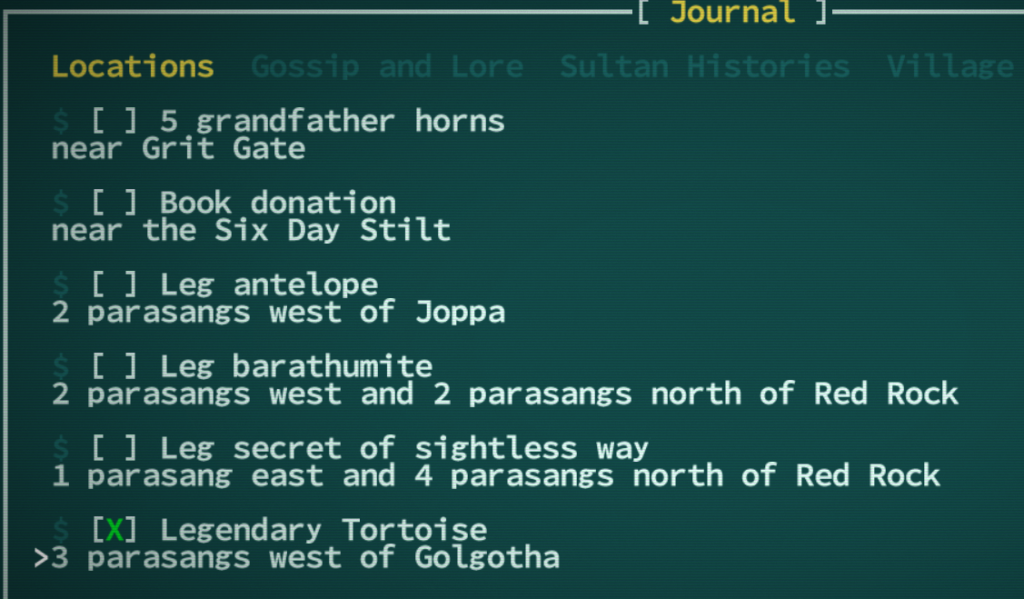
And the next time you move to the world map you can see that place is highlighted in green! When you enter that tile, you can select to travel directly to that screen.
Custom Notes
If you want to write notes that don’t need a location stuck to them, you can go to the General Notes tab and press ‘+’ there to write down whatever your heart desires.
For all entries, you can remove them by pressing Delete.
The Interaction Menu
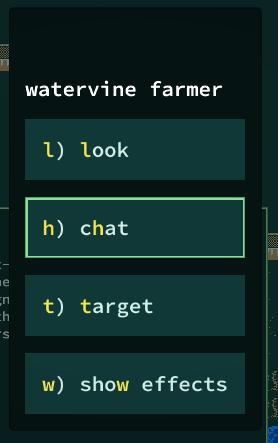
As of 2.0.176.0, Caves of Qud now has an interaction menu! To bring it up, first (L)ook and move the cursor over the thing you want to interact with. Then, press space.
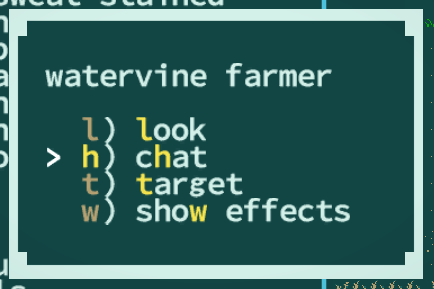
Adjacent only options: Chat, Open, Take
All of these look similar, besides sho(w) effects. This is similar to your own active effects menu (ctrl + A) but for non player characters. Take a look when you find an effect you don’t know about!
The Menu on a follower
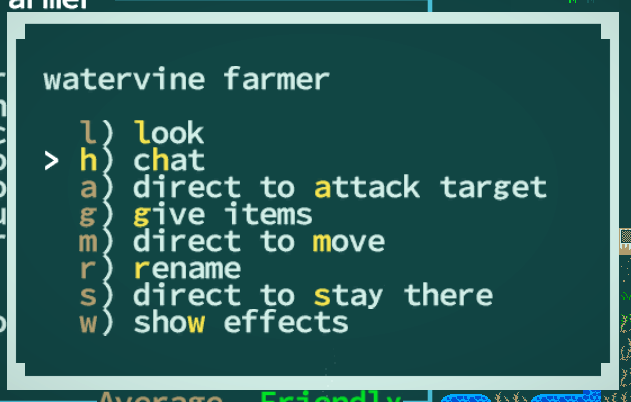
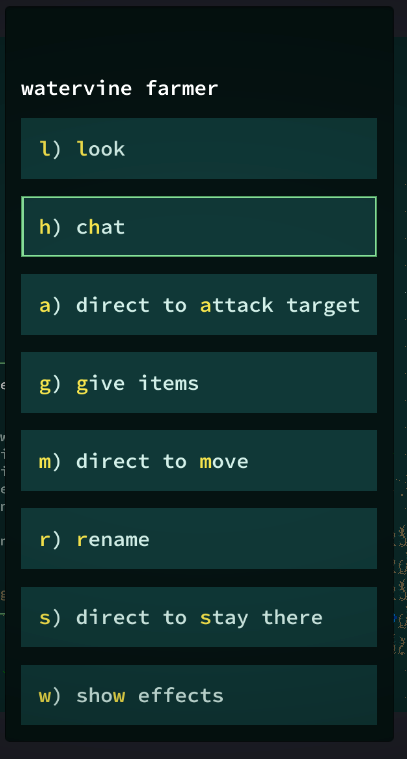
Adjacent only options: Chat, Give Items
Direct to attack opponent- This reopens the looker and you select the target you want your follower to attack with the spacebar.
Give Items- This is essentially the trade menu, but with no required money exchange. Your followers will tend to equip things you give them, so make sure you don’t mind if they wear it!
Direct to move- That follower will move to the space specified in the looker. Takes a turn or so to get moving, though.
Rename- what you expect
Direct to stay there- That follower will stay in that spot UNLESS a hostile creature is nearby. If you leave the screen while a follower is commanded to stay, they will not follow you into the new screen.
Trading with Tinkers
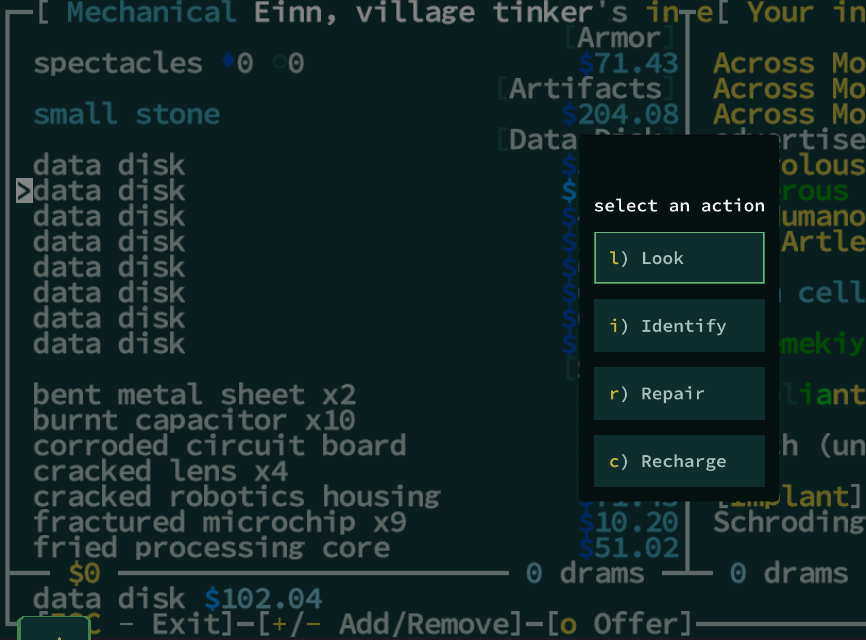
Tinkers are usually the light cyan colored characters in your starting village. You can trade with them by pressing [enter] on the items you want to select the whole stack, and press [O], but there are some other things they can do that most people don’t know. Pressing [space] on an item opens up the additional options dialogue:
You can also use these hotkey shortcuts without pressing [tab] first. These options can be used on items in both your and the tinker’s inventory. Use this to your advantage if you’re unable to repair or recharge items yourself!
Tinker Hotkey Quick Reference
| Key | Action |
| i | Identify unknown artifacts |
| r | Repair broken or cracked items |
| c | Recharge empty energy cells |
Using ALT
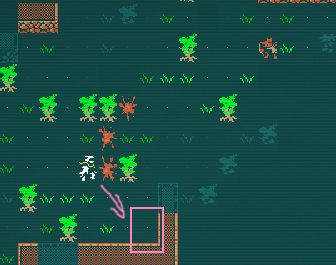
Here’s a feature that I didn’t even know existed until recently. But if you’re having issues spotting enemies or objects to interact with, this button is for you.
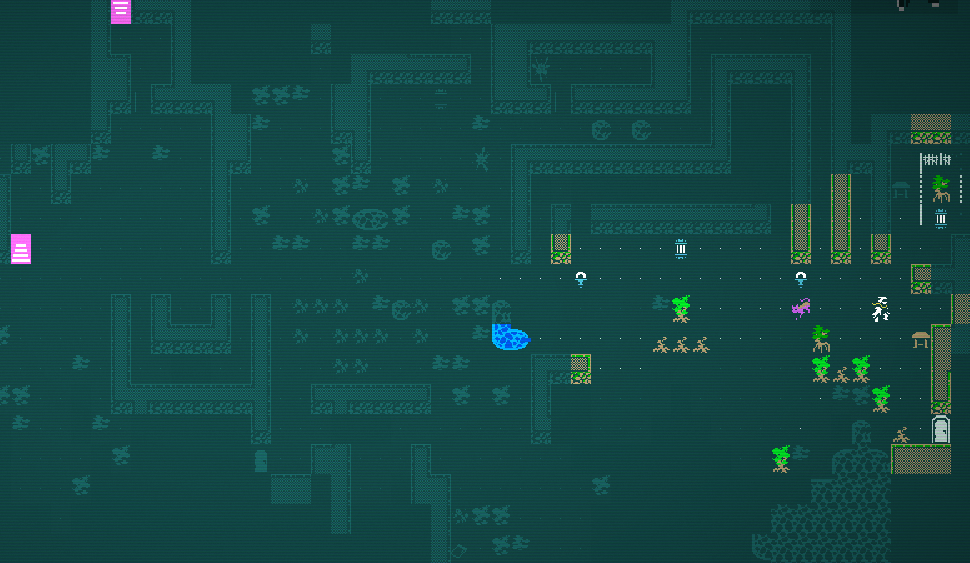
Now that’s much more legible. Not only can you see the most important sprites, but they’re color coded as well.
Understanding the colors
White: interactable and gettable items like bottles or corpses.
Green: Friendly or neutral creatures in your sight.
Red: Hostile creatures in your sight.
Yellow: Chests!
Purple: Sultan statue
Brown: Harvestable plant, oven, or bookcase.
A Light Dip Into Cooking
Not only can your character get thirsty, but they can get hungry as well. Cooking is decidedly more complex than sipping some fresh water, so here’s a brief overview into cooking.
How to Cook
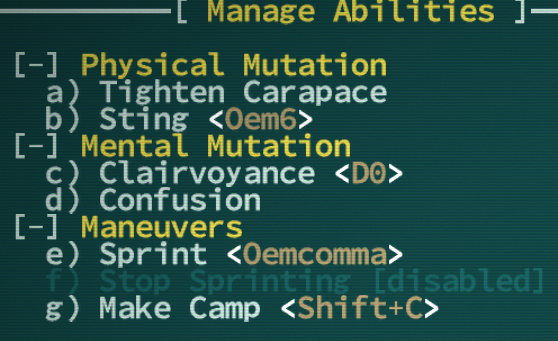
The most accessible way is to select Make Camp from the (A)bilities menu. You can make your own custom hotkey for it, as I found it something very commonly used. I set mine to Shift+C, but you can make it whatever you like.
Now that you have a campfire, press space to interact with it. Then, press (C)ook to open up the cooking menu!
The Cooking Interface
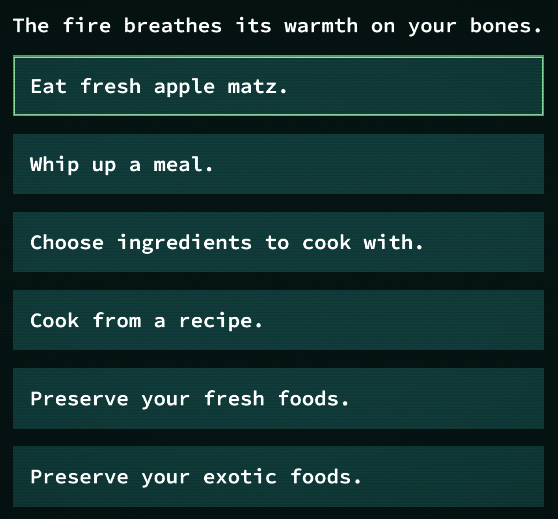
Eat (Recipe)- This is a specific recipe that can be found only on specific ovens in the world. If you have enough reputation with the locals, they’ll be willing to teach you so you can cook it whenever you want, as long as you have the ingredients.
Whip up a meal.- If you do not have the Cooking and Gathering base skill, this will be the only one that you can use. It will only fill you up, with a chance of randomly using ingredients in your inventory and your surroundings to get their effects. This does not require any ingredients.
Once you have the Cooking and Gathering skill, the below options become usable.
Choose ingredients to cook with.
This brings up a separate UI that lets you select 1-2 (or three, if you have the right skill) ingredients to cook.
Cook from a recipe.
If you’re taught a recipe you can select this to open up a menu that has indicates how much of the required ingredients you have.
Preserve your fresh foods.
Fresh food takes up a lot of weight, and some are even inedible raw. This will allow you to convert food into 0 weight ingredients that can be used for cooking.
Preserve your exotic foods.
These ingredients are harder to come by, and usually have important applications when unpreserved. However, if you want to cook with them, you must preserve them first.
How do I learn recipes?
- Have someone teach you their local recipe via water ritual. It will cost some reputation, so decide for yourself whether it is worth the reputation.
- Read a cook book, denoted by its green text. After reading through the book, you’ll be able to cook these recipes the next time you cook.
- Craft your own! This requires Carbide Chef. When Inspired, the result for the next “Choose ingredients to cook with” will become a custom recipe. Like most secrets, you can delete recipes you don’t need anymore by pressing Del in the recipes section in the Journal.
Why go through all this effort?
The random effects make this seem like a mechanic not to rely on, but there is one specific skill that gets around this: Carbide Chef. When you have Carbide Chef, you’re able to create your own recipe that will always the same effect that you designate. Cooking wisely lets you use mutations that you don’t start with(even as a true kin!!), and powerful stat boosts!
What all ingredients do, and how they synergize is outside of the scope of this faq, but you can find a complete list of what each ingredient does here!
How Cooking Effects Work
Ingredients have three different types of effects:
Basic Effect: This is the effect that you will always get if you cook with only one ingredient, or multiple ingredients with the same effect.
Trigger Condition: This affects what action is required for a more powerful effect to occur.
Triggered Effect: When the prerequisite trigger condition is met, this will happen. This will always be stronger than the simple effect.
On Reality Bubbles
Because Caves of Qud has such an expansive world, the game takes a few shortcuts to prevent your CPU from overheating from the calculations. I’ll borrow a term from another roguelike called the “Reality Bubble”. This is basically the area around the player that is considered active. Anything outside of that bubble will “freeze”.
Frozen areas will have everything there remain in stasis until the player returns back to that screen, which time will resume normally. This reality bubble is typically the current screen the player is on and a few edge tiles of the surrounding screens. This means that anything you leave in an area that freezes will be the usually same as you left it. Time still passes, but NPCs will not take any actions.
Customizing the Overlay UI
Currently, Caves of Qud has two different types of user interfaces: the default console text look, and the in progress Overlay UI. This section is still WIP, because it’s pretty customizable and is currently undergoing some pretty hefty changes. Be sure to try out all the options to see what works best for you!
Enabling Overlay UI

The overlay UI is in options > Overlay UI > Enable overlay user interface elements. That’s not all of the overlay elements enabled: it’s only for the dialogue and basic menu UI.
Customizing the Look Box
The default is the console look box, if you want to change to something more befitting of the overlay UI, go to Options > Overlay UI > Show tooltips instead of console look.

Danger Tier Map (Mild Spoilers!)
These are the danger tiers indicated in Text.txt of each pasarang on the world map. In general, a tier = 5 levels. It starts at 0, and gets to a maximum of 5 (or an average level of 25). If you’re wondering where you should go next, this map is a good way to check if you’re able to explore relatively safely there.
However, the tiers are only a basic guideline. From personal experience, the 5 better represents an average level of 25 or higher. There is also always the off chance something will spawn “out of depth” which means a creature who usually spawns in harder areas suddenly appears in an easier area.
Changelog
8/12/2020: Minor fixes. updated trade interface keys to match 2.0.200.
7/13/2020: Fleshed out the true kin section some more.
7/4/2020: Added “Should I focus on AV or DV?” and also promo’d Caelyn’s very very good mod
7/2/2020: Added “How much should I put into each stat?” and moved sections that were in one place in to that one because it fit better there. Added a bit more about implants to the true kin section.
5/23/2020: Miscellaneous fixes.
2/13/2020: Added two sections: One about leaving items on the ground to come back to and a brief explanation of the Reality Bubble.
1/2/2020: Happy new year! added two sections: one about bug reporting and reverting to a previous build to fix incompatible saves.
9/6/2019: Added two new small sections about tinkering and mouse input. Still up to date for patch 2.0.190.1!
8/24/2019: Updated for patch 2.0.190.0. Alternate village tinkers are now available, and I added a quick section on the neat things you can do with them. Also added a better clarification on saves in attributes/modifiers.
7/30/2019: It’s been a while, folks! I don’t have much time to update this guide, due to me working on the official wiki. You should check it out! This guide will still be the go to source for beginner help though ;). I added a small section that talks about what the different colors in book titles represent. Up to date as of build 2.0.186.1.
6/19/2019: Still up to date as of build 2.0.181.0. Added a small section about companions not healing. Also added a section in the appendix to talk about cooking and a secondary section about harvesting/butchering! Completely reworked the section about what to do when you start the game. Next. ??
6/6/2019: Made a meaty section about doing alternative village quests. Also added my favorite danger tier image in the appendix. Next: ??
6/5/2019: Made an appendix section so I don’t have to force some titles into questions :P. Added a section about the new interaction menu, dealing with way too much fresh water, and a very in progress overview of the overlay UI.
6/1/2019: Made some tiny edits to fit the changes made in 2.0.179.0. Added a section about cleaved/cracked armor and a brief overview of what you can do with the character screen. Also extra tidbit about secrets in the journal. UI tweaking: maybe next?? Probably need to change the hotkey section to talk about the new interaction menu.
4/28/2019: I added a new addition to Intermediate Movement Strategies and added sections explaining pasarangs and averaging AV/DV! Next: UI tweaking?
4/25/2019: As of updating this guide, the game is currently on build 2.0.173.5. I added a new section called “intermediate Movement Strategies”. I also added sections on using relatively unknown features of the journal and the alt key! They all got pictures!
4/13/2019: It’s posted!!!!
Closing comments and credits
First of all, a thank you to the Caves of Qud discord for providing input and feedback, they’re a real cool bunch. This guide aims to help those who are dipping their toes into the abyss that is Qud, but have never played a roguelike before. As such there will be no content spoilers because the best way to have fun with the game is to find things out while dying. A lot! But this guide will help you with the stuff learned to number of deaths ratio. When I first played this game, I only had clocked about 30 minutes of Dungeon Crawl Stone Soup, so I feel like I’m well equipped to talk about the game in layman’s terms.
I wrote this guide for what past me needed so long ago. This is how I managed to survive the early game, but it might not be for everyone. If you have your own beginner’s tips, be sure to leave a comment! If you have any questions, feel free to also leave a comment or ask it on the official Caves of Qud discord, where there are people way more equipped to answer than me!
This guide was written by Dij, who has graciously granted me permission to post their guide on this blog. Here is a link to the original. To them belongs the full credit. Also, please feel free to head over to the original and leave a comment of thanks if you found the guide here.