
In this tier list, I want to rank the eight Divinity: Original Sin 2 builds that hold up best in the Definitive Edition and give you a full setup for each of them, from the attributes and ability order to the talents, skills and race.
Divinity 2 lets you combine almost any skills you like, and that freedom is also why so many first characters turn out weak. Points end up spread over two or three attributes, the party mixes physical and magic damage, and by Act 2 nothing seems to hit hard anymore. Quite a few build lists also still quote numbers from before the Definitive Edition, and some leave the Necromancer out completely.
For reference, the skill costs, talent values and other mechanics below were looked up in the Definitive Edition’s own game files (Steam build 9530355), while the ranking follows the player consensus from 2023 to 2026.
The Necromancer (or Blood Mage) is the strongest build, the Ranger is the easiest of the strong builds, and the Two-Handed Warrior is the best melee build. Whatever you pick, keep the party on all physical, all magic or a 2 + 2 split, never three of one type and one of the other. The classes you pick at character creation are only starting presets, so you will be able to rebuild every character later.
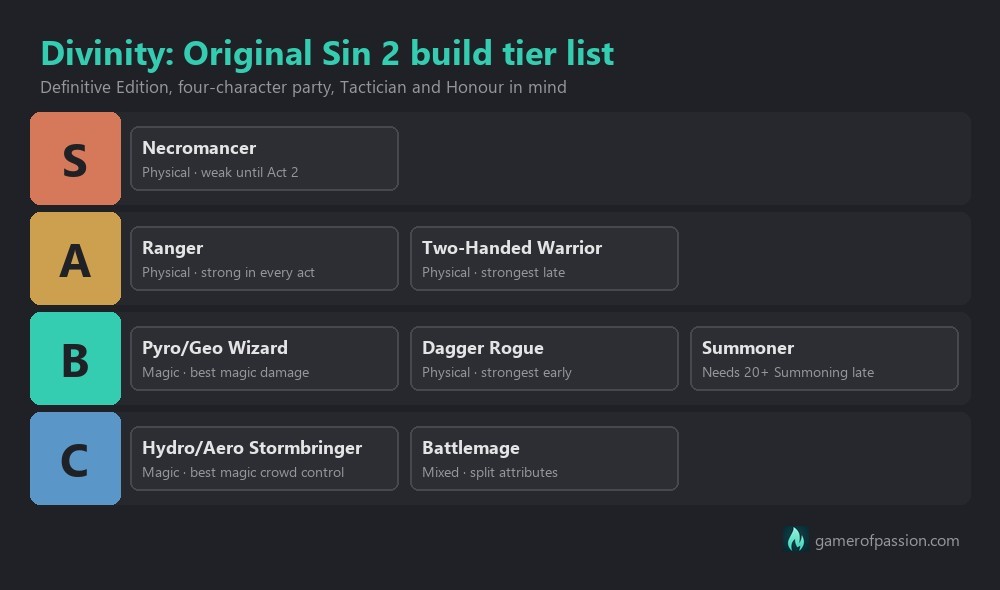
Best builds ranked
| Rank | Build | Damage | Main attribute | Core abilities | Best race | Strongest in |
|---|---|---|---|---|---|---|
| 1 | Necromancer (Blood Mage) | Physical | Intelligence | Warfare, Necromancer, Polymorph | Elf | Act 2 onwards |
| 2 | Ranger | Physical | Finesse | Warfare, Huntsman, Scoundrel | Elf | Every act |
| 3 | Two-Handed Warrior | Physical | Strength | Warfare, Polymorph, Two-Handed | Any (Red Prince is the usual pick) | Act 2 onwards |
| 4 | Pyro/Geo Wizard | Magic | Intelligence | Pyrokinetic, Geomancer, Huntsman | Lizard | Every act, slowed by resistances from Act 2 |
| 5 | Dagger Rogue | Physical | Finesse | Warfare, Scoundrel, Polymorph | Elf | Acts 1 and 2 |
| 6 | Summoner | Physical or elemental (Incarnate) | None needed (Summoning) | Summoning, utility schools | Elf | Act 1, and late with 20+ Summoning |
| 7 | Hydro/Aero Stormbringer | Magic | Intelligence | Hydrosophist, Aerotheurge | Any (Lohse is the usual pick) | Crowd control in every act |
| 8 | Battlemage | Fire + physical | Strength + Intelligence | Pyrokinetic, Warfare | Any | Below Tactician |
If you want one character who carries the party from Act 2 to the end, build a Necromancer. If you would rather be strong from the first fight in Fort Joy, the Ranger is the safer pick, with the Two-Handed Warrior catching up once Act 2 starts. The magic builds further down are fine on lower difficulties, but they are going to spend more and more turns against high elemental resistances as the game goes on, which is why they rank lower.
Two rules apply to almost every build below. First, your damage scales with one attribute at 5% per point, so you will put nearly everything into it until it reaches 40 and then move on to Wits (+1% critical chance per point), while Constitution (7% Vitality per point) gets nothing. Second, Warfare adds 5% to all Physical damage you deal per point, spells included, so every physical build maxes it first. That includes the Necromancer.
You will also see the same few utility skills on almost every character, which is why most builds put a point or two into their schools. Adrenaline (Scoundrel 1) gives you 2 AP now and takes 2 away next turn, Teleportation and Nether Swap need Aerotheurge 2, Chameleon Cloak and Skin Graft are Polymorph skills, and Haste and Peace of Mind come from Pyrokinetic.
1. Necromancer (Blood Mage)
The Necromancer tops this list for a fairly simple reason. Its spells deal Physical damage, which almost no enemy resists, and they scale with both Intelligence and Warfare, so once it comes online in Act 2, it will wipe whole encounters in a single turn.
The trick is that the Necromancer ability itself adds nothing to your damage. Each point heals you for 10% of the damage you deal to enemy Vitality, so 5 points is 50% lifesteal once their armour is down, and that is all it does. Your spells scale with Intelligence like any other mage spell, and Warfare boosts them on top because their damage is Physical. 10 Warfare means +50% on every Necromancer damage spell except Silencing Stare, which deals Magic damage, and players report that this bonus multiplies with your Intelligence bonus instead of being added to it.
As such, Necromancer only gets the points you need to learn your spells: 3 for Grasp of the Starved and Blood Storm, or 5 if you also want Totems of the Necromancer. Your other damage points go into Warfare. If the damage on your character sheet drops after a respec, do not worry, because that number is only your weapon damage.
Intelligence gets almost every attribute point until it reaches 40, then Wits takes over. Memory only gets what your skill bar needs, and Constitution stays at its base value unless you want to carry a shield.
Combat abilities, in the order you are going to raise them:
- Fort Joy: Necromancer 2 for Mosquito Swarm, Decaying Touch and Infect, Pyrokinetic 1 so you can learn Corpse Explosion, Hydrosophist 1 for Raining Blood, Scoundrel 1 for Adrenaline, and Aerotheurge 2 or a pair of Gloves of Teleportation. Every other point goes into Warfare.
- Act 2: Necromancer 3 for Grasp of the Starved, Polymorph 1 and then 3 for Chameleon Cloak and Skin Graft, and Hydrosophist 3 if you want Blood Storm. Keep pushing Warfare toward 10.
- Late game: Polymorph 5 for Apotheosis (every Polymorph point also hands you a free attribute point). Once Warfare sits at 10, spare points go into Huntsman for high-ground damage or Scoundrel for critical damage.
For talents, take Executioner (2 extra AP after your first killing blow each turn) and Elemental Affinity first. Savage Sortilege is the standard pick at level 13, as it lets your spells crit at your full critical chance, Necromancer spells included. Hothead and Five-Star Diner come after that, and Glass Cannon is optional but very strong if you can keep the Necromancer out of reach.
The elf version of the build runs on a small loop. Flesh Sacrifice costs 0 AP and drops a blood surface at your feet, and with Elemental Affinity your Necromancer spells will cost 1 AP less while you stand in it. Mosquito Swarm drops to 1 AP and Infect to 2 AP, and the sacrifice itself adds 1 AP and +10% damage. Rinse and repeat whenever its cooldown is up.
Your key spells, roughly in the order you are going to get them:
- Corpse Explosion (crafted, useful from around level 3) costs 1 AP and blows up a corpse for 250% Physical damage in a 4 m radius.
- Grasp of the Starved (book from level 13) costs 2 AP and 2 Source Points and deals 250% Physical damage to every enemy standing in blood within its area, plus Crippled.
- Raining Blood (2 AP, Hydrosophist 1 and Necromancer 1) and Blood Storm put the blood under the enemies. Blood Storm costs 4 AP and 3 Source Points and stays up for 2 turns, dropping 6 Physical blood bolts per turn.
- Mass Corpse Explosion (1 AP and 1 Source Point) detonates every corpse around you with the same 250% blast.
- Teleportation deals Physical damage to whoever you drop, so with high Warfare it doubles as a nuke.
Corpse Explosion will carry you through Act 1 and the start of Act 2. From level 13, you put blood under a group of enemies with Raining Blood or Blood Storm (pulling them together with Teleportation and Nether Swap first helps a lot), cast Grasp of the Starved, and most encounters will be over before they really started.
Apotheosis at level 16 adds the turn this build is known for. It costs 2 AP and 3 Source Points, works once per combat, and for 2 turns gives you +3 to all six attributes and makes Source skills 3 SP cheaper, which takes the Source cost off Blood Storm and Grasp of the Starved while it lasts. Skin Graft (1 AP, 1 Source Point, once per combat) then resets all your cooldowns, so with enough AP you can cast both of them a second time inside that window. Flesh Sacrifice, Adrenaline and Executioner pay for all that AP.
Blood Storm is up for debate. Raining Blood plus Grasp of the Starved already ends most fights and saves you two points of Hydrosophist, so you can skip it. I would still take it once you have the points, since it lays down exactly the blood Grasp needs.
Mind that the Necromancer is going to feel weak for quite a while, since you will only have Corpse Explosion and the basic spells in Fort Joy. The build starts to feel good around level 12 and takes off at 16. If the slow start bothers you, put a few early points into Summoning and move them out again at the Magic Mirror in Act 2.
Play an elf for Flesh Sacrifice. Sebille is the obvious origin pick, and if she agrees to take root when the Mother Tree asks on the Nameless Isle (Act 3), she will get the Rooted talent for +3 Memory. That is a story choice that changes her ending, though, so do not make it only for the stats. Fane works just as well in elf form with his Mask of the Shapeshifter, which gives him Flesh Sacrifice next to Time Warp at the cost of the helmet slot.
There are no Necromancer wands or staves, so your weapon is simply a stat stick. Dallis’ Blazing Justice is a good one, a one-handed hammer with +2 Strength, +2 Intelligence and +2 Memory. Late in the game, the Devourer armour set is worth the detour. It does nothing until you unlock it, but from then on it marks a random enemy at the start of every fight, and killing that enemy heals you and resets all your cooldowns. That works like a free Skin Graft every combat, and players report it even refreshes Time Warp. If the marked enemy survives too long, though, the set starts to damage you every turn instead. Players place the pieces in the Tower of Braccus Rex, Stonegarden, the Altar to Zorl-Stissa and the Vault of Linder Kemm, plus one more they disagree on, and say the unlock comes in Act 4. The quest that tracks all of it is called A Hunger from Beyond.
On Tactician, a finished Necromancer turns most fights into a formality, but your Act 1 is going to be slow and hard. Skip Death Wish, since your own lifesteal keeps pulling your Vitality back up and works against it.
2. Ranger
The Ranger is the easiest strong build in Divinity 2. It will be good from the first fight in Fort Joy to the last one in Act 4, and it is the build I would pick for a first solo Tactician run.
Finesse goes to 40, then Wits for critical chance and initiative. Your Ranger should act first, so make sure it has the highest initiative in the party, and cast Peace of Mind on it before a fight.
Combat abilities, in order:
- Early: a couple of points in Huntsman for Ricochet, Pin Down, Elemental Arrowheads and Tactical Retreat, Scoundrel 1 for Adrenaline, and the rest into Warfare.
- Next: Aerotheurge 2 for Teleportation and Nether Swap, and Polymorph 1 for Chameleon Cloak.
- Warfare to 10, then more Huntsman, then Scoundrel for critical damage.
Warfare comes before Huntsman because it adds 5% per point to every Physical shot. Huntsman adds 5% per point only from high ground, in addition to the base 20% that high ground already gives, but the game applies it after every other bonus, so it multiplies everything else. Ranged (+5% damage and +1% critical chance per point with bows and crossbows) is probably the weakest of the three.
Knockdown Arrows will be your main crowd control. They only deal 70% of a normal shot, but the damage stays Physical and the target goes down once its Physical Armour is gone. Most other special arrows also deal 70% and change the damage type. The Slowdown (Sticky) Arrow is the better damage arrow for a physical Ranger, since it keeps 100% Physical damage and adds Slowed, so you can fire it freely. Sky Shot always counts as high ground, which makes it a good opener when there is no ledge nearby.
Glass Cannon fits the Ranger well, since it fights from a distance. Add Executioner, and Hothead (+10% critical chance and accuracy while your Vitality is full).
An elf is the best pick again, but avoid an undead elf, because normal healing will hurt it. Ifan is a natural Ranger too, and as a human he gets +5% critical chance for free. From Act 2, look out for the Vulture armour set (level 14). Its pieces add Finesse, Huntsman and critical chance, the full set adds a flight skill and a 15% damage boost, and players say it can carry an archer to the end of the game.
3. Two-Handed Warrior
The Two-Handed Warrior is the best melee build and brings the best physical crowd control to an all-physical party. It is a little bit slower than the Ranger in Act 1, but with Warfare maxed and decent gear it will kill most enemies in one turn.
Strength goes to 40, then Wits. Constitution is the stat you dump.
Combat abilities, in order:
- Early: Warfare first, a point or two of Polymorph for Tentacle Lash, Bull Horns and Chameleon Cloak, and Scoundrel 1 for Adrenaline.
- Next: Aerotheurge 2 for Teleportation and Nether Swap, Pyrokinetic 1 for Haste and Peace of Mind, a second point of Scoundrel for Cloak and Dagger, and Polymorph 3 for Skin Graft.
- Warfare to 10, and only then Two-Handed (+5% damage and +5% critical multiplier per point).
Battering Ram, Battle Stomp, Whirlwind, Crippling Blow and Onslaught carry the damage, Tentacle Lash adds 125% Physical from Polymorph, and Heart of Steel is useful early on. Enrage (Warfare 2, 2 AP) makes you or an ally Enraged for 1 turn: every hit is a guaranteed critical, but you are Muted, so only weapon skills can be used that turn. A one-point splash of Pyrokinetic and Necromancer for Corpse Explosion fits too, since the blast is Physical and Warfare boosts it.
Executioner is the default talent, although this is one of the few builds where The Pawn is a reasonable alternative. Five-Star Diner, Hothead, What a Rush and Glass Cannon round it out. Take Elemental Affinity only if you slot Necromancer spells.
Any race works, and the Red Prince is the usual pick. On Tactician, this is the character who knocks enemies down with Battering Ram once their Physical Armour is gone. On Reaper’s Coast, make sure to grab Lohar’s Two-Handed Source Hammer, which has 20% critical chance, +2 Strength, +1 Two-Handed and +1 Warfare. Sword and shield, or dual-wielding Strength weapons, are slightly weaker versions of the same idea.
4. Pyro/Geo Wizard
Pyro/Geo is the strongest magic build and the easiest of the mages. It deals more damage than Hydro/Aero, and the two schools feed each other, since Geomancer lays down oil and Pyrokinetic sets it on fire. What keeps it in tier B is resistance. From Act 2 on, many enemies will resist anywhere from 10% to 100% of an element, and fire resistance is the most common one.
Intelligence goes to 40, then Wits. For abilities, start with Pyrokinetic 1, Geomancer 1 and Huntsman 1, since Throw Explosive Trap needs Pyrokinetic 1 and Huntsman 1, then raise both elements together, since each point adds 5% to that element. Aerotheurge 2 for Teleportation and Nether Swap comes next, then Pyrokinetic 2 and Huntsman 2 for Deploy Mass Traps, and late in the game enough Geomancer for Pyroclastic Eruption.
Elemental Affinity is a must. Add Savage Sortilege, because your spells cannot crit without it, then Torturer and Executioner. Torturer is the underrated pick here: your Burning, Poisoned and Entangled get through enemy armour and last a turn longer, which turns Worm Tremor into crowd control that ignores armour. This is also the one magic build where The Pawn makes a fair case for itself, since the free step helps you reach a fresh surface for Elemental Affinity.
Fossil Strike followed by Fireball is the classic opener. Throw Explosive Trap and Deploy Mass Traps add burst that is easy to miss, since neither is in a skill tree, and Dust Blast and Worm Tremor deal with groups. Pyroclastic Eruption (300% Earth damage, 3 Source Points) is the endgame nuke and can wipe out the final battle when the enemies stand close together. Meteor Shower is the weaker pick these days.
A Lizard is the best fit, thanks to Dragon’s Blaze (a 1 AP fire cone that needs no memory slot) and extra Fire and Poison resistance, which makes the Red Prince a fine Pyro/Geo wizard as well. A human is the alternative for the extra critical chance. In a party with two mages, pair this one with a Hydro/Aero mage, never with a second Pyro/Geo. On Tactician, lean a little more on Geomancer, since earth resistance is rarer than fire resistance and Worm Tremor with Torturer gives you crowd control from the first turn.
5. Dagger Rogue
The Dagger Rogue is strong early and falls off a little bit late. It does most of what a Two-Handed Warrior does, and Fan of Knives is the main reason to pick it over one.
Finesse is your attribute, then Wits, with Memory as needed. Warfare is still your main damage ability. Scoundrel comes second, adding 5% critical multiplier per point plus some movement, which matters on a character who lives on backstabs. Dual Wielding (+5% damage and +1% Dodging per point) usually gets points last. Use two daggers rather than a dagger and a shield.
Early on, Warfare, Scoundrel 1 for Adrenaline and a point of Polymorph for Chameleon Cloak and Chicken Claw are enough. Then more Scoundrel for Fan of Knives and Cloak and Dagger, Aerotheurge 2 and Polymorph 3 for Skin Graft, and finally Warfare 10 before the rest goes into Scoundrel. Your skill bar is going to be Backlash, Fan of Knives, Rupture Tendons, Battering Ram, Battle Stomp, Whirlwind and Crippling Blow, with Cloak and Dagger to get in and out and Corpse Explosion as an optional splash.
The Rogue is the build where The Pawn beats Executioner, because a free step every turn is exactly what you need to get behind a target. Torturer is strong too, since Bleeding and Ruptured Tendons are on its list. An elf is again the best race, and Sebille is the popular pick, with Flesh Sacrifice, backstabs, Rupture Tendons and Chicken Claw as the usual kit. On Tactician, the Rogue does its best work in Acts 1 and 2, which makes it a good partner for a Necromancer who takes over later.
6. Summoner
The Summoner splits opinion more than any other build here. It is at its strongest compared with the other builds in Act 1, when nobody else has come online yet, and close to S tier once you reach Summoning 10, especially with Lone Wolf, but it peaks earlier and lower than the min-maxed builds above it. The idea that it falls off late is only true if you stop at 10. A late-game Summoner wants 20 or more Summoning, which means a +Summoning bonus on as many gear pieces and runes as you can find.
Every point in Summoning gives your summons and totems +10% Vitality, damage and both armours, and at Summoning 10 your Incarnate becomes the much stronger Incarnate Champion. Summons do not scale with Intelligence, so your attributes are free for Wits, Memory or even a shield.
Put almost every point into Summoning until it reaches 10, plus Scoundrel 1 for Adrenaline and later Aerotheurge 2. Then add a point or two to the schools whose infusions you want, and keep raising Summoning past 10 with gear and runes. Summoning 5 will also give you Ethereal Storm from level 16.
Infusions are where the Incarnate gets its real power, and they do not all work the same way. Power, Farsight, Shadow and Warp Infusions give the Incarnate +25% damage, while the elemental ones give it +5 (or +10 for the Source-tier ones) in that element plus a new spell. Summoned on a blood surface, it learns Mosquito Swarm and gets Necromancer 5 for 50% lifesteal, no skillbook needed, and an elf can make that blood with Flesh Sacrifice. Cursed Electric Infusion with Closed Circuit is a strong late combination.
You keep one Incarnate-type summon at a time, but totems do not count against that, so you can keep placing them next to it. Supercharger (Summoning 2, 1 AP) gives a summon +100% damage for its next turn, after which it dies, so save it for a summon you are about to lose anyway.
Torturer is a good talent if you open fights with Worm Tremor, and Lone Wolf is very strong: with it and All Skilled Up you can reach Summoning 10 by about level 3, which is when the Summoner is strongest compared with everything else. An elf is the best race again, for the Blood Incarnate. A properly built Summoner holds up on Tactician into Act 4 as well. Whatever you do, commit fully, because a few Summoning points next to another build will give you the weak half of both.
7. Hydro/Aero Stormbringer
Hydro/Aero brings the most crowd control of the magic builds and the lowest damage of the two elemental pairs. A party of four Hydro/Aero mages can stun-lock almost anything, but a single Stormbringer will deal noticeably less than a Pyro/Geo Wizard.
Intelligence goes to 40, then Wits, since this character should act early. Raise both schools together, with Aerotheurge 2 early for Teleportation, Nether Swap and Uncanny Evasion.
The basic loop is Rain to soak the enemies, then Electric Discharge or Shocking Touch on the wet targets, with Global Cooling to freeze them and Blinding Radiance as a backup. Rain on yourself is useful too, since standing in water lets Elemental Affinity cut 1 AP off your Hydro spells. Uncanny Evasion (1 AP) gives you or an ally +90% Dodging for 1 turn, a great answer to physical burst.
Nails in your boots will make a character immune to slipping on your own ice, and Armour of Frost keeps a friend’s Magic Armour up against a stray stun. Any race works, and Lohse is the usual pick. If you run two mages, pair this one with a Pyro/Geo Wizard or try Hydro/Geo plus Pyro/Aero, which some players prefer, but two Hydro/Aero mages only double up on the same resistances. On Tactician, a Stormbringer that acts first is there for the crowd control, keeping the most dangerous enemies stunned or frozen once their Magic Armour is gone.
8. Battlemage
The Battlemage plays worse than it looks on paper. You need Strength for the weapon and Intelligence for the spells, and your damage goes into both armour bars at once, so neither will drop quickly.
The version that works is a critical-hit mage. Take Savage Sortilege so your spells can crit, put enough Strength in for Lohar’s Two-Handed Source Hammer on Reaper’s Coast (20% critical chance), and later swap to the Falone scythe or Voor d’lamas in Act 4. Fire is the best element, since the only element-specific melee spells are the Sparks line and Venom Coating, which leaves earth in second place.
Sparking Swings (Pyro 1 and Warfare 1) makes your hits throw sparks of 100% Fire damage for 3 turns, and Master of Sparks (Pyro 2 and Warfare 2, 1 AP and 1 Source Point) can go on an ally as well, with sparks that fork up to twice. Both are a lot of fun on lower difficulties, but I would not bring a Battlemage to a Tactician run.
Builds for beginners
For a first playthrough I would go with the Ranger or the Two-Handed Warrior. Both follow a simple plan (one attribute to 40, Warfare to 10), and neither depends on crafted spells or a tricky turn order. The Ranger is probably one of the most forgiving builds in the game, since it is strong from the first fight, fights from range and can climb to high ground when things go wrong. The Two-Handed Warrior needs a little bit longer to get going, but it is a simple melee character to build.
The Necromancer is stronger, but it will feel weak until level 12 or so, which is a hard sell on a first run. Start with a single damage type for the whole party (all-physical is the easiest) and keep the other builds for later.
The first act and a half are going to be the hardest part of the game for a new party. Leave Tactician and Honour for later, explore and do side quests for experience, and do not pick fights with enemies two or more levels above you. Once you reach Reaper’s Coast, puzzles like the Hissing Tomb are worth doing for the experience alone.
Tactician and Honour
Tactician does not change which builds are good, but it punishes mistakes much harder:
- Act 1 hurts the most, so every bit of quest experience counts.
- Going first matters much more. Your fastest character should open with crowd control or a buff, and Chameleon Cloak is close to mandatory for a solo run.
- Glass Cannon starts you at maximum AP every round, the first one included (normally you start at 4 and recover 4), but your armour no longer blocks statuses, so one stun or knockdown will land even when your armour is full. Give it to one high-initiative character with Chameleon Cloak first, and only hand it to the next once that works.
- Staying on one damage type matters more, because a mixed party spends its turns chipping at two armour bars.
- Torturer is better than it looks. On a Geomancer it lets Worm Tremor’s Entangled through armour, which gives you crowd control on turn one, and some parties run it on two characters for that reason.
For Honour, finish a Tactician run first, since that prepares you for almost everything Honour is going to throw at you. The Necromancer’s slow Act 1 is the biggest risk there, so a Ranger is probably the safer first Honour character.
Lone Wolf builds
Lone Wolf is the strongest talent in the game for a party of one or two. It gives +2 maximum AP, +2 AP recovery, +30% Vitality and +60% Physical and Magic Armour, and it doubles the points you invest in attributes (up to 40) and combat abilities (up to 10, Polymorph excluded). It only works while your party has two members or fewer, it lowers your maximum party size by one, and you cannot take it together with Glass Cannon.
The doubling means your main attribute and first combat abilities will hit their caps very early, and from there a normal character slowly catches up. Polymorph is not doubled at all, so plan its points the same way you would on a normal character.
Lone Wolf is for damage builds only, since a support or tank character wastes it. Popular duos:
- Necromancer plus a Ranger or a Summoner, a pairing that can end many Act 3 fights on the first turn.
- Two-Handed Warrior and Ranger.
- Fane and Sebille if you want two origins, for Time Warp’s extra turn and Flesh Sacrifice’s extra AP.
Whatever pair you choose, both should hit the same armour type, and physical is the safer choice, because Acts 2 and 3 are full of enemies with high elemental resistance.
Party composition
| Party | Members | Why it works |
|---|---|---|
| All-physical (strongest) | Necromancer, Ranger, Two-Handed Warrior, Rogue or second Ranger | Almost nothing resists physical damage and everyone breaks the same armour |
| All-magic | Four mages, for example Pyro/Geo, Hydro/Aero, Pyro/Aero and Hydro/Geo | Most crowd control, slower against high resistances in Acts 2 and 3 |
| 2 + 2 (flexible) | Two-Handed Warrior, Ranger, Pyro/Geo, Hydro/Aero | Never stuck against one armour type, works if the two mages use different element pairs |
| Lone Wolf duo | Necromancer + Ranger, or Two-Handed + Ranger | Both hit Physical Armour, Lone Wolf doubles their points |
| Avoid: 3 + 1 | Three physical and one mage (or the reverse) | The odd one out hits an armour bar nobody else is breaking |
If you are unsure, go all-physical, since it is the easiest party to run on any difficulty and uses the top three builds of the ranking. Pick the 2 + 2 split if you want more crowd control, or if your favourite companions happen to be two fighters and two mages.
The reason is the armour system. Every enemy has two separate shields, Physical Armour and Magic Armour, and no status lands until the matching one is gone. A party that deals all-physical damage (warriors, rangers, rogues, Necromancers, Tentacle Lash) or all-magic damage (the four elements) strips one bar fast instead of chipping at both.
With origin characters, the builds map onto the cast fairly naturally:
- Fane: Necromancer, ideally in elf form with his mask, or a Pyro/Geo Wizard. Time Warp makes him the most popular origin for raw power.
- Sebille: Necromancer, Ranger or Dagger Rogue, and an elf without giving up a helmet slot.
- The Red Prince: Two-Handed Warrior, or a Pyro/Geo Wizard thanks to Dragon’s Blaze.
- Lohse: Hydro/Aero Stormbringer or Summoner, plus a human’s Encourage and critical chance.
- Ifan: Ranger, close to his default Wayfarer class, or a Ranger and Summoner mix.
- Beast: a dwarf, usually a Ranger or a crowd-control mage. His best build is less settled than the others.
A good all-physical origin party is Sebille and Fane for Flesh Sacrifice and Time Warp, plus Lohse and Ifan for the human critical bonus and Encourage. The Red Prince can take Ifan’s place, but as a lizard he does not bring those human bonuses. That puts Lohse on a physical build, such as a Blood Incarnate Summoner. If you would rather keep her as a Stormbringer, give her a second mage and make it a 2 + 2 party.
Best talents
| Talent | What it does | Best on | Note |
|---|---|---|---|
| Lone Wolf | +2 max AP, +2 AP per turn, +30% Vitality, +60% Physical and Magic Armour, doubles invested points (up to 40 attribute / 10 ability, not Polymorph) | Parties of 1-2 | Can't be combined with Glass Cannon |
| Glass Cannon | Refills you to maximum AP at the start of every round, but statuses hit you through armour | Rangers, mages, Necromancer in a 4-party | Can't be combined with Lone Wolf |
| Executioner | +2 AP after a killing blow, once per turn | Almost every damage dealer | Needs Warfare 1, blocks The Pawn |
| The Pawn | 1 AP worth of free movement every turn | Rogues | Needs Scoundrel 1, blocks Executioner |
| Elemental Affinity | Spells cost 1 AP less while you stand in a surface of their element | Mages, elf Necromancer (blood) | |
| Savage Sortilege | Non-weapon skills can critically hit at your full crit chance | Necromancer, mages | Usual level 13 pick |
| Torturer | Listed damage statuses (Burning, Poisoned, Bleeding, Entangled and more) land through armour and last a turn longer | Pyro/Geo, rogue | Hard crowd control is not on the list |
| Five-Star Diner | Doubles what food and potions give you | Late game, solo runs | |
| Hothead | +10% crit chance and +10% accuracy while your Vitality is full | Ranged builds, crit builds | |
| Far Out Man | +2 m range for skills and scrolls | Mages | No effect on melee or touch skills |
| Picture of Health, Opportunist, Living Armour | Defensive or situational | Nobody | Players rate them as traps |
In a party of one or two, take Lone Wolf and you are mostly done. In a party of four, Executioner on almost everyone is the safe default, plus Elemental Affinity and Savage Sortilege on every spellcaster, the Necromancer included. Glass Cannon goes on your back-line damage dealers once you can plan your turns around it.
Two pairs of talents in the table exclude each other. Executioner needs 1 point in Warfare and gives you 2 extra AP the first time you land a killing blow each turn, while The Pawn needs 1 point in Scoundrel and gives you 1 AP worth of free movement every turn. You cannot have both, and Executioner wins on nearly everything except a backstabbing Rogue, because 2 AP you can spend on anything beats 1 AP that only moves you. Lone Wolf and Glass Cannon lock each other out as well. Lone Wolf is the better talent if your party is small enough, and Glass Cannon is the strongest one a full party can take.
Additionally, players report that Savage Sortilege crits use your normal critical multiplier, so Scoundrel and crit-multiplier gear make it even stronger. Comeback Kid (once per combat, it saves you from a killing blow and leaves you on 20% Vitality) is niche, but on Honour one saved character can be worth the talent point, and Pet Pal is great for the story but does nothing for your build.
Crafted skillbooks
| Skill | Combine | Needs | Used by |
|---|---|---|---|
| Corpse Explosion | Pyrokinetic skillbook + Necromancer skillbook | Pyro 1, Necro 1 | Necromancer, Two-Handed splash |
| Mass Corpse Explosion | Same, with one Source-tier book | Pyro 2, Necro 2 | Necromancer |
| Blood Storm | Hydrosophist + Necromancer books, at least one Source-tier | Hydro 3, Necro 3 | Necromancer |
| Grasp of the Starved | Grasp scroll + High Tier Blank Necromancy Skillbook | Necro 3 (book from level 13) | Necromancer |
| Throw Explosive Trap | Pyrokinetic skillbook + Huntsman skillbook | Pyro 1, Huntsman 1 | Pyro/Geo, Ranger |
| Deploy Mass Traps | Same, with one Source-tier book | Pyro 2, Huntsman 2 | Pyro/Geo |
| Sparking Swings | Pyrokinetic skillbook + Warfare skillbook | Pyro 1, Warfare 1 | Battlemage |
| Master of Sparks | Same, with one Source-tier book | Pyro 2, Warfare 2 | Battlemage |
| Apotheosis | Apotheosis scroll + High Tier Blank Polymorph Skillbook | Polymorph 5 (level 16) | Necromancer, any Source user |
If you only craft one thing early, make it Corpse Explosion, since it helps a Necromancer through Act 1 and works for any physical character with a point each in Pyrokinetic and Necromancer. Blood Storm and Deploy Mass Traps come next, because they are the big turns of their builds.
The rule behind most of these is simple. Hybrid skills come from combining two skillbooks: a normal book of each school gives the basic version (Throw Explosive Trap, Sparking Swings, Corpse Explosion), and swapping in one Source-tier book gives the big one (Deploy Mass Traps, Master of Sparks, Mass Corpse Explosion, Blood Storm). A Source-tier book is one whose skill costs Source Points, such as Grasp of the Starved or Totems of the Necromancer. The Summoner’s infusions follow the same rule: an elemental book plus a Summoning book gives the Fire, Water, Poison or Electric Infusion, and a Source-tier book on either side gives Necrofire, Ice, Acid or Cursed Electric.
Grasp of the Starved is the exception. Necromancer vendors sell the book later on, and to craft it yourself you will need a Grasp scroll, made from a Sheet of Paper, a hand and a Source Orb (or a higher-grade Shadow Essence), and you combine that scroll with a High Tier Blank Necromancy Skillbook. Apotheosis works the same way, with a scroll made from a Sheet of Paper, a Source Orb and a Puppet Bead plus a High Tier Blank Polymorph Skillbook.
Best race
The short version: an elf for most builds, a lizard for a fire mage and a human for crit-heavy builds. Racial skills cost no memory slot, so they are free value either way.
Elves win because of Flesh Sacrifice. It is free (0 AP, no memory slot, 5-turn cooldown), gives you 1 AP right away (lost if you are already at maximum AP) and +10% damage for 2 turns, costs some Constitution, and leaves a blood surface at your feet, which is what makes elf Necromancers and Elemental Affinity work so well together. The Constitution loss can drop you below a shield’s requirement, so elves and shields do not mix well.
Humans get +5% critical chance and +10% critical multiplier for free, plus Encourage (1 AP, 6-turn cooldown), which raises Strength, Finesse and Intelligence by 2 and Constitution by 3 for allies in a wide radius for 3 turns. Those are the base values, and they will grow with your level.
Lizards get Dragon’s Blaze, a 1 AP fire cone with no memory cost (75% damage, 7 m, Burning, 3-turn cooldown, leaves fire behind), plus extra Fire and Poison resistance, which makes them the natural pick for a Pyro/Geo Wizard.
Undead characters heal from poison and are hurt by normal healing. They also get Play Dead (0 AP, 6-turn cooldown), which makes enemies ignore them until they act, and they pick locks with their fingers.
Dwarves get Petrifying Touch (1 AP, melee range, 4-turn cooldown), which deals Earth damage and petrifies a target for 1 turn once its Magic Armour is gone, plus bonus Vitality and Dodging and a free point of Sneaking. Nothing in their kit pushes a build the way Flesh Sacrifice does, though.
Fane is a special case. His Mask of the Shapeshifter, worn as a helmet, can turn him into an elf, human, dwarf or lizard, swapping in that race’s talents and racial skill, so elf-form Fane gets Flesh Sacrifice next to his own Time Warp (2 AP, 1 Source Point, once per combat), which gives him or an ally an extra turn right after their turn ends.
How to respec
From the start of Act 2, the Magic Mirror below deck on the Lady Vengeance lets you redo attributes, abilities, talents and looks as often as you like, but not race, origin or tags. If you want to respec while still in Act 1, the Fort Joy Magic Mirror gift bag adds a mirror to the Fort Joy arena, but turning on gift-bag features switches off achievements for that save, and that gift bag cannot be turned off again once it is active.
Since the ship’s mirror has no limit, you can play a Ranger or a Summoner through Fort Joy and turn it into a Necromancer once you are on board, as long as the race already fits.
Common build mistakes
- Splitting your damage attributes, for example Strength and Intelligence on one character.
- Putting points into Constitution. Killing enemies faster protects you better than a slightly bigger health bar.
- Not maxing Warfare or your element. Points in Dual Wielding or Necromancer look like damage, but Warfare is what actually scales a physical build.
- Running three physical characters and one mage, or the other way around.
- Wearing outdated gear. A level 15 character in level 1 trousers is going to feel weak whatever the build.
- Missing the crafted skills. Corpse Explosion, Blood Storm and Deploy Mass Traps are not in any skill tree, so you will have to craft them from two skillbooks.
- Building a pure tank or healbot. Enemies simply go for your weakest character, and healing falls behind in the mid and late game.
FAQ
What is the most overpowered build in Divinity: Original Sin 2?
The elf Necromancer with Warfare at 10 and Elemental Affinity. From level 13, Grasp of the Starved on a group standing in blood can end a fight in one turn, and once you reach Polymorph 5, Apotheosis and Skin Graft let you cast it a second time.
Is Necromancy good in DOS2?
Yes, if you keep Necromancer at 3 and push Warfare to 10. The ability itself only gives you the spells and lifesteal, while Intelligence and Warfare give you the damage.
What is the best class for a first playthrough?
The Ranger. It is strong in every act, simple to build and easy to keep alive at range. If you prefer melee, take the Two-Handed Warrior.
Can you change your class later?
Yes, at the Magic Mirror on the Lady Vengeance from the start of Act 2. Only race, origin and tags stay fixed.
What is the best build for Fane or Lohse?
Fane is at his best as a Necromancer, ideally in elf form with his mask. Lohse is most often built as a Hydro/Aero Stormbringer, with the Summoner as the popular alternative.