
A Taste of Freedom sends you down into the cellar of Mordus’ House in Driftwood, on Reaper’s Coast in Act 2, where a hidden skull with one empty eye socket guards the way to a chained lich.
The missing Glowing Eye waits in Mordus’ quarters at the end of the Wreckers’ Cave, or you can simply pick the skull’s lock instead. Behind the skull you are going to find a floor of 16 pressure plates that opens with exactly five weights, and past that door the Green Button on a console frees the Lich. Once he is loose, he can cross your path twice more, first on Reaper’s Bluffs and then in Cloisterwood, and those two meetings are where most of the quest’s rewards are handed out.
Most of the details below were read from the current Definitive Edition build, which has not had a gameplay patch since August 2020.
Where A Taste of Freedom starts
Lohar’s job sends you to Mordus’ House on the edge of Driftwood, and the cellar hatch is inside. The problem is Glenna Graeme, a dwarf who sits right on top of it. Talk her into getting up or deal with her some other way, then move her chair off the hatch as well, because it stays blocked while she or the chair is on it.
Down in the cellar, the One-Eyed Skull is set into a wall. Your journal calls it an ornate skull, and it will stay invisible until a character with high Wits walks close to it. Lead with your best-Wits character along the walls of the anteroom at the bottom of the steps, in the north-west part of the cellar. Peace of Mind helps if nobody has much Wits, and so does a respec at the Magic Mirror on the Lady Vengeance.
Click the skull once before you fetch the eye. That adds a journal entry with a small XP reward that you would otherwise miss.
Mind that Mordus’ office in the same cellar has a trap of its own. If its stone door locks you in, read the Schematic on the shelf and press the hidden button on the Defaced Shrine. Teleporting out to a waypoint should work too.
Getting the Glowing Eye
The Glowing Eye lies in a Velvety Pouch beside a Dead Dwarf in Mordus’ quarters, at the very end of the Wreckers’ Cave, behind the hatch that Mordus’ Amulet opens. Mordus himself does not carry it, and sparing or killing him changes nothing for this quest. What matters is that you open his quarters with the amulet before you hand it over to Lohar. Freeing the Lich first will not affect Mordus either, in case you reach the cellar before the cave.
Without the eye, you can open the skull with Lockpicks, which also unlocks an achievement. Bear in mind that using the Glowing Eye earns quest XP, while picking the lock does not. Either way, a secret passage will open beside the skull, and the ladder down takes you to the puzzle room.
Mordus’ basement puzzle solution
The puzzle room has 16 Pressure Plates in a four by four grid and a stone door on the far side. Cast Spirit Vision there and a small glowing picture of the solved floor will appear on the wall in front of the puzzle door. On Explorer Mode, the spirit of a dead rat should give you a hint too, as long as you have Pet Pal.
Every weight lights the tile it stands on and the four tiles touching its sides, never the corners. One overlap shows a blue swirl, two show a flame, three show a green leaf, and four or more show nothing. The door only opens when all 16 tiles match the picture, dark tiles included, and that takes exactly five weights.
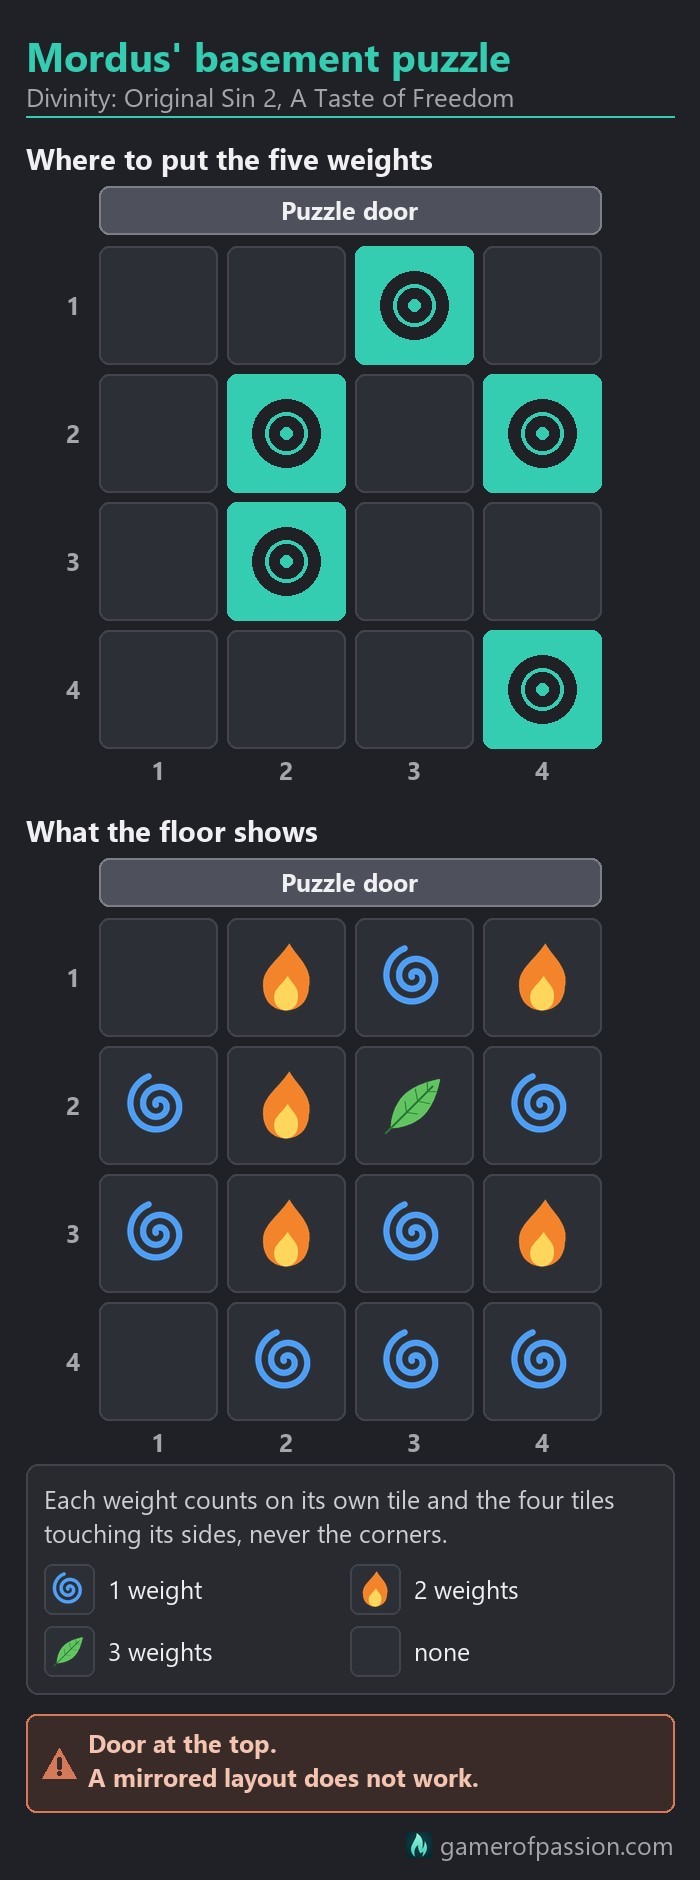
Read the grid with the puzzle door at the top, the way you see it when you face the door, and count the columns from the left. Row 1 is the row by the puzzle door, and you will enter the room on the left side, level with row 4. In row 1 the weight goes on the third plate, in row 2 on the second and the fourth, in row 3 on the second and in row 4 on the fourth. A mirrored layout will not work, since only this one combination of plates matches the picture.
The stone door opens by itself the moment the floor matches, and it stays open. You do not need Spirit Vision to open the door, only to see the picture, and with the grid above you can skip it. Pressure plates are nothing new if you have been through the Hissing Tomb, but this floor is a proper logic puzzle.
What counts as a weight
Almost anything with a bit of heft will hold a plate down. Party members, summons, pets, the vases in the room, barrels, crates and books all work, and even a skull is enough. Keys and candles are too light, and corpses and floating characters do not count at all. Four party members plus one of the vases will do the job, and a smaller party can fill the gaps with summons or a few items from the bags.
If the door stays shut
If every tile matches and the door still does not move, lift any one weight off and put it back. A match you reached by taking a weight away may not register. Also check that every character really stands on a plate without floating, and that no stray item is left lying on the grid. A tile that stays lit with nothing near it usually points to exactly that.
The console and the five skeletons
Behind the stone door lies Mordus’ laboratory, where the Lich is bound to a Source Rack. The game labels him the Desiccated Undead. Five urns in the room hold his guards, and a console with four coloured buttons stands in front of him. Step up to it and he will warn you: “Be… wary. The urns will shatter. The bones will… rise.”
| Button | What it does |
|---|---|
| Green Button (second from the left as you face him) | Frees him and wakes the five urn skeletons if not out yet |
| Red Button | Wakes the five skeletons but does not free him |
| Purple Button | Unlocks the plain Chest next to the console |
| Yellow Button | Lights or puts out the braziers |
The Green Button is the second from the left as you face him. It frees him and wakes the five skeletons in the urns at the same time, unless they are already out. Any party member should be able to press it, not only the one who talked to him.
Whatever you do, do not hit the Lich while he is on the rack. You cannot simply attack him there, and any damage will break him off it. If one of your characters did the damage, he turns on you and the skillbook is gone. Keep area skills well away from him for that reason. Fighting the urn skeletons before you free him, on the other hand, does not cost you the skillbook.
Read The Undead Among Us in the lab before you talk to him. It gives you the chant that makes him say his name, Xhaxh, and only “In void you fell, and from void you come. Reveal your truth to me!” works on your single try. Fane hears his murmur as the Eternal tongue and can repeat its prayer, which earns the same hint that a Mystic or anyone shouting his name will get: the second button from the left sets him free. Nothing else changes.
The skeleton fight
Once he is free, a Skeletal Hailcaller, Flameweaver, Graverobber, Stormbinder and Skullcrusher will climb out of the urns, and the Lich fights on your side. I would come at around level 12 for the fights in this quest. Afterwards, look for the Acid-Stained Key on the floor between two water barrels (hold Alt to spot it). It opens the Acid-Stained Chest in the same room.
The skillbook reward
With the skeletons dead, he thanks you and offers a skillbook. You pick a school, Necromancy, Geomancy, Hunting, Rogue or Warrior, and the book itself is rolled from that school’s short list of three or four. Telling him to surprise you, asking him for Source skills, asking him to explain himself or making the Jester joke gets you a random book from a random school instead.
Pick a school that one of your characters actually uses. If your party is not settled yet, our best builds list can help you decide. After that, he says “Stay out of my way.” and teleports off.
Should you free the Lich?
Much like the burning Historian in Act 1, the Lich asks you to end his torment, but this time other people pay for your kindness. You have three choices at the rack.
- Free him with the Green Button. You get quest XP, the skillbook and the rest of the quest. In return, he kills the Magisters at Driftwood’s west gate on his way out, and depending on your later choices, he will feed on a dead child in Cloisterwood.
- Leave him on the rack. The quest simply ends with no reward when you leave Reaper’s Coast.
- Try to kill him. You cannot simply attack him on the rack, and if he dies there anyway, you should get his staff and a small boss drop and lose everything else the quest offers.
I would say freeing him is the right call for almost every party, since the skillbook and everything that follows depend on it. Leaving him chained keeps him away from Driftwood, but the quest gives you nothing more.
Xhaxh on Reaper’s Bluffs and in Cloisterwood
Your journal will only tell you that he fled. On his way out, he kills the two Magisters guarding Driftwood’s west gate, Telyn and Idris, plus their Source hounds and Glenna if she is still around. You will find him next on Reaper’s Bluffs, west of Driftwood, feeding on three dead dwarves.
Reaper’s Bluffs
If you freed him, he will talk to you first. He tells you that someone drained him and that he cannot control the hunger, and from there you have three ways to go.
- Feed him a Source point. Ask what he meant by being drained first, because the offer only shows up after that, and the character doing the talking needs at least one free Source point. You lose that point, he stops feeding on innocents and asks you to “Join me at my reliquary.” Feeding him is one of the larger quest-XP steps.
- Let him eat. “Let it go” and “Leave it to its food” end this way, and so does letting him feed after the [MYSTIC] or [OUTLAW] line. Once everyone has left the spot, he moves on to Cloisterwood.
- Fight him. The [BARBARIAN] growl, “Attack the murderous brute” and “Move in for the kill” start combat, and he raises the three dead dwarves as Dwarven Skeletons. He cannot die in this fight. At near-zero health he drops out of combat and begs, and you choose whether he lives.
Spare him and he will move on to Cloisterwood as well. Kill him and the quest ends right there with his staff and a small boss drop, but no quest XP, no third meeting and no cache.
Cloisterwood
The third meeting takes place at his reliquary, at the entrance to the ruins in Cloisterwood, and what you find there depends on the bluffs.
If you fed him, there will be no child. He asks for a drop of a living character’s blood to open his cache, which costs that character 10% of their health. An undead character cannot give it, which means someone else has to do the talking. Refusing starts a fight.
If you let him eat or spared him, you will find him gorging on a dead child instead. He explains that “the younger the meat, the purer the power”, and you can either attack him with “Slay this creature!” or leave the creature be and let him finish.
Both deals end the same way. Xhaxh’s Cache appears, and it always holds a random Source skillbook among its loot. He then picks up Xhaxh’s Phylactery, says “I am me. I am whole. I am Xhaxh!” and vanishes for good. He does not turn up later in the game. A fight near the altar, on the other hand, will bring four Parasitic Hearts in on his side.
Double loot
Double loot still works, and it is no bug. The game lets you turn on Xhaxh once he has opened his cache. Wait until Xhaxh’s Cache appears, then attack him before he picks up his soul jar. You keep the cache and the quest reward, and killing him adds his staff and a boss drop on top.
The window is short, about as long as it takes him to walk over to the jar. Attack too early and the cache will never appear. Wait until he holds the jar and your attacks will only annoy him before he vanishes. Have your party in position and save before you finish the conversation.
Xhaxh’s Phylactery is his soul jar. Breaking it with any attack inside the window kills him on the spot, loot and all, but then there is no Source point left to absorb. If you kill him the normal way, you can absorb the jar afterwards for a Source point (as long as you have room for one) or smash it. While he is alive and calm, touching the jar only makes him attack you.
Whether you keep the deal or break it for the extra loot is up to you. The game allows both, and the quest counts as complete either way.
Rewards and the best route
| Choice | What you get |
|---|---|
| Free him | Quest XP and a random skillbook from the school you pick |
| Leave him on the rack | Nothing. The quest ends when you leave Reaper’s Coast |
| Attack him on the rack | Damage frees him hostile to you, and you lose the skillbook |
| Fight at Reaper’s Bluffs and spare him | Combat XP for three Dwarven Skeletons. The quest goes on |
| Kill him at Reaper’s Bluffs | His staff and a small boss drop, but no quest XP or cache |
| Feed him a Source point | You lose one Source point. Quest XP, and no child dies |
| Let him open his cache in Cloisterwood | Quest XP and Xhaxh’s Cache with a random Source skillbook |
| Double loot (attack after the cache appears) | Cache, quest XP, his staff, a boss drop and a Source point |
Quest XP is paid for freeing him, for feeding him a Source point and for the cache step, while sparing or killing him pays none. Killing him pays in loot instead, and the best moment for that is after he has opened his cache.
The max-reward route
- Read The Undead Among Us in the lab if you want to hear his name.
- Press the Green Button and kill the five urn skeletons.
- Take the skillbook from a school you will actually use.
- On Reaper’s Bluffs, attack him, kill the three Dwarven Skeletons, bring him down until he begs and spare him.
- In Cloisterwood, choose to leave the creature be.
- The moment Xhaxh’s Cache appears, attack him before he picks up the jar.
- Kill him and the four Parasitic Hearts, then take his staff and the boss drop.
- Loot Xhaxh’s Cache and absorb Xhaxh’s Phylactery for a Source point.
As a variant, you can feed him a Source point on the bluffs and give blood in Cloisterwood instead. That swaps the skeletons’ combat XP for a quest-XP step, and which of the two adds up to more is hard to say. The jar will hand you a Source point back at the end either way.
The route without betrayal
- Press the Green Button, kill the five urn skeletons and take the skillbook.
- On Reaper’s Bluffs, ask what he meant by “drained”, then give him one Source point.
- In Cloisterwood, give a drop of blood with a living character.
- Let him take his jar and loot Xhaxh’s Cache.
FAQ
Should you let the Lich live?
Yes, at least until the last meeting. Killing him on Reaper’s Bluffs ends the quest with only his staff and a small boss drop. In Cloisterwood, you can let him leave with his jar or kill him once his cache is open, which pays the most loot.
Should you let Mordus live?
For this quest, it does not matter, as long as you open his quarters with Mordus’ Amulet before you give it to Lohar. If that is no longer possible, pick the skull’s lock.
Where is the Lich after you free him?
He heads for Reaper’s Bluffs, west of Driftwood, where you will find him feeding on three dead dwarves. Unless you kill him there, he will wait for you next at the entrance to the ruins in Cloisterwood.
What does the Acid-Stained Key open?
Only the Acid-Stained Chest in the Lich’s room, where the key also lies between two water barrels. The other chest there is unlocked by the Purple Button on the console.
Do you need Spirit Vision for the puzzle?
No. It only shows the target picture on the wall by the door, and the grid in this guide shows you the same thing. The door opens the moment the floor matches, with or without it.
Conclusion
If you want the quest done with as clean a conscience as it allows, free him, feed him on the bluffs and let him have his jar. That costs you one Source point and a drop of blood, and no child ends up as his meal. If loot matters more to you than his trust, spare him after the fight and strike the moment his cache appears. Either way, open Mordus’ quarters before the amulet goes to Lohar, or you are going to be picking the skull’s lock instead.