
If you want a corvette in No Man’s Sky, buy the basic modules for a first ship at the Corvette Workshop on any space station for about 8.6 million Units, build the smallest design it will finalise, and then use that ship to shoot buried Salvage Containers on Salvageable Scrap planets for better parts.
It is worth building as a flying base you can walk around in, with a pulse drive that is faster than a normal starship’s and the salvage, courier and memento jobs that only a corvette can do, but in normal flight it handles like a Hauler.
Every new build starts at C-class, and Upgrade Class takes it to S, the best class, for 85,000 Nanites. You build the ship module by module at the Corvette Workshop aboard every Space Station, and it will hover over the ground while you beam down. The Corvette Assembly mission starts when you pick up your first corvette module or use the Workshop. The basic set costs about 8.6 million Units, a build from dug-up parts costs nothing but time, and Salvage Containers will give you most of your parts.
Most prices, odds and part stats in this guide are read from the Forsaken 7.14 game files on PC, and the update history is taken from the official patch notes.
Contents
- What a corvette is
- Building your first corvette
- Workshop build rules
- Where to get corvette parts
- What each part does
- Best corvette builds
- Corvette class
- Corvette speed
- Forsaken corvette parts
- Corvette questions
- Conclusion
What a corvette is
A corvette is a starship class of its own. Its interior is built much like a planetary base, with rooms you can furnish with refiners, planters, bunks and storage, and you can leave the pilot seat and walk around inside whenever you like.
The accessway is what makes it special. That is the landing bay or another access module that connects the inside to the outside, and with one fitted, the ship will hover over rough ground or water while you and your passengers beam down and back up. The autopilot will fly it to a space station, a discovered planet or a mission target.
Some jobs need a corvette. Deep-space salvage with the Tractor Beam, the haunting mementos that float in space and the courier contracts from deep-space outposts all ask for a corvette-class ship, and all three also need a Gravitino Coil on your Multi-Tool. Inside, a Mission Radar module will find co-op jobs for you and your friends.
In normal flight, a corvette is a heavy ship with the stat ranges of a Hauler, which makes it a fairly poor dogfighter until you fit it out with weapon parts. It also cannot be archived. For how it ranks against the other ship types, see my starship tier list.
Corvette or freighter
A corvette does not replace your freighter, and the two work well together. The corvette is the ship you fly down to planets, hover and beam down from, and it does the corvette-only jobs above. The freighter keeps its frigates and its fleet missions.
Storage links the two. Cargo Racks inside a corvette open the same storage containers as your base and freighter, and whatever you put into container 2 at home will be waiting in Cargo Rack 2 on board. Personally, I would keep both.
Is a corvette worth it?
Yes, for most players who have reached the Space Anomaly. A flying base that hovers while you beam down will save you a lot of landing.
The downsides are the grind and the slow start. Every new build starts at C-class, a good set of parts will take some digging and trading, and about 8.6 million Units is a big bill early on. It also handles like a Hauler, and you will probably keep a fighter or an Interceptor around for quick fights.
Building your first corvette
The Corvette Workshop is the terminal where you design, build and change corvettes, and you will find it aboard any Space Station by the large landing pads near the entrance tunnel. Its menu offers Create new corvette, Resume previous design, Modify for a corvette you own and Purchase modules, which splits into Purchase basic modules for Units and Trade advanced modules for barter. Mind that Create new corvette only works once you own at least one corvette module.
The Corvette Assembly mission is going to ask you to buy the basic modules, design and assemble the ship, furnish it with an interior module such as a Refiner Unit in a hab wall, and then excavate advanced modules from buried salvage. A hab is a habitation module, one of the rooms of the ship. My beginner guide explains when a corvette becomes worth building on a new save.
| Module | Price (Units) |
|---|---|
| Thunderbird-Class Cockpit | 1,600,000 |
| Thunderbird-Class Hab | 680,000 |
| Landing Gear, two in the set | 800,000 each |
| Pyrodrive Booster | 1,000,000 |
| Medusa-Class Reactor | 1,750,000 |
| Photon Cannon Array | 1,200,000 |
| Titan-Class Landing Bay | 800,000 |
| Cheapest set for the mission | 8,630,000 |
| Tractor Beam, an add-on | 350,000 |
| Titan Sublight Thruster, not needed | 1,400,000 |
| All 14 basic modules, one each | 10,580,000 |
| Selling a dug-up part | 150,000 (hull) to 1,750,000 (reactors) |
Once you have the Units, the first build goes like this:
- Walk to the Corvette Workshop and open Purchase modules, then Purchase basic modules.
- Buy one Thunderbird-Class Cockpit, one Thunderbird-Class Hab, two Landing Gear, a Pyrodrive Booster, a Medusa-Class Reactor, a Photon Cannon Array and a Titan-Class Landing Bay. Add a Tractor Beam if you want to haul salvage.
- Pick Create new corvette and place the parts, with every module connected to the rest of the ship.
- Save your game first if you want to reroll the supercharged layout and the base stats, because both are set when you finalise.
- Finalise the design, place a Refiner Unit in the hab for the furnishing step, and fly to a planet with Salvageable Scrap.
The cheapest set
To finalise, a design needs one cockpit, at least one hab, landing gear, an engine, a reactor, a weapon and an accessway, with every module connected and the total under the complexity limit. A second cockpit blocks finalising, as does fitting too many habs. Any thruster, booster or drive counts as the engine. The Corvette Assembly mission asks for two landing gear, but one is enough for the Workshop.
The cheapest set that the mission accepts comes from Purchase basic modules and costs about 8.6 million Units. The tutorial’s two Titan Sublight Thrusters are not needed, since any engine counts and the Pyrodrive Booster does the job for less. A Tractor Beam adds 350,000 Units if you want to haul salvage right away.
These prices are the module values from the game files. Make sure to check the shop before you buy, in case they differ. I would build this cheap set first and replace parts later, because the hovering corvette is what makes the salvage farm quick.
Building one for free
Outside an expedition, nobody hands you a corvette. You can still build one for free from dug-up parts, because salvage drops every module type the Workshop needs: Titan- and Ambassador-Class cockpits, habs, landing gear, engines, the Azimuth-, Ceto- and Zenith-Class Reactors, weapons and landing bays.
A free build looks a little bit different, because the Medusa-Class Reactor, the Thunderbird-Class Cockpit, the basic Landing Gear, the Pyrodrive Booster, the Photon Cannon Array and the Titan-Class Landing Bay never drop from salvage. You will use the dug-up kinds instead, or trade spare parts for them at the Salvage Exchange. The Thunderbird-Class Hab and the Titan Sublight Thruster turn up only in the scrap modules around a Salvage Container.
Some expeditions, such as the Corvette and Breach expeditions, hand you a Corvette Basic Modules Pack from a milestone. In a normal save, the dug-up route makes your first ship nearly free.
Workshop build rules
The Workshop will tell you on screen what a design is missing before it lets you finalise it. Shields, wings and hull plates are not required, and a working corvette can be quite small and ugly.
| Requirement | Rule | What the Workshop shows |
|---|---|---|
| Cockpit | exactly 1 | “No cockpit installed” / “Excess cockpits installed” |
| Hab | at least 1, too many blocks it | “No habitation module installed” / “Too many habs” |
| Landing gear | 1 to finalise, the mission asks for 2 | “No landing gear installed” |
| Engine | at least 1, any thruster, booster or drive | “No thrust systems installed”, on Finalise only |
| Reactor | at least 1 | “No reactor installed” |
| Weapon | at least 1 | “No weapon system installed” |
| Accessway (landing bay) | at least 1 | “No accessway installed” |
| Connection | every module connected | “All modules must be connected” |
| Complexity limit | 100, windows do not count | “CAUTION: Near complexity limit”/”Complexity limit breached” |
| Tractor Beam | at most 4 | per-part limit |
| Shield, wings, hull | not required | no refusal string |
| Stats per system | 3 part modules per system count | the part tooltip tells when the next one adds nothing |
A second cockpit will give you the “Excess cockpits installed” message, and too many habs will block it as well, though the game does not tell you the number. A finalised corvette can be changed again at the Workshop on any Space Station.
Functional parts will put their modules into the ship’s tech grid on their own, and those modules only come out when you take the part off at the Corvette Workshop. Every corvette also carries a Photon Cannon you cannot remove. Plan a tech slot for it. Normal starship upgrade modules, including S-class and X-class ones, install in the corvette’s tech grid as on any other ship.
The complexity limit
The complexity limit is the size cap of a corvette. The Workshop caps a corvette at a complexity of 100, which works out to about 100 exterior modules, and windows do not count toward it. Near the cap, you will get a caution with your current count, and over it the Workshop shows “Complexity limit breached” and will not finalise the ship. Additionally, the Tractor Beam has a cap of its own at 4 per corvette.
The Workshop Cache
The 160 slots you may have read about belong to the Corvette Workshop Cache, the storage box next to the Workshop terminal (its window is titled Corvette Module Storage). It holds only corvette modules, up to 500 of one module per slot, and refunded modules that do not fit into your inventory will land there.
The cache does not grow when it fills up. Sell spare basic modules first, because you can always buy them again for Units. The cache cannot sell anything itself. Move the parts into your inventory first and sell them at a trade terminal, where dug-up corvette parts fetch 150,000 Units for most hull pieces up to 1.6 million for a cockpit and 1.75 million for a reactor. My money guide has more on selling them in the early game.
The corvette’s own inventory follows its class, up to 120 slots at S-class, and each hab links to the cargo systems for 3 more Cargo Slots. Physical salvage you pull in with the Tractor Beam takes up room in the hull rather than inventory slots.
Getting rid of a corvette
A corvette cannot be archived or scrapped at the Starship Outfitting terminal, and it always takes one of your active ship slots. To get rid of one, strip it at the Workshop to the cheapest build that still finalises, which returns the removed modules to your inventory, and then exchange it with a visiting pilot for their ship.
Since Voyagers, a basic corvette has been valued at about 30 million Units in NPC trades, far more than the roughly 8.6 million its modules cost. That figure has not been confirmed for Forsaken. Check the trade value on screen before you swap.
Where to get corvette parts
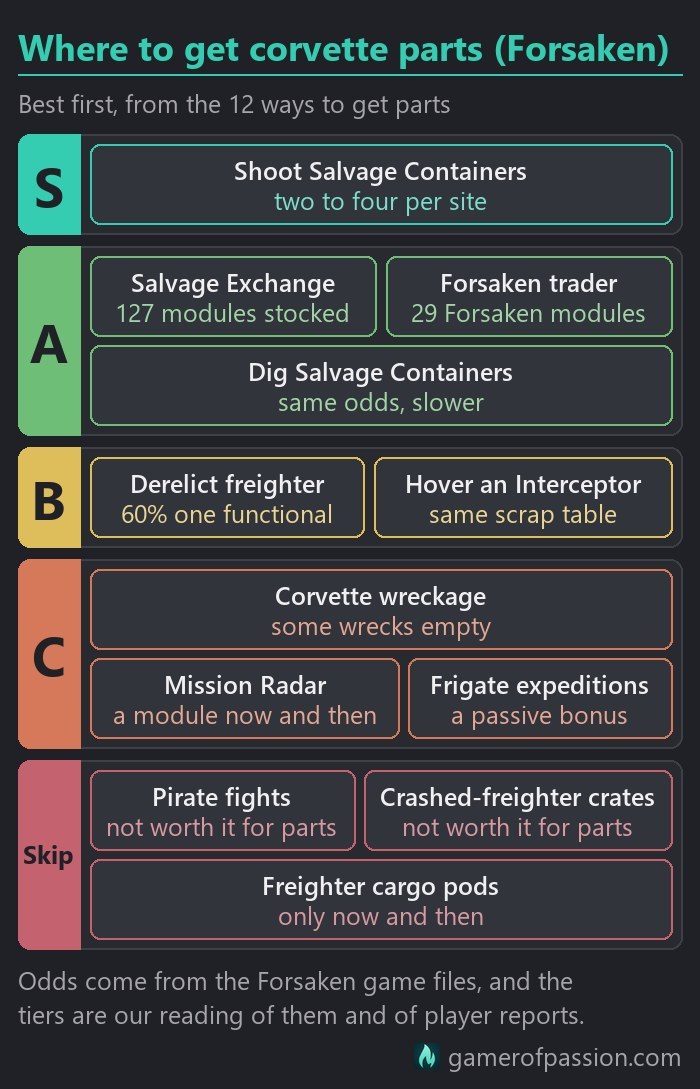
Shooting Salvage Containers from a hovering corvette sits alone in the top tier. You buy the cheap basic set first and then farm with the corvette, and every site will give you at least one hull piece (the cosmetic parts) with a fair chance of functional modules (the parts with stats).
The A tier has three routes. The Salvage Exchange always stocks 127 modules and trades them for your duplicates, the forsaken trader is the only source of the 29 Forsaken modules, and digging the containers out by hand gives the same odds, only slower between sites.
Derelict freighters, with a 60% chance of a functional module per run, and an Interceptor hovering over the same scrap make up the B tier.
The order of the lower routes is our reading of the reward tables. Deep-space Corvette wreckage, Mission Radar missions and frigate expeditions sit in C, while pirate fights, crashed-freighter crates and freighter cargo pods are at the bottom, and you do not need to go out of your way for any of them.
| Source | What you get | How to find it | Best for |
|---|---|---|---|
| Purchase basic modules | 14 fixed modules for Units | Corvette Workshop | the first, cheapest corvette |
| Salvage Container | 1-2 hull parts every time, 40% chance of 1-2 functional | Analysis Visor marks them, shoot from a hovering corvette | bulk parts, early functional modules |
| Scrap modules around it | 33% one hull part, 20% one functional module | same sites | extra rolls per site |
| Salvage Exchange (Trade advanced modules) | any of 127 modules for parts you offer | Corvette Workshop on any Space Station | turning duplicates into the exact module you want |
| Forsaken trader | 29 fixed modules (13 with stats) for haunting mementos | Summoning Terminal at a deep-space outpost’s corvette pad | Forsaken cockpits, Legion habs, A-class thrusters |
| Derelict freighter, Fabricate Corvette Modules | 2-3 copies of one hull part + 60% one functional module | Emergency Signal Scanner, free weekly from Iteration: Helios | functional modules |
| Deep-space Corvette wreckage | 1-2 copies of a hull part + 40% functional per roll | system map points of interest in deep space | a side stop, not a farm |
| Mission Radar missions | a corvette module now and then | Mission Radar inside the corvette | a bonus |
| Frigate expeditions | a part now and then | freighter fleet terminal | a passive bonus |
| Pirates | a part now and then | pirate fights | not worth it for parts |
| Crashed-freighter crates | a part now and then | distress-signal charts | not worth it for parts |
| Freighter cargo pods | a part now and then | freighter convoys | skip |
| Expedition milestones | Corvette Basic Modules Pack, Aeron set, Deadeye Cannon | expeditions and their reduxes | free starter set, Aeron Drive |
Shooting scrap from the corvette
This is the route you are going to use the most:
- Find a planet whose scan shows Salvageable Scrap and fly there.
- Let the corvette hover over a scrap site.
- Leave the pilot seat, stand at the open hatch and mark the Salvage Containers below you with the Analysis Visor.
- Sit down again and shoot each marked spot. The parts will drop straight into the corvette.
The Photon Cannon works best for this job, and the Photon Cannon Array from the basic set makes it hit harder. Every Salvage Container gives one or two hull parts and has a 40% chance of one or two functional modules as well, and the scrap modules around it can drop another part each. A site will usually yield two to four parts. Rinse and repeat.
Digging the containers out on foot or by exocraft with the Terrain Manipulator gives the same parts, but it is slower between sites. Before you own a corvette, an Interceptor can hover over the same scrap, and you can try the same trick from it.
The Salvage Exchange
Trade advanced modules at the Workshop opens the Salvage Exchange, the barter screen of every Corvette Workshop. It trades its 127 modules, the basic ones included, for parts you offer and will show your EXCHANGE ODDS (Unlikely, Low, Moderate, Good or Excellent) before you confirm. Those odds depend on the value of what you put in against the module you want.
It will never accept the 14 basic modules or the Titan-, Thunderbird- and Ambassador-Class Walkways, however you got them. Offer looted engines, reactors, weapons and shields instead. Forsaken modules can be offered there but not received, and the exchange neither takes nor sells Aeron parts or the Deadeye Cannon.
Derelict freighters
When you reach the end of a derelict freighter, pick Fabricate Items, then Fabricate Corvette Modules. You will get two or three copies of one hull part plus a 60% chance of one functional module, instead of the tech upgrade, bulkhead or Nanites. My freighter guide goes through the other end rewards of a derelict.
Iteration: Helios in the Space Anomaly will give you one free Emergency Signal Scanner each week, which leads you to a derelict freighter. Since COSMOS, derelict freighters sit at fixed locations. I would take the corvette modules whenever you do not need the freighter upgrade.
Other part sources
Deep-space Corvette wreckage appears on the system map as a point of interest. Each wreck will usually give one or two hull parts, sometimes a functional module, and some wrecks turn out empty. That makes it a side stop on the way somewhere rather than a farm.
Corvette Mission Radar missions can pay out a corvette module now and then, though most of their rewards are Units and goods. Pirates, crashed-freighter crates, freighter cargo pods and frigate expeditions can all drop corvette parts too, but only now and then. Treat them as a bonus when they happen. The forsaken trader, the other big source, gets its own section further down.
What each part does
Functional parts work like built-in upgrade modules. Each one links a module to one of the corvette’s ship systems, and that module rolls its stats inside a range, while hull plates, wings and connectors only change the look.
| Part | What it adds | Module class | How many count |
|---|---|---|---|
| Cockpit, one per ship | boost x1.01-1.10, boost manoeuvrability x1.01-1.075 | C | 3, shared with Medusa and Chelone |
| Medusa-Class Reactor, Chelone-Class Generator | boost x1.10-1.20, boost manoeuvrability x1.05-1.16 | A | 3, shared with the cockpit |
| Azimuth-Class Reactor, Limos-Class Generator | launch cost x0.80-0.85, auto-charge, pulse fuel x0.80-0.85 | A | 3 |
| Ceto-Class Reactor | shield +0.10-0.20 | A | 3 |
| Zenith-Class Reactor | hyperdrive jump distance +165-220, +1 jump per warp cell | A | 3 |
| Engine, A parts | pulse fuel x0.80-0.85, boost x1.10-1.20 | A | 3 for all main engines |
| Engine, B parts | pulse fuel x0.85-0.90, boost x1.10-1.15 | B | 3 for all main engines |
| Landing gear, incl. Thunderbird Landing Thrusters | launch cost x0.85-0.90, boost x1.02-1.05 | B | 3 |
| Shield generator, all 5 | shield +0.05-0.10 | B | 3 |
| Photon Cannon Array | damage +16-24, fire rate x1.016-1.021, heat x1.02-1.03 | A | 3 |
| Phase Beam Array | damage +50-60, heat x1.55-1.75 | A | 3 |
| Torpedo Launcher | damage +400-500, cool x0.75-0.80, range x1.05-1.10 | A | 3 |
| Infra-Knife Platform, Dematerialisation Ray | damage +8-12, fire rate x1.05-1.10, heat x1.05-1.07 | A | 3, shared |
| Cyclotron Defence Cannon | damage +8-12, fire rate x1.05-1.10, heat x1.25-1.30 | A | 3 |
| Deadeye Cannon, expedition reward | Positron damage +5-6, fire rate x1.06-1.10, heat x1.06-1.10 | A | 3 |
| Hab: Titan, Thunderbird, Ambassador, Legion | +3 Cargo Slots | B | same group as walkways and the Cargo Pod module |
| Walkway, Cargo Capsule, Cargo Pod, Cargo Sphere | +1 Cargo Slot | C | same group as habs |
| Tractor Beam | tractor beam (Salvage Recovery System) | A | at most 4 per corvette |
Only three part modules per ship system add stats, and a fourth only adds looks. The part tooltip will tell you which system a part links to, and some systems share their three places between part types:
- Every cockpit shares the flight control systems with the Medusa-Class Reactor and the Chelone-Class Generator. Fit three of those reactors or generators before you place the cockpit, or the cockpit takes one of the three places.
- The Infra-Knife Platform shares its places with the Dematerialisation Ray.
- The Azimuth-Class Reactor shares the navigation systems with the Limos-Class Generator.
- Habs, walkways and the cargo modules all link to the cargo systems, and each hab adds 3 Cargo Slots.
Upgrade modules you install yourself count separately from the modules your parts bring. Every copy of a part also rolls its own values inside its range, and since two copies of the same reactor will differ, you should keep the copies that rolled best and sell or trade the rest. Every cockpit and every shield generator carries the same module, so pick them for looks.
Landing Gear, Hydraulic Legs, Mag-Field Landing Thrusters and Thunderbird Landing Thrusters all carry the same launch thruster module, each rolling a 10-15% launch cost cut, and only three of them count. The Azimuth-Class Reactor and the Limos-Class Generator cut launch cost by 15-20% each and add launch auto-charge. Hovering and beaming down through the accessway simply skips the launch altogether.
Each weapon part brings its weapon and an A-class upgrade for it, and only three of one weapon type add stats. A corvette’s base damage is the Hauler’s, 15-30% at S-class against 70-90% on a Fighter, which means its firepower comes from weapon parts and upgrade modules. For fights, fit Phase Beam Arrays and put your best Phase Beam upgrade modules on supercharged slots. For shooting buried salvage, stay with the Photon Cannon Array.
Interior modules are built from resources in the build menu. A Refiner Unit takes 20 Platinum and 1 Hydraulic Wiring, and a Mission Radar takes 40 Gold, 1 Microprocessor and 1 Ion Battery. A corvette has no NPC crew, and the Crew Berth is furniture.
Best corvette builds
The picks below follow the three-per-system rule. Most of them are our reading of the part modules, and the lower picks in each list are suggestions you can swap freely.
Combat layout
- The Phase Beam Array is the top pick, with +50-60 beam damage from its A-class module. Fit three and pair them with your best Phase Beam upgrade modules on supercharged slots.
- The Ceto-Class Reactor is our second pick, with +0.10-0.20 shield, twice a shield generator’s range.
- The Infra-Knife Platform is a decent extra with +8-12 damage, sharing its three places with the Dematerialisation Ray.
- The Torpedo Launcher can work as a heavy hitter, since it installs the Rocket Launcher and adds +400-500 damage and a cooldown of x0.75-0.80 to it.
- The Cyclotron Defence Cannon is another option, with +8-12 damage and heat x1.25-1.30.
- The Deflector Shield is a fair choice for a little more shield. All five shield generators carry the same module with +0.05-0.10 shield, and three of them count.
- The Photon Cannon Array is fine to keep. Its A module adds +16-24 damage, and a Photon Cannon is always in the grid anyway.
- The Deadeye Cannon you can skip. It was a reward from the Corvette expedition, and +5-6 Positron damage is not enough to bother with.
Exploration layout
- The Zenith-Class Reactor is our top pick. It is the only part with hyperdrive range, adding +165-220 jump distance and one more jump per warp cell.
- The Azimuth-Class Reactor is a good second choice. It cuts launch cost by 15-20%, adds launch auto-charge and lowers pulse fuel use (x0.80-0.85).
- The Limos-Class Generator is just as good, since it carries the same module as the Azimuth-Class Reactor. It is sold by the forsaken trader, and the two share the same three places.
- Landing Gear can round it off. Every gear part has the same module with launch cost x0.85-0.90, and three of them count.
Cargo hauling
- The Tractor Beam is the top pick. You will need it for deep-space salvage and some outpost missions, and you can fit up to 4 per corvette.
- The Cargo Racks (Cargo Rack 0 to 9) are a good second choice. Each one opens the matching storage container you share with your base and freighter, for 3 Metal Plating and 1 Microprocessor.
- The Titan-Class Hab is a good choice too. It adds +3 Cargo Slots plus room for physical cargo, and since every hab family has the same module, you can pick by layout.
- The Legion-Class Hab is an equally good choice. It carries the same +3 module, opens up the interior and is sold by the forsaken trader.
- The Thunderbird-Class Walkway is a small extra with +1 Cargo Slot, in the same group as the habs.
- The Cargo Pod module you can skip. It adds +1 Cargo Slot in the same group as the habs and costs complexity for very little.
Starter layout
- The Medusa-Class Reactor is our top pick, as the only reactor in the basic shop and an A-class module.
- The Photon Cannon Array is our other top pick, the basic-shop weapon and the best gun for shooting buried salvage from the hovering ship.
- The Thunderbird-Class Cockpit and the Thunderbird-Class Hab are solid picks, with the same modules as every other cockpit and hab (+3 Cargo Slots for the hab).
- Two Landing Gear are a good choice, because the mission asks for two.
- The Pyrodrive Booster is a solid first engine, with the same B module as the Titan Sublight Thruster.
- The Titan-Class Landing Bay is a good choice as the basic accessway, which gives you the hover and the beam-down.
- The Tractor Beam is worth adding, since you are going to need it for salvage hauling and some outpost contracts.
Corvette class
Every new corvette starts at C-class, whatever parts it uses. Upgrade Class at the Starship Outfitting terminal costs 10,000 Nanites to B, 25,000 to A and 50,000 to S, 85,000 in total. Each step raises the slot caps, the base stats and the number of supercharged slots, and at S-class the game will answer Max Class Reached.
| Class | Slot caps (general / tech) | Supercharged slots | Upgrade |
|---|---|---|---|
| C, every new build | 60 / 30 | 1 | 10,000 Nanites to B |
| B | 80 / 40 | 2 | 25,000 Nanites to A |
| A | 100 / 50 | 3 | 50,000 Nanites to S |
| S | 120 / 60 | 4 | Max Class Reached |
The slot caps are maximums, and you still buy the slots themselves or add them with Storage Augmentations. S-class is the class to aim for, with the highest caps (120 general and 60 tech slots) and 4 supercharged slots. My Nanites guide has the fastest ways of earning the 85,000 Nanites.
The parts themselves do not change the ship’s class. No corvette part has an S-class module: weapons and reactors carry A-class modules, and cockpits C. A ship full of A-class parts will still start at C and climb only through Upgrade Class.
Supercharged slots
A supercharged slot is a tech slot that boosts whatever upgrade module you put into it. A corvette has 1 at C-class and gains one per step up to 4 at S-class.
The supercharged layout and the base stats are set when you finalise, so save first if you want to reroll them. That way you can reload and finalise again until the supercharged slots sit where your best modules will go, and then put your best Phase Beam or Pulse Engine upgrade modules on them.
Corvette speed
The corvette’s strength is its pulse drive, which is faster than a normal starship’s. In normal flight it handles like a Hauler, it picks up speed far more slowly on planets, and the speed readout in the cockpit will show far more than the ship really does. Ignore it. Judge a build by how it flies.
COSMOS changed how corvette stats are displayed, and a lower manoeuvrability number after that update does not mean the ship got slower.
Fastest corvette build
Speed in a corvette means boost and manoeuvrability. No corvette part raises the pulse speed itself, which leaves that job to the upgrade modules in the tech grid.
- Three Medusa-Class Reactors are the top pick, with boost x1.10-1.20 and boost manoeuvrability x1.05-1.16 each. Fit all three before the cockpit.
- Chelone-Class Generators are a good choice too. They carry the same module as the Medusa-Class Reactor, share the same three places and are small and flippable, which helps in tight designs.
- Three A-class engines are the next pick. The Ambassador Heavy Booster, the Titan Heavy Booster and the Arcadia Heavy Booster all carry the same A engine module with boost x1.10-1.20, and so do the Forsaken Gorgon, Eldritch and Plated Thrusters. The Arcadia Heavy Booster is an ordinary A-class engine like the others. Keep the copies that rolled best.
- Twin Sublight Jets can stand in until you find A-class engines, with a B engine module and boost x1.10-1.15.
- The Titan-Class Cockpit or any other cockpit goes on last, since all of them carry the same C module. Place it after the three reactors.
Add your best Pulse Engine upgrade modules in the tech grid, which count separately from the engine parts, and put the strongest ones on supercharged slots. That being said, it will still feel like a heavy ship in a dogfight.
Forsaken corvette parts
Forsaken added the forsaken traders, who sell corvette modules for haunting mementos at deep-space outposts. Every forsaken trader stocks the same 29 corvette modules, so you never need to hop systems for a part. Whether he will take your mementos is a judgement the game shows before you confirm, from Unacceptable up to Pleasing.
Summoning a trader is free and does not need a corvette. You will find the Summoning Terminal on the edge of a deep-space outpost’s corvette landing pad. Only the mementos floating in space need a corvette and a Gravitino Coil to collect, and my Forsaken guide covers the trader and the mementos in detail.
Thirteen of the 29 add stats, and they fit into builds like this:
- The Hornet-I-Class, Viper-I-Class, Mantis-I-Class and Vantage-Class Cockpits carry the same module as every cockpit and are a pure looks choice.
- The Legion-Class Hab (+3 Cargo Slots) and the Legion-Class Walkway (+1) link to the cargo systems like every hab and walkway.
- The Razor Jet is a B-class engine.
- The Gorgon, Eldritch and Plated Thrusters are A-class engines and slot straight into the fastest build.
- The Dematerialisation Ray shares its three places with the Infra-Knife Platform.
- The Chelone-Class Generator carries the same module as the Medusa-Class Reactor.
- The Limos-Class Generator carries the same module as the Azimuth-Class Reactor.
The rest are hull, wing and joint pieces with no stats. What Forsaken added are parts for your own design, and no finished ship comes with them.
For reference, corvettes arrived with Voyagers (6.0) in August 2025, together with the Corvette Workshop and parts from salvage containers and derelict freighters. Breach (October 2025) added deep-space corvette wrecks and the Aeron set, and Remnant (February 2026) added the Gravitino Coil. COSMOS (7.0, September 2026) brought the Tractor Beam, deep-space salvage hauling and a fix to how corvette stats are displayed, while Forsaken (7.10, October 2026) brought the forsaken traders, corvette courier missions and corvette pads at trading outposts, and the hotfixes since then mostly fixed bugs, polished the new parts and added a few courier mission variants.
Corvette questions
How much money do you need for a corvette?
The basic set for a first corvette costs about 8.6 million Units, and a Tractor Beam adds 350,000. If you build from dug-up parts instead, you will not spend any Units on modules at all. Taking the ship from C to S-class costs another 85,000 Nanites, and spare parts sell for 150,000 to 1.75 million Units each.
Which corvette class is best?
S-class, for its slot caps of 120 general and 60 tech and its 4 supercharged slots. Getting there from C costs 85,000 Nanites, and the class of the parts you fit has no say in it.
Can you hire crew for a corvette?
No. A corvette has no NPC crew, and its crew are other players, who can ride along, beam down through the accessway and join Mission Radar jobs. Only the owner can fly it.
Do corvette parts have blueprints?
Only a few do. The Atlas-themed Aeron parts from the Breach expedition and the Deadeye Cannon from the Corvette expedition are the only corvette parts with blueprints. If you earned them, you can build more from Pugneum, Platinum and similar materials, while a gifted copy is used up when placed and turns back into materials when removed.
Conclusion
A corvette is probably the most useful ship you can build in Forsaken, mostly because it hovers while you beam down and because the salvage, courier and memento jobs need one. It will never fly like a fighter, but that is not what it is for.
If you just want one quickly, then buy the basic set, finalise the smallest design and spend your first trips shooting Salvage Containers. Trade the duplicates at the Salvage Exchange and save the 85,000 Nanites for S-class once you are happy with the layout.