Why does the Historian in Divinity: Original Sin 2 keep burning, no matter how much water you throw at him? His flames are a special status that the game lists as “HellFire”, and it will only go out while he kneels in a pool of blood.
In order to save him, you are going to need plain blood under him first, for example from Raining Blood, and a Bless on him or on the blood straight after the flames die. You will find him in Act 1, in the central room of the Gargoyle’s Maze in the swamp in the southeast of the Fort Joy island.
All of this was checked on the current version of the Definitive Edition. You will also find out below whether saving him is worth a Source point at all.
Where to find the Historian
The Historian kneels in the middle of the Gargoyle’s Maze, the maze of locked rooms in front of Braccus Rex’s tower, and he will keep begging you to douse the flames for as long as he burns. He and his skeletons are level 6, and so are the locks and the rewards. I would advise you to come once your party is around that level.
The proper entrance is on the north side, up the vines, and the gargoyle statue there will greet you with “You are not Braccus Rex.”, after which you can lie to it, admit it, show it a ring or simply take your leave. As it lets you in, it warns you that “Each lock opens only with a soul.” Those souls are six skulls, called Crumbling Skull or Soul-Infused Skull in the game, one-use keys that crumble to dust after you open a door with them.
The Band of Braccus shortcut
If you carry the Band of Braccus, the entrance gargoyle will also let you show it the ring of the Source King. It then says “Welcome home, master.” and teleports you straight to the end of the maze. Bear in mind that the option only exists in your first conversation with that gargoyle and will not come back later.
The shortcut still completes the quest, but you skip every skull, the Historian and the loot along the way, and the gargoyle at the tower door gives you no item reward. Our guide to cursed items has more on the ring itself, and personally, I would only use it if the maze does not interest you at all.
The fight in his room
If you came in the proper way, the gargoyle in his room first asks its riddle: “Riddle me this, wanderer. How would mighty Braccus douse a man on fire? Ahahahaha!” Take it seriously, because that riddle is the game’s hint for putting out his flames.
Then three level 6 skeletons will rise. The Incandescent Decapitator swings a two-handed axe, the Incandescent Scorcher is a fire mage and the Incandescent Marksman is an archer. All three are immune to fire, poison and bleeding and weak to water, so bring water or physical damage. Since they cannot bleed, hitting them will not give you any blood for the douse either. The game autosaves when the fight starts.
How to put out the Hellfire
His Hellfire is tied to his own script. Water does nothing to it, and the only thing that puts it out is plain blood on the spot where he kneels. That leaves him Bleeding and Cursed, and the Cursed part is what Bless is for.
The cleanest blood source is Raining Blood, which you might also know as Blood Rain or Rain of Blood. It costs 2 AP, needs Hydrosophist 1 and Necromancer 1, and it also puts out fire on the floor. You can find a Blood Rain Skillbook in a desk in Orivand’s quarters in Fort Joy, or craft one from a Hydrosophist and a Necromancer skillbook. The Necromancer in our best builds list picks it up in Fort Joy anyway. An elf can use Flesh Sacrifice instead, which costs 0 AP and leaves a small pool of blood at the elf’s feet.
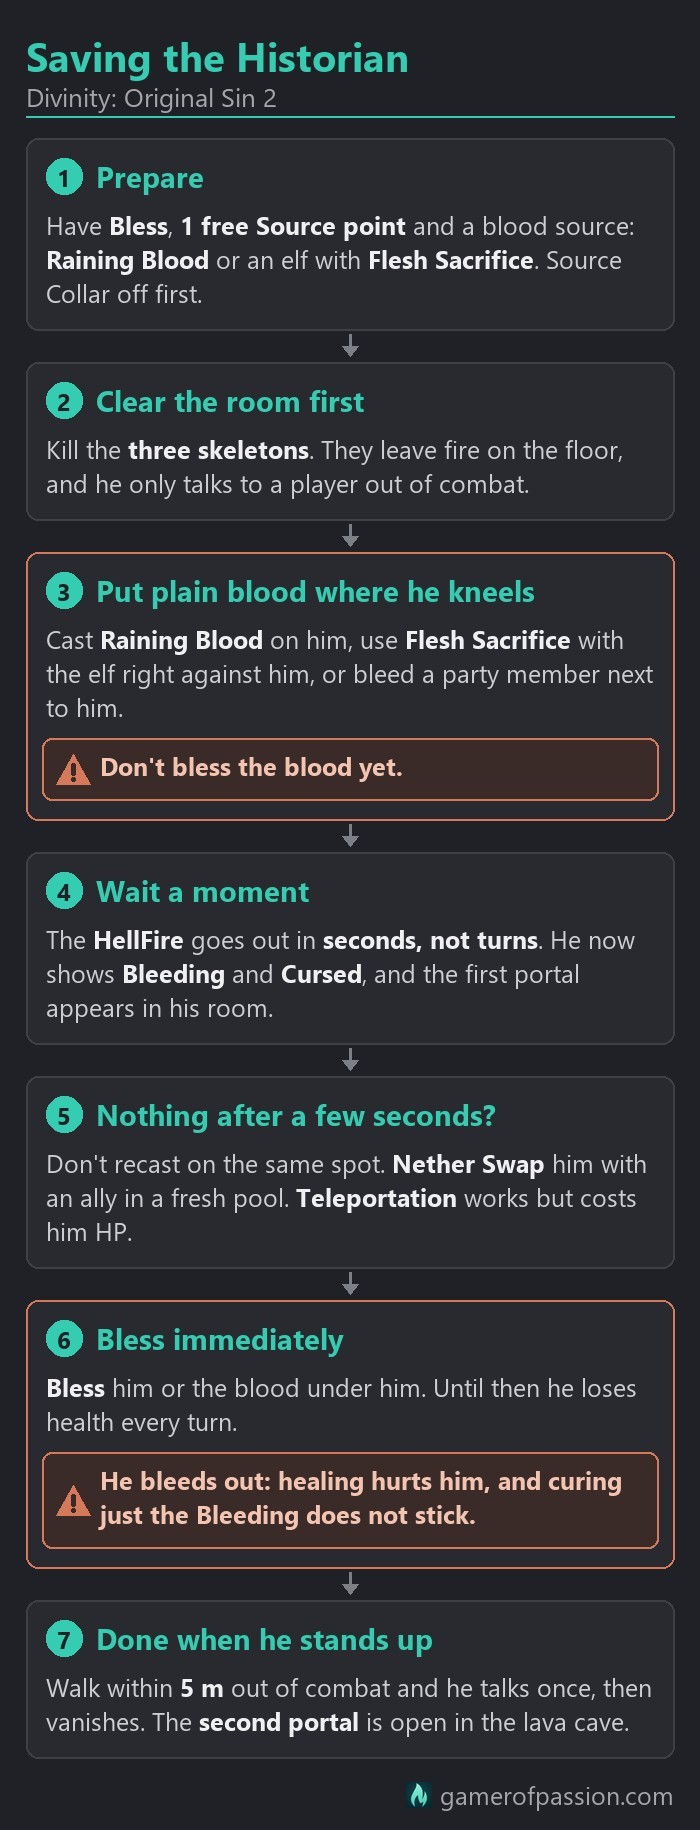
- Have Bless, one free Source point and a blood source ready. In Fort Joy, your Source Collar has to come off first, since it blocks your Source, and you learn Bless on your first trip to the Hall of Echoes.
- Kill the three skeletons first, because he will not talk to you during combat.
- Put plain blood where he kneels with Raining Blood, Flesh Sacrifice or a bleeding party member. Do not bless anything yet.
- Give the blood a moment to pool. The Hellfire will go out as soon as it reaches him, and he groans “The fire… it’s left me weak… I won’t last long…” He now shows Bleeding and Cursed, and the first portal appears in his room.
- Still burning after a few seconds? Do not recast on the same spot. Nether Swap him with a party member who stands in a fresh pool.
- Cast Bless immediately, on him or on the blood under him, because he loses health every turn until you do.
- Once he stands up, walk over to him out of combat. He will talk to you once and vanish, and the second portal will be open in the lava cave.
| Method | Does it work? | Why |
|---|---|---|
| Raining Blood | Yes, the best way | Rains a plain blood pool on him and puts out the HellFire |
| Flesh Sacrifice (elf) | Yes, if the elf stands right next to him | 0 AP. The small pool has to cover his spot |
| A bleeding party member | Yes, once they bleed | Hits only make blood once their Physical Armour is gone |
| Bless on him | Yes, after the fire is out | Removes Cursed. Alone it does nothing while he burns |
| Bless on the blood under him | Yes, after the fire is out | Cures him. Only plain blood puts out the HellFire |
| Rain or water | No | Water arrows, barrels and Rain do nothing to the HellFire |
| Armour of Frost | No | It cures Burning, not Cursed or the HellFire |
| Restoration / Fortify / Cleanse Wounds | No, and the healing ones hurt him | The Bleeding they cure comes straight back |
| Nether Swap or Teleportation into blood | Yes, but Teleportation hurts him | Not required. Use it if the pool will not reach him |
You can also cast Bless on him a moment before the blood lands. That should work as well, as long as he still shows Blessed when the flames die. It is the same idea as in the Hissing Tomb, where Bless blocks the petrification once and is used up doing it.
You do not have to teleport him into the blood either, as blood that pools where he kneels is enough. If you do have to move him, Nether Swap is the better tool, since Teleportation drops him for Physical damage.
Historian not dousing or dying?
If he sits in blood and still burns after a few seconds, more blood on the same spot will not help, because the surface under him is probably not plain blood anymore (usually because it was blessed too early) or the pool simply does not reach his spot. Move him into a fresh pool that has not been blessed. Never bless, freeze or electrify the blood before the flames are out.
With Flesh Sacrifice, the elf has to stand right against him, since the pool will only spread a short way. A party member you hit for blood will only bleed once their Physical Armour is broken.
The bleed-out is the second trap. The moment the flames go out, he loses health every turn until you cure him, and if you wait too long, he dies. Healing is no way out. He counts as undead, which means healing spells hurt him, and curing only the Bleeding does not stick. If he dies after the douse, the first portal stays, but the second one never appears.
Rain, water, Armour of Frost, Restoration, Fortify and Cleanse Wounds will not help, and there is no need for a Rain step between Raining Blood and Bless.
Sometimes the skeletons’ fire will have left him Burning at the moment the Hellfire goes out. In that case he can skip the Cursed stage and stand up still showing Necrofire. That still counts as saving him, and you can talk to him as normal.
If blood does nothing at all, load a save from before you entered his room. You do not need to hear the riddle for the puzzle to work, and how you got into the room should not change how you save him.
What the Historian says
If you talk to him while he burns, all he says is “The flames… I cannot quench them… it buuurrns!”, and after the douse you only get a weak “H-help… the flames… they’ve drained me…”. Both will end the conversation at once. Only once he is cured will he greet you with “You… you released me… long have I waited for this moment…”
He was a scholar and a librarian in the service of Braccus Rex, and he calls his burning “a reward… for doing my duty”. He unearthed knowledge of “a great and terrible power”, one that Braccus coveted above all. Ask what it was, and he refuses with “I will not say. I spoke of it once, and was damned to eternal hellfire for it…” Threaten to force it out of him, and his answer is “My secret leaves this world with me.”
A few options depend on who you are. If you have heard of Braccus, you can say you know of “the mad Source king”, and otherwise you ask whether he is a figure from some other tale. Sebille gets two extra opening lines marked [SEBILLE], one of them about looting him, which he answers with “I have nothing to give you, I’m afraid”. Additionally, a Scholar can ask where his texts are, and undead characters get two joke goodbyes.
None of these change how the talk ends. There is no Persuasion check, and no tag, origin or talent will get the secret out of him. Once the talk is over, he vanishes.
Is saving the Historian worth it?
Saving the Historian gives you no XP, no items and no gold. He has nothing to give you, and that is how the quest is built. His real reward is the pair of portals he leaves behind.
Putting the fire out opens the first one, on the raised platform in his room, and it takes you to a lava cave right next to one of the maze’s skulls, which you are going to want for the maze’s end reward. Only curing him opens the second portal, in the lava cave, and that one leads up to a level 6 chest on a ledge.
Killing him while he still burns gives normal enemy XP, but no skull and no portal. You can also leave him burning, as the rest of the maze works fine without him. With a jump or teleport skill, you should be able to reach the chest ledge even without the second portal.
I would say saving him is worth the Source point. The douse alone gets you the skull, and the Bless adds the chest. Killing him for the XP is an option, of course, but you are giving up a skull for the end reward.
| Outcome | What you get |
|---|---|
| Save him (blood + Bless) | No XP or items, but the second portal opens to a ledge chest |
| Douse him only | The skull portal only, no portal to the chest |
| Kill him (while burning) | Normal enemy XP, but no skull and no portal |
| Leave him | Nothing, and the rest of the maze still works |
| 3+ skulls used at the end | You get to pick a purple (Epic) item |
| Exactly 2 skulls used | Should be a smaller, green (Uncommon) pick |
| 0-1 skulls used, proper entrance | The gargoyle calls you a CHEATER and gives you nothing |
| Band of Braccus skip | The quest still closes, but you get no item reward |
Gargoyle’s Maze route and skulls
The maze is a little bit confusing the first time through. Any skull on any door counts toward the end reward, and this walk will get you to the tower door with three skulls used and the Historian on the way.
- In the entrance hall, leave a barrel or a companion on the square plate while someone else takes the skull from the altar on the east side. If the plate is released first, the skull vanishes until someone steps back on.
- Use that skull on the east door and take the trapdoor down from inside that small room.
- Below, hold the first square plate to open the two shimmering gates. Go through and hold the second plate, and the next skull appears on the eastern altar. If nobody stays on the gate plate, the gates shut and lock again.
- Back in the entrance hall, use the second skull on the south door into the Historian’s room.
- Win the fight, save him and take his portals to the lava cave skull and the chest.
- Go back down through the trapdoor and use the third skull on one of the two south doors of the plate room. You are now on the tower grounds with three skulls used.
- Loot skulls four and five from Jimfred’s corpse and from a skeleton behind the tower.
- Walk up to the gargoyle at the tower door.
Watch out for irregular-shaped trap plates, which should make the statues spit fireballs while someone stands on them. The square plates are the puzzle ones.
The sixth skull is optional. It sits in the room west of the entrance, where you have to get something onto a high plate, for example a barrel with Telekinesis or a party member you teleport up. The gargoyle there will compliment you with “Master would be impressed.”
The end reward
The gargoyle at the tower door judges you only once, the first time you step up to it, and it only counts the skulls you have used on doors by then.
- Three or more skulls used: “You. You have earned your reward.” You get to pick a purple item.
- Exactly two: “You have proven yourself worthy. Wise. For you.” This should get you a smaller, green-quality pick.
- None or one, because you jumped or teleported past the doors: “CHEATER.” You get nothing, although it still lets you through.
- The Band of Braccus shortcut: “Welcome back.” and no item reward.
Skulls left in your bag do not count, and teleporting past gates is fine as long as you have used three skulls on doors by the time you get there. If you came up the back way first, the gargoyle should give you white items at best. The Dominating Statue of Braccus Rex by the tower will then teleport you back outside.
FAQ
Can you save the Historian?
Yes. Blood under him puts out the Hellfire, and a Bless on him or on the blood straight after will cure him before he bleeds out.
Does Rain or Bless alone work?
No. He cannot even get Wet, and Bless alone does nothing to the Hellfire. It only helps once blood puts the flames out.
Do you need Raining Blood?
No. Any plain blood under him works, including Flesh Sacrifice or a party member who bleeds right next to him. Corpse Explosion can leave blood too, but the blast also hurts him. That being said, blood is not the answer to every puzzle in the game, and a blood spell on the Decrepit Altar on the Nameless Isle, for example, will not get you anywhere.
What is the Historian’s secret?
The game never tells you. He only reveals that he found “a great and terrible power” in the texts he studied, and the Sebille lines, the Scholar tag, the Undead lines or knowing about Braccus will not change that.
What happens when you pull the lever in Braccus Rex’s tower?
The Gargoyle’s Maze has no levers, as it runs on plates and skulls, but two other levers on the island might be what you mean. The lever in the Necromancer Tower shuts off the fire trap and the two Boar Head turrets and opens a barred gate. Pick up the Antique Key first, because the lever makes it vanish if it is still lying there. The cursed lever by Braccus’s armoury needs a Bless before you pull it. Once the curse is gone, pulling it should open the armoury door.
Conclusion
The Historian is probably one of the meaner puzzles in Fort Joy, mostly because the main clue is a gargoyle’s riddle that is easy to laugh off. Blood goes first, Bless goes second, and water does not come into it at all. Make sure to have that Source point ready before the first drop of blood lands, because he will not wait for you. If you have none to spare, dousing him still gets you the skull, which is the part the maze cares about.