The Commando (Soldier + Demolitionist) is a very good pick for your first Grim Dawn character. It can stand in the middle of a pack, take the hits and still burn everything down, which is exactly what you want while you are still learning the game. This guide is going to walk you through a two-handed fire Cadence Commando from level 1 to level 100, bracket by bracket, with the skills, devotions and gear to farm at each stage.
The build is not mine. It is S.E.P_Ralf’s “Braddock, the fire commando”, posted on the official Crate Entertainment forums, and you can find his finished level 100 setup on GrimTools here. He leveled it from scratch without mandates, merits or Potions of Clarity, and every item it uses drops from specific enemies or is sold by faction vendors. That is exactly what makes it a good beginner build, since you can follow it on a fresh account. What follows is my beginner-friendly walkthrough of his leveling plan, with a GrimTools snapshot linked for every phase so you can check your points against his.
Before we start, a quick note from me. I picked this Commando because it does what a first character should do. You do not need to juggle a lot of buttons, it takes a beating without dying constantly, and it does not need rare items to work. Most of what makes Grim Dawn great (the devotions, the skill modifiers, gearing up) you will learn along the way, without the build falling apart on you.
Build at a glance
You swing a two-handed weapon and deal fire and burn damage. The gameplay loop is short: Blitz into a group, drop Thermite Mine to debuff and damage them, throw Blackwater Cocktail to lower their damage, then finish everything with Cadence. Very few buttons, which also makes it comfortable on a controller.
- Masteries: Soldier first, Demolitionist second (from around level 20 onward in this plan)
- Weapon: two-handed melee, eventually the Sunherald’s Claymore
- Main attack: Cadence (levels 1 to 20 use Forcewave instead)
- Other actives: Blitz, Thermite Mine, Blackwater Cocktail
- Damage type: fire and burn
- Endgame gear: the Shattered Guardian set from the Shattered Realm vendor
According to the author, the finished character farms all skeleton key dungeons, facetanks the faction nemesis bosses and can even take down Mogdrogen without much investment. A budget version before the set already pushes to Shard 26 of the Shattered Realm.
One important patch note before you start. The original guide told you to put 3 points into Discord (a Cadence modifier) to turn Cadence’s physical damage into elemental. With patch 1.3, Menhir’s Bulwark now converts 100% of physical damage to fire on its own, so the author updated his post: do not spend any points on Discord. The snapshots linked below are from patch 1.2.1.6, and small balance numbers can shift between patches, but the skill plan itself still holds.
Mind one thing about the numbers in this guide. GrimTools shows the total skill level including bonuses from gear, so you will see values like “Cadence 24/16”. You can only spend 16 points yourself, and the rest is added by +skill items. Wherever that happens below, I tell you to max the skill and let the gear do the rest.
Levels 1 to 20: Forcewave and the Soldier start
Pick Soldier at the start. You are going to want a two-handed weapon from the very first minutes. If nothing drops, buy one from the vendor in Devil’s Crossing, or grab Hevill’s Greatsword, which sits in a small house in Lower Crossing.
Skills
For the first handful of levels, every point goes into the Soldier mastery bar until you reach Tremor. From there you split between Forcewave and the mastery bar. Put one point into Menhir’s Will and one into Fighting Spirit, and one into Blitz as soon as it becomes available.
Once Rending Force (the Forcewave modifier) opens up, you settle into a simple rhythm: one point in Rending Force, one in Forcewave, one in the mastery bar, and repeat. The author’s level 1-10 snapshot shows the very early version.
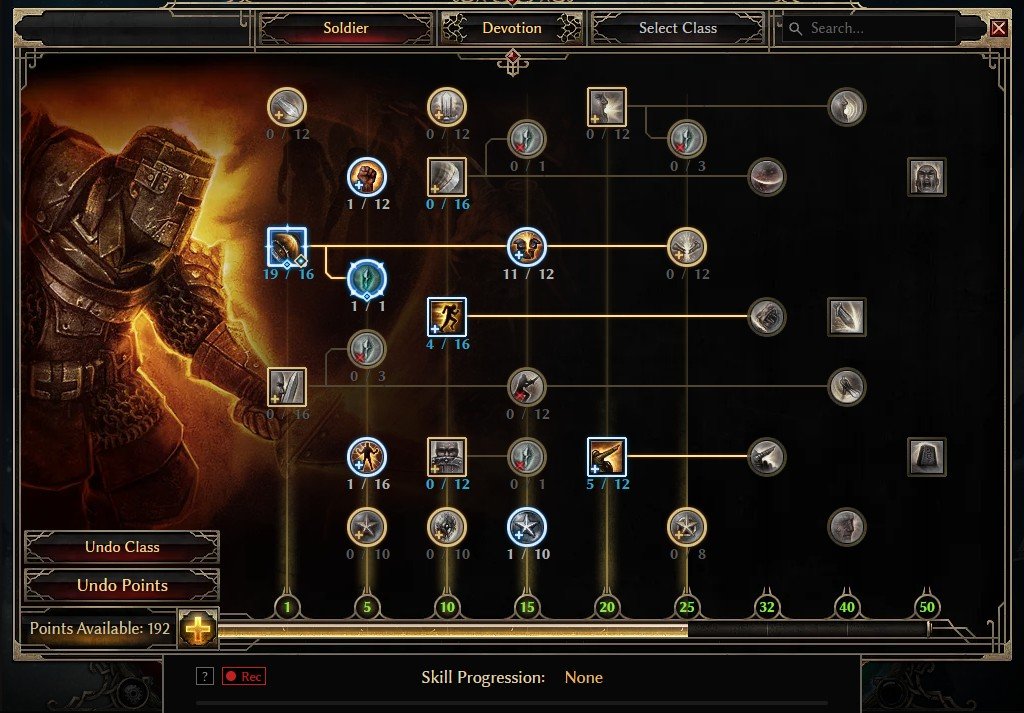
By level 20 the level 20 snapshot looks like this: Forcewave maxed (16 of your own points, gear pushes it to 19), Rending Force 11/12, Field Command 5, a few points in Blitz (4 in the snapshot) and single points in Veterancy, Menhir’s Will and Fighting Spirit. No Demolitionist yet. Even though you can pick a second mastery from level 10, this plan keeps everything in Soldier until the respec.
Devotions
Restore every shrine you pass. Once you have 6 devotion points, spend one on the Primordial Crossroads and complete Imp. Bind Imp’s celestial power to Forcewave so it procs from your main attack. A power only levels up while it is bound, so make sure to do this as soon as you complete Imp.
Gear to farm
The first real target is the Shambler’s Heart amulet. It drops from the Ancient Shambler in the Flooded Passage, which you pass anyway on the way to Burrwitch.
Levels 20 to 30: Sunherald’s Claymore and the switch to Cadence
This is the bracket where the build turns into the actual Commando, so it is worth a little bit of detour.
Gear to farm
After Warden Krieg, head to the Arkovian Foothills and pick up the Bone Talisman relic. The trick here is to lie to the Lost Rover Elder when you finish the quest and say you did not find it. The relic’s skill helps a lot with energy regeneration and early damage.
Then go straight to the Forgotten Gods expansion. The goal is the build’s main weapon, the Sunherald’s Claymore, which drops from Astros the Sunherald in Sunward Spire. While you are there, also farm the Chosen Visage helmet. You will wear it all the way to endgame, just in upgraded versions.
The respec
You can keep playing Forcewave for a while if you like it, but the author respecced to Cadence as soon as the Claymore dropped. Respec at the Spirit Guide in Devil’s Crossing. And again: skip Discord, Menhir’s Bulwark handles the fire conversion now.
After the respec your priority is Menhir’s Bulwark. Work up the Soldier bar, and once Squad Tactics is available put a point in Field Command and a point in Squad Tactics. From there alternate one point in Squad Tactics with two in the mastery bar until Menhir’s Bulwark opens, then give it a point. After that, every new point goes into the Demolitionist mastery bar.
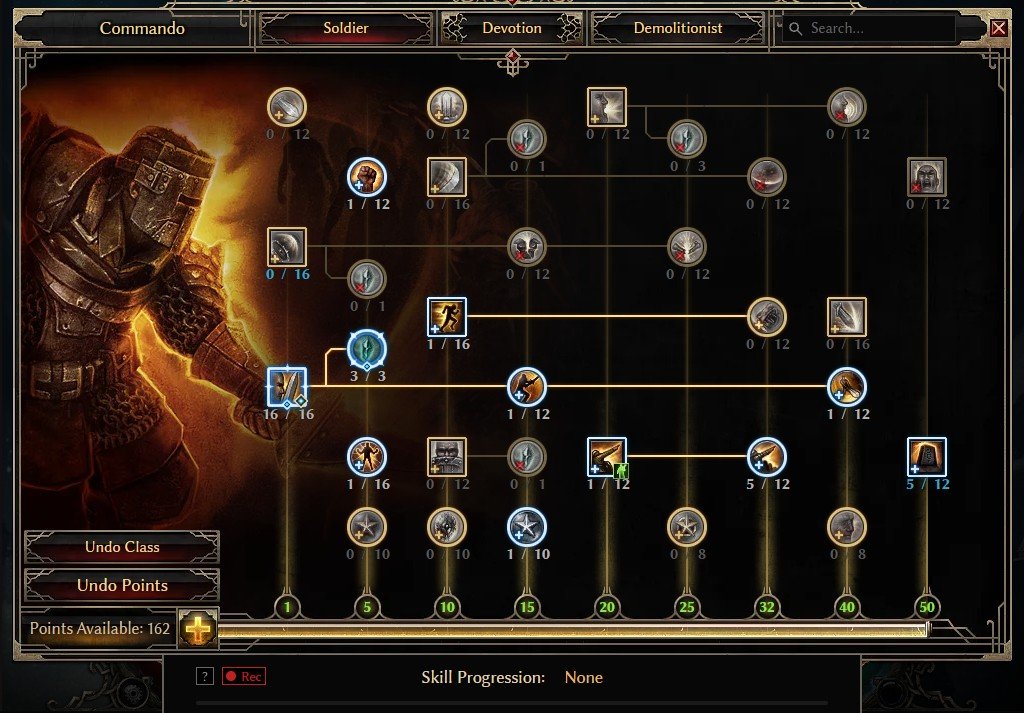
The level 30 snapshot shows where you should end up: Cadence maxed at 16/16, single points in Fighting Form, Deadly Momentum, Veterancy, Menhir’s Will, Fighting Spirit, Blitz and Field Command, 5 in Menhir’s Bulwark and 5 in Squad Tactics. On the Demolitionist side there are only 4 points in Flame Touched so far, the rest went into the mastery bar.
Devotions
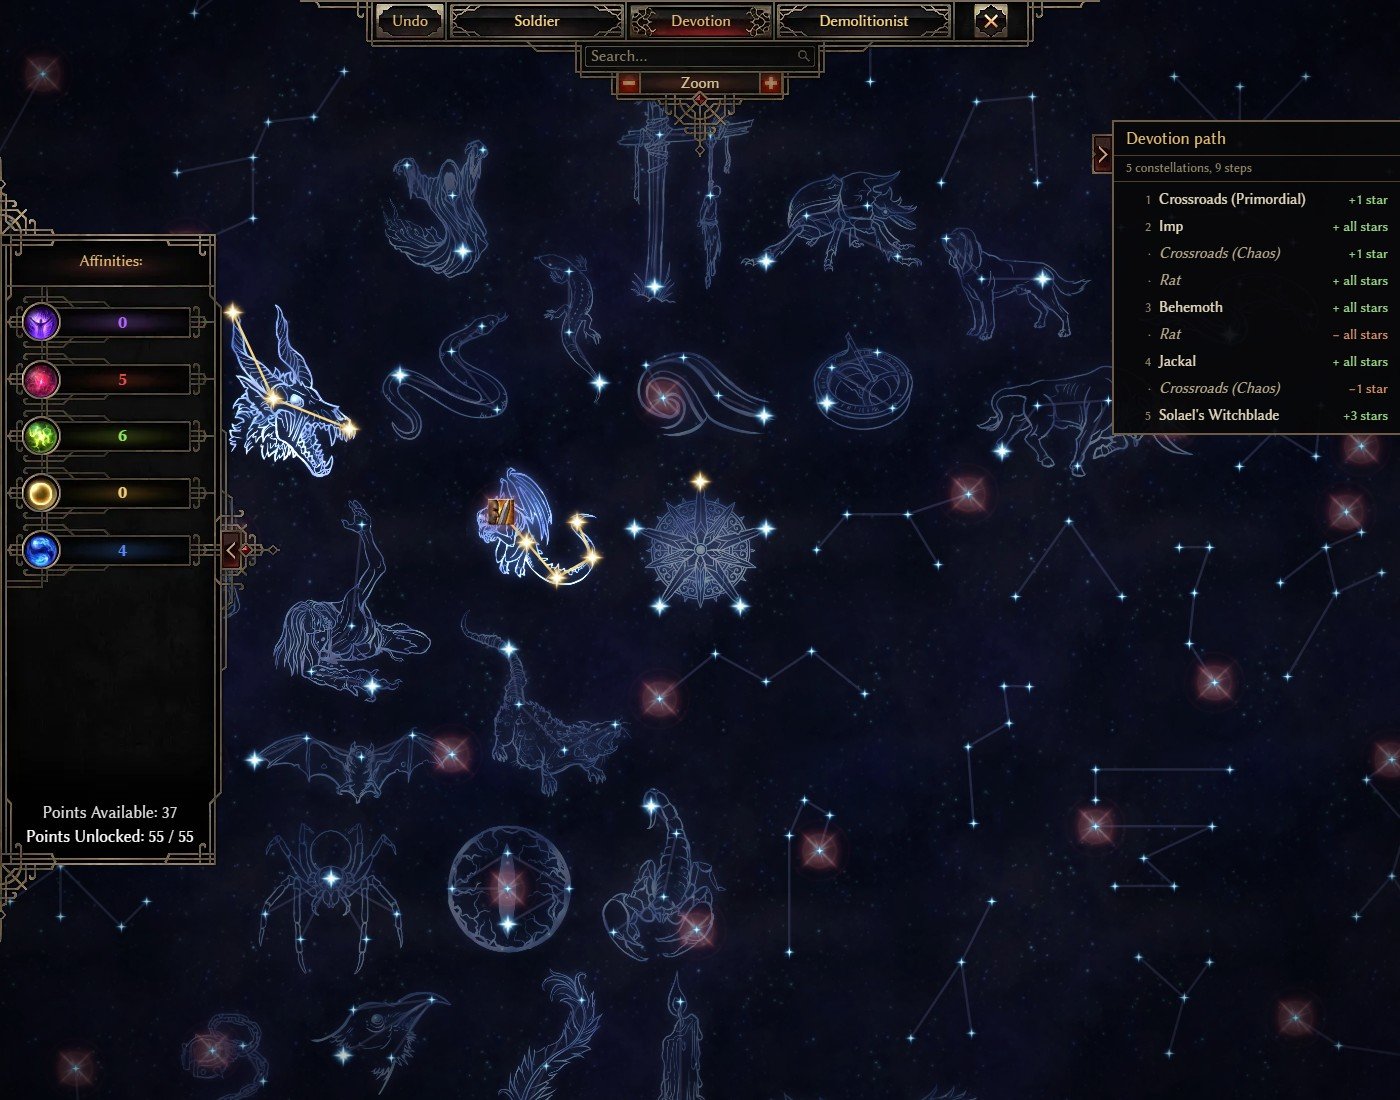
The goal for this bracket is to finish Behemoth and Jackal, then start on Solael’s Witchblade. The author’s text describes the route through the Chaos and Eldritch crossroads, but his level 30 snapshot takes a slightly different path, and I am following the snapshot here since that is the finished state you want to match:
- Keep Primordial Crossroads and Imp from before.
- Take the Chaos Crossroads, then complete Rat.
- Complete Behemoth and bind its power, Giant’s Blood, to Field Command.
- Remove Rat, then complete Jackal.
- Remove the Chaos Crossroads and put the freed points into Solael’s Witchblade (3 stars by level 30).
In case “remove” sounds scary, stepping-stone constellations like Rat and the crossroads stars only exist to give you the affinity you need to unlock the next constellation. Once the bigger one is complete, you refund the stepping stone at the Spirit Guide (it costs iron and an Aether Crystal per point) and reuse those points.
Levels 30 to 40: Demolitionist and Thermite Mine
With the Forgotten Gods part done, go back to the main campaign and pick up where you left off.
Gear to farm
- Martin’s Crest (medal) from the henchman “Moneybags” Martin in Cronley’s Hideout
- Gollus’ Ring (you want two) from Gollus in the Den of the Lost, during the quest to kill the Dermapteran Queen near Homestead
- Fleshwarped Pauldrons from Fleshwarped monsters around Homestead (if they do not show up, try the Conflagration area or the Port Valbury Outskirts)
Skills
Put at least one point into Flame Touched and one into Vindictive Flame, then keep pushing the Demolitionist bar until you reach Thermite Mine. The next goal is Thermite Mine at 16, which in the author’s final build is 14 of his own points plus 5 from gear. Once it is maxed, spread your points over the Cadence modifiers, Menhir’s Bulwark, Flame Touched, Blast Shield and Vindictive Flame.
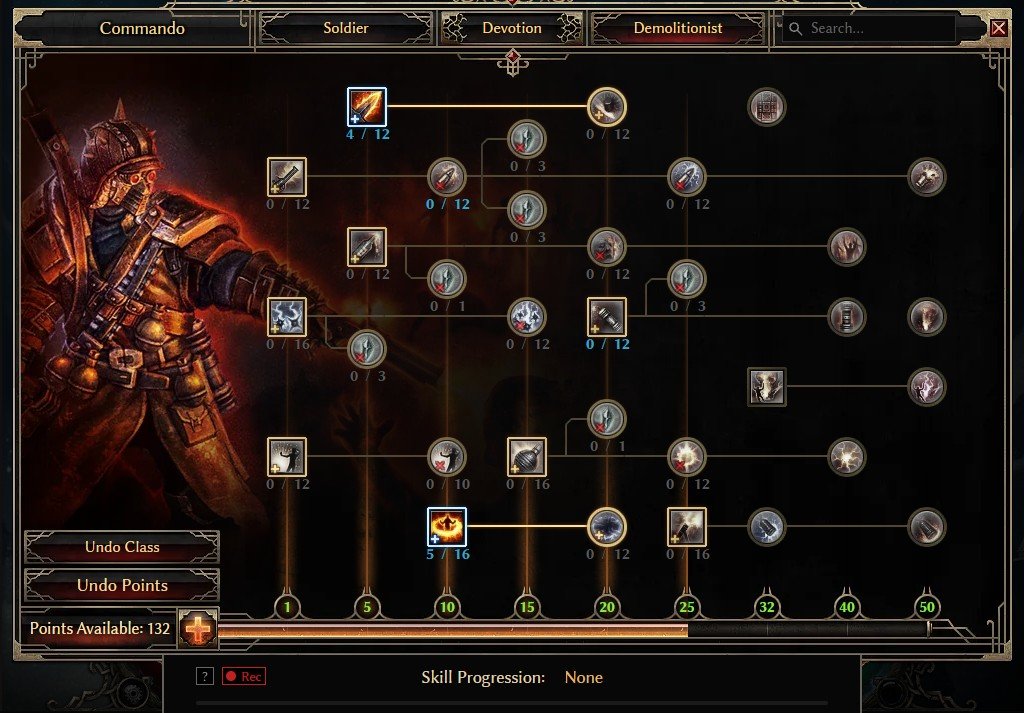
Mind that the level 40 snapshot is a little bit behind that description. It shows Flame Touched 4/12 and Vindictive Flame 5/16 on the Demolitionist side, with Thermite Mine not taken yet, while on the Soldier side Squad Tactics is already maxed at 12/12 and Menhir’s Bulwark has 8. So at level 40 you are most likely still climbing the Demolitionist bar towards Thermite Mine, and the mine itself becomes a thing in the 40s. Cadence also shows 21 there, which is your 16 points plus gear.
Devotions
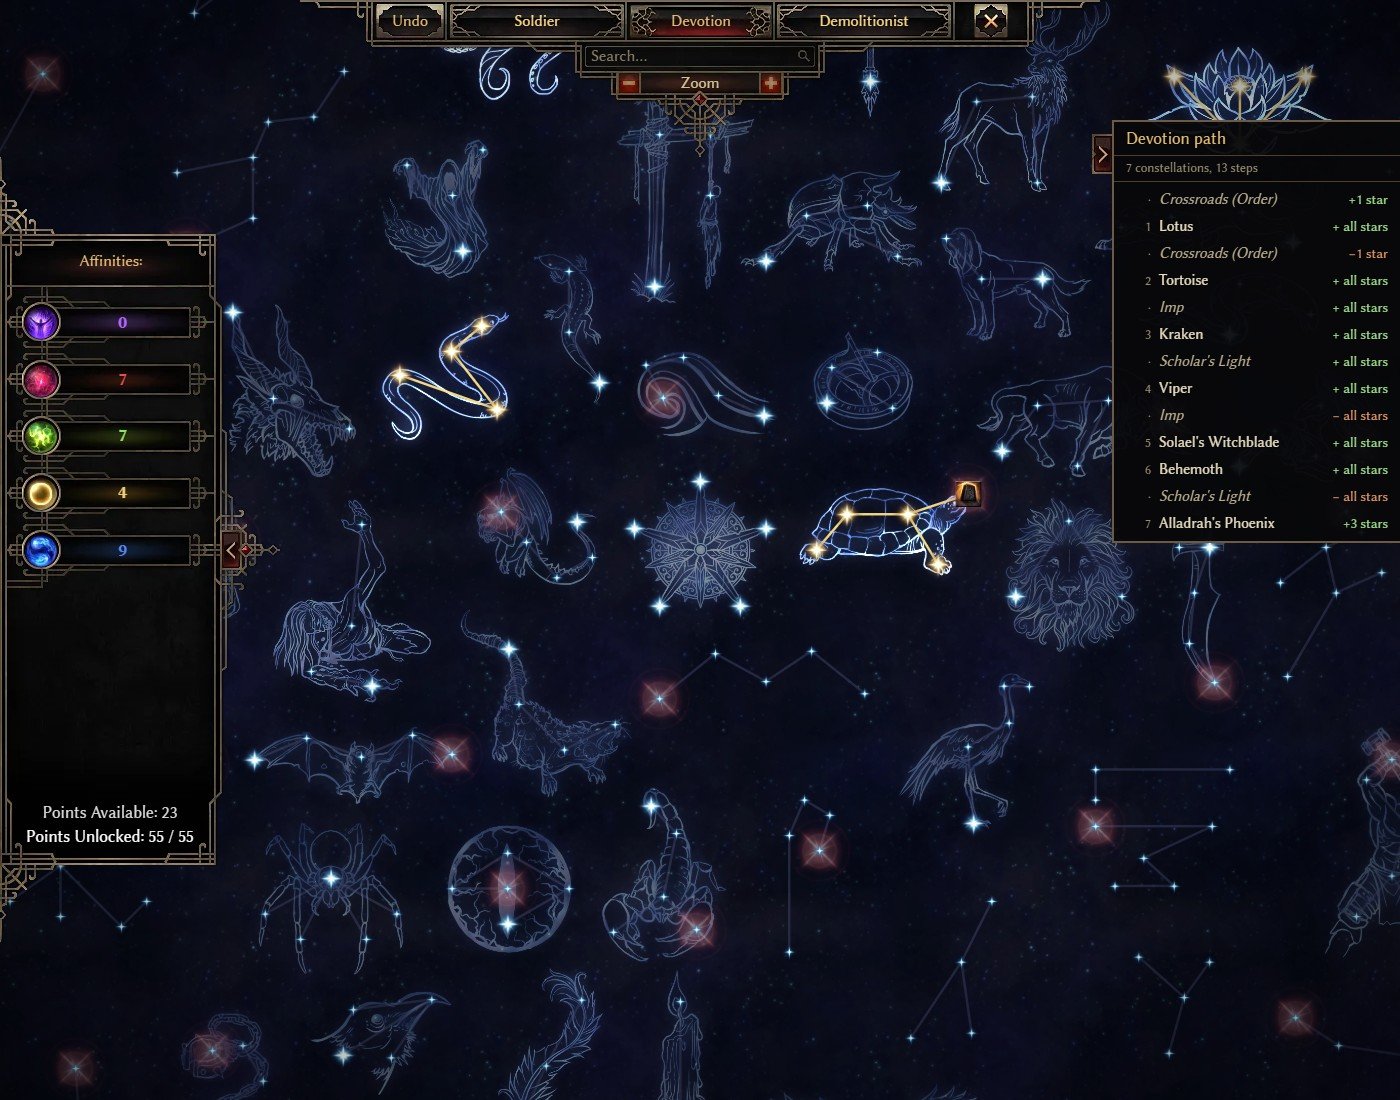
This bracket is where the devotion map gets reshuffled the most. In order:
- Finish Solael’s Witchblade and bind its power to Cadence.
- Complete Viper.
- Remove Jackal and complete Kraken.
- Spend one point on the Order Crossroads and complete Lotus.
- Remove Imp and complete Tortoise. Bind its power, Turtle Shell, to Menhir’s Bulwark.
- Remove the Primordial Crossroads.
- Start putting points into Alladrah’s Phoenix (3 stars by level 40).
Once Imp is gone, Forcewave is long gone too, so you are not losing anything there. The GrimTools path for the level 40 snapshot also passes through Scholar’s Light as a temporary stepping stone and removes it again. If you run short on affinity for a constellation, that is the one to borrow.
Levels 40 to 50: Ugdenbog, Malmouth and the Phoenix
From here on, make it a habit to activate every Monster Totem you come across. They drop plenty of loot to sell and, every now and then, a piece that fixes a resistance you are short on.
Gear to farm
- Ugdenbog Girdle (belt) from Carraxus Foul in Ugdenbog, who drops one every single kill
- Galakros Dread Plating (chest) near the entrance to the Malmouth sewers
- Blueprint: Relic – Juggernaut, if it has not dropped yet. After the Malmouth resistance quests, you can reset Hyram’s shop until it shows up.
Loghorrean on the way should not be a problem at this point. The author describes the fight as a complete facetank.
Skills
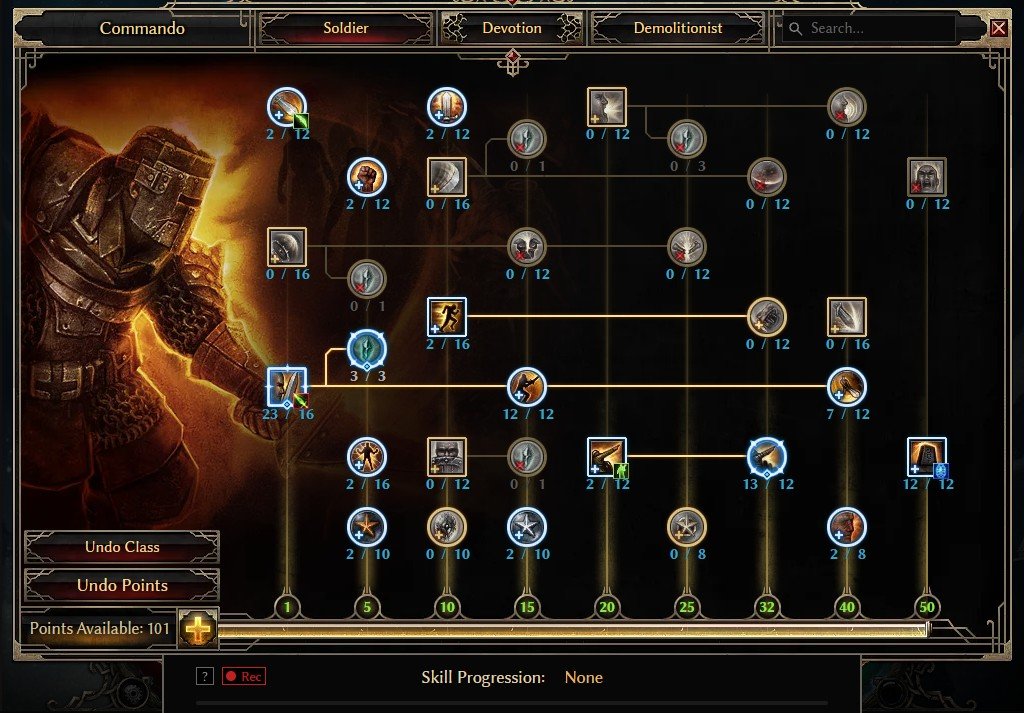
Keep going with the spread from the previous bracket. The level 50 snapshot gives you the checkpoint:
- Soldier (numbers as GrimTools shows them, gear bonuses included): Cadence maxed, Fighting Form 12/12, Deadly Momentum 7, Menhir’s Bulwark 12/12, Squad Tactics maxed, and 2 points each in Military Conditioning, Veterancy, Scars of Battle, Menhir’s Will, Fighting Spirit, Blitz, Field Command, Markovian’s Advantage and Zolhan’s Technique
- Demolitionist: Flame Touched 4, Thermite Mine 8, Blast Shield 5, Vindictive Flame 8
Menhir’s Bulwark being maxed matters here, since it is now the skill doing your physical-to-fire conversion. Thermite Mine is at 8 in the snapshot, so keep feeding it towards 16 as your next big target.
Devotions
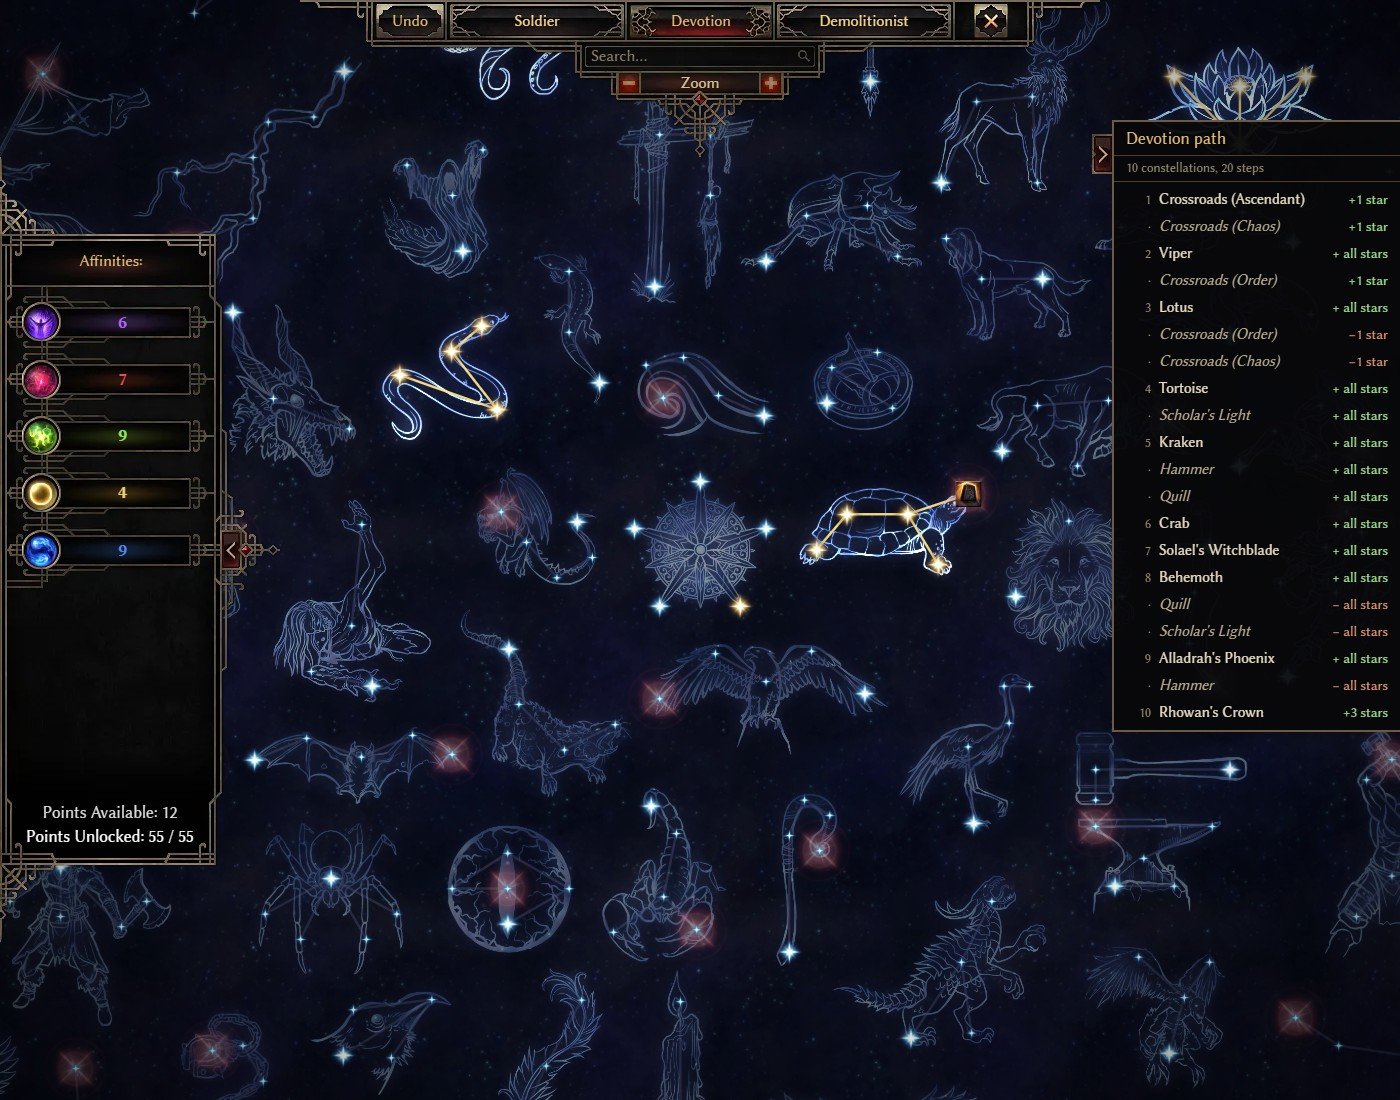
Finish Alladrah’s Phoenix and bind its power to Blitz. Then complete Hammer, then Crab, and bind Crab’s power, Arcane Barrier, to Flame Touched. Take one point in the Ascendant Crossroads, remove Hammer, and start on Rhowan’s Crown (3 stars by level 50).
Level 50 to 100: Elite, Ultimate and the endgame setup
Levels 50 to 70
Time for Elite. Check your resistances before you go in and upgrade the essentials, your weapon first of all. For skills, put one point into Blackwater Cocktail and one into High Potency, then start maxing Demon Fire (level 50-60 snapshot).
On the devotion side this is the final stretch:
- Complete Rhowan’s Crown and bind its power to Thermite Mine.
- Remove the Ascendant Crossroads and complete Raven.
- Take one point in the Chaos Crossroads.
- Put every remaining point into Ulzuin’s Torch and bind its power to Blackwater Cocktail.
By levels 60 to 70 (snapshot) you will be Honored with several factions. I would say the faction writs are worth buying, since they speed up reputation gain considerably. The author pushed the Malmouth faction that sells Potions of Clarity to Revered as quickly as possible, since those potions make the road to 100 on Ultimate much faster.
Levels 80 to 100: the budget setup
On Ultimate the advice is short: upgrade your gear and keep your resistances in check (level 80-90 snapshot). From level 90 you start farming the “budget” version of the build, which is what you will use to farm the actual endgame set (level 90-100 snapshot).
Most of it is simply better rolls of the items you have been using:
- A strong Ultimate Sunherald’s Claymore with fire affixes and attack speed
- A better Chosen Visage from Forgotten Gods
- A good Martin’s Crest (more visits to Cronley’s Hideout)
- Two good Gollus’ Rings (the author spent around two hours or more on these)
- Fleshwarped Pauldrons from the Port Valbury skeleton key dungeon (you can also reset the shop inside the dungeon a few times)
- A good Ugdenbog Girdle from Carraxus Foul again, plus an upgraded amulet and chest armor
- Pants: Mythical Leggings of Arcane Currents if they drop, otherwise the Dreeg-Sect Legguards
- Gloves: Mythical Turin’s Grips or Mythical Handguards of Justice, or in the meantime Elite Rhowari Grips or crafted Plagueguard Grips
- Boots: Elite Legion Greaves until something like Mythical Boots of Primordial Rage drops
For reference, the author’s finished budget character is here on GrimTools. He tested it against bosses like Theodin Marcell, Korvaak, Rashalga and Kra’vall with videos in the forum thread, and it comfortably reaches Shard 26 of the Shattered Realm.
The final version: Shattered Guardian
After clearing Shards 26 to 27, claim the reward and buy the Shattered Guardian legendary set from the Shattered Realm vendor. You are going to lose a little bit of damage compared to the budget setup, but you will gain health, physical resistance and overall toughness, which is the better trade for a facetanker. This is the level 100 build.
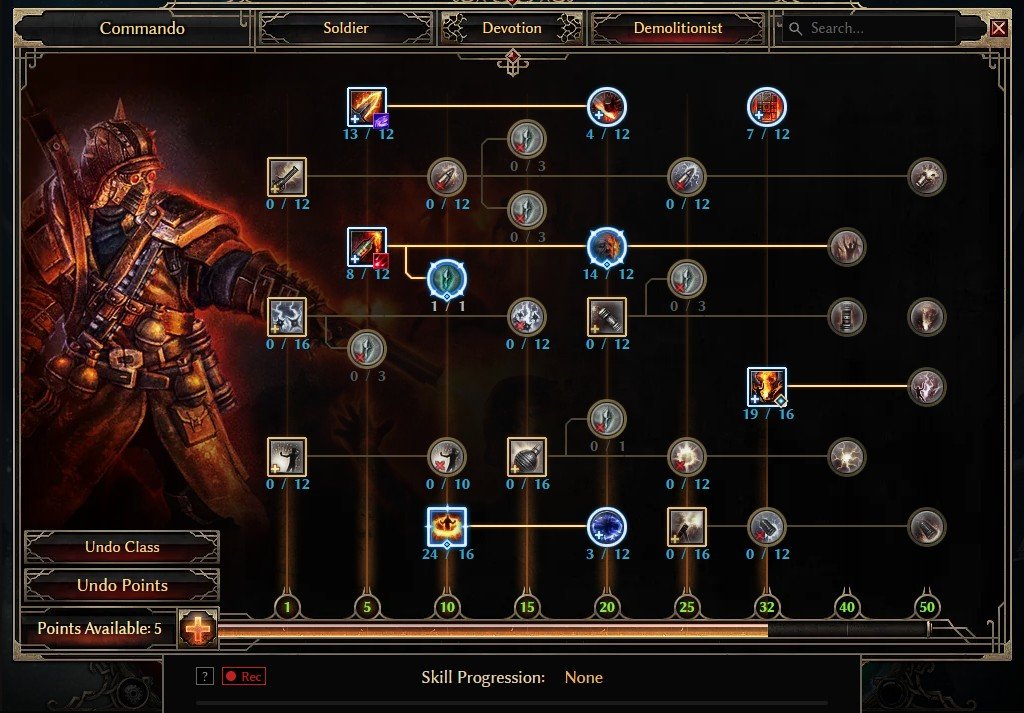
The final skill picture as GrimTools shows it, gear bonuses included:
- Soldier maxed: Cadence, Fighting Form, Deadly Momentum, Military Conditioning, Veterancy, Fighting Spirit, Menhir’s Bulwark, Field Command, Squad Tactics
- Soldier partial: Blitz 8, Blindside 5, Scars of Battle 5, Menhir’s Will 5, Markovian’s Advantage 5, Zolhan’s Technique 5
- Demolitionist maxed: Flame Touched, Thermite Mine, Demon Fire, Vindictive Flame
- Demolitionist partial: Blackwater Cocktail 8, Blast Shield 7, Temper 4, Ulzuin’s Wrath 3
Those totals include the +skill bonuses from the Shattered Guardian set and the rest of the gear. The points you actually spend yourself at level 100 are lower, so here they are:
- Soldier: Cadence 16, Field Command 12, Squad Tactics 12, Fighting Form 11, Deadly Momentum 10, Fighting Spirit 9, Menhir’s Bulwark 8, Military Conditioning 6, Veterancy 6
- Demolitionist: Vindictive Flame 16, Thermite Mine 14, Demon Fire 12, Flame Touched 11, Blackwater Cocktail 6, Temper 2
- 1 point each: Blitz, Blindside, Menhir’s Will, Scars of Battle, Markovian’s Advantage, Zolhan’s Technique, Blast Shield, High Potency, Ulzuin’s Wrath
Gear adds the rest. Menhir’s Bulwark, for example, goes from your 8 points to 22, and Blitz from 1 to 8. The level 100 planner also still shows 3 points in Discord because it was saved before patch 1.3, so ignore those and keep skipping Discord.
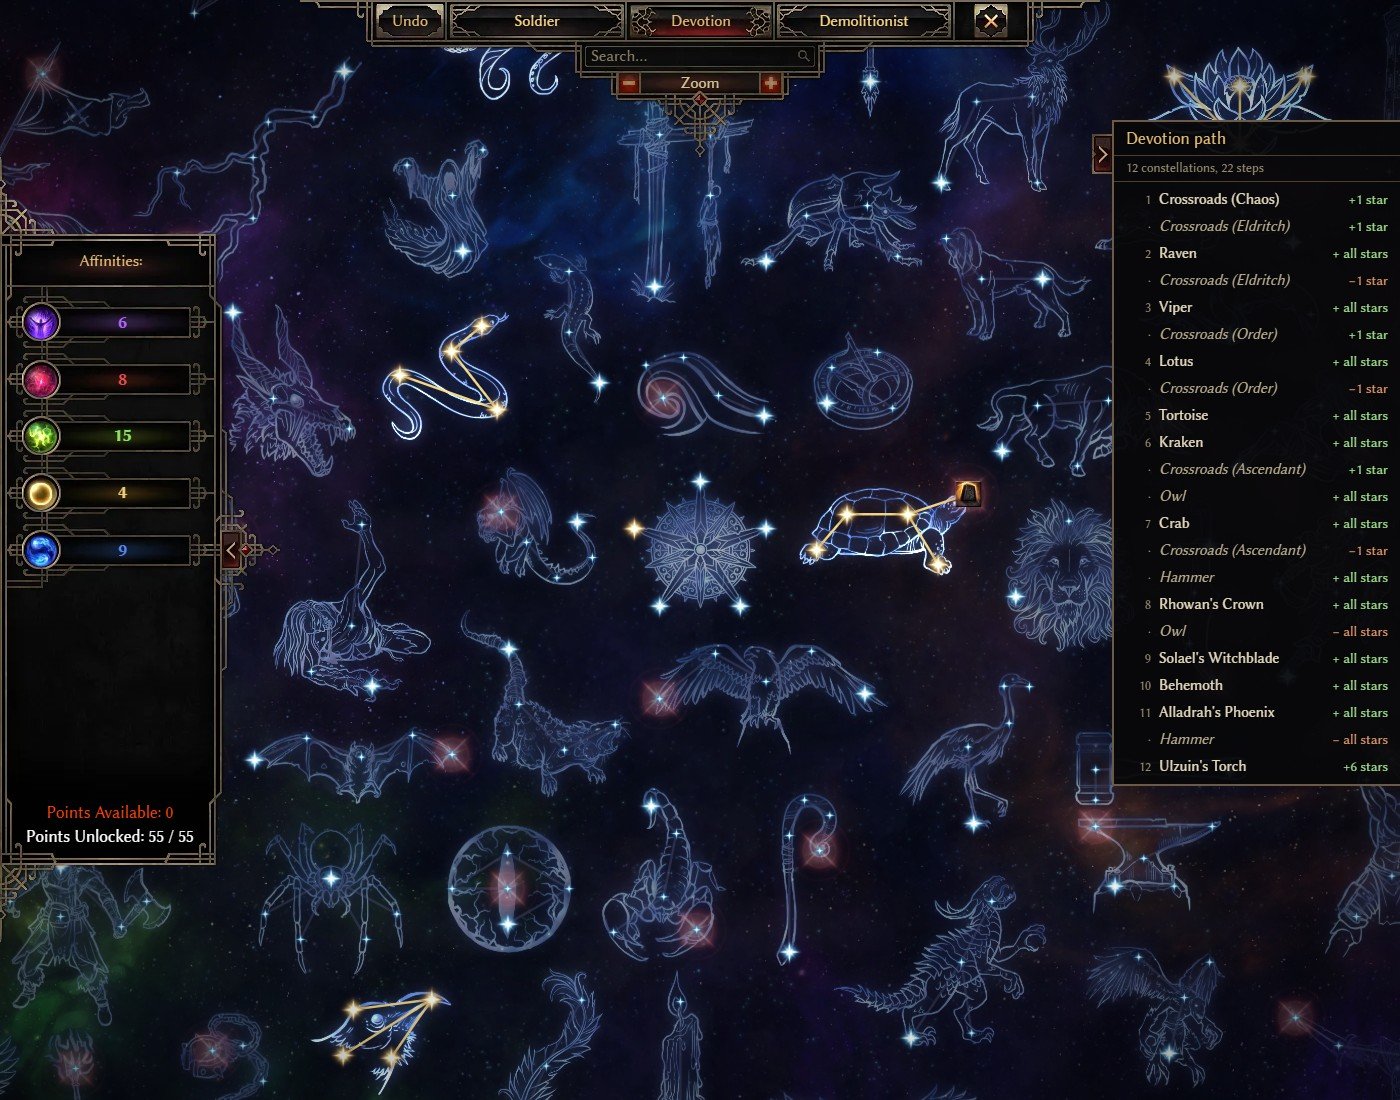
The final devotion setup has Raven, Tortoise, Alladrah’s Phoenix, Lotus, Viper, Kraken, Rhowan’s Crown, Crab, Solael’s Witchblade and Behemoth completed, one Chaos Crossroads point and the rest in Ulzuin’s Torch. So to make it quick, your binds are:
- Solael’s Witchblade (Eldritch Fire) -> Cadence
- Alladrah’s Phoenix (Phoenix Fire) -> Blitz
- Tortoise (Turtle Shell) -> Menhir’s Bulwark
- Behemoth (Giant’s Blood) -> Field Command
- Crab (Arcane Barrier) -> Flame Touched
- Rhowan’s Crown (Elemental Storm) -> Thermite Mine
- Ulzuin’s Torch (Meteor Shower) -> Blackwater Cocktail
Attributes
The source post does not list attribute numbers, so I will not make up a split. The general principle for a melee facetanker like this one is simple. Most of your points will go into Physique for health and defense, and you only put enough into Cunning and Spirit to meet the requirements on the gear you want to wear. Check the requirement of your next weapon or armor piece before you level up, and add points to that attribute only when you actually need them.
If you want the exact numbers, open the level 100 GrimTools link and look at the character sheet.
Common mistakes
- Putting 3 points into Discord because an older copy of the guide says so. Since patch 1.3, Menhir’s Bulwark does the full conversion to fire, and those points are wasted.
- Staying on Forcewave forever. It is fine for levels 1 to 20, but the build is designed around Cadence and the Sunherald’s Claymore. Respec once you have the weapon.
- Forgetting to bind celestial powers. A power that is not bound to a skill never levels up. Check your binds every time you complete a constellation, and rebind after respeccing skills.
- Being afraid to remove constellations. Rat, Jackal, Imp, Hammer, Quill, Scholar’s Light and the crossroads points are all meant to be refunded later. That is how the path works.
- Skipping shrines. Every one you ignore is a devotion point you do not have, and the late devotion path needs every point it can get.
- Trying to put more than 16 points into Cadence because GrimTools shows 24. Max it, and gear will take care of the rest.
- Ignoring resistances when moving to Elite and Ultimate. The author repeats this at every difficulty change for a reason.
FAQ
Do I need the expansions for this build?
Yes. The main weapon is from Forgotten Gods, the Galakros Dread Plating and Ugdenbog Girdle come from the Ashes of Malmouth areas, and the endgame set comes from the Shattered Realm. The full 55 devotion points also require Ashes of Malmouth.
What if the Sunherald’s Claymore will not drop?
Keep playing Forcewave. As the author points out, you can stay on it for a while. The level 20 setup is a complete, working build, so there is no rush to respec before you have the weapon.
Is this build good for hardcore?
The source post does not cover hardcore, so I cannot promise anything. That being said, it is built to facetank, and tanky melee builds are usually the safer choice. Just respect the bosses he warns about, like Lokarr’s sunder waves and the Avatar of Mogdrogen’s sunder clouds.
Is it controller friendly?
Pretty much. You only use Cadence, Blitz, Thermite Mine and Blackwater Cocktail, plus toggles you switch on once. That fits comfortably on a controller layout.
If melee is not your thing, the Conjurer pet build and the Pyromancer grenadier are two other beginner friendly starts.