
If a fleet of yours has just been wiped out by a group of ancient stations at a class A star, you have met the Enigmatic Fortress. It is a guardian from the Leviathans DLC made up of 17 stations with kinetic weapons, built around a central Vault, and once the stations are destroyed and the Vault is disabled, it turns into an expedition with three steps. Getting there is going to take a much bigger and better armored fleet than the usual guardian numbers, and after the fight, you will need the right choice at each of those three steps.
The station values, timers and option texts in this guide are taken straight from the Stellaris 4.5.2 “Cygnus” game files.
Where the Enigmatic Fortress Spawns
You will only find the Enigmatic Fortress if you own the Leviathans DLC. It always spawns at a class A star, and the game will never place it in a bottleneck system or inside an empire or Fallen Empire cluster. There can be at most one per galaxy, and its spawn chance scales with the size of the galaxy.
Its system will have one or two habitable planets and one to five uninhabitable planets, some of which may have a moon. As soon as one of your ships enters it, you will get the “Ancient Structure” event, which warns you about a massive installation surrounded by smaller, heavily armed structures. The fortress never moves, so it will not come after you while you build up a fleet for it.
Fortress Stations and Weapons
The fortress is one fleet of 17 stations in five types. Bear in mind that the table shows base values from the ship designs, before the fortress’s hidden modifier and the difficulty bonuses are added, so its guns in particular will hit far harder than these designs suggest.
| Station | Count | Base hull | Base shield | Base armor | Weapons | Extras |
|---|---|---|---|---|---|---|
| Ancient Sentinel | 8 | 1,250 | 4,290 | 2,340 | 1 small autocannon | Shield Booster |
| Ancient Defender | 4 | 5,000 | 8,580 | 4,680 | 1 small autocannon, 1 point defence | Shield Booster |
| Ancient Warden | 2 | 10,000 | 12,870 | 7,020 | 1 kinetic artillery, 1 small autocannon | Shield Booster |
| Ancient Guardian | 2 | 20,000 | 25,740 | 9,360 | 1 kinetic artillery, 1 small autocannon, 1 point defence | Shield Booster, Enigmatic Decoder |
| Ancient Vault | 1 | 50,000 | 25,740 | 16,380 | 7 kinetic artillery | Shield Booster, Enigmatic Decoder, disruption field |
The Shield Booster on every station is already counted in the shield column. For reference, the Vault alone has 50,000 base hull, while the other 16 stations add up to 90,000. Every station also has more shield than armor, which is going to matter once you pick your own weapons.
Every fortress gun that can hit your ships is kinetic. There are 11 kinetic artillery guns (seven of them on the Vault), 16 small autocannons and six point-defence guns, and none of the stations carry flak.
| Weapon | Count | Base range | Vs shields | Vs armor |
|---|---|---|---|---|
| Kinetic artillery | 11 | 120, minimum 45 | double damage | half damage |
| Small autocannon | 16 | 30 | 1.5 times damage | a quarter of the damage |
| Point defence | 6 | 30 | shoots down missiles and strike craft | |
The Vault also projects a disruption field around itself. Inside 120 range, the Vault’s disruption field slows your weapons by 20% and your shield regeneration by 10%. Additionally, the Vault and both Ancient Guardians mount an Enigmatic Decoder each, the same component you can research after the expedition, which gives them +5 Chance to Hit and +5 Tracking.
You will never actually destroy the Vault in this fight. At 5% hull it is disabled, and once the other 16 stations are gone as well, the window that starts the expedition will appear. For a normal empire, the order in which you take them down does not matter, since both ways open the same window. It only matters for the gestalt shortcut and the Machine Age option further down.
How Much Fleet Power You Need
The fortress carries a hidden modifier that multiplies its weapon damage several times over, which is why its guns hit far harder than the ship designer numbers suggest. The game files define that modifier twice with different values, so I cannot give you an exact figure for it. It also receives half of the usual difficulty bonuses. Players on 4.3 and later report losing fleets of 150,000 power and more.
Do not trust the Curators here. They answer “yes” as soon as your empire’s total fleet power is above 30,000, and they use that same yardstick for almost every guardian. For the fortress, that “yes” means very little. The Curator Enclave does sell hints about the fortress for energy, but you will find every correct choice further down in this guide anyway.
Since the files do not give a safe number, I would advise you to go in with a fleet that was built for this fight and sits far above the 30,000 to 50,000 power that older guides recommend for guardians. As such, the fortress is a mid-to-late-game target, and you will probably want to leave it alone while you are still building up your first real fleet.
Best Fleet Against the Fortress
Since every gun on the fortress is kinetic, armor will protect you far better than shields. Its artillery deals double damage to shields and only half to armor, and its autocannons do even less against armor. A shield-heavy fleet basically hands the fortress a damage bonus, and the disruption field slows your shield regeneration a little bit as well, so put armor on your ships first.
For your own guns, it is the other way around. Every station has more shield than armor, so open with weapons that are strong against shields, such as kinetic weapons. The shields and armor on the stations also come with some hardening, so weapons that bypass shields will lose part of their edge here.
Next, you will have to decide how close you want to fight. Its kinetic artillery cannot fire at anything closer than 45. Ships that sit right on top of the stations only face the autocannons and point defence. That being said, the fortress’s hidden modifier may stretch its ranges, so treat this as an edge and do not count on it as a safe zone. Close to the Vault, your ships will also sit inside its disruption field and lose 20% of their fire rate.
The other approach is to stay as far away as you can. Its longest gun has a base range of 120, so long-range fleets can trade at the edge. The same caveat applies here, because the hidden modifier may push its guns beyond that base value. If you go for range, an admiral with a trait that adds weapon range is a sensible pick, and a fleet that stays more than 120 away from the Vault will be outside its disruption field as well.
Seven of the eleven artillery guns sit on the Vault, while every autocannon and point-defence gun is on the smaller stations. Clearing out those stations will take away the short-range fire, but the Vault is going to stay dangerous at long range until the very end.
Several players report the fortress cannot see cloaked ships, which lets cloaked fleets close in before it fires. The game files do not settle this, so treat it as a player tip, but if you have cloaking anyway, it goes well with the close-range approach.
There is no flak on any station, and only six point-defence guns in total. Strike craft and missiles only face six point-defence guns, although the hidden modifier makes each of them hit harder, and that interception will get weaker with every Defender and Guardian you destroy.
Destroyed stations stay destroyed. You do not have to win this in one battle, so you can wear the fortress down over several attacks and repair your ships in between. For more on ship roles and weapon choices in general, have a look at my guide to the best fleet composition in Stellaris.
Before the last station goes down, make sure to have a science ship with a scientist waiting nearby. It can handle both the first and the last step of the expedition, and a transport ship gives you a second option for the first step.
Enigmatic Fortress Event Chain
Once the last station is gone and the Vault sits at 5% hull, you will get “The Enigmatic Fortress” window. The event goes to the empire whose ship lands the last hit, so if an AI empire finishes the job, the expedition will be theirs. “Give the go-ahead.” starts the expedition, while “Better stay out of that thing.” leaves the fortress alone, and the Vault will repower 360 days later.
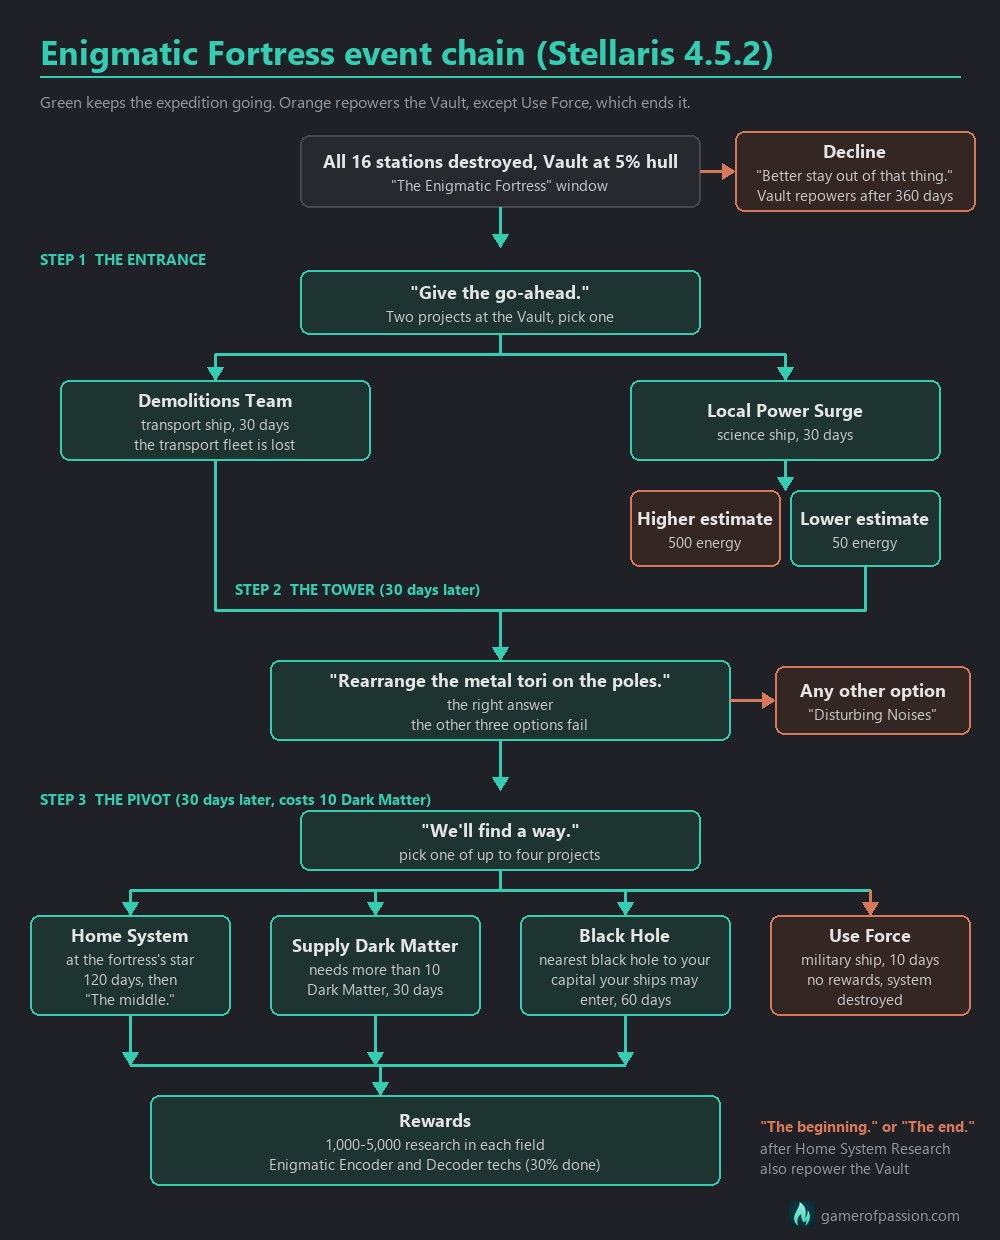
The first and the last step are special projects that one of your ships will have to carry out at a specific spot, and the middle step is a single event choice. You have three years for each project. Letting the Demolitions or Black Hole project run out repowers the Vault, so do not leave those two waiting.
The Entrance
Right after the go-ahead, “Fortress: The Entrance” fires. Your team has found an airlock, and the option “We’ll find someone to assist the team.” will give you two special projects at the Vault. Both share one option group, so doing one cancels the other.
| Choice | What you need | Time | Result |
|---|---|---|---|
| Demolitions Team | A transport ship | 30 days | The airlock is blown open, the transport fleet that did it is lost, and the expedition continues 30 days later |
| Local Power Surge | A science ship | 30 days | “Fortress: Adjusting Energy Supply” with two estimates |
| “Go with the higher estimate.” | 500 energy (only offered if you have that much) | event choice | “Fortress: Repowering”, the Vault powers back up |
| “Go with the lower estimate.” | 50 energy | event choice | “Fortress: Airlock Opened”, the expedition continues 30 days later |
Personally, I would go with the Local Power Surge and the lower estimate. It will only cost you 50 energy, your science ship can carry on afterwards, and with three years on the clock there is no time pressure on it. The Demolitions Team works as well, but since the transport fleet that does it is lost, send a fleet with a single transport in it.
The Tower
Thirty days after the team gets inside, “Fortress: The Tower” fires. The team finds a pedestal with three poles and three metal rings of different sizes stacked on the leftmost one, which looks a lot like the Tower of Hanoi puzzle. You will get four options, and only one of them is right.
| Option | Result |
|---|---|
| “Place metal rings around the remaining two poles.” | Fail, the Vault repowers |
| “Search for torus-shaped indentations on the bulkhead.” | Fail, the Vault repowers |
| “Rearrange the metal tori on the poles.” | Success, “Fortress: Tower Rebuilt” |
| “Remove center and rightmost poles from the pedestal.” | Fail, the Vault repowers |
Every wrong answer leads to “Fortress: Disturbing Noises”, which ends the expedition and switches the Vault back on. After “Rearrange the metal tori on the poles.”, the bulkhead opens and the last step will follow 30 days later.
The Pivot
The team then reaches the center of the fortress, and “Fortress: The Pivot” fires with a single option, “We’ll find a way.” The game will take 10 Dark Matter from you the moment you click it. You will then get a set of special projects that share one option group, so you can only run one of them.
| Project | What you need | Where | Time | Result |
|---|---|---|---|---|
| Home System Research | A science ship with a scientist | The fortress system’s star | 120 days | “Fortress: Our Star Witness”, then pick “The middle.” |
| Supply Dark Matter | A science ship with a scientist, and more than 10 Dark Matter when the Pivot fires | The Vault | 30 days | Success, “Fortress: Dark Matter Gambit” |
| Black Hole Research | A science ship with a scientist | The black hole nearest to your capital (counted in hyperlane jumps) that your ships are allowed to enter | 60 days | Success, “Fortress: The Heart of Dark Matter” |
| Use Force | Any military ship | The Vault | 10 days | “Fortress: Shot Through the Heart”, no rewards |
Home System Research has one more question at the end. In “Fortress: Our Star Witness”, you will have to pick which part of the construction footage to review. “The middle.” is the right answer, while “The beginning.” and “The end.” both repower the Vault.
If Supply Dark Matter is on the list, it is the quickest of the routes that give you rewards. Otherwise, Home System Research is probably the safest pick, since your science ship only has to fly to the fortress’s own star and the right answer is in the table above. Black Hole Research is fine as well when that black hole is close, but it only shows up if there is a black hole your ships are allowed to enter, and if its project runs out, the Vault will repower.
What Happens If You Fail
A wrong choice repowers the Vault. You will have to disable it again, but the stations you destroyed stay gone. The game repairs the Vault and switches it back on, and no event brings the other 16 stations back, so the second fight will be against the Vault alone.
Once you disable it again, the start window will come back and you can run the expedition from the first step. The files have no limit on retries, so a mistake is going to cost you time, some resources and one more fight. Beating the Vault again will not destroy it for good either, since it only disappears after a successful expedition, the gestalt shortcut or Use Force.
The Vault repowers after any of these:
- “Better stay out of that thing.” in the start window, after 360 days
- “Go with the higher estimate.” after the Local Power Surge
- “Place metal rings around the remaining two poles.” at the Tower
- “Search for torus-shaped indentations on the bulkhead.” at the Tower
- “Remove center and rightmost poles from the pedestal.” at the Tower
- “The beginning.” or “The end.” after Home System Research
- Letting the Demolitions Team or Black Hole Research project run out
Use Force: What It Does
Use Force only needs a military ship at the Vault and takes 10 days. Once it finishes, “Fortress: Shot Through the Heart” fires. A pilot sends a torpedo into the core, the whole fortress explodes, and the tooltip simply reads “The solar system burns.” The expedition ends there, and you will get no research and no techs.
The explosion will do the following to the system:
- Every fleet in the system is destroyed, including your own.
- Every planet and moon apart from gas giants and asteroids ends up as a Molten world. Going by the script, habitable planets are turned into Tomb Worlds first, but a second pass then turns every rocky body that is not habitable into a Molten world, and that includes the fresh Tomb Worlds.
- Gas giants, asteroids and the star itself are left untouched.
The fortress is gone for good after that. Never pick Use Force unless you actually want that system wrecked, since every other successful route gives you the rewards and leaves the planets alone.
Rewards: Enigmatic Encoder and Decoder
All three working routes at the Pivot give the same rewards. For each of physics, society and engineering, you will get 24 months of your current monthly output in that field, with a minimum of 1,000 and a maximum of 5,000 per field. That adds up to between 3,000 and 15,000 research in total.
You will also get the Enigmatic Encoder and the Enigmatic Decoder as research options, each with 30% progress already done. Both are rare tier 5 physics techs with a base cost of 60,000, and neither of them will turn up as a normal research option. Outside the fortress, the game also hands them out through the Cosmogenesis crisis path from Machine Age and, as a random pick, through the technology gifts of the Synthetic Queen.
| Component | Slot | Power | Cost | Effect |
|---|---|---|---|---|
| Enigmatic Decoder | Auxiliary | Uses 20 | 20 alloys | +5 Chance to Hit, +5 Tracking |
| Enigmatic Encoder | Auxiliary | Uses 20 | 20 alloys | +1 Disengagement Opportunity |
Some guides swap the two or still list an old evasion bonus. In 4.5.2, the Decoder is the Chance to Hit and Tracking component, and the Encoder only adds one more disengagement opportunity.
If you own the Grand Archive and breed space fauna, there are also an Enigmatic Decoder Chip and an Enigmatic Encoder Chip for their mutation slots, with the same effects. After the expedition, the fortress disappears and only a dead husk will stay near the star. If you own planets, a Leviathan celebration situation also starts on one of them.
I would say the Decoder is the component you will actually use. It is a strong aux-slot pick for any gun fleet. The Encoder’s +1 disengagement opportunity is of little use to fleets that are not meant to retreat, so for most empires the real prize is the Decoder plus the research. If you want to compare this haul with what the other guardians give you, I have a separate post on every guardian reward.
Gestalt and Machine Age Options
If the last station falls while the Vault is already disabled, hive minds and machine intelligences can get a shortcut window that hands over the rewards at once and scuttles the fortress, without the expedition. The option reads “We salvage what we can and scuttle the rest.” If your window shows the normal options instead, run the chain like everyone else.
Machine Age adds a third option, “Enigma Broken”, to the start window that appears when the Vault is the last thing you disable. It needs the Machine Age DLC, one of the techs Binary Motivators, Quantum Neuro-Links or Artificial Administration, and either the Integrated Anatomy tradition or a synthetic empire, and you will not see it after a genetic or psionic ascension. Picking it adds Leviathan Tech Genesis as a research option and sets a flag that robotic and cyborg traits check for. Taking the parts gives up the expedition and its rewards, so there will be no Encoder, no Decoder and no research burst.
Enigmatic Fortress Chain Not Working
If the expedition gets stuck or never starts, check these causes first.
| Problem | Cause | Fix |
|---|---|---|
| The Pivot projects say “We have already chosen another project.” | They share one option group, and one of them has already been started or is still running | Finish the project that is already running |
| No Supply Dark Matter project | You had 10 Dark Matter or less when the Pivot fired | Use Home System Research or Black Hole Research |
| No Black Hole Research project | There is no black hole your ships are allowed to enter | Use Home System Research or Supply Dark Matter |
| The start window never appeared | A station is still alive, or another empire landed the last hit | Destroy every remaining station. If another empire got the last hit, the event went to them |
| The Vault is active again | A wrong choice, an expired Demolitions Team or Black Hole Research project, or you declined the expedition | Disable the Vault again to restart the chain |
There is also a bug report from patch 4.4.4 about the Pivot projects not being available at all. Whether that bug is still around in 4.5 is not known.
Is the Enigmatic Fortress Worth It?
I would say the fortress is worth fighting, but only once you can afford to lose part of a fleet. The research burst is a nice boost in the mid game, and the Decoder will keep paying off on your gun ships for the rest of the game. Because the research is capped at 5,000 per field, it will matter less the bigger your economy gets, while the Decoder stays just as useful.
The price is a fleet built for this one fight, a real chance of losing ships and possibly a second fight against the Vault if a choice goes wrong. If you are struggling to keep up with your neighbours, that fleet is probably better spent elsewhere. If a strong armored fleet is sitting idle in the mid-to-late game, the fortress is a fairly solid use for it.
Conclusion
Attack the Enigmatic Fortress once you have a fleet built for it, heavy on armor and well above the old guardian numbers, which will usually be somewhere in the mid to late game. Have a science ship with a scientist waiting before the last station falls. For the expedition, pick the Local Power Surge with “Go with the lower estimate.”, then “Rearrange the metal tori on the poles.”, and at the Pivot either Supply Dark Matter or Home System Research with “The middle.” Stay away from Use Force, and once the Decoder is researched, put it on your gun ships.