
The Multi-Tool is one of the few pieces of gear in No Man’s Sky that you will carry from your first minute to your last, and its type decides how much bonus damage, mining and scanning it can ever roll. Two tools of the same class can feel completely different because of that, and some types are simply better at one job than all the others.
For combat, the best Multi-Tool is a Sentinel or a Voltaic Staff. Both reach the highest damage bonus in the game, up to +50% at S class. For mining, it is the Atlantid, which has the biggest mining bonus and can run its Runic Lens next to a normal Mining Beam. For scanning, a Royal or an Experimental will give you the widest scan radius. If you want one tool for everything, I would say the Sentinel is the best all-rounder, since it is free at a Harmonic Camp, hits as hard as anything else and can carry two mining beams.
Most bonus ranges, odds and costs in this guide are taken from the game files of version 7.11 (Forsaken). Below, I will also go through how to get each top type step by step and how to lay out your upgrades.
Contents
- Best Multi-Tool by job
- Multi-Tool types compared
- Sentinel vs Voltaic Staff
- How to get a Sentinel Multi-Tool
- Best mining Multi-Tool
- How to get an Atlantid
- Voltaic Staff assembly
- Best Multi-Tool for scanning
- Weapons and layout
- Class upgrades
- How many Multi-Tools can you own?
- Early game path
- Common questions
- Final verdict
Best Multi-Tool by job
| Job | Best pick | Key number | How to get it |
|---|---|---|---|
| Combat | Sentinel, or a well-rolled staff | Damage +32-50% (staff +25-50%) | Harmonic Camp (Sentinel), Autophage camp (staff) |
| Mining | Atlantid | Mining +35-50% | Korvax monolith; needs part of They Who Returned |
| Scanning | Royal or Experimental | Scan radius +100% | Royal: Sentinel Pillars. Experimental: cabinets |
| All-round or first upgrade | Sentinel, upgraded from A or B | 50,000 nanites from A to S | Harmonic Camp, then a station upgrade rack |
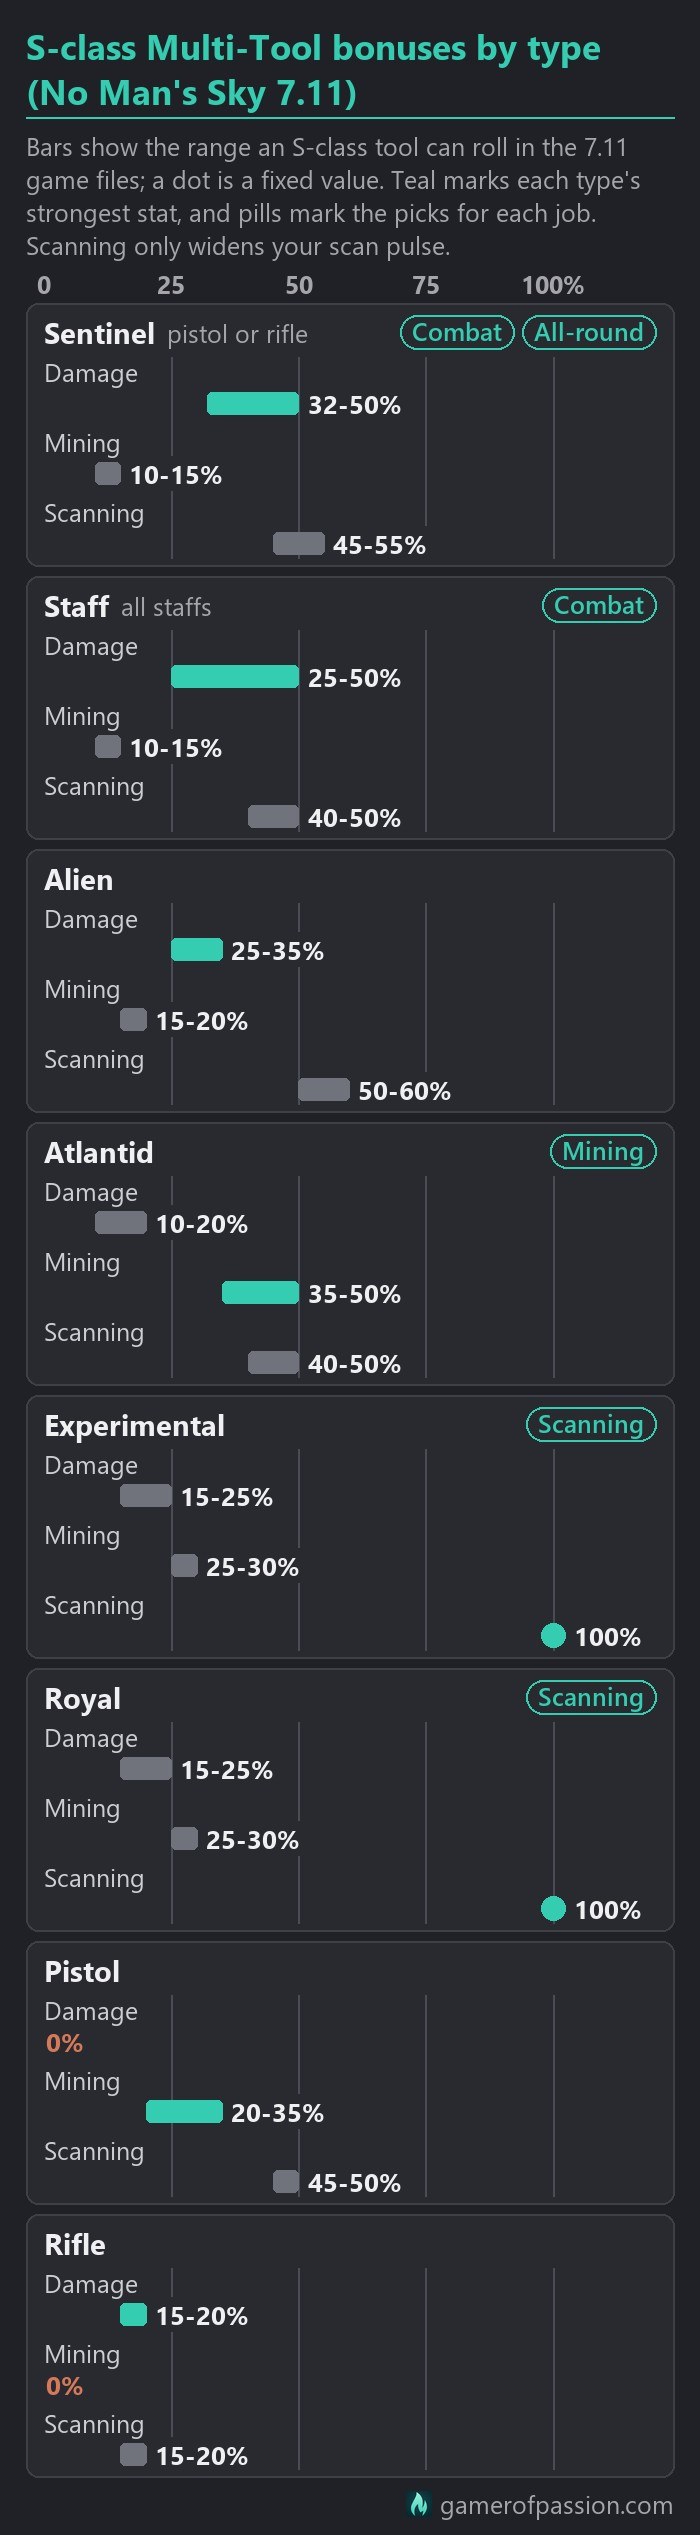
Every Multi-Tool rolls three bonuses when the game generates it: damage, mining and scanning. The type sets the range each of them can roll in, and the class decides how high that range sits, with S at the top and C at the bottom for every stat. Some types have nothing at all in a stat, and no class upgrade is going to fix that. For an endgame tool, only the S-class ranges really matter, since that is where you will end up sooner or later, and those are the ranges the chart shows.
Multi-Tool types compared
As of 7.11 there are eight Multi-Tool types: Pistol, Rifle, Experimental, Alien, Royal, Sentinel, Atlantid and the staffs. The model decides the type, and you can read it on the type line of the purchase screen before you take a tool.
| Type | S-class bonuses (%) | Where to get it |
|---|---|---|
| Pistol | Damage 0, mining 20-35, scan 45-50 | Station, outpost and Space Anomaly cabinets |
| Rifle | Damage 15-20, mining 0, scan 15-20 | Station, outpost and Space Anomaly cabinets |
| Experimental | Damage 15-25, mining 25-30, scan 100 | Cabinets, and standard Sentinel Pillar rolls |
| Alien | Damage 25-35, mining 15-20, scan 50-60 | Cabinets; Larva Cannon from Forsaken traders |
| Royal | Damage 15-25, mining 25-30, scan 100 | Sentinel Pillars only (15% of Pillars) |
| Sentinel | Damage 32-50, mining 10-15, scan 45-55 | Harmonic Camp; no Autophage quest needed |
| Atlantid | Damage 10-20, mining 35-50, scan 40-50 | Korvax monolith interface, paid in nanites |
| Staff (every staff) | Damage 25-50, mining 10-15, scan 40-50 | Assembled at an Autophage camp, or an expedition reward |
The Pistol is a mining and scanning type with no damage bonus at any class. At S it will roll 20-35% mining and 45-50% scanning, which makes it a fair early miner, but you are going to feel the missing damage in every fight.
The Rifle is the opposite, with a small damage bonus of 15-20% at S, no mining bonus and very little scanning. A cheap rifle with many slots can be a decent stopgap, but Sentinels, staffs and Alien tools will all out-damage it.
The Experimental is a scanning type. At S class it will always have the full +100% scan bonus, together with 15-25% damage and 25-30% mining. It shares every range with the Royal, but you will usually find one more easily, since Experimentals turn up in ordinary cabinets.
The Alien type sits in between, with 25-35% damage and 50-60% scanning at S. Alien tools were the damage pick before Sentinel tools and staffs arrived, but their ceiling is clearly lower. Forsaken added the Larva Cannon, an A-class Alien-type Multi-Tool with a fixed 19-slot layout that you buy for 5 Preserved Grubs from the Forsaken traders. You will find a complete walkthrough in the Forsaken guide.
The Royal shows up as “Exotic” on the type line in game. It has the same ranges as the Experimental, which makes it a scanning tool with a fixed +100% scan bonus at S. Royals are only found at Sentinel Pillars and will often arrive with many damaged slots to repair.
The Sentinel Multi-Tool has the highest damage floor of all types, 32-50% at S class, and every one of them comes with the Hijacked Laser, a second mining beam. You will get one for free at a Harmonic Camp, either as a pistol or as a rifle, and both models share the same stat ranges.
The Atlantid is the mining type, with 35-50% mining at S class but only 10-20% damage. Its built-in Runic Lens takes the place of the Mining Beam and takes longer to overheat, and you can add a normal Mining Beam next to it. You will buy it with nanites at a Korvax monolith.
Staffs share the Sentinel’s damage ceiling of 50% at S class, with a lower floor of 25%. The Voltaic Staff is assembled from parts during the Autophage questline They Who Returned, and you can restyle it with custom heads, poles and cores. A Voltaic Staff comes with the Polyphonic Core already installed.
The starter tool is a C-class tool with a small layout, and it is rarely worth your nanites once a Sentinel is within reach.
Expedition reward tools are fixed designs with a set class and layout, and most of them are A class. The Starbound v0.27, for example, is an A-class pistol with 19 slots, and the Direwasp Disintegrator is an A-class rifle. Their bonuses still follow their type, which means an expedition pistol will have no damage bonus like every other pistol.
Sentinel vs Voltaic Staff
Sentinel Multi-Tools and staffs share the highest damage ceiling in the game, up to +50% damage at S class. The difference is the floor. In 7.11, a Sentinel’s S-class range starts at 32%, a staff’s at 25%. As such, a random S-class Sentinel will usually hit a little bit harder than a random S-class staff, while a well-rolled staff matches a well-rolled Sentinel. Staffs were not nerfed in 7.x, even if a weak roll can make one look that way.
Beyond the roll, a few things will decide which of the two suits you better:
- A Sentinel is free at a Harmonic Camp and needs no Autophage quest progress. A Voltaic Staff needs They Who Returned, and custom parts will cost you Void Motes.
- A Sentinel can run two mining beams. A regular Voltaic Staff comes with only the normal Mining Beam and no second laser.
- A Sentinel’s class is rolled per camp. A staff’s class depends on the head and the terminal, and the same combination will always give the same result. You can shop around between terminals.
- For both, the supercharged layout matters a lot. Four supercharged slots in a 2×2 square will let you supercharge the weapon and all three of its modules at once.
I would say the Sentinel is the better pick for most players, simply because you can get it much earlier and it doubles as a miner. If you prefer the look of a staff, or you want to build towards a specific class at a terminal, a staff will do the same job in combat.
Additionally, the Damage Potential number on the tool screen is a poor way to compare two tools. Install the same weapon and modules on both and compare the weapon’s own listed damage instead.
How to get a Sentinel Multi-Tool
You do not need the Autophage questline for a Sentinel Multi-Tool. The Harmonic Camp comes first, and breaking a camp’s seal is what later triggers They Who Returned on a following warp in your starship.
- Find a dissonant system on the Galaxy Map and scan its planets from your starship until one of them shows dissonance.
- Land on the dissonant planet and destroy Dissonance Resonators. Each one will drop either an Inverted Mirror (80%) or an Echo Locator (20%). The combat supply barrels that corrupted Sentinels leave behind add a 7% chance as well.
- Use the Echo Locator from your inventory with Resonate. It will mark the nearest Harmonic Camp.
- At the camp, the Harmonic Interface terminal will be in lockdown. Choose “Input override glyphs” and solve the short number puzzle, then pick “Deactivate Multi-Tool seal”.
- Open the Multi-Tool Assembly Unit and take the tool. It is free, but check the six-tool limit first.
- Repair the damaged slots, one part per slot.
Every Harmonic Camp holds one sealed Sentinel tool, either the pistol or the rifle, and its class is rolled per camp like any cabinet tool, which means you will usually see B and A, while a native S does turn up, but only rarely. Taking a good A or B and upgrading it with nanites is the practical route.
Each damaged slot will ask for one of these repair parts:
- Sentience Resistor, 120 Atlantideum
- Discordant Prism, 1 Inverted Mirror
- Corrupted Lens, 4 Radiant Shards and 70 Atlantideum
- Drained Power Core, 1 Crystallised Heart
Keep the Inverted Mirrors from the Resonators for that reason. They are going to save you a second trip.
Best mining Multi-Tool
The Atlantid is the best dedicated mining tool as of 7.11. Its S-class mining bonus is 35-50%, against 10-15% on a Sentinel or a staff. Its Runic Lens also takes longer to overheat than the normal Mining Beam (12 against 8 in base heat time) and yields a little bit more from each deposit.
Both the Atlantid and the Sentinel can run two beams at once. Every Sentinel Multi-Tool comes with the Hijacked Laser, a second mining beam with exactly the stats of the normal Mining Beam, and you can install a regular Mining Beam next to it. Beware that both are core tech: once both are installed, neither can be removed. The Atlantid does the same trick with its Runic Lens plus a Mining Beam, and on paper it comes out ahead, with the cooler lens and the much bigger mining bonus.
Mind that the mining bonus is not the whole picture. A type’s damage bonus also raises laser damage, and both mining beams deal laser damage. Whether that makes a high-damage Sentinel mine faster than its small mining bonus suggests is not settled for 7.11. The Atlantid stays the safer choice for a dedicated miner, and the Sentinel is the all-rounder that also mines well.
For everyday mining, a Sentinel with both beams will do the job. If you mine a lot for base building or refining, the Atlantid is worth the extra effort.
How to get an Atlantid
Atlantid tools need the Autophage questline They Who Returned, but not the whole thing. The Discordant Interfaces at Korvax monoliths switch on during its first part, when the Autophage head sends you to a Korvax monolith.
- Start They Who Returned. It will trigger on a starship warp after you have broken the seal of a Harmonic Camp.
- Follow it until the Autophage head sends you to a Korvax monolith.
- In any Korvax system, find a monolith and fill the three slots of the violet Discordant Interface beside it with Atlantideum.
- Interact with the monolith (“Witness before the central plinth”).
- Use the interface again, pick “Inspect Runic Technology” and buy the tool. As with the Sentinel, check the six-tool limit first.
The Atlantid will cost you nanites. The price rises with class and slot count, and one B-class example cost 5,650 nanites. Atlantideum is also what the Sentinel repairs eat, and you can mine it from Living Fragments on dissonant planets. A dissonant system is a good place to stock up for both.
Each Discordant Interface hands out one Atlantid, and afterwards it will only offer “Leave”. Which model it shows depends on the planet, moon or station where you last reloaded your save, while the class stays fixed to that monolith. Make sure to preview the system’s variants first by reloading on different bodies, and only then buy the one you want.
Voltaic Staff assembly
The Voltaic Staff is the staff you build yourself during They Who Returned. As mentioned above, its class depends on the head and the terminal you build it at.
- Break the seal of a Harmonic Camp, then warp in your starship to start They Who Returned.
- Follow the Autophage missions. They will hand you the blueprints for the three Voltaic Staff parts, which you craft in your inventory.
- Go to an Autophage Synthesis Terminal, or to the Harmonic Interface of an unlocked camp, and choose “Staff assembly”. This opens the Custom Staff Assembly, where you pick a head, a pole and a core.
- Check the class before you confirm. If it rolls low, cancel and try another terminal.
The three crafted parts need these materials:
- Fibreglass Grip from 1 Glass, 50 Pure Ferrite and 3 Carbon Nanotubes
- Atlantideum Chamber from 1 Wiring Loom, 1 Radiant Shard and 1 Microprocessor
- Concentric Transducer from 1 Superconductor and 50 Magnetised Ferrite
Custom staff parts are bought with Void Motes at Autophage Synthesis Terminals in Autophage camps, and at the Harmonic Interface of an unlocked camp. A head costs 999 Void Motes, a core 646 and a pole 333. Each terminal stocks its own random selection, and a matching set is probably going to take several camps. You will earn Void Motes from Autophage missions, around 200-285 per mission-board job, and from camp crates.
An assembled staff has no fixed class. The class and the colour depend on the head and on the terminal you build at, and the same head at the same terminal will always give the same result. If no terminal gives you what you want, a nanite class upgrade is the fallback. The parts themselves carry no stats. The part sets in 7.11 are called Salvaged, Havoc, Reclaimed, Radiant and Runic, and if you have read about an “Ancient Staff” somewhere, that is not a name the game uses.
Expedition staffs
The Atlas Sceptre is the Expedition 12 (Omega) reward. If your account earned it, in the original run or a rerun, you can claim it from the Quicksilver Synthesis Companion on the Space Anomaly. Otherwise there is no regular way to get one in 7.11. It is an A-class staff with a 19-slot layout and the only staff with a Runic Lens.
Two later expeditions handed out staffs as well, the Pillar of Titan and the Basilisk Crown. Both are A class with a 19-slot layout.
Best Multi-Tool for scanning
An S-class Royal or Experimental always has the maximum +100% scan bonus. That range is 100 to 100, with no random roll. A Royal or Experimental that you upgrade to S should end at the same 100. There is no need to hunt a natural S for scanning.
Bear in mind what that bonus actually does, though. A type’s scanning bonus only widens the radius of your scan pulse, and it does not raise the units you earn per scan or shorten the scanner cooldown. Money per scan depends on your scanner upgrade modules, supercharged slots and Nutrient Ingestor food. A Sentinel with good scanner modules on its supercharged slots can earn just as much per scan as a Royal with the same modules.
Royal and Experimental tools are therefore the best scanners for range. For units, chase the scanner modules and their placement first.
Where Royals and Experimentals spawn
Experimental tools belong to the normal Multi-Tool pool. They turn up in ordinary cabinets on space stations, in planetary outposts and on the Space Anomaly, and they can also come from the 85% of Sentinel Pillar rolls that offer a standard tool. Check the type line on the purchase screen, because some pistols only look like Experimentals.
Royal Multi-Tools come only from Sentinel Pillars:
- Find a Sentinel Pillar with a Sentinel boundary map, which the Salvaged Glass that Sentinels drop or salvageable scrap can contain, or by beating every Sentinel reinforcement wave until a Pillar is marked.
- At the Pillar, defeat all reinforcement waves to get access to the Boundary Archive Terminal.
- Open the terminal and choose “Extract weapons technology”.
- About one Pillar in seven offers a Royal (15%). Otherwise you will get a standard tool.
The offer is fixed per planet. You can decline and come back later, but the same Pillar planet will keep offering the same tool, and for another roll you should try a Pillar on a different planet. Royals can be any class, including S.
Weapons and layout
Main weapon
The Neutron Cannon is the best all-round Multi-Tool weapon for most players. Its charged shots hit an area, it has the longest base range of the guns (800, against 300 for the Pulse Spitter and the Boltcaster) and it scales hard with upgrades and supercharged slots. The Pulse Spitter is the best rapid-fire alternative and easier to use against fast targets. The Scatter Blaster is the close-range pick.
Run one main weapon and give it your supercharged slots. Since Forsaken, holding the weapon cycle button opens a weapon wheel with your installed Multi-Tool technologies, and switching to a second weapon for stunning is a lot less fiddly. The classic partner is the Paralysis Mortar together with a Voltaic Amplifier, which adds damage against stunned targets and reaches +50% on a supercharged slot.
Module limit
You can install at most three upgrade modules (C, B, A, S or X) per weapon or tool. A fourth one will switch the whole set off until you remove one. Sentinel weapon augments count as their own group. A Boltcaster can carry three normal modules plus up to three augments.
X-class modules, the ones marked as Suspicious, have the widest spread of all. Their best rolls can beat an S-class module, but they can also roll as low as a C-class one. Look at the numbers before you install one.
Adjacency
Tech of the same family gets an adjacency bonus when it touches edge to edge. Diagonal neighbours do not count. A glowing outline will show you the link. The best shape is a 2×2 square of the weapon and its three modules, ideally on your supercharged slots. A line or an L-shape loses a little bit.
Supercharged slots
A supercharged slot multiplies the effect of the tech inside it by 1.25. On a percentage upgrade that adds more than 25 points. For example, an Optical Drill will go from +50% to about +88% resources on a supercharged slot.
Supercharge your main weapon’s three upgrade modules first. If your four supercharged slots form a 2×2 square, put the weapon and its three modules all in it. If you have fewer supercharged slots than that, the modules should get them before the weapon itself does.
Example layouts
- For combat, place the Neutron Cannon and its three modules in a 2×2 square on the supercharged slots, and keep the Paralysis Mortar and the Voltaic Amplifier outside that square.
- For mining, keep the Runic Lens or Hijacked Laser, the Mining Beam, the mining modules and the Optical Drill touching each other. On a dedicated miner, the Optical Drill and the mining modules deserve the supercharged slots.
- For scanning, keep the Scanner, the Analysis Visor and the three scanner modules touching each other, with the modules on supercharged slots if the tool is your money scanner.
Class upgrades
Class upgrades cost nanites at a Space Station’s Multi-Tool upgrade rack: 10,000 from C to B, 25,000 from B to A and 50,000 from A to S. That is 85,000 nanites from C to S, or 50,000 if you start from an A-class tool. If that sounds like a lot, the nanites guide will show you the faster ways to farm them.
The number of supercharged slots follows class: one at C, two at B, three at A and four at S. Each class upgrade adds one. Their positions are fixed for each tool, and some can sit in slots you have not bought yet. As such, you may only see all four after upgrading to S and expanding the inventory.
Class also caps the size. A Multi-Tool can grow to 21 slots at C, 30 at B, 45 at A and 60 at S. If you plan to expand a tool a lot, you are going to want to upgrade its class first.
Upgrade or hunt an S-class
A class upgrade raises a tool’s bonuses, but a Multi-Tool found at S class will usually have a higher damage or mining bonus than the same type upgraded to S. For a max-damage combat tool a found S is worth hunting, but for everything else, upgrading a tool you like is the sensible route. Royal and Experimental scanning is the exception, because the S-class scan range is a fixed 100 and an upgraded tool should reach it too.
S-class Multi-Tools are rare in cabinets: 0% in 1-star (poor) economies, 1% in 2-star and 2% in 3-star (wealthy) systems. Outlaw systems give the best S odds of all, but tools found there can roll weaker bonuses than the same class elsewhere. For a natural S, hunt in 3-star and outlaw systems.
Reloading your save on another planet, moon or station in the same system can change which model a cabinet shows. Its class should stay the same, though. A reload will help you find a model you like, but do not expect it to raise the class.
Buying slots
Buying Multi-Tool slots with units gets expensive fast. The game’s price list starts at 100,000 units per slot, climbs into the millions and tops out at 600 million per slot. A Multi-Tool Expansion Slot adds a slot for free at the same upgrade rack. Use those whenever you have them.
| Class | Nanites to reach it | Max slots | Supercharged slots |
|---|---|---|---|
| C | None (lowest class) | 21 | 1 |
| B | 10,000 | 30 | 2 |
| A | 25,000 (35,000 from C) | 45 | 3 |
| S | 50,000 (85,000 from C) | 60 | 4 |
How many Multi-Tools can you own?
You can carry six Multi-Tools and archive up to 18 more in a Weapon Rack, which you can build inside any habitable base. Archived tools keep all their installed technology.
The limit hides a nasty trap. With six on you, taking a new one from a station cabinet, a Sentinel Pillar, a Harmonic Camp, an Atlantid interface or an expedition redeem replaces the tool in your hand, along with everything installed in it. Before you claim a new tool, equip a throwaway tool, or move one into a Weapon Rack at your base.
Trading a tool in at a cabinet will get you a discount on the new model, but the technology does not move over and will need to be reinstalled. Take your best modules out first.
Scrap unwanted tools at the Multi-Tool Decommissioning Terminal on the Space Anomaly. The tool and everything installed in it are destroyed, so move your upgrade modules to another tool first. The payout is sellable scrap (Once-Useful Springs, Handful of Cogs, Reinforced Piping, Thermal Panels and Alloy Scraps) plus upgrade modules. Higher-class, higher-value tools pay more and damaged slots pay less. You will need free Exosuit slots to receive it. Autophage-type tools such as Atlantids can also pay out Void Motes.
Six Multi-Tools are plenty for one tool per job. A Sentinel or a staff for combat, an Atlantid for mining and a Royal or Experimental for scanning will cover everything, with room left for a cheap utility tool that carries the Gravitino Coil and a throwaway tool for claiming new ones.
Early game path
On a new save, your starter is a C-class tool with a small layout, and it is not worth many nanites. The first upgrades that pay off are scanner modules, because every creature and plant you scan will pay you more units. If you are still in your first hours, the beginner guide will help you get there.
After that, the free Sentinel tool from a Harmonic Camp is the biggest jump you can make. Take the best A or B you can find, repair it and upgrade it to S once you have the nanites (75,000 from B, 50,000 from A). Breaking that camp’s seal will also start They Who Returned on a later warp, and that opens up the Atlantid and the Voltaic Staff later on. A Royal or Experimental can wait until you start scanning for money in earnest.
Common questions
What is the best Multi-Tool as of 7.11?
For one tool that does everything, an S-class Sentinel Multi-Tool. It shares the top damage ceiling with the staffs, has the higher damage floor and can carry two mining beams. For single jobs, the Atlantid is the best miner and a Royal or Experimental the best scanner for range.
What is the most powerful Multi-Tool?
An S-class Sentinel or staff, both with up to +50% damage. The Sentinel’s range starts at 32% against 25% for staffs. That gives a random Sentinel a slight edge. A natural S with four supercharged slots in a 2×2 square is about as strong as a Multi-Tool gets.
What is the best Multi-Tool weapon?
The Neutron Cannon, thanks to its area damage, the longest range of the guns and strong scaling with modules and supercharged slots. The Pulse Spitter is the rapid-fire alternative.
Is the Larva Cannon good?
It is a decent tool for 5 Preserved Grubs, since it arrives at A class with a fixed 19-slot layout. As an Alien type, though, it has a lower damage ceiling than a Sentinel or a staff of the same class.
Can you upgrade the starter Multi-Tool?
Yes. You can raise its class with nanites at a Space Station upgrade rack and buy more slots, just like on any other tool. It is rarely worth it, though, because the same nanites will do much more for you on a Sentinel.
Final verdict
If you just want one Multi-Tool that does everything well, a Sentinel from a Harmonic Camp, upgraded to S, is the one I would pick. Once you have nanites to spare, add an Atlantid for mining and a Royal or Experimental for scanning. And whenever you claim a new tool, hold a throwaway one first, because the six-tool limit does not forgive mistakes.