
When I came back to Slay the Spire 2, I mostly wanted a simple answer to one question: what should I actually pick in Act 1?
Tier lists give you an opinion per card, and Reddit gives you about ten more, but what I could not find was a plain look at how runs actually turn out after a given pick, so this article uses about 1.1 million solo runs from the Spire Codex community export (generated on 2 October 2026) and holds them up against what top players like Baalorlord and Jorbs say in their tier lists.
Not everything in here is a big discovery. A lot of it simply confirms what good players already say. I still find that useful, because now there is data behind it.
The short version
- In Act 1, cards that help in the fight you are in win more runs. Cards that need setup before they do anything lose runs when you take them early, even if they are great later.
- Glacier, Battle Trance, Hidden Daggers, Bulwark and Gamma Blast are among the best early picks in the data. Juggling, Drum of Battle, Expertise, Chaos and Monologue are among the worst.
- Several rares that players take about half the time or more, like Master Planner, Creative AI and Reaper Form, come out clearly negative as early picks.
- Where top players disagree, the early numbers can be quite clear. Null, which Baalorlord rates A and Jorbs C, comes out at +3.1%, and Vicious, which Baalorlord rates S, comes out at -5.4%.
- At Neow, Stone Humidifier is the best option in the data, yet players take it only about 1 time in 4. Hefty Tablet and Kaleidoscope are negative however you count restarts, and Arcane Scroll is a small minus that drops to about zero in the newest patches.
- Runs that fought 2 or 3 elites in Act 1 and made it out win a lot more often than runs that avoided them, at every HP level.
- A9 is mostly an Act 1 problem. Only about 40% of A9 runs get out of Act 1, but once a run is in Act 3, A9 and A10 win about equally often.
Part 1: What it means for your runs
Early card picks
After every normal fight in Act 1, the game will offer you three cards, and which three you get is random, which is what makes a fair comparison possible. For every card, I took the runs that were offered it and compared them with similar runs (same character, Ascension, game version and floor), then scaled the result by how often players actually take that card.
What you get is an estimate of what taking the card is worth compared with the character’s average card of the same rarity that was offered at the same point. Skipping the reward is a different choice, and these numbers do not rate it.
All differences in this article are written as a plain gap between two win rates. If the average pick leaves you at 18% and a card gets you to 22%, that card is listed as about +4%. Most common and uncommon cards sit between about 2% and 6%. A few rares and rarely taken cards reach 7-12%, but those come from small samples and are the noisiest numbers in the article.
Even a 6% gap is small next to the deck you have and how well you play. If a card is exactly what your deck is missing, take it, whatever the table says.
Most of the difference between good and bad early picks comes down to timing. In Act 1 your deck is still close to the starter deck, the fights are short, and the elites will punish you for every turn you spend not blocking or not hitting, so a card that deals damage or gives you Block the turn you draw it will help in every one of those fights. A card that needs setup before it does anything, like a power that wants three other cards first, will usually sit in your hand while you take damage, and by the time the other pieces arrive, the run may already be over.
You will find the same advice in Reddit help threads: take cards that do something useful right now.
In the tables below, “Value” is the estimated gap described above and “Taken” is how often players pick the card when it is offered. Rare cards are marked. I also checked the newest patches (v0.108 to v0.111) on their own, and the headline picks keep the same direction there: Glacier is at +5.1%, Battle Trance +4.3%, Feel No Pain -5.8% and Expertise -9.7%.
Ironclad
If you played a lot of the first game, [[Feel No Pain]] is probably one of the first cards you will click on as the Ironclad. In this data it is one of his most expensive early picks, at -5.9% when taken in Act 1. That does not make it a bad card.
Baalorlord writes on its Untapped page that it “becomes a great card once you have 3 or 4 sources of Exhaust”, and Nat1Gaming warns that taking it first out of habit from the first game is a mistake. In Act 1 you will rarely have those Exhaust sources, so you are paying a card slot and an energy for a power that will not block anything yet. I will probably keep picking Feel No Pain more often than I should, but at least now I know what it costs.
| Card | Value | Taken |
|---|---|---|
| Crimson Mantle (rare) | +5.7% | 63% |
| Offering (rare) | +5.3% | 71% |
| Battle Trance | +4.9% | 52% |
| Uppercut | +4.5% | 42% |
| Dismantle | +3.0% | 40% |
| Second Wind | -4.2% | 24% |
| Rupture | -4.5% | 31% |
| Vicious | -5.4% | 25% |
| Feel No Pain | -5.9% | 23% |
| Drum of Battle | -7.3% | 15% |
| Juggling | -9.3% | 13% |
At the top, [[Battle Trance]] is the card everyone agrees on. Jorbs rates it highly for the first half of a run, and Baalorlord says “0-cost card draw makes this a no-brainer”. It comes out at +4.9%, and yet players only take it about half the time. [[Uppercut]] is close behind at +4.5%, and Baalorlord points out that it is the Ironclad’s only source of Weak, which you are going to want for the Act 1 bosses.
[[Vicious]] is where the two experts split. Baalorlord rates it S and writes “You only need 2 or 3 sources of Vulnerable to make this excellent”. Jorbs is more careful, saying it is “not an awesome card to have in your deck against tough fights in Act 1” (both notes are on the Vicious page).
For an Act 1 pick, the data sides with Jorbs at -5.4%, and the newest patches put it at -6.4%. Once you actually have those sources of Vulnerable, Baalorlord may well be right. This data can’t tell you that.
[[Juggling]] and [[Drum of Battle]] are the clearest skips, since both of them need a very specific deck (three Attacks a turn, or a real Exhaust plan) before they will do much of anything, and the experts already rate them low.
Two more cards look good but are not stable. [[Dominate]] comes out at +3.3% and [[Blood Wall]] at +3.0%, but both move around depending on Ascension and patch, so I would not read much into either. Blood Wall splits the experts as well (Jorbs S, Nat1 C).
Silent
| Card | Value | Taken |
|---|---|---|
| Blade of Ink (rare) | +8.2% | 72% |
| Afterimage (rare) | +7.3% | 75% |
| Adrenaline (rare) | +5.6% | 87% |
| Hidden Daggers | +5.0% | 58% |
| Accuracy | +4.9% | 48% |
| Phantom Blades | +4.4% | 36% |
| Leg Sweep | +2.5% | 40% |
| Tactician | -5.4% | 34% |
| Speedster | -7.6% | 18% |
| Expertise | -10.5% | 12% |
| Master Planner (rare) | -11.6% | 45% |
The Silent has the widest spread of the five characters, from [[Blade of Ink]] at the top to [[Master Planner]] at the bottom (more on that one in the rares section below). [[Expertise]] is close behind at -10.5%, though at least most players already skip it. Jorbs finds it too expensive for what it does, and he is probably right.
[[Hidden Daggers]] at +5.0% will give you two Shivs for zero energy in the very fight you draw it in. Nat1 calls it “the Silent sleeper pick”, and among the rares, [[Serpent Form]] (+6.7%) and Knife Trap (+6.7%) also sit high.
Then there is [[Accuracy]], which is a power and still does well, at +4.9% (and +4.5% in the newest patches). Baalorlord’s advice is “Don’t take this with only one shiv card”, while Nat1 says “even taking a speculative Accuracy has been a relatively safe move”. My guess is that Shiv cards like Hidden Daggers and [[Phantom Blades]] are common enough that Accuracy rarely stays without a partner for long, but that is only a guess.
[[Speedster]] goes the other way. Baalorlord and Jorbs both rate it A, as long as you have card draw, and Jorbs adds that it is “a much much worse card unupgraded”. The vmService A10 list rates it D. Taken in Act 1, when your copy will usually still be unupgraded, it lands at -7.6%.
[[Tactician]] is a good example of a strong card at the wrong time. Jorbs says it is “Awkward to take in Act 1… a card I hope will be strong by the time I reach Act 3”, and it comes out at -5.4% as an early pick.
Defect
Nobody argues about [[Glacier]]. Baalorlord, Jorbs and vmService all rate it S, and Jorbs calls it “usually the best possible way for Defect to make enough Block”. At +6.2%, it is the best non-rare early pick in any of the tables here, and players take it 56% of the time.
| Card | Value | Taken |
|---|---|---|
| Ice Lance (rare) | +7.4% | 53% |
| Glacier | +6.2% | 56% |
| Boot Sequence | +3.5% | 48% |
| Chill | +3.3% | 46% |
| Null | +3.1% | 34% |
| Fight Through | +3.1% | 29% |
| Chaos | -4.2% | 24% |
| Iteration | -4.4% | 20% |
| Synchronize | -4.6% | 18% |
| Synthesis | -4.9% | 14% |
| Fusion | -5.5% | 23% |
| Creative AI (rare) | -6.2% | 56% |
[[Null]] is the clearest disagreement between the two big names. Baalorlord rates it A and calls it a “Very good add in the early floors”. Jorbs rates it C and writes “by default I’m skipping this” (see the Null page).
The data sides with Baalorlord at +3.1%, although in the newest patches it drops to +2.1% and is less certain there. Null will deal damage, apply Weak and channel an orb on the turn you play it, and while none of those three things is amazing by itself, getting all of them for two energy is the sort of package that helps in Act 1.
The bad end of the Defect list is almost all orb and energy setup. Jorbs wants “at least a Capacitor and three different Orb Slots” before he takes [[Synchronize]], and you will not have that on floor 4. [[Fusion]], [[Synthesis]] and [[Chaos]] are rated low by the experts as well, and Creative AI is covered with the other rares below.
[[Fight Through]] does well (+3.1%) but is only taken 29% of the time. The experts call it conditional on Status payoffs, so it won’t fit every deck.
Regent
The biggest single effect of any card in this data belongs to the Regent’s [[Big Bang]], at +10.3%. Players already know it and take it 92% of the time when offered, and Bombardment (+6.8%) and Comet (+4.7%) are the next best rares.
| Card | Value | Taken |
|---|---|---|
| Big Bang (rare) | +10.3% | 92% |
| Bombardment (rare) | +6.8% | 61% |
| Gamma Blast | +5.1% | 42% |
| Bulwark | +4.6% | 60% |
| Stardust | +3.3% | 30% |
| Shining Strike | +2.9% | 47% |
| Alignment | -3.0% | 29% |
| Royalties (rare) | -5.1% | 48% |
| Monologue | -5.8% | 16% |
| Resonance | -6.4% | 19% |
Among the uncommons, [[Gamma Blast]] and [[Bulwark]] lead. XecnaR’s A10 Regent guide calls Bulwark “1 of the absolute best early game cards”, and at +4.6% it is also one that players already take 60% of the time.
XecnaR calls [[Stardust]] “Quite bad early game”, while it comes out at +3.3% when taken in Act 1. His guide was written for an older patch (0.104.0). In the newest patches, Stardust sits at +4.9%, with a wide range.
[[Shining Strike]] is probably the most argued-about card in the game. One Reddit thread literally asks “Is Shining Strike a noob trap?”, XecnaR calls it “Unpickably bad most of the time”, and Jorbs rates it A.
The complaint is that it will put itself back on top of your draw pile, so you lose a draw every time you play it. The defence is that it helps with both Act 1 damage and star generation. The data comes out mildly positive at +2.9%, which supports the Act 1 camp, although it is a small effect. Personally, I would have taken Shining Strike every single time, so it was a relief to see it come out slightly positive.
At the bottom, [[Resonance]] and [[Monologue]] are the two to skip. Neither of them does much to win an Act 1 fight.
Regent players are also the most willing to skip card rewards altogether. Across all characters, players skip about 5% of rewards after their first fight, rising to about 16-22% by the sixth reward of Act 1, and the Regent sits at the top of that range.
Necrobinder
Jorbs rates [[Danse Macabre]] S and calls it a “Massive payoff”, while Nat1 rates it D. Taken in Act 1, it comes out at -5.1%, but Jorbs is talking about the payoff later in a run. Danse Macabre gives you Block whenever you play a card that costs 2 or more, and an Act 1 deck rarely has many of those.
| Card | Value | Taken |
|---|---|---|
| Neurosurge (rare) | +7.6% | 58% |
| Squeeze (rare) | +5.8% | 49% |
| Defy | +3.3% | 46% |
| Deathbringer | +3.2% | 56% |
| Putrefy | +2.7% | 40% |
| Sleight of Flesh | +1.8% | 34% |
| Death March | -4.6% | 16% |
| Parse | -4.9% | 18% |
| Danse Macabre | -5.1% | 14% |
| Reaper Form (rare) | -5.2% | 61% |
| Devour Life (rare) | -7.8% | 50% |
[[Defy]] and [[Deathbringer]] are the best common and uncommon picks at a bit over +3%, and the experts are unanimous about both. Deathbringer is also the Necrobinder’s early answer to fights with several enemies, so it fits the pattern well.
[[Parse]] is interesting because Jorbs, who rates it A, more or less predicts its early number himself. He writes that it is “Nothing special in Act 1 because you don’t have much to draw with it yet”, and that it gets better as the run goes on. At -4.9%, that looks about right.
Rares players take too often
When the game offers you a rare after an Act 1 fight, it is tempting to take it, and for many rares that is fine. The ones below are different. Players take them about half the time or more, and they still come out clearly negative as early picks.
| Card | Character | Taken | Value |
|---|---|---|---|
| Master Planner | Silent | 45% | -11.6% |
| Devour Life | Necrobinder | 50% | -7.8% |
| Storm of Steel | Silent | 50% | -6.8% |
| Signal Boost | Defect | 48% | -6.6% |
| Transfigure | Necrobinder | 50% | -6.6% |
| Creative AI | Defect | 56% | -6.2% |
| Reaper Form | Necrobinder | 61% | -5.2% |
| Royalties | Regent | 48% | -5.1% |
| Dying Star | Regent | 63% | -3.7% |
Rares show up far less often than commons. Each of these has only about 3,000 offers in Act 1 normal fights, so the ranges are around ±3%. [[Creative AI]] and [[Reaper Form]], for example, are taken 56% and 61% of the time, so the direction is what matters here more than the exact value.
Most of these cards need a deck built around them before they will do anything, which is the same timing problem as above, and in Act 1 you will rarely have that deck yet. That does not make every power a bad early pick. [[Afterimage]] (+7.3%), Accuracy (+4.9%), Serpent Form (+6.7%) and [[Neurosurge]] (+7.6%) are all powers, and all four do well. What matters is whether a card does something useful by itself or needs other cards first.
It also goes the other way. A few cards do well although players rarely take them: [[Lunar Blast]] for the Regent (taken 15%, +4.6%, with a wide range), Stardust (30%, +3.3%), and Null (34%, +3.1%), Fight Through (29%, +3.1%) and [[Rocket Punch]] (26%, +2.8%) for the Defect.
If you want to look up a card that is not listed here, every card is in the per-card table (CSV), and every Neow option is in the Neow table (CSV).
Neow: what to take
Before the first fight, Neow will offer you a few options at random. About 1 in 5 solo runs in this data gets abandoned, mostly because players restart after a bad start, and that creates a problem.
If you count those restarts as losses, the options that make people restart will look worse than they are, and if you leave them out, you throw away some of the worst outcomes along with them. Some results change depending on which way you count, so I only call a Neow option good or bad when both counts agree.
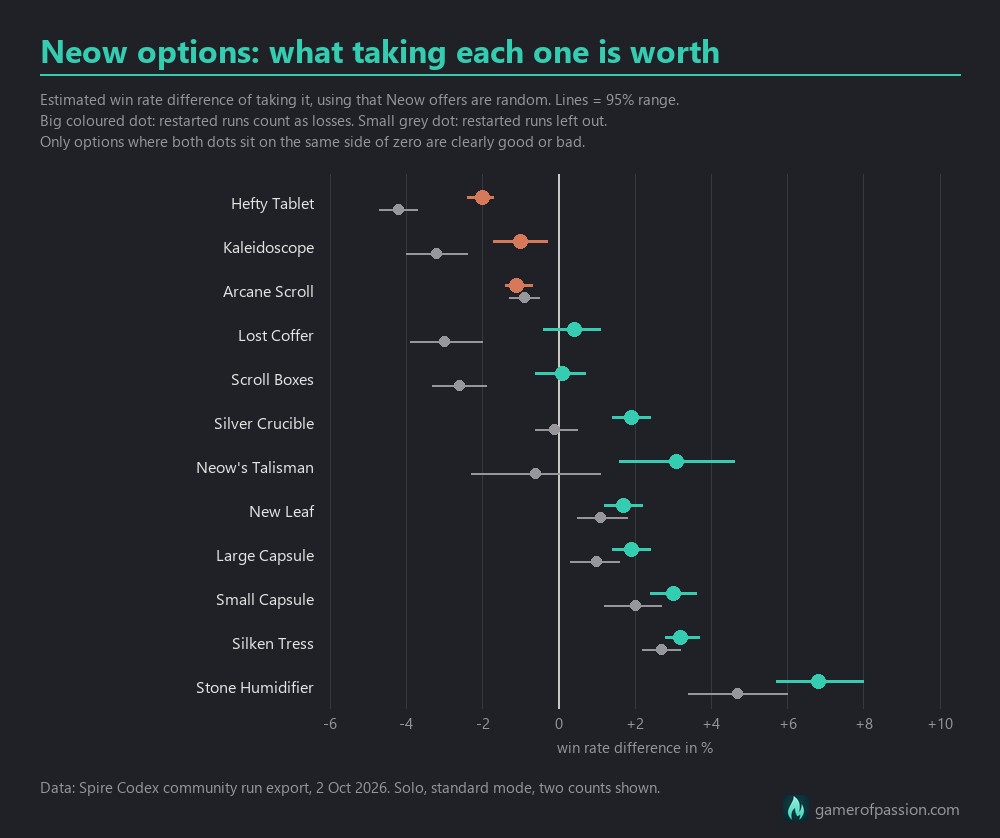
| Neow option | Restarts left out | Restarts counted as losses | Taken |
|---|---|---|---|
| Stone Humidifier | +4.7% | +6.8% | 23% |
| Silken Tress | +2.7% | +3.2% | 63% |
| Small Capsule | +2.0% | +3.0% | 44% |
| Arcane Scroll | -0.9% | -1.1% | 57% |
| Kaleidoscope | -3.2% | -1.0% | 38% |
| Hefty Tablet | -4.2% | -2.0% | 57% |
[[relic:Stone Humidifier]] will raise your Max HP by 5 whenever you rest at a Rest Site. It is the best Neow option in the data either way you count, yet players take it only 23% of the time. In the newest patches (v0.108 to v0.111) it stays positive, at +6.1% with restarts counted as losses and +1.4% without, although that second number is less certain.
It helps every character, but the size of the effect changes a lot. For the Ironclad it is small (+1.0% or +3.2%, depending on the count), while for the Defect it is +8.1% or +10.0%.
[[relic:Silken Tress]] and [[relic:Small Capsule]] are also good both ways. Lava Rock, Large Capsule, New Leaf and Precarious Shears are positive both ways too, though the effects are small.
[[relic:Hefty Tablet]] will let you choose 1 of 3 Rare cards and add an Injury to your deck. Players take it 57% of the time, and it is negative for every character and every Ascension band. [[relic:Kaleidoscope]] is negative both ways as well.
An Injury this early is a real cost. The effect has shrunk in the newest patches, to between -0.7% and -2.7% depending on how you count.
[[relic:Arcane Scroll]] is only a small minus (around -1%), and in the newest patches it is basically zero. It still shows nicely why the restart question matters, because Arcane Scroll runs are abandoned by floor 3 in 13.9% of cases while [[relic:Silver Crucible]] runs are abandoned in 1.5%. Some players clearly take the Scroll, look at the random rare, and restart if they do not like it.
The rest depend on how you count, so I would not call them good or bad. That includes Neow’s Talisman, Silver Crucible, Lost Coffer, Scroll Boxes, Winged Boots, Booming Conch, Neow’s Torment, Golden Pearl, Cursed Pearl, Leafy Poultice, Neow’s Bones, Lead Paperweight, Pomander, Precise Scissors and Phial Holster. For these, I would simply pick what fits.
Act 1 elites
If you just count elites, the chart looks absurd. Runs that fought 10 elites win about 87% of the time, and runs that fought none win about 1%. Most of that is survivorship, because a run that dies on floor 6 will never get the chance to fight many elites.
A fairer look is to count only Act 1 elites and only runs that made it to Act 2.
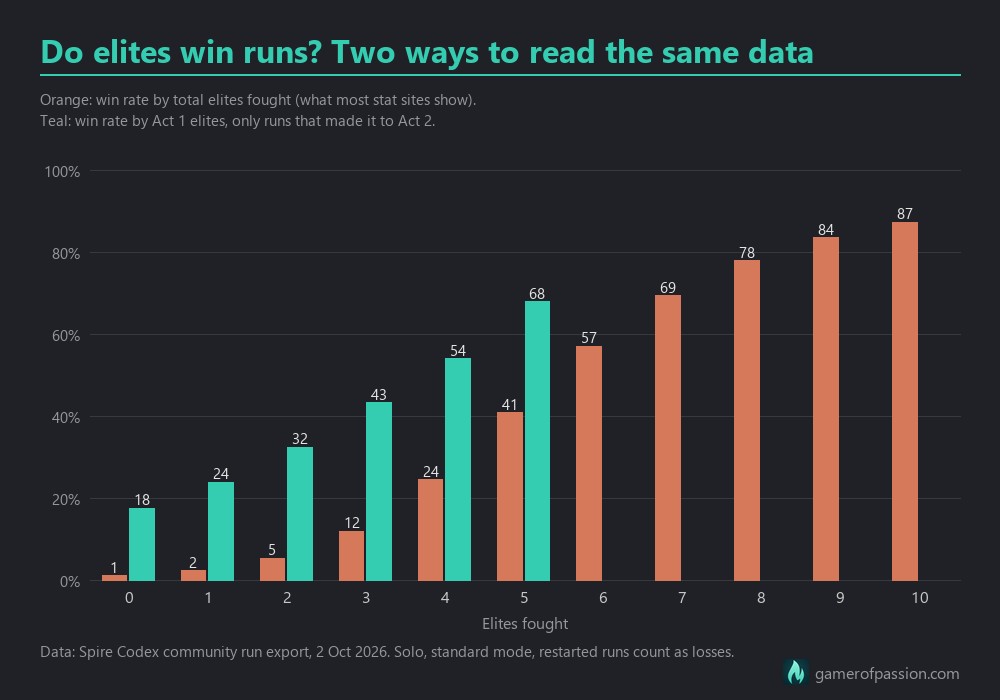
| Elites fought | All elites, all runs | Act 1 elites, runs that reached Act 2 |
|---|---|---|
| 0 | 1.0% | 17.5% |
| 1 | 2.3% | 23.8% |
| 2 | 5.3% | 32.4% |
| 3 | 11.9% | 43.2% |
| 4 | 24.4% | 54.0% |
| 5 | 40.8% | 67.9% |
With that filter, the win rate still goes from 17.5% with no Act 1 elites to 43.2% with three, and it holds at every HP level at the end of Act 1, too. Runs that leave Act 1 on low HP go from 15.0% with no elites to 39.0% with three, and at A9-10 the same climb goes from 13.4% to 35.6%.
Of course, strong decks will choose paths with more elites, so deck strength is still hidden in these numbers. The data fits the old advice to fight elites in Act 1, but it cannot prove that the elites themselves are the reason. Ascension 1 (Swarming Elites) also makes elites spawn more often, so you are going to see more of them anyway.
Stuck on A9?
A9 has the lowest win rate in the data at 7.5%, against 19.2% at A8 and 14.5% at A10.
Part of that is down to how players move through the levels. Players leave A9 the moment they beat it once, because beating the Act 3 boss opens the next level, while A10 is the top level, so everyone who gets there stays there and keeps adding runs, wins and losses alike. That is also why only 9.9% of runs are at A9 and 26.9% at A10. And since Ascension modifiers stack, A10 is not easier than A9.
What the data adds is where those A9 runs end. Only 39.7% of A9 runs get out of Act 1 (A8 is at 56.6% and A10 at 52.0%), so about 60% of A9 runs end there. Once a run makes it to Act 3, though, A9 wins 53.8% of the time and A10 51.8%, which is about the same.
A9 adds Deadly Enemies, which will make enemy attacks hit harder, and that hurts most when your deck is still weak. So if you are stuck there, the early picks in this article matter more than anywhere else, and you should make sure your first few rewards go to cards that block or deal damage on the turn you play them. XecnaR puts it more bluntly: “Act 1 is by far the most important part of the run”.
Part 2: Statistical tidbits
The rest of the numbers will not change how you play much. Some of them are fun, though, and a few come up on Reddit a lot.
Win rates by character and Ascension
The overall solo win rate in the sample is 17.5%, or 22.0% if you leave restarts out. If you have seen 25.7% on Spire Codex, that number also includes co-op, daily and custom runs.
The characters are very close: Silent 18.2%, Defect 17.7%, Regent 17.6%, Ironclad 17.1% and Necrobinder 16.9%. The more interesting bit is how they change with Ascension. The Defect has the best win rate at A0 (15.9%) and the worst at A10 (12.7%), while the Regent does the opposite and goes from last at A0 (12.1%) to first at A10 (16.5%).
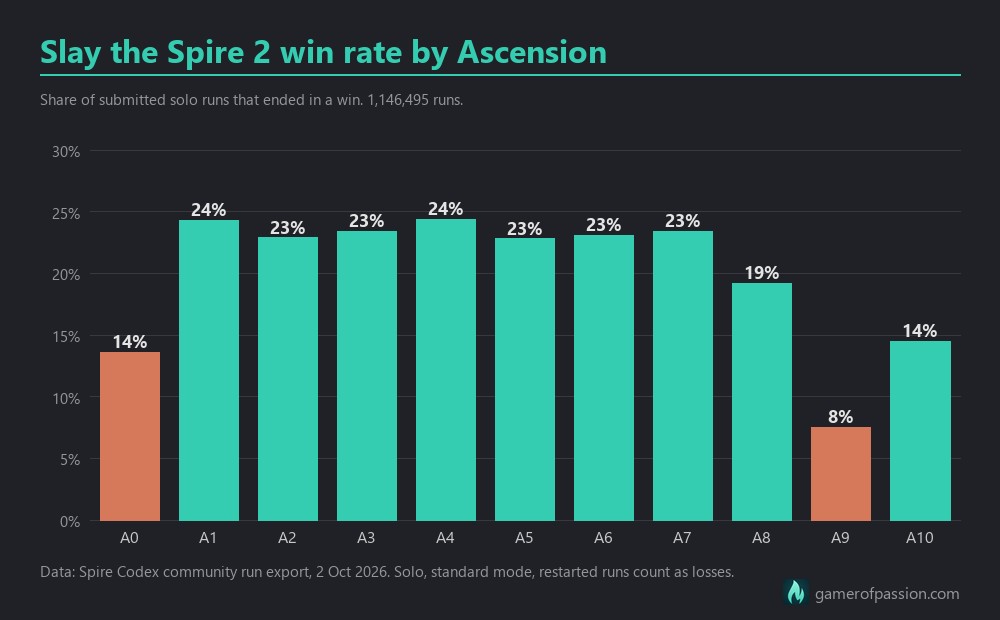
A0 sits at only 13.6%, while A1 to A7 are all around 23-24%. Every new player who has never won is playing at A0, because Ascension will only open after your first Act 3 boss kill, so the A0 number includes the first runs of every complete beginner.
Where runs end
About 54% of lost runs end in Act 1 (restarts included), 31.8% in Act 2 and 14.2% in Act 3. Only 29.2% of runs reach Act 3 at all, but those runs win 59.8% of the time.
The fights that end the most runs are mostly in Act 2. By share of all losses in a fight, [[encounter:Knowledge Demon]] leads with 5.3%, followed by [[encounter:The Decimillipede]] at 5.0%, [[encounter:Kaiser Crab]] at 4.9%, [[encounter:The Insatiable]] at 3.9% and [[encounter:Test Subject]] at 3.9%. At A10 the Decimillipede takes first place (5.1%), and at A0 the Knowledge Demon causes 6.7% of losses.
Mind that this is a share of losses, so a fight that every surviving run has to face will rank high partly for that reason. A winning run takes about 48 minutes (median).
Co-op
Co-op runs win a lot more often. Two players win 20.9%, three players 44.5% and four players 69.8%, against 17.5% solo. At A10 the jump with three and four players is still big (30.4% and 61.6%).
These groups are not the same players, though. Multiplayer Ascension progresses separately, and a multiplayer win will open the next level for all characters, so I would not compare these too directly.
Juzu Bracelet
[[relic:Juzu Bracelet]] has had a couple of long Reddit threads (one, two), including the claim that it can “swing your winrate by 13%”. Runs that own it do look 12.1% better, but that is mostly survivorship.
When you compare random single-relic drops with other common relics found at the same floor, Juzu comes out at -3.0%. Bag of Preparation is at +2.2%, so Juzu is about 5% behind it and below average overall.
A few more
A Reddit thread asked whether the Regent is the best character at A10. With restarts counted it is 16.5% against Silent’s 15.7%, which is too close to call, especially since the Regent has the fewest A10 runs.
On the Fresnel Lens or Glowwater debate, the data does not show Fresnel losing more runs. Among rare relics from random drops, [[relic:Lizard Tail]] (+6.8%) and Pocketwatch (+5.1%) do best, while Girya (-5.2%) and The Courier (-4.6%) do worst.
Live numbers
The box below loads current, unfiltered numbers straight from Spire Codex. They include co-op, daily and custom runs, so they will be higher than the numbers in this article.
How the numbers were made
I am not a statistician, so I tried to keep the method simple and to show where the numbers are shaky. If you think I got something wrong, I would like to hear it.
The sample is every solo, standard-mode run (no daily or custom) with one of the five base characters at Ascension 0 to 10 in the Spire Codex export, covering game versions v0.98 to v0.111. That is 1,146,495 runs out of 1,978,666 submitted. Modded characters are left out.
Spire Codex’s own scoring page already says that its Codex Score is a naive win-rate correlation and names survivorship and exposure as known biases. This article is an attempt to correct for those two.
For cards and Neow options, it uses the fact that the offers are random and compares runs that were offered something with similar runs at the same point, then scales by how often players take it. Each card is measured against the character’s average card of the same rarity. Restarts count as losses unless I say otherwise, and Neow results were checked both ways. The full numbers are available as CSV downloads, in the per-card table (CSV) and the Neow table (CSV).
There are real limits. The export has no player IDs (the field is empty in every run), so I cannot compare the same player with and without a pick. People who upload their runs are probably more engaged than the average player, and the card numbers only cover Act 1 picks, so a card that is bad early can still be great later.
The best and worst cards in each table are also the extremes out of many, so their numbers are probably a little bit inflated, and rarely taken cards like Expertise are the noisiest. Ranges are around ±1% for common cards and ±3% for rares.
Thanks to Spire Codex for collecting the runs and sharing the export.
Conclusion
Act 1 in Slay the Spire 2 is mostly about the next fight. Cards that block or deal damage the turn you draw them win more runs, while cards that need setup first, including a few popular rares, are better left for later. At Neow, Stone Humidifier is probably the best option you will see, and Hefty Tablet is the one I would leave alone. Everything else is small enough that your own deck should decide.