If you have answered an emergency broadcast in No Man’s Sky and ended up as the Overseer of a run-down town, chances are the place is deep in debt and you are not quite sure what to do with it.
A settlement is a small town of Gek, Korvax, Vy’keen or Autophage citizens that you will run as its Overseer. Your first one will usually come from a story broadcast once you have made at least ten warps, and you can buy Settlement Charts to find more.
Running one comes down to three steps. First, you build the Overseer’s Office. Then you push Productivity above Maintenance Cost, at which point the debt will repay itself, and once it is gone the town starts producing goods for you. After that, you upgrade its buildings from C-class towards S-class, which raises its stats and, over time, the class of the whole settlement.
Most of the costs, timers and decision effects here are read from the 7.11 (Forsaken) game data, with the official patch notes filling in what changed over time. This guide will go through getting and picking a settlement, clearing its debt and pushing it towards S-class, plus fixes for the problems you are most likely to run into.
Contents
- How to get a settlement
- Autophage settlements
- Owning several settlements
- Picking a good settlement
- Settlement stats
- Getting out of debt
- Buildings and upgrades
- Decisions
- Production
- Reaching S-class
- Sentinel attacks
- Settlement problems
- Is a settlement worth it?
- Settlement FAQ
- Final thoughts
How to get a settlement
There are two main ways to become an Overseer. The story route will normally only come once, and only if you do not run a settlement yet. A Settlement Chart, on the other hand, can be bought as often as you like.
The emergency broadcast
Once you have finished the opening tutorial and warped at least ten times, your ship’s communicator will pick up an Emergency Broadcast at some point while you are flying in space. It does not fire on a fixed warp, and you may need a few more jumps before it comes. The mission is called A Planet in Distress, and it plays out like this:
- Answer the communicator. The game will then mark the nearest settlement that has no Overseer.
- Fly there and land. The town is under attack, and you will have to destroy the Sentinel forces first.
- Speak to the Settlement Survivor.
- Use the Settlement Hub Interface at the central monument and choose “Apply to be Overseer”. The hub will refuse applications until the attack is over.
- Follow The Settlers mission. It will ask you to build the Overseer’s Office, approve your first new building and answer your first few decisions.
Have the claim item for that race in your inventory when you apply, even on the story settlement.
Beware that the broadcast only comes if you are not already Overseer of a settlement. If you claim one with a chart first, the story route is skipped for good. It will most likely not appear in Expedition mode either.
Settlement Charts
For most other settlements, you are going to need a Settlement Chart. The Cartographer on any Space Station sells one for 5 Navigation Data. Once you own a settlement with a Tower, that Tower will also make 1 to 5 Navigation Data a day, enough for a new chart every few days.
A chart will only search the star system you are in. Land on the planet you want first and only then use the chart from your inventory, since it should then point to a settlement on that planet if there is one.
If the chart says “Locational interference”, there is no unclaimed settlement it can find in this system. Warp somewhere else and try again.
Players report that a settlement usually belongs to the dominant race of its system, unless it is an Autophage one. If you want a specific race, pick the system first.
Claiming will cost you 3 GekNip at a Gek settlement, 3 Convergence Cubes at a Korvax one, 3 Vy’keen Daggers at a Vy’keen one and 300 Atlantideum at an Autophage one.
Only the items count. The refusal messages about “battle experience” or an “insufficient trade deal” are just flavour text for the missing items.
| Route | What you need | Where | Claim fee |
|---|---|---|---|
| A Planet in Distress (story) | At least 10 warps, tutorial done, no settlement yet | Emergency Broadcast while in space | Have the race item ready |
| Settlement Chart | 5 Navigation Data | Cartographer on any Space Station | 3 GekNip, 3 Convergence Cubes or 3 Vy’keen Daggers |
| Autophage invitation | They Who Returned done, a finished Overseer’s Office | Autophage Settlement Signal decision at your town | 300 Atlantideum |
| Autophage Settlement Chart | 1,499 Void Motes | Autophage Synthesis Terminal | 300 Atlantideum |
In your first hours, a settlement can wait. The No Man’s Sky beginner guide has more on what deserves your time early on, and the broadcast will find you anyway once you have done some warping.
Autophage settlements
Autophage settlements are rare and work a little bit differently. Their settlers will stay cloaked until you scan them, every one of these towns starts with an extra feature that lowers Sentinel attention, and they have their own production list with goods like Pugneum, Radiant Shards and Inverted Mirrors. They also get a building of their own, the Autonomous Crane.
The cheapest way in is an invitation, which works like this:
- Finish the Autophage story They Who Returned.
- Visit one of your settlements that has a finished Overseer’s Office and stay close to it until the “Autophage Settlement Signal” decision shows up. It will not come if you already own an Autophage settlement.
- Choose “Accept invitation”. This starts A Dissonant Transmission and marks a Dissonant Planetary Settlement.
- Fly there and scan to reveal the cloaked settlers.
- Go to the Heart of Atlantid at the central monument, which is the Autophage version of the settlement hub, and pay 300 Atlantideum to become Overseer.
If you chose “Ignore transmission”, do not count on the signal coming back. In that case, buy an Autophage Settlement Chart for 1,499 Void Motes at an Autophage Synthesis Terminal, since the normal Cartographer does not stock it. Mind that the Heart of Atlantid will turn you away until you have discovered the Autophage.
Autophage settlements are meant to have their own Autophage Synthesis Terminal at the central monument, but it can be missing at some of them.
Owning several settlements
You can be Overseer of up to four settlements at the same time. Older guides still say you can only run one, but that changed with the Beacon update in 2025, and the limit is still four as of 7.11. You can also only run one settlement per planet.
Running one settlement of each race is a good plan, because it gives you all four production lists. Whether the game lets you own two settlements of the same race is not clear as of 7.11.
Retiring as Overseer
If a settlement turns out to be a dud, you can let it go. Open its status page, go to Settlement History and choose “Retire as Overseer”. The story settlement only lets you retire after its starter tasks are done, meaning the Overseer’s Office, the first building and the first decisions.
A settlement tied to A Trace of Metal cannot be retired, and you should not count on retiring while a building is under construction or being upgraded.
You will not get anything back for what you spent. Players report that if you return later, the town is back in its original run-down state, and claiming it once more costs the race items again.
Picking a good settlement
Every new settlement will start at C-class, in debt, and with exactly one good feature and four bad ones. There is no perfect start, and what you are really looking for is the least painful mix. The worst starting features are these:
- Citizens are all clones, which draws a lot more Sentinel attention.
- Built on sand and Frequent tremors, which each add 50,000 to 100,000 units a day of maintenance.
- Full of parasitic eggs, which takes 3 to 5 citizens off the maximum population.
On the good side, HypnoDrones is the best starting feature you can roll, worth 50,000 to 100,000 productivity a day. Most other good starters are worth a lot less, and a single bad maintenance feature can easily cancel them out.
The race matters more than it looks, because each one has its own production list. A Gek settlement makes Frigate Fuel four times faster than the others once its Starport is S-class. In Gek, Korvax and Vy’keen towns, an S-class Saloon will make the race’s own curio, meaning GekNip, Convergence Cubes or Vy’keen Daggers, which happen to be the claim fee for that race.
The planet matters too. A town on fairly flat ground on a calm planet will give you fewer headaches, and I would advise skipping planets with aggressive Sentinels, since you are going to spend a lot of time on that planet.
As for the story settlement, I would say take it. It is the easiest way to learn how all of this works, and since you can hold four settlements, keeping it no longer blocks a better one. If it rolled a terrible set of features, you can still retire once its starter tasks are done and use a chart to find another.
Settlement stats
The Settlement Overview shows six numbers: Population (current and maximum), Happiness, Productivity, Maintenance Cost, Sentinel Alert Level and Debt. Productivity and Maintenance Cost are both counted in units per day, and the same goes for every decision that changes them.
Two more meters stay hidden and fill up in the background. When one of them is full, you will get a Sentinel attack or a bug infestation.
| Stat | Range and start | Raised by | Lowered by |
|---|---|---|---|
| Population | Dial fills at 175 | Dwellings, upgrades, up to two new citizens a day | Banishing, failed expeditions, bad features |
| Happiness | In %; can climb past 100%, up to 180% | Upgrades, Fishing Pond, celebrations, art, prayers | New buildings, refused requests, taxes, bans |
| Productivity | Units a day; dial fills at 1.5 million | Productive buildings and upgrades, taxes | Bad features, Saloons, refusing a tax |
| Maintenance Cost | Units a day | New buildings and settlers; upgrades never add any | Bans, hard labour, prayers, cost-saving choices |
| Sentinel Alert Level | In %; Sentinels attack at 100% | Time; the ‘Citizens are all clones’ feature | Winning resets it to zero; a few features and prayers |
| Debt | Starts at 600,000 to 1.2 million, stops at 10 million | Maintenance above productivity, paid choices | Productivity above maintenance, fines, donations |
Three things move these numbers: your buildings, the settlement’s features and your decisions. Every building will add its own population, happiness, productivity and maintenance, and each class upgrade adds more on top, but upgrading a building will never raise its maintenance cost, which is a big part of why upgrades carry the whole settlement.
Two buildings of the same kind will rarely add exactly the same amount, though, since each one rolls its numbers inside a range.
The dials on the Overview fill up at 175 population and 1.5 million units of productivity per day, while happiness can climb past 100% to about 180%. The productivity dial is not a hard cap, and a well-developed settlement can show more than 1.5 million a day.
Debt is the number that worries new Overseers most. A new settlement will start 600,000 to 1.2 million units in debt, and the debt keeps growing as long as maintenance is higher than productivity. Seeing 2 to 3 million after the first week or two is normal and nothing to panic about.
Population seems to matter most for how fast the settlement produces goods. New citizens arrive slowly, though, at most two per day, and filling a fully upgraded town will take months. That is why housing upgrades pay off in the long run, even though they add no productivity.
Happiness counts too, since it is one of the inputs to production speed, and a very unhappy town gets penalised for it. Do not let it sink while you chase productivity.
Getting out of debt
A settlement in debt will produce nothing. The fix is simple on paper. Get Productivity above Maintenance Cost and the game will repay the debt automatically over time, and once it is gone, production starts again.
Debt does not stop you from building or upgrading, which is a good thing, because building and upgrading is exactly how you get out of it.
You have a handful of cheap levers for this:
- Upgrade productive buildings first. Farms, Factories, Warehouses and Towers cost more to run than they make at C-class, roughly break even at B-class and turn a real profit at A and S.
- Upgrade the Overseer’s Office early. Its stages only take 90 seconds, the materials are cheap, and it adds happiness at B-class and productivity at A-class.
- Pick decisions that cut maintenance. “Assign to hard labour”, banning on a Market Regulation decision, “Search for cost savings” and “Pray for respite” all lower Maintenance Cost.
- Hold off on decisions that cost the settlement money, like endorsing a celebration or commissioning art, until the debt is under control.
- Be careful with new buildings. A fresh building runs at a loss until it is upgraded, and the construction offer only lists the productivity it adds while leaving its maintenance out.
Once the debt is gone, any decision that costs the settlement money will put it back into debt and can cost you the batch in progress. Make sure to collect your goods before you accept one.
Keep productivity comfortably above maintenance from then on. Players report that a small shortfall will not put a settlement straight back into debt, but a bigger one will.
Debt will also stop growing at 10 million units. Even a settlement you ignored for a year can be rescued, and once it is running well, that much debt can be gone in a week or two.
If you ever saw a debt of around 2 billion units, that was a bug, and patch 7.04 fixed it.
Buildings and upgrades
There are 14 kinds of building: the Overseer’s Office, small, medium and large dwellings, the Saloon, Starport, Tower, Trade Centre, Utility Module, Warehouse, Farm, Factory, Fishing Pond and the Autophage-only Autonomous Crane. Some kinds can appear more than once in the same town. The status page uses its own type names for them, for example Storage Facility for the Warehouse or Nutritional Supply for the Farm, and upgraded buildings get grander names as well.
A new settlement starts with 10 to 13 buildings. A finished one tends to end up with about 25 to 30, and new building offers will dry up as you get close to that.
Construction
New buildings come from “Settlement Expansion Available” decisions. Once you approve one, the build goes like this:
- Go to the Building Construction Site and choose “Supply materials”. Have the full amount in your inventory.
- Wait out the stage timer.
- Repeat for the next stage. Most buildings will take two to four stages before they open as C-class.
- When the last stage ends, walk back to the site and officially open the building. Until you do, it counts as unfinished.
The Overseer’s Office follows the same pattern with three supply runs: 210 Silicate Powder, then 5 Metal Plating, then 3 Microprocessors, each followed by a 90-second wait. You also cannot place base parts or dig terrain inside the settlement limits.
Upgrades
An open building can be upgraded three times, to B, A and finally S-class. You can start an upgrade from the building’s own terminal and do not have to wait for the Administration Terminal to suggest one. Each settlement will only run one upgrade at a time, and a construction site that is still waiting for materials will block new upgrades as well.
If you own several settlements, keep one upgrade running in each.
Every construction stage and every upgrade of a building has the same real-time wait, and it does not get longer at A or S-class. The waits will range from 90 seconds for the Office to 2 hours for large dwellings and Trade Centres.
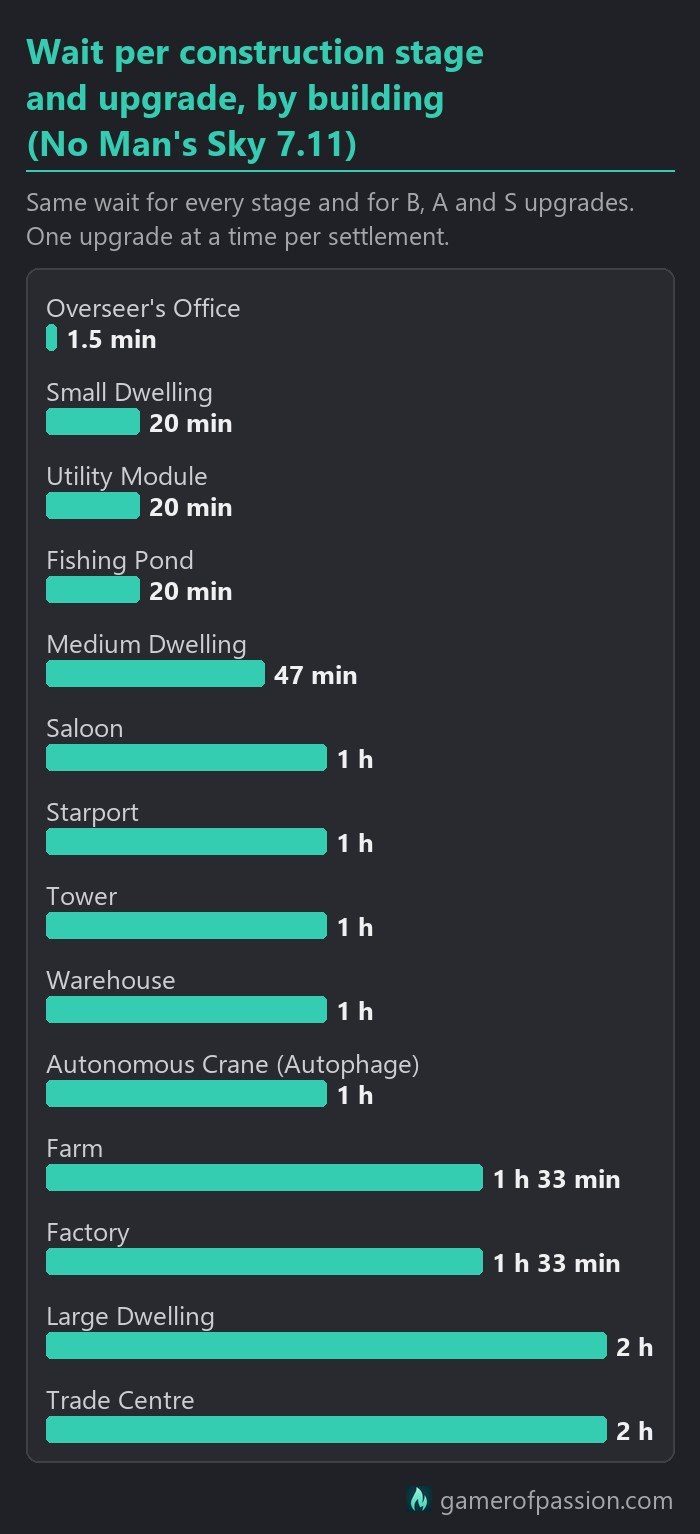
Most upgrade materials are ordinary items, with a few exceptions. The Office’s B-class upgrade costs 150 Nanites, and the Large Dwelling’s last build stage costs 55,000 units. Only four S-class upgrades need materials from purple star systems. The Large Dwelling wants 300 Polished Stone, the Warehouse 250 Crystallised Helium, the Factory 350 Crystallised Helium and the Tower 250 Lithium.
The Utility Module reaches S-class with ordinary materials, and it counts as an industrial building for production too.
| Building | Wait per stage | Upgrades add | Output it unlocks |
|---|---|---|---|
| Overseer’s Office | 90 s | Happiness (B), productivity (A), population (S) | None |
| Small Dwelling | 20 min | Population and happiness | None |
| Medium Dwelling | 46 min 40 s | Population and happiness | None |
| Large Dwelling | 2 h | Population and happiness | None |
| Saloon | 1 h | Population and happiness | Race goods; GekNip, Convergence Cube, Vy’keen Dagger at S |
| Starport | 1 h | Productivity, population and happiness | Ship fuels; Frigate Fuel at S |
| Tower | 1 h | Productivity, population and happiness | Industrial goods |
| Trade Centre | 2 h | Productivity, population and happiness | Trade goods; Fusion Core, Vector Compressors at S |
| Utility Module | 20 min | Productivity, population and happiness | Industrial goods |
| Warehouse | 1 h | Productivity, population and happiness | Industrial goods |
| Farm | 1 h 33 min 20 s | Productivity, population and happiness | Faecium at C, crops from B, Kelp Sac at S |
| Factory | 1 h 33 min 20 s | Productivity, population and happiness | Industrial goods |
| Fishing Pond | 20 min | Happiness only | None; fish in it yourself |
| Autonomous Crane (Autophage) | 1 h | Productivity, population and happiness | None |
| Building | B-class | A-class | S-class |
|---|---|---|---|
| Overseer’s Office | 150 Nanites | 1 Quantum Computer | 200 Indium |
| Small Dwelling | 150 Pure Ferrite | 80 Ionised Cobalt | 1 Amino Chamber |
| Medium Dwelling | 150 Magnetised Ferrite | 9 Glass | 200 Gold |
| Large Dwelling | 300 Magnetised Ferrite | 20 Star Silk | 300 Polished Stone |
| Saloon | 220 Magnetised Ferrite | 3 Hot Ice | 99 De-Scented Bottles |
| Starport | 200 Chromatic Metal | 1 Lemmium | 12 Navigation Data |
| Tower | 180 Cobalt | 3 Quantum Computer | 250 Lithium |
| Trade Centre | 200 Chromatic Metal | 1 Mind Control Device | 9 Teleport Coordinators |
| Utility Module | 80 Magnetised Ferrite | 5 Enormous Metal Cog | 150 Chlorine |
| Warehouse | 9 Ion Battery | 3 Superconducting Fibre | 250 Crystallised Helium |
| Farm | 120 Nitrogen | 3 Organic Catalyst | 64 Dirt |
| Factory | 8 Welding Soap | 3 Semiconductor | 350 Crystallised Helium |
| Fishing Pond | 5 Mealworms | 3 Spicy Chum | 5 Bionic Lure |
| Autonomous Crane (Autophage) | 1 Radiant Shard + Atlantideum | 1 Inverted Mirror + Atlantideum | 5 Salvaged Glass |
As for the order, start with the Overseer’s Office because it is cheap and quick, then move on to the Farms, Factories, Warehouses and Towers, and leave the dwellings for when the debt is under control. Do not expect an S-class Office to speed up the rest of the town, but its upgrades are some of the cheapest happiness and productivity you are going to find.
A few buildings are useful beyond their stats. The Tower’s terminal makes 1 to 5 Navigation Data a day and can scan for planetary buildings, distress signals and space anomalies, each of them once a day, although some of them may only unlock as you upgrade the Tower. The Fishing Pond is probably one of the cheapest sources of happiness, with only 9,000 to 10,000 units a day of maintenance, and you can fish in it yourself.
Decisions
Decisions are the requests, disputes and visitors that pile up at the Administration Terminal in the Overseer’s Office. A new one will arrive 15 minutes to 2 hours after the last, and they will wait for you. Nothing happens if you leave one for days, and checking in once or twice a day is plenty.
You can teleport to the Office from any Space Station.
As a default, take the options that cut Maintenance Cost or add a feature, accept visitors and gifts, and never seize a gift or dismiss a warning. Those two come with a guaranteed curse and a long list of chances at bad features. Every decision previews its stat change. While you are in debt, pick productivity or maintenance cuts, and once happiness starts falling, switch to happiness.
| Decision | Pick | Effect |
|---|---|---|
| Settlement Expansion Available | A productive building; Fishing Pond if unhappy | Productive buildings add 10,000 to 30,000 productivity |
| Theft in the Community | Collect fine | Debt -5,000 to -10,000, happiness -1 to -2 |
| Faulty Goods, Criminal Enterprise | Assign to hard labour if offered, else Collect fine | Maintenance -10,000 to -30,000 |
| Relational Difficulties | Fine both | Debt -10,000 to -50,000 |
| New Opportunities | Either; both risk a bad feature | Happiness +3 to +4 or productivity +30,000 to +50,000 |
| Fiscal Opportunities | Tax, unless happiness is low | Productivity +10,000 to +30,000, happiness -1 to -2 |
| Market Regulation | Ban, unless happiness is low | Maintenance -10,000 to -30,000, happiness -1 to -2 |
| Bettering the Settlement, Improving our Lives | The maintenance or productivity option | Some versions add a feature (up to 18 per town) |
| An Unexpected Guest | Allow them to stay | Population +1, a job feature, maintenance +10,000 to +30,000 |
| A Stranger In Need | Assist | Debt +5,000 to +10,000, 5% chance of a blessing |
| A Good Neighbour (offering) | Exchange gifts or Accept the gift; never seize it | A gift; exchanging adds a blessing, debt +5,000 to +10,000 |
| A Mysterious Warning | Heed the warning | A blessing, debt +5,000 to +10,000; refusing brings a curse |
| A Good Neighbour (technology) | Accept technology | A technology feature at no cost |
| Friendly Business | Purchase technology if the debt is affordable | Debt +50,000 to +100,000 for a technology feature |
| A Grand Day Out | Endorse the event once debt is under control | Happiness +4 to +6, debt +50,000 to +100,000 |
| An Immortal Legacy | Commission the work once debt is under control | Happiness +4 to +6, debt +50,000 to +100,000, art feature |
| A Glorious Expedition | Authorise the mission; donate the proceeds while in debt | Debt +10,000 to +50,000; 70% success, 150 to 200 Nanites |
| The Next Generation | Either name | Population +1 |
| Specialist Skills | Search for cost savings | Maintenance -30,000 to -50,000 |
| A Personal Tribute | Accept the gift | A gift item, or debt -5,000 to -10,000 if donated |
| Higher Powers | Pray for respite or Pray for happiness | Maintenance -30,000 to -50,000 or happiness +3 to +4 |
| Hard at Work (renovation) | Expedite live repairs | Productivity +10,000 to +30,000, debt +10,000 to +50,000 |
| Hard at Work (rewards) | Grant a holiday or Award a regular bonus | Happiness +3 to +4 |
| The Burden of History | Refuse if the job’s feature is good | Surrender pays 200 to 500 Quicksilver, loses the feature |
A “+productivity” and a “-maintenance” choice of the same size move your daily balance by the same amount, and both are per day. Neither is always the better pick, although productivity also counts towards production speed. I would take whichever number is bigger.
Bad features do not have to stay forever. A settlement holds up to 18 features, and once the list is full, new ones from decisions start replacing old ones, usually the bad ones first. Cheap feature-granting choices like blessings, public artworks and visitor technology are how you clean up a settlement over time.
Citizen expeditions are a nice extra. Authorising one adds 10,000 to 50,000 debt, and the citizens come back after 50 minutes with a 70% chance of success. A success pays 150 to 200 Nanites, or cuts 50,000 to 100,000 debt if you donate the proceeds, while a failure costs you 2 or 3 settlers.
The Sentinel options are the weakest choice you can make. A prayer for deliverance only trims Sentinel attention by 2 to 3 points, and happiness, maintenance or productivity will do far more for you.
Production
Since patch 7.04 (September 2026), a better settlement produces faster. Before that patch, a bug made upgrades slow production down, which is why older posts tell you to keep your settlement miserable. That advice is out of date.
Each settlement has two output slots, and each slot works on one batch at a time. You pick what they make with Change Output, where every option shows its requirement, for example “Requires S-Class Industrial Building”. What is on the list depends on the race and on which buildings the town has at which class.
Basic goods like Metal Plating, Glass and gases need nothing, while the best items need an S-class Starport, Saloon, Trade Centre or industrial building. For industrial goods, a Utility Module, Warehouse, Factory or Tower of the required class will all count.
In Korvax, Vy’keen and Autophage settlements, a batch will take roughly 20 to 40 real hours, whatever you choose. Gek settlements finish most goods in a few hours, but their top items like Hot Ice and the Cryogenic Chamber take days to weeks. Batch sizes are fixed per item. A Korvax or Vy’keen settlement makes about 165 Radon or two Glass at a time, while rare goods arrive one or two at a time.
Finished goods will pile up while you are away, but only up to a cap per item, for example 1,500 Radon or 10 Frigate Fuel at a Korvax settlement. Try to collect soon after a batch finishes, since collecting restarts the timer and throws away the progress of the batch that is currently running. You may not even have to fly there for that, since you should also be able to collect the goods from a teleport terminal.
If you are after Frigate Fuel, a Gek settlement is the best choice. Once its Starport is S-class, it will make Frigate Fuel four times faster than the other races, with the same batch size.
The Fishing Pond, on the other hand, adds nothing to the output list. Its value is the happiness and the fishing you do yourself.
Reaching S-class
Every settlement has its own class from C to S, separate from the classes of its buildings. It rates the whole town, rising as population, happiness and productivity go up and maintenance comes down, and every new settlement starts at C. The Beacon update completely reworked how this class is worked out, and the exact rule is not public.
Towns that do reach S-class tend to have full dials, meaning about 175 population and 1.5 million productivity, along with happiness above 100% and low maintenance. S-class buildings alone are not enough, and a town can have every building at S and still sit at A-class. Zero debt is not a requirement either, as a settlement can be S-class while still millions in debt.
You will still find guides asking for 200 population and 1 million productivity. Those numbers are older than the Beacon rework, and the population dial in 7.11 stops at 175.
The realistic path is to clear the debt, take every building to S-class, keep happiness above 100% with upgrades and good decisions, and then give the population time to grow. With at most two new citizens a day, that last part is going to take months.
Sentinel attacks
Every settlement has a hidden alert meter that slowly fills up. When it is full, you will get “Settlement status: Sentinel alert level high!” and the game will wait for you to come back and fight. The alert also creeps up slowly while the game is closed.
Owning more settlements does not mean more attacks, because the alert is shared between them.
You can expect one wave of mixed Sentinel units, and the objective will count down how many are left. Winning will reset the alert to zero. Attacks do not seem to wreck anything either, since the Sentinels simply wait until you return, and there is no sign of lost buildings, citizens or production from an attack you leave for later.
Since Beacon, the swarming brood can also infest a settlement. You will get “Biological infestation detected!” and have to kill the horrors that spawn in town.
Pirate ships can raid the town as well while you hang around it, and hired squadron pilots will join the defence.
Some starting features raise Sentinel attention, worst of all Citizens are all clones. Other features and the odd decision will lower it, but only by a few points.
Settlement problems
Stuck in debt
Debt will only shrink once Productivity is higher than Maintenance Cost, and until then there is nothing to collect. Compare the two numbers on the Overview first. Then upgrade the Farms, Factories, Warehouses and Towers, pick maintenance cuts in decisions and skip anything that adds debt for now.
Building will not finish
When the last stage ends, a building still has to be opened. Walk to the construction site and officially open it. Until you do, it counts as unfinished, and it can also hold back new building offers.
Construction terminal missing
Patch 7.04 fixed buildings that failed to spawn their construction terminal, so update the game first. If a marker or the Overseer’s Office prompt is missing, select that settlement’s own mission in the Mission Log and teleport back. There is no reliable fix for a terminal buried in the terrain.
Happiness keeps dropping
New buildings cost a little bit of happiness until you upgrade them, and refusing citizens’ requests costs more. To lift it, upgrade buildings to B-class, take a Fishing Pond when one is offered, endorse celebrations and art when you can afford the debt, and pick the happiness options in decisions.
No new decisions
Deal with any pending attack or infestation first, as those can hold back the decision prompt. Build the Overseer’s Office if it is still missing, and check whether A Trace of Metal is asking for you in the log. Beyond that, a new decision can take up to 2 hours.
The broadcast never came
You need the opening tutorial done and at least ten warps, and the call only comes while you are in your ship in space. It will not come at all if you are Overseer of a settlement. If you are tired of waiting, a Settlement Chart for 5 Navigation Data gets you a settlement just as well.
Is a settlement worth it?
A settlement is a slow side game built on real-time timers. In return, a developed town will hand you free goods every day or two, from gases and crops up to Frigate Fuel, trade goods and its race’s curio, and on top of that you get a Tower that makes Navigation Data and scans for you, a Fishing Pond, a teleporter and the odd batch of Nanites from expeditions.
It is not a fast way to get rich, and the first stretch in debt can feel like a chore. That being said, once a settlement is out of debt it more or less runs itself, and four of them will add up to a steady income. If you enjoy the management side and the decisions, it is easily worth it. If you only want the loot, one Gek settlement making Frigate Fuel is probably enough.
Settlement FAQ
How many settlements can you have?
You can be Overseer of up to four settlements at the same time, with at most one per planet. The old limit of one ended with the Beacon update.
How do you make a settlement S-class?
Clear the debt, upgrade every building to S-class and keep happiness above 100%. Then let the population grow towards 175 while productivity heads for 1.5 million a day. The exact rule is not public, and S-class buildings alone will not do it.
Can you lose a settlement?
You should not lose one by ignoring it. Debt stops at 10 million units, attacks simply wait for you to return, and nothing suggests that a settlement gets taken away while you are gone. Retiring is how you give one up.
Should I take the first settlement?
Yes. It is the easiest way to learn the system, and since you can own four, it does not block a better one later. You can still retire from it once its starter tasks are done.
How do you get rid of settlement debt?
Get Productivity above Maintenance Cost and the debt will repay itself over time. Upgrade productive buildings first, pick maintenance cuts and avoid decisions that cost money until it is gone.
Final thoughts
Settlements look like a lot of work at the start, with a pile of debt, four bad features and a town full of grumpy citizens. Most of the pressure goes away once Productivity beats Maintenance Cost and the debt starts shrinking. If you just want a settlement that pays off without much fuss, upgrade the Office and the productive buildings first, pick maintenance cuts, and remember to open every building once its last stage is done.