In this Pact of Punishment tier list, I am going to rank every Hades 1 Condition by how much it hurts for the Heat it adds, easiest first. The cheapest Heat in the game sits in Extreme Measures 1 and 2, Tight Deadline 1 and Middle Management. Right after them come Underworld Customs, Tight Deadline 2, Convenience Fee, the first two ranks of Lasting Consequences and Extreme Measures 3. I would leave Extreme Measures 4, Heightened Security, Routine Inspection and Approval Process 2 for last.
That order is a verdict per point of Heat, and it will shift a little bit with your weapon, because a slow, hard-hitting aspect is going to hate some Conditions that a fast one barely notices.
Every Heat cost and per-rank value on this page was checked against the game files of v1.38, the final version of Hades 1, and the tier order is my own verdict. Hades II replaced the Pact with the Oath of the Unseen, and nothing here applies to the sequel.
Contents
- Pact of Punishment basics
- Conditions by tier
- Cost per rank
- Setups for 8 to 32 Heat
- Rewards for Heat
- Extreme Measures bosses
- Hell Mode rules
- Pact questions
- Raising Heat step by step
Pact of Punishment basics
The Pact of Punishment is the contract you will find at the exit door of the House, and it opens after your first successful escape. In Hell Mode (the harder save option you pick when you start a new game), it is there from the very first run.
Each Condition makes the run harder in one specific way, and most of them have several ranks. Every rank you switch on adds some Heat, and your total Heat is simply what all of those ranks add up to.
Outside Hell Mode there are 15 Conditions, and Hell Mode adds a 16th one, Personal Liability. With every rank of every Condition switched on, you will reach 63 Heat, or 64 in Hell Mode. Extreme Measures stays hidden until you have met Alecto and Tisiphone, and Routine Inspection only appears once you have unlocked every locked set in the Mirror of Night.
Why would you turn up the Heat at all? The main reason is bounties.
A bounty is a one-time reward for beating a region boss at a new Heat level with a weapon, and it pays out in Titan Blood (for weapon aspects), Diamonds (for the House Contractor) and Ambrosia (for Companions). Bounties stop at 20 Heat (25 in Hell Mode). Additionally, Skelly hands out three cosmetic statues for clears at 8, 16 and 32 Heat, Erebus gates open in the first three regions once your Heat is high enough, and three prophecies in the Fated List, The Useless Trinket, Harsh Conditions and Slashed Benefits, pay you for Pact work as well. Heat gives you no extra Darkness, by the way.
Conditions by tier
The tiers judge each rank by how much trouble it causes for the Heat it gives you. S tier is close to free Heat, while D tier is Heat you will only take for a challenge or for a prophecy.
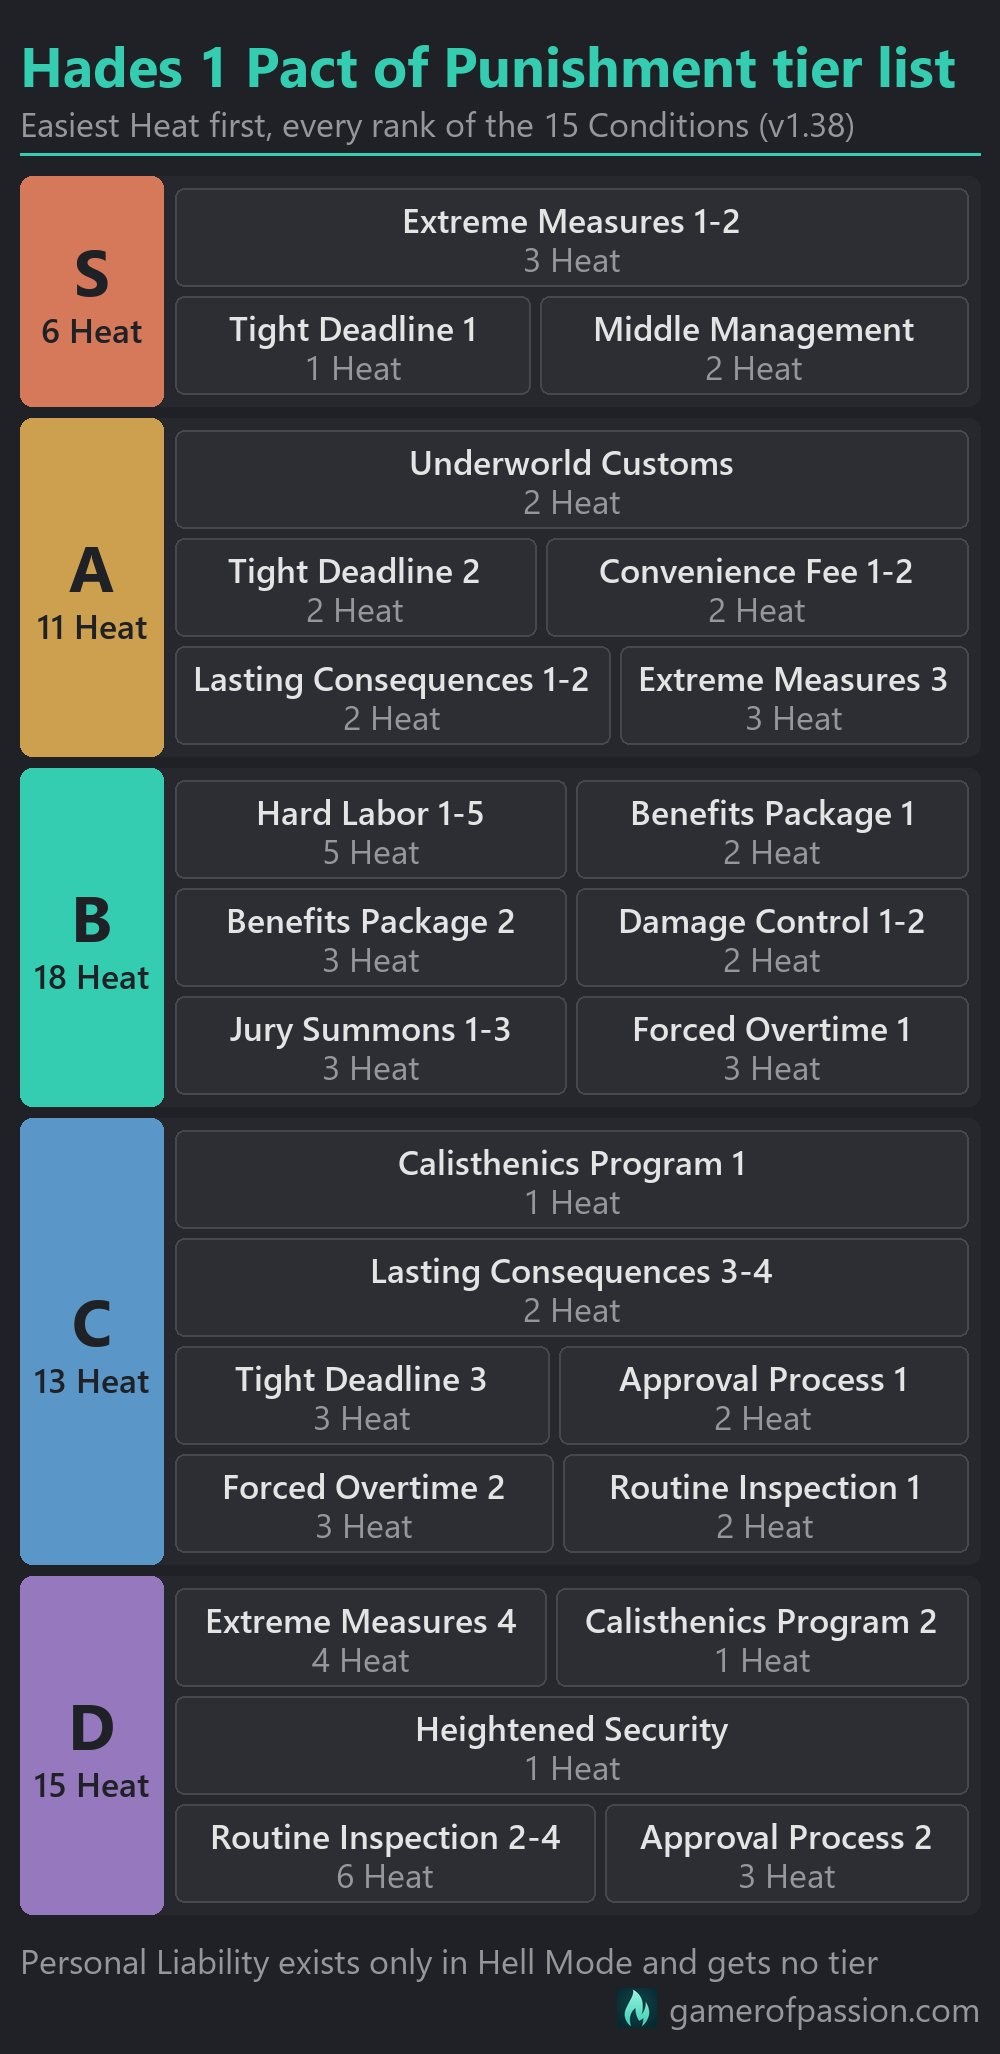
| Entry | Heat | Tier | What it does | Best for / avoid |
|---|---|---|---|---|
| Extreme Measures 1-2 | 3 | S | Tartarus, then Asphodel boss changes | |
| Tight Deadline 1 | 1 | S | 9:00 per region | avoid: very slow, careful play |
| Middle Management | 2 | S | extra foe or harder version in mini-boss chambers | |
| Underworld Customs | 2 | A | exit locked until 1 Boon is purged | best: spare-Boon builds, avoid: boon-starved Tartarus starts |
| Tight Deadline 2 | 2 | A | 7:00 per region | avoid: slow single-target weapons with Jury Summons 2-3 |
| Convenience Fee 1-2 | 2 | A | prices x1.4, then x1.8 | avoid: Bone Hourglass and gold-hungry builds |
| Lasting Consequences 1-2 | 2 | A | healing x0.75, then x0.50 | avoid: builds that live on food and fountains |
| Extreme Measures 3 | 3 | A | Elysium boss changes, the solo Asterius too | best: ranged weapons |
| Hard Labor 1-5 | 5 | B | foe damage x1.2 up to x2.0 | best: ranged weapons, Aspect of Arthur, avoid: Guan Yu |
| Benefits Package 1 | 2 | B | 1 Perk on most armored foes in normal encounters | best: AoE builds |
| Benefits Package 2 | 3 | B | 2 Perks on most armored foes in normal encounters | best: AoE builds, avoid: Jury Summons 2-3, Forced Overtime 2 |
| Damage Control 1-2 | 2 | B | 1 Hit Shield per rank, bosses included | best: Adamant Rail, Chiron, avoid: charged attacks |
| Jury Summons 1-3 | 3 | B | encounter budget x1.2 up to x1.6 | best: AoE builds, avoid: Chiron, Tight Deadline 3 |
| Forced Overtime 1 | 3 | B | foe speed x1.2 (movement, attacks, waits) | best: fast weapons, avoid: Chiron, Rama, charge-up attacks |
| Calisthenics Program 1 | 1 | C | foe Health and armor +15% | best: high-damage builds, avoid: Tight Deadline 2-3 |
| Lasting Consequences 3-4 | 2 | C | healing x0.25, then x0 | best: Stubborn Defiance runs, Aspect of Guan Yu |
| Tight Deadline 3 | 3 | C | 5:00 per region | best: fast clears, avoid: Jury Summons, slow weapons |
| Approval Process 1 | 2 | C | 2 of 3 offers open | best: Fated Persuasion, avoid: one specific Boon builds |
| Forced Overtime 2 | 3 | C | foe speed x1.4 | best: fast weapons, avoid: charge-up weapons |
| Routine Inspection 1 | 2 | C | Mirror rows 10-12 off | best: Shattered Shackle, avoid: rarity and reroll builds |
| Extreme Measures 4 | 4 | D | Hades boss changes, needs Extremer Measures | |
| Calisthenics Program 2 | 1 | D | foe Health and armor +30% | |
| Heightened Security | 1 | D | trap and magma damage x5 | |
| Routine Inspection 2-4 | 6 | D | Mirror rows 7-12, 4-12, then all 12 off | best: Shattered Shackle runs (rank 2 only) |
| Approval Process 2 | 3 | D | 1 offer open | best: Shattered Shackle runs |
You will notice that some Conditions appear in two or even three tiers. That is on purpose, since each rank is judged by the Heat it adds, and the third rank of Tight Deadline, for example, is a very different deal from the first one.
S tier (6 Heat)
Tight Deadline 1 costs 1 Heat and gives you 9 minutes for each region, and since unused time carries over to the next region, you end up with 36 minutes of clock time over the four regions, with the clock stopping while a menu is open, between chambers, during boss intros and during kill scenes. It does keep running in boss fights, though.
When it hits zero, you will lose 5 Health every second, and that can kill you. You will also never get a Survival chamber while it is on. Unless you play very slowly and carefully, that clock is hardly going to bother you.
Extreme Measures 1-2 costs 3 Heat for both ranks. Rank 1 only changes the Furies in Tartarus: the sister you face will have a bit more Health and backup from one or both of the others. Rank 2 will also change the Bone Hydra fight in Asphodel. You meet each of these bosses once per run, and neither fight turns into a wall (the Extreme Measures section further down goes through every boss).
Middle Management (2 Heat) is the S tier pick that might raise an eyebrow. It only changes mini-boss chambers, the tougher fights in their own rooms such as the Wretched Sneak or the Barge of Death, and you will not meet many of those in a run.
The extra foes it brings will also come without Perks, because mini-boss encounters block Benefits Package.
| Region | Mini-boss | With Middle Management |
|---|---|---|
| Tartarus | Dire Inferno-Bomber (pair) | +2 foes: Dire Inferno-Bomber, Burn-Flinger or Slam-Dancer |
| Tartarus | Doomstone | fought in a different arena |
| Tartarus | Wretched Sneak | endless Wringers until the Sneak dies |
| Asphodel | Megagorgon + Dire Skull-Crusher | Megagorgon teleports, Skull-Crusher gets an upgraded slam |
| Asphodel | Dire Spreader (4) | new radial, cone and cross attack patterns |
| Asphodel | Barge of Death | harder version, a Voidstone mini-boss joins |
| Elysium | Asterius | none, Extreme Measures 3 makes him armored |
| Elysium | Dire Soul Catcher + Exalted Shades | Soul Catchers get new attacks incl. a dash |
| Styx | Dire Satyr Cultist | +1 random Styx mini-boss |
| Styx | Dire Gigantic Vermin | +1 random Styx mini-boss |
| Styx | Dire Snakestone | +1 random Styx mini-boss |
| Styx | Dire Bother | +1 random Styx mini-boss |
The worst part is probably Styx, where most mini-bosses will get one more random Styx mini-boss as company. In Tartarus, Wringers will keep coming in the Wretched Sneak fight until the Sneak dies. The solo Asterius fight in Elysium stays exactly the same with Middle Management, as Extreme Measures 3 is what changes him.
A tier (11 Heat)
A tier is where your build starts to matter. None of these five entries is hard, but each one has a type of run that it does not suit.
Underworld Customs (2 Heat) works best for builds that have a spare Boon to give away. After the Tartarus, Asphodel and Elysium bosses, the exit will stay locked until you purge 1 Boon at the Pool of Purging, and you still get its Obols. That makes 3 purges per run and none in Styx.
The pool offers up to 3 random Olympian Boons, which means you cannot always pick the one you want to lose, and if there is nothing it can take, the door simply stays open. On a boon-starved Tartarus start, it will hurt the most. If you are unsure which Boons are worth keeping, the gods overview helps with that call.
Tight Deadline 2 costs 2 more Heat and cuts the clock to 7 minutes per region. For most builds that is still a comfortable amount of time. The exception is a slow single-target weapon together with Jury Summons 2 or 3, where the extra foes are going to eat your clock.
Convenience Fee 1-2 multiplies Obol prices by 1.4 at rank 1 and 1.8 at rank 2 (rounded) in Charon’s shop, at the Well of Charon and on chamber rewards with a price tag. I put rank 1 in A because Obols are the only thing it ever costs you.
Discounts will still work, and the Diamond or Titan Blood that the Styx shop sometimes sells should keep its normal price. Gold-hungry builds will feel it the most, and the Bone Hourglass keepsake also loses a little bit of value, because dearer Well items leave fewer purchases for it to extend.
Lasting Consequences 1-2 cuts your healing to x0.75 and then x0.50, which covers fountains, food, shop heals, chamber heals and healing Boons. It sounds worse than it plays. With the Mirror’s Chthonic Vitality at full rank (3 Health per chamber), you will still heal 2 per chamber at both ranks, and revives from Death Defiance are not reduced at all. If your runs live on food and fountains, keep it low or leave it out.
Extreme Measures 3 is the priciest A tier entry at 3 Heat. Theseus will fight you from a chariot in armor with 12,000 Health instead of 9,000, and Asterius will be armored as well, also in his solo mini-boss fight in Elysium. Ranged weapons will have the easiest time here.
B tier (18 Heat)
B tier is where cheap-looking ranks start to stack up. S and A together hold exactly 17 Heat, so every setup up to 17 Heat can skip this tier completely. Past that, you will need ranks from here, and the right ones depend on your weapon more than anywhere else.
Hard Labor 1-5 makes foes and bosses hit harder: x1.2 at rank 1, up to x2.0 at rank 5, in equal steps of 20%. Since the steps are equal, each new rank adds a smaller share on top of the damage you already take. It never touches traps or magma. That is the job of Heightened Security, and the two never affect the same hit.
Ranged weapons, Aspect of Arthur and anyone who rarely gets hit can take all 5 ranks. With Aspect of Guan Yu, I would keep it low.
Benefits Package gives Perks to armored foes, the tougher enemies with an armor bar you have to break first. A Perk is an extra trait, such as a teleport, double damage or a homing shot. At Benefits Package 1, which costs 2 Heat, most armored foes in normal encounters will get 1 Perk, and Benefits Package 2 costs 3 more Heat for 2 Perks. Bosses, mini-boss chambers and Hades’ summons will never get any.
Armored foes can also appear from the first chambers of every region while it is on, which is why you will feel even rank 1 early in Tartarus.
| Perk | What it does | Where |
|---|---|---|
| Shifter | teleports to a random spawn point every 5.5-9 s | all regions |
| Bruiser | Health x1.5, armor scales with it | all regions |
| Slugger | its attacks deal double damage | all regions |
| Savior | when it dies, nearby foes gain 1 Hit Shield | all regions |
| Speeder | +50% speed, adds to Forced Overtime | all regions |
| Puller | pulls you toward it | all regions |
| Linker | links to other foes with beams | all regions |
| Cloner | creates copies of itself that vanish when it dies | Tartarus only |
| Burner | leaves magma splashes | Asphodel only |
| Seeker | its shots home in on you | ranged foes only |
| Popper | drops several eggs when it dies | Elysium armored shades only |
There are 11 Perks, and every run rules out 2 of them at random. Some are tied to a region: Cloner only appears in Tartarus, Burner only in Asphodel (after your first win over the Furies), and Popper only on Elysium’s armored Strongbow, Longspear, Greatshield and Brightsword shades. Seeker only goes on ranged foes.
Builds with good area damage will handle both ranks well. Rank 2 will get ugly in a setup that also runs Jury Summons 2 or 3, or Forced Overtime 2, and for reference, a Speeder with Forced Overtime 2 runs at 1.9 times its normal speed.
Damage Control 1-2 gives every foe 1 Hit Shield per rank when it spawns, bosses and mini-bosses included. A Hit Shield makes a foe ignore one hit completely. On a boss, that only blocks the first 1 or 2 hits of the whole fight, which is why it mostly hurts against packs of small foes.
Slow, heavy hitters and charged attacks will suffer the most (Aspect of Arthur, Aspect of Hestia). Fast multi-hit weapons and on-hit effects barely notice it, which makes it one of the easier picks for Aspect of Chiron, Aspect of Zeus, fast Twin Fists and the Adamant Rail outside of Hestia.
Jury Summons 1-3 will put more foes into each wave of a normal encounter. The number of waves will stay the same, and only rank 3 lets one more foe stand on screen at the same time, which means that at ranks 1 and 2 the extra foes mostly arrive as earlier ones die. Area damage builds will hardly mind. Aspect of Chiron and other slow single-target weapons will, and so will anyone who runs Tight Deadline 3.
Forced Overtime 1 is 3 Heat in a single rank. It speeds up the whole foe by 20%, which covers movement, attacks, wind-ups and the pauses between attacks, but it adds no damage. Fast weapons will cope fine with it, while charge-up attacks such as Aspect of Chiron, Aspect of Arthur or Aspect of Rama will lose a good part of their safe windows.
C tier (13 Heat)
C tier is Heat you take with a plan.
Calisthenics Program 1 costs only 1 Heat, but it gives every foe, bosses and mini-bosses included, 15% more Health and armor, and every room and every boss will take longer as a result. I split this Condition on purpose: rank 1 sits in C, rank 2 in D. Hell Mode forces rank 1 anyway, and with a high-damage build and no Tight Deadline it is fairly harmless. Next to Tight Deadline 2 or 3, though, it adds up fast.
Lasting Consequences 3-4 drops your healing to x0.25 and then to nothing, and Chthonic Vitality falls to 1 Health per chamber at rank 3 and to 0 at rank 4. What still works are revives. Death Defiance and Stubborn Defiance are not reduced, and Stubborn Defiance brings you back with 30% of your Health once per chamber.
That turns rank 4 into a plan built around Stubborn Defiance instead of Death Defiance (the two share one Mirror row, and you only get one of them). Healing from Aspect of Guan Yu’s spin and from Quick Recovery should keep working too. Beware that Routine Inspection 4 switches off that Mirror row, which rules out the two together.
Tight Deadline 3 gives you 5 minutes per region for 3 more Heat. Fast clears without Jury Summons can live with it, while slow weapons, Jury Summons and Calisthenics Program will all eat into that clock.
Approval Process 1 (2 Heat) will block one of the three offers at random whenever you pick an Olympian Boon, a Hermes Boon, a Chaos Boon or a Daedalus Hammer. Charon’s shop, the Well of Charon and the Pool of Purging will keep all their items.
It suits builds that run Fated Persuasion. Mind that Routine Inspection 1 switches Fated Persuasion off, so the two do not mix. If your build needs one specific Boon, stay away from it.
Forced Overtime 2 pushes foe speed to +40% in total. Megaera even has a line for it (“Never took you for the Forced Overtime type. That’s not a Pact condition for the faint of heart.”), and she has a point. Fast weapons with crowd control can handle it, but charge-up weapons should leave it alone, and it is a bad match with Benefits Package 2 in the same setup.
Routine Inspection 1 costs 2 Heat and switches off the bottom 3 Mirror of Night talents, whichever side you picked: Fated Authority or Fated Persuasion, Gods’ Pride or Gods’ Legacy, and Olympian Favor or Dark Foresight. Rarity and reroll builds will lose the most here, while Shattered Shackle runs get away with it more easily.
D tier (15 Heat)
These five entries are the last Heat I would add. Each of them either costs a lot for a single change or punishes one mistake far harder than the rest of the Pact.
- Extreme Measures 4 costs 4 Heat for the Hades fight alone. He gets a third phase, more Health and tougher summons, and you need the Extremer Measures item before the rank even opens.
- Calisthenics Program 2 raises foe Health and armor to +30% in total, in every room of the run.
- Heightened Security costs only 1 Heat, but trap and magma hits deal 5 times their damage. A 5-damage spike trap hits for 25, and a 30-damage Styx axe for 150. The urns in the Hades fight most likely count as traps too.
- Routine Inspection 2-4 switches off 6, 9 and then all 12 Mirror rows from the bottom, for 2 Heat per rank. Rank 4 even takes your Death Defiance row away.
- Approval Process 2 leaves you with a single offer for 3 more Heat. Your build turns into whatever the gods hand you.
The only setup on this page that touches D tier is the Shattered Shackle 32, which takes Routine Inspection 2 and Approval Process 2 because a run with no Boons on Attack, Special or Cast barely feels them. Outside of that, D tier is Heat for bragging rights. The Harsh Conditions prophecy (a cleared escape with each Condition at some point, at any rank) only needs one of these five, Heightened Security, because a lower rank of the other four counts too.
Cost per rank
Most Conditions charge the same Heat for every rank. Four of them get pricier as you go up: Extreme Measures (1, 2, 3 and 4 Heat), Tight Deadline (1, 2 and 3), Benefits Package (2 and 3) and Approval Process (2 and 3). That is a big part of why the top ranks of Extreme Measures, Tight Deadline and Approval Process sit in lower tiers than their first ranks.
| Condition | Ranks | Heat per rank | Max Heat | Effect per rank |
|---|---|---|---|---|
| Hard Labor | 5 | 1, 1, 1, 1, 1 | 5 | +20% foe damage per rank |
| Lasting Consequences | 4 | 1, 1, 1, 1 | 4 | -25% healing per rank |
| Convenience Fee | 2 | 1, 1 | 2 | +40% prices per rank |
| Jury Summons | 3 | 1, 1, 1 | 3 | +20% encounter budget per rank |
| Extreme Measures | 4 | 1, 2, 3, 4 | 10 | one more region’s bosses per rank |
| Calisthenics Program | 2 | 1, 1 | 2 | +15% foe Health per rank |
| Benefits Package | 2 | 2, 3 | 5 | 1 Perk, then 2 Perks |
| Middle Management | 1 | 2 | 2 | extra foe or harder version in mini-boss chambers |
| Underworld Customs | 1 | 2 | 2 | exit locked until 1 Boon is purged |
| Forced Overtime | 2 | 3, 3 | 6 | +20% foe speed per rank |
| Heightened Security | 1 | 1 | 1 | trap and magma damage x5 |
| Routine Inspection | 4 | 2, 2, 2, 2 | 8 | 3 Mirror talents off per rank |
| Damage Control | 2 | 1, 1 | 2 | 1 Hit Shield per rank |
| Approval Process | 2 | 2, 3 | 5 | 1 fewer choice per rank |
| Tight Deadline | 3 | 1, 2, 3 | 6 | 9, 7 or 5 minutes per region |
| Personal Liability | 1 | 1 | 1 | Hell Mode only, forced at rank 1 |
| All 15 Conditions | 38 | 63 (64 in Hell Mode) |
Two gates are easy to miss. Extreme Measures is not even on the Pact until you have met Alecto and Tisiphone, and its rank 4 also needs the Extremer Measures item, which is the only Pact Stipulation in the game (no other Condition has a rank that needs an item). Routine Inspection stays hidden until every locked set in your Mirror of Night is unlocked.
Setups for 8 to 32 Heat
Every setup here is counted rank by rank, and each one starts from the cheapest tiers. They also build on each other: the 16 keeps everything from the 8, the 20 keeps the 16, and the main 32 keeps the 20.
| Condition | 8 | 16 | 20 | 32 | 32 Shackle |
|---|---|---|---|---|---|
| Hard Labor | off | off | 1 | 5 | 2 |
| Lasting Consequences | off | 1 | 2 | 2 | 2 |
| Convenience Fee | off | 2 | 2 | 2 | 2 |
| Jury Summons | off | off | off | 2 | 2 |
| Extreme Measures | 2 | 3 | 3 | 3 | 3 |
| Benefits Package | off | off | 1 | 2 | 2 |
| Middle Management | 1 | 1 | 1 | 1 | 1 |
| Underworld Customs | 1 | 1 | 1 | 1 | 1 |
| Forced Overtime | off | off | off | 1 | off |
| Routine Inspection | off | off | off | off | 2 |
| Approval Process | off | off | off | off | 2 |
| Tight Deadline | 1 | 2 | 2 | 2 | off |
| Total Heat | 8 | 16 | 20 | 32 | 32 |
8 Heat
The first setup uses free Heat only: Extreme Measures 2, Tight Deadline 1, Middle Management and Underworld Customs. That is every S tier rank plus Underworld Customs, and once you have 5 cleared runs, it is also enough for Skelly’s first statue.
On a fresh save, Extreme Measures may still be hidden because you have not met Alecto and Tisiphone yet. In that case, take Lasting Consequences 1, Convenience Fee 1 and Jury Summons 1 instead of Extreme Measures 2, which also adds up to 3 Heat.
16 Heat
For 16 Heat, raise Extreme Measures to 3 and Tight Deadline to 2, and add Convenience Fee 2 and Lasting Consequences 1. Everything is still S or A tier. The hardest new part will be the armored pair in Elysium, plus the shorter clock if your weapon is slow. A clear here will also earn you Skelly’s second statue.
20 Heat
20 Heat is the last level that pays a bounty (25 in Hell Mode). The setup takes every S and A rank (17 Heat, with Lasting Consequences at 2) and adds Benefits Package 1 and Hard Labor 1.
Since more Heat than your next bounty level simply counts as that level, you can also run this setup on a weapon that is still low on its track and collect one level per clear. Personally, I would get each of the six weapons to 20 this way before thinking about 32.
32 Heat
The main 32 setup keeps all S and A ranks and adds Benefits Package 2, Hard Labor 5, Forced Overtime 1 and Jury Summons 2. It leaves out Damage Control, Forced Overtime 2, Tight Deadline 3 and Extreme Measures 4 on purpose. With a fast weapon, you can swap Hard Labor 5 for Hard Labor 3 plus Damage Control 2, which costs the same 5 Heat.
The Shattered Shackle 32 is built around that keepsake and takes Hard Labor 2, Lasting Consequences 2, Convenience Fee 2, Jury Summons 2, Extreme Measures 3, Benefits Package 2, Middle Management, Underworld Customs, Routine Inspection 2 and Approval Process 2. It is only cheap when you take no Boons on Attack, Special or Cast, and Routine Inspection needs every locked Mirror set unlocked. Underworld Customs hurts a little bit more in this run, since each purge eats one of your few Boons.
A third way to 32 replaces Lasting Consequences 2, Tight Deadline 2, Forced Overtime 1 and Jury Summons 2 with Lasting Consequences 4 and Tight Deadline 3. That plan is built around Stubborn Defiance as your heal.
No weapon is locked out of 32 Heat. Slow and charge-up weapons simply have a harder time with Forced Overtime, Damage Control and Jury Summons next to a tight clock. For the Boons that go with each weapon, there is a build for each weapon in a separate post.
Rewards for Heat
Bounties are the real reason to climb, and they follow a strict rule. Every weapon has its own bounty track, six in total, and all aspects of a weapon share one. Each Heat level from 0 to 20 pays once per boss: Titan Blood for the Furies, a Diamond for the Bone Hydra, Ambrosia for Theseus and Asterius, and Titan Blood again for Hades.
| Boss or rule | Reward | Rule |
|---|---|---|
| Furies (Tartarus) | 1 Titan Blood | once per Heat level per weapon |
| Bone Hydra (Asphodel) | 1 Diamond | once per Heat level per weapon |
| Theseus and Asterius (Elysium) | 1 Ambrosia | once per Heat level per weapon |
| Hades (Styx) | 1 Titan Blood | once per Heat level per weapon |
| 0 Heat set | 4 per weapon | only at exactly 0 Heat |
| Cap | 21 levels either way | 0 to 20 Heat, 5 to 25 in Hell Mode |
| Per weapon | 84 bounties: 42 Titan Blood, 21 Diamonds, 21 Ambrosia | 21 levels x 4 bosses, aspects share one track |
| All 6 weapons | 252 Titan Blood, 126 Diamonds, 126 Ambrosia | 6 x 84 bounties |
Only the next unclaimed level pays. The game takes the lowest record of the four bosses and adds 1, which means 32 Heat on a weapon at level 5 still pays level 5. More Heat never pays more and never skips a level.
A partial run is not wasted, though. Each boss you beat will bank its bounty for that level, and the level will only go up once all four have paid. The 0-Heat set is separate and only pays at exactly 0 Heat.
Over 21 levels, that makes 84 bounties per weapon (42 Titan Blood, 21 Diamonds and 21 Ambrosia), or 252 Titan Blood, 126 Diamonds and 126 Ambrosia over all six weapons. The prophecies add 43 more Titan Blood, and the Styx shop sometimes sells one.
Once a weapon is done, the Pact screen will tell you in its own way: “Bounty limit reached! Thank you for suffering.”
Skelly’s statues
Skelly gives you three statues for a cleared run at 8, 16 and 32 total Heat. Any weapon and any save mode counts, and they will show up after 5 cleared runs. They read the total Heat of the run you cleared, which makes them separate from bounties.
You also do not need three different clears, because one clear at 32 is enough if you talk to the statues in order and collect them one after the other. They give no resources themselves. You get the statue itself and, for the first two, an achievement: The Useless Trinket at 8 Heat and Skelly’s Last Lamentations at 16. Collecting the first statue also fulfills the prophecy of the same name in the Fated List, which pays 5 Diamonds. The 32 statue comes with no achievement at all.
Erebus gates
An Erebus gate is a Heat-locked extra door that can appear in a chamber once you have bought “Gateways, Erebus” from the House Contractor. It will only open when your total Heat is at least 5 in Tartarus, 10 in Asphodel and 15 in Elysium. Styx has none.
Clear the chamber behind it without getting hit, and you will get the full reward plus the Hold the Onions achievement. A single hit will turn the reward into a consolation prize.
Achievements
No achievement asks for 32 Heat, or for anything above 16. Champion of Elysium needs Extreme Measures 3 or 4 against Theseus and Asterius, at least 6 Heat in total.
Harsh Conditions is a prophecy with its own achievement. It wants a cleared escape with each of the 15 Conditions at least once, at any rank and spread over as many runs as you like, and it pays 15 Titan Blood (Personal Liability does not count for it). Slashed Benefits asks you to kill foes with each Benefits Package Perk and pays 450 Gems. It becomes available once you have a cleared run and a bounty level of at least 1.
Extreme Measures bosses
Extreme Measures is the only Condition that rewrites boss fights. It works region by region, Tartarus first, and each rank adds the next boss.
| Rank | Heat | Boss | What changes |
|---|---|---|---|
| 1 | 1 (1 total) | Megaera, Alecto or Tisiphone | more Health, sisters join as support |
| 2 | 2 (3 total) | Bone Hydra | its fight changes to the Pact version |
| 3 | 3 (6 total) | Theseus and Asterius | armored, Theseus 12,000 Health on a chariot |
| 4 | 4 (10 total) | Hades | third phase, 22,000 Health, tougher summons |
The first two ranks are mild, while rank 3 is the real step up, because the armored Theseus on his chariot and the armored Asterius both come with more Health, and you will meet the armored Asterius again in his solo mini-boss fight. Beating the pair at rank 3 or 4 earns you Champion of Elysium.
Rank 4 changes Hades, who will get a third phase, 22,000 Health instead of 17,000 and tougher summons. In order to use it, you have to buy Extremer Measures from the House Contractor for 100 Gems, and that item only appears after the story ending. For 4 Heat, that is a lot of extra fight at the very end of the run, which is why I keep it in D.
Hell Mode rules
You choose Hell Mode when you create the save, and you cannot change it later. It forces Hard Labor 1, Lasting Consequences 1, Jury Summons 1, Calisthenics Program 1 and Personal Liability into every run, which means you start each escape at 5 Heat. The Pact is open from your first run, and the maximum will go up to 64 Heat.
Personal Liability is the extra Condition. It costs 1 Heat, you cannot switch it off, and it removes the short invulnerability you normally get after taking a burst of damage. As a result, packs of fast foes can chain their hits on you. Since you can neither pick nor drop it, it gets no tier.
Bounties in Hell Mode run from 5 to 25 Heat instead of 0 to 20. That is still 21 levels, just without a 0-Heat set. There are no bonus resources for playing Hell Mode, but Skelly’s statues do count Hell Mode clears.
Pact questions
What are the easiest pacts in Hades?
The easiest ones are everything in S and A tier: Extreme Measures up to rank 3, the first two ranks of Tight Deadline and Lasting Consequences, Middle Management, Underworld Customs and Convenience Fee. Together they are worth 17 Heat, and they work on bosses, mini-boss rooms, prices, healing, Boons and the clock.
What is the point of the Pact of Punishment?
The Pact is the way the game pays you for harder runs. Raising Heat earns you bounties of Titan Blood, Diamonds and Ambrosia, Skelly’s statues and access to Erebus gates. It is also the game’s own way to make Hades harder once a normal escape starts to feel easy.
Which Pact of Punishment condition is best?
There is no single best Condition for every weapon. Per point of Heat, Extreme Measures 1-2, Tight Deadline 1 and Middle Management give you the most for the least trouble. Past those three, it depends on your aspect, as Damage Control is easy on fast multi-hit weapons, while Hard Labor suits ranged weapons and careful players.
Is 32 Heat hard?
It is a real step up from 20. S and A tier only hold 17 Heat, which forces a 32 setup below A tier, as the main setup does with Hard Labor 5 and Benefits Package 2. No achievement and no bounty asks for it, and the reward is Skelly’s third statue. If you want to try it, take a weapon and aspect you are comfortable with, and the weapon tier list will help with that choice.
What is the max Heat in Hades?
With every rank switched on, the Pact reaches 63 Heat, or 64 in Hell Mode. Nothing rewards you past 32, where the last statue sits, and anything above that is purely for the challenge.
Raising Heat step by step
The easiest way up is slow and steady. Add one or two cheap ranks after every clear, starting with S tier, and move on to A tier once those feel normal.
Make sure to spread your runs over all six weapons. Every weapon has its own bounty track up to 20 Heat, and a weapon you have not touched yet will pay its low levels even inside your usual setup. That is where most of your Titan Blood, Diamonds and Ambrosia are going to come from.
Once every weapon has reached 20 and collected its 0-Heat set, the bounty side of the Pact is done. Additionally, your 20 Heat clears already cover the first two statues. If you only want the rewards, stopping there is perfectly fine. If you enjoy the challenge, then 32 with the main setup above is the next goal, and I would start it with the weapon you trust the most.