This guide aims to be a resource for new players to find quick references while playing the game. Looking for the way resources work? Or what chambers there are in the game? Perhaps you want to find out what boon works best with what weapon. Check the table of contents for more information.
Beware that this guide is only for the first Hades from 2020. Hades II is a separate game and is not covered here. Most of the reference lists below were written for Early Access Patch 044, while the Mirror of Night numbers were read from the scripts of the final Steam version (the July 2021 post-launch patch, build 10929685) in November 2026.
If you came here for one Mirror of Night choice, such as Privileged Status or Family Favorite, you will find all twelve pairs with their exact numbers under Mirror of Night Talents Compared.
Currency Artifacts

Darkness
Used to upgrade Abilities (at the Mirror Of Night) that provide passive bonuses.
Chamber Rewards
- 10 Darkness (or 25 Darkness from skull chambers)
- +5 maximum health (from Pitch-Black Darkness work order)
- For comparison, 25 Darkness cost 25 Obols in Charon’s shop and a Centaur Heart (+25 maximum health) costs 125 Obols.

Gemstones
Used to complete Work Orders (at the House Contractor) that add helpful features in the chambers, such as fountains and troves. Also used for cosmetic additions to the House of Hades.
Chamber Rewards
- 5 Gemstones (or 10 Gemstones from skull chambers)
- 20 Obols (from Brilliant Gemstones work order)
- For comparison, 20 Gemstones cost 75 Obols in Charon’s shop.

Chthonic Key
Used to permanently unlock Weapons and to permanently unlock additional Abilities (at the Mirror of Night).
Chamber Rewards
- 1 Chthonic Key (or 2 Chthonic Keys from skull chambers)
- 1 Dice (from Fated Keys work order)
- For comparison, 1 Chthonic Key costs 50 Obols in Charon’s shop.

Nectar
Used to permanently unlock Keepsakes (by gifting to characters) and increase your bond with characters. Each character (with a few exceptions) offers one keepsake. The Codex tracks your progress with each character.
Chamber Rewards
- 1 Nectar (or 2 Nectars from skull chambers)
- +1 level to random boon (from Vintage Nectar work order)
- For comparison, 1 Nectar costs 200 Obols in Charon’s shop and 1 Pom Slice (+1 level to random boon) costs 50 Obols.
Other Artifacts

Daedalus Hammer
Used to modify your weapon, sometimes drastically.
- In general, get these whenever they are available since they will largely influence your boon choices. However, if you pass on one, it’s possible to find others later.
- You can acquire a maximum of 3 Daedalus Hammers per escape attempt. No more than 2 can be acquired before Styx.
- Daedalus Hammer costs 200 Obols in Charon’s shop.

Charon’s Obol
Used to purchase artifacts, health, and boons at Charon’s Shop, and to purchase instant and temporary buffs at Well of Charon.
Chamber Rewards
- 100 Obols (or 200 Obols from skull chambers)

Pom of Power
Used to increase the level of a boon.
Chamber Rewards
- +1 level to a boon (or +2 levels to a boon from skull chambers)
- For comparison, a 1-level Pom of Power costs 100 Obols in Charon’s shop and 2-level Pom of Power costs 300 Obols.

Centaur Heart
Used to increase your maximum health.
Chamber Rewards
- +25 maximum health (or +50 maximum health from skull chambers)
- For comparison, a Centaur Heart costs 125 Obols in Charon’s shop.
Olympian Boons


Aphrodite
Inflicts Weak (victim deals less damage).
Large damage increase for Attack and Special.
Notable Boons
- Heartbreak Strike: Attack inflicts Weak and has a large damage increase
- Heartbreak Flourish: Special inflicts Weak and has a large damage increase
- Aphrodite’s Aid: Call inflicts Charm (victim turns against other enemies) and, when fully charged, large spike of damage

Ares
Inflicts Doom (delayed burst of damage, not stackable)
Creates Blade Rifts (area damage over time)
Notable Boons
- Curse of Agony: Attack inflicts Doom
- Curse of Pain: Special inflicts Doom
- Blade Dash: Blade Rift is created at the beginning of a Dash

Artemis
Chance for Critical damage, which can also inflict Marked (higher chance of taking critical damage)
Large DPS increase for Attack and Special
Notable Boons
- Deadly Strike: Attack has a chance to deal Critical damage and has a large DPS increase
- Deadly Flourish: Special has a chance to deal Critical damage and has a large DPS increase
- Artemis’ Aid: Call inflicts a large spike of damage
- Hunter’s Mark: Critical damage also inflicts Marked on another enemy
- Support Fire: Fires a seeking arrow after hitting with Attack, hitting with Special, or Casting

Athena
Deflect projectiles, which can also inflict Exposed (bonus backstab damage)
Resist damage
Notable Boons
- Divine Dash: Dash can Deflect
- Blinding Flash: Abilities that can Deflect also inflict Exposed (Combos extremely well with Divine Dash)
- Deathless/Last Stand: Replenishes 1 Death Defiance

Demeter
Inflicts Chill (slows victim, stackable status effect)
Moderate damage increase for Attack and Special
Notable Boons
- Frost Strike: Attack inflicts Chill and has a moderate damage increase
- Frost Flourish: Special inflicts Chill and has a moderate damage increase
- Rare Crop: Some of your boons become common and then gain rarity every 3 encounters

Dionysus
Inflicts Hangover (damage over time, stackable status effect)
Conditionally restores health
Notable Boons
- Drunken Strike: Attack inflicts Hangover
- Drunken Flourish: Special inflicts Hangover
- Trippy Shot: Cast sends out Festive Fog (area that repeatedly stuns enemies inside)

Hermes
Enhance Speed of movement and abilities
Notable Boons
- Hyper Sprint: After Dashing, you run very fast for a short period of time
- Greatest Reflex: You can Dash more times in a row
- Side Hustle: Gain Obols at each chamber
- Maximum 3 boons from Hermes
- No Duo boons

Poseidon
Adds Knock-away to abilities, which can also inflict Ruptured (damage while moving or knocked away)
Moderate damage increase for Attack and Special
Notable Boons
- Tempest Strike: Attack knocks enemies away and has a moderate damage increase
- Tempest Flourish: Special knocks enemies away and has a moderate damage increase
- Typhoon’s Fury: Deals more damage when slamming enemies into barriers
- Razor Shoals: Knock-away effects also inflict Rupture

Zeus
Adds Lightning (area damage) to abilities, which can also inflict Jolted (self-inflicted area damage on next attack)
Notable Boons
- Tempest Strike: Attack also deals Chain-Lightning
- Tempest Flourish: Special also deals Lighting Bolt
- Static Discharge: Lightning effects also inflict Jolted
Chambers

Charon’s Shop
Purchase items from Charon’s shop, which includes artifacts, health, and boons. Enemies do not appear here (i.e. this is a non-encounter chamber).
Offerings
- 25 Obols: 25 Darkness
- 50 Obols: Chthonic Key
- 50 Obols: Restore 50 Health
- 50 Obols: Pom Slice
- 75 Obols: 20 Gemstones
- 100 Obols: Pom of Power
- 125 Obols: Centaur Heart
- 125 Obols: Random God Boon
- 150 Obols: God Boon
- 200 Obols: Nectar
- 200 Obols: Daedalus Hammer

God Boon
Gain a boon from a god, which enhances abilities and provides passive bonuses
Chamber Rewards
- Boon (increased rarity at skull chambers)
- For comparison, a God boon costs 150 Obols in Charon’s shop.
Hermes
- Hermes is treated a bit differently from the other gods.
- You can have a maximum of 3 boons from Hermes.
- Hermes does not inflict any status curses.
- Hermes does not have any Duo boons.
- It’s possible to find Hermes before triggering one of the other God’s keepsake since Hermes is not considered a God Boon in that regard.

Trial of the Gods
Gain a boon from each of the two gods
In this chamber, you gain a boon from the god that you choose first. Then you will have an encounter with an extra environmental hazard based on the second god. After the encounter, you can claim a boon from the second god.
Environmental hazards, ordered from hardest to easiest to deal with:
- Aphrodite: A projectile aims for you, stunning and dealing damage
- Poseidon: Waves spawn and aim for you, dealing damage
- Artemis: Circles on the ground spawn and follow you, dealing damage
- Zeus: Circles on the ground spawn, dealing damage
- Dionysus: Circles on the ground spawn, dealing damage over time
- Ares: Circles on the ground spawn, dealing damage
- Demeter: Circles on the ground spawn and grow slowly, slowing and dealing damage
- Athena: Grants enemies invulnerability

NPC
Chamber Rewards (choose one)
Tartarus: Sisyphus
- Restores 42 health
- 30 Darkness
- 100 Obols
Asphodel: Eurydice
- Upgrade rarity of 2 random boons of yours
- Upgrade level of 4 random boons of yours
- Upgrade rarity of the next 3 boons you acquire
Elysium: Patroclus
- Replenish all Death Defiances
- Restore 50% more health from Stubborn Defiance (for the next 15 encounters)
- Restore 30% health per chamber for the next 5 chambers
- Attack +60% damage for the next 10 encounters

Chaos
Gain a boon after a temporary curse expires
When is it safe to visit Chaos?
The list below tells you which chambers are safe to enter the Chaos gate such that you will not be cursed for the boss fight. It assumes that you will have an encounter every chamber after the Chaos chamber. If you want to be safer, assume that you will have one non-encounter chamber (e.g. Charon’s shop, NPC, etc) and adjust the numbers accordingly.
- From Chamber 1-6, enter Chaos Gate and get 5-encounter (or less) curse
- From Chamber 7, enter Chaos Gate and get 4-encounter (or less) curse
- From Chamber 8, enter Chaos Gate and get 3-encounter Curse
- At Chamber 12, safe to get Light of Ixion (spawns Chaos Gate at next opportunity) from Well of Charon.
- Chamber 14: Tartarus boss (Furies)
- From Chamber 16, enter Chaos Gate and get 5-encounter (or less) curse
- From Chamber 17, enter Chaos Gate and get 4-encounter (or less) curse
- From Chamber 18, enter Chaos Gate and get 3-encounter curse
- At Chamber 22, safe to get Light of Ixion (spawns Chaos Gate at next opportunity) from Well of Charon.
- Chamber 24: Asphodel boss (Hydra)
- From Chamber 26-28, enter Chaos Gate and get 5-encounter (or less) curse
- From Chamber 29, enter Chaos Gate and get 4-encounter (or less) curse
- From Chamber 30, enter Chaos Gate and get 3-encounter curse
- Chamber 36: Elysium boss (Heroes)
Weapons
Recommended Boons


Stygian Blade (Stygius)
A balanced melee weapon with good DPS and area damage.
Recommended Boons
- Artemis: passive Attack damage and Special damage increase — plus criticals — to multiply the large base damage
- Athena: Deflect and Expose for backstab damage
- Aphrodite: passive Attack damage and Special damage increase
- Avoid Poseidon (for knock-away effects)

Heart-Seeking Bow (Coronacht)
Long-range weapon with low DPS.
Surprisingly, the bow can be much more effective in short range. The Special can hit an enemy multiples times in close range and deal a large amount of damage.
Recommended Boons
- Ares: reapply Doom with the slower attack speed
- Demeter: Chill for easier kiting
- Poseidon: Knock-away for more distance/time

Shield of Chaos (Aegis)
Melee weapon with low DPS and the ability to block.
Recommended Boons
- Ares: reapply Doom with the slower attack speed
- Hermes: movement speed and positioning is important to get the extra collision damage
- Poseidon: Knock-away works well with the shield’s passive knock-away

Eternal Spear (Varatha)
Melee weapon with good DPS and range
Recommended Boons
- Artemis: passive Attack damage and Special damage increase — plus criticals — to multiply the large base damage
- Aphrodite: passive Attack damage and Special damage increase; can spread Weak easily with Spin Attack
- Dionysus: can spread Hangover easily

Twin Fists (Malphon)
Risky close-quarters melee weapon with high DPS
Recommended Boons
- Hermes: movement speed and positioning is important due to the short range
- Athena: Deflect and Expose for backstab damage
- Zeus: lightning from rapid attack speed and dashes
- Avoid Poseidon (for knock-away effects)

Adamant Rail (Exagryph)
Medium-range weapon with good DPS and area damage, and is more difficult to use. You may want to disable aim assist with the rail.
Recommended Boons
- Zeus: lightning from rapid attack speed
- Demeter: quick stacks of Chill and for easier kiting
- Dionysus: quick stacks of Hangover
- Avoid Poseidon (for knock-away effects)
Keepsakes

Keepsakes provide a passive buff for Zagreus while equipped. One keepsake can be equipped at a time. You can equip a keepsake in the weapons room. Your currently equipped keepsake is shown in the Boon Info overlay, last boon in the left column. The Keepsake Collection work order (at the House Contractor) allows you to switch keepsakes between Underworld regions.
Recommendations
- Old Spike Collar from Cerberus: Increase maximum health
- Chthonic Coin Purse from Hypnos: Instantly receive Obol. Since there is no passive benefit, swap to another keepsake at the next opportunity.
- Lucky Tooth from Skelly: Revive after taking fatal damage (once per escape attempt). This activates only if there are no more Death/Stubborn Defiances.
- Broken Spearpoint from Patroclus: Gain temporary invulnerability after taking damage.
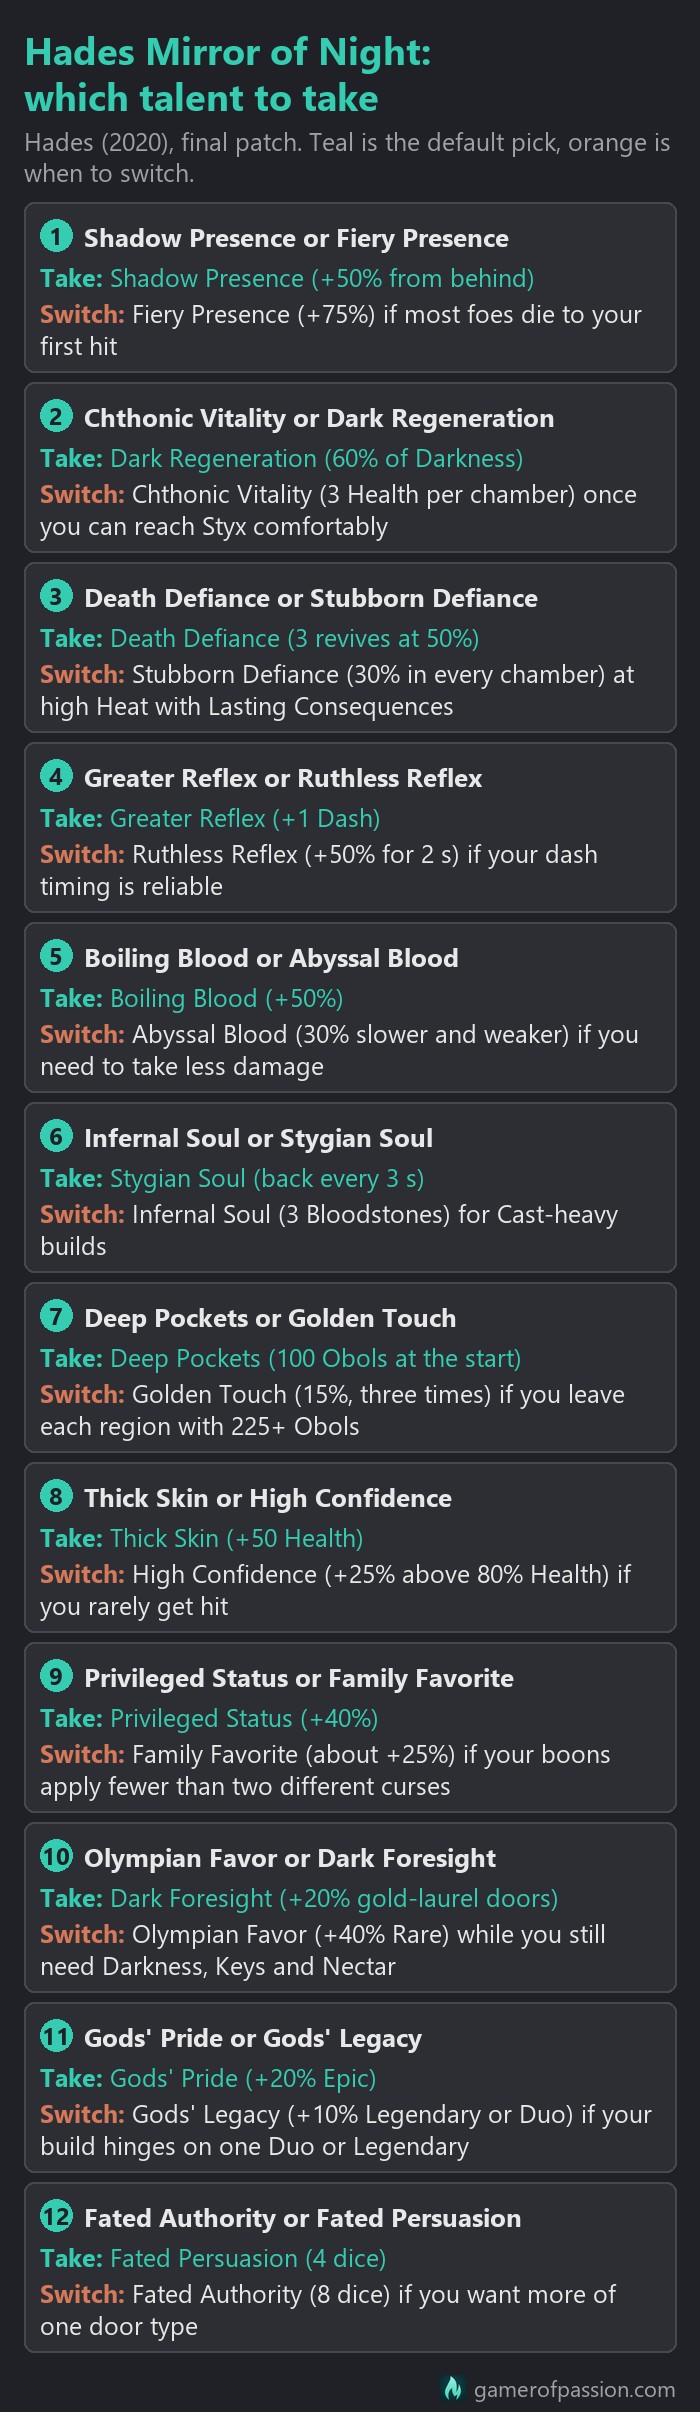
Mirror of Night Talents Compared
The Mirror of Night in Zagreus’ room turns your Darkness into permanent talents. It has twelve rows, and each row holds two talents, of which only one can be active at a time.
Nyx will offer you the second talent of every row once you have collected 300 Darkness in total. From then on, you can swap sides for free whenever you stand at the Mirror, and the ranks you bought on either side will stay where they are.
The first four rows are open from the start. The other eight open two rows at a time for 5, 10, 20 and 30 Chthonic Keys, which adds up to 65 keys for the whole Mirror. Every purchase of a talent is one rank. If you ever want your Darkness back, the Reset Talents button refunds everything you spent on talents for a single Chthonic Key.
| Row | First talent | Second talent | Which to take |
|---|---|---|---|
| 1 open | Shadow Presence Each rank gives +10% Attack and Special damage from behind Up to +50% with 5 ranks, 100 Darkness | Fiery Presence Each rank gives +15% Attack and Special damage vs untouched foes Up to +75% with 5 ranks, 100 Darkness | Shadow Presence, or Fiery Presence if most foes die to your first hit |
| 2 open | Chthonic Vitality Each rank heals 1 Health whenever you leave a chamber Up to 3 Health per chamber with 3 ranks, 70 Darkness | Dark Regeneration Each rank turns 30% of collected Darkness into Health Up to 60% with 2 ranks, 90 Darkness | Dark Regeneration, or Chthonic Vitality once you can reach Styx comfortably |
| 3 open | Death Defiance Each rank gives 1 revive at 50% Health per escape Up to 3 revives with 3 ranks, 1,530 Darkness | Stubborn Defiance 1 revive at 30% Health in every chamber 1 rank for 600 Darkness | Death Defiance, or Stubborn Defiance at high Heat with Lasting Consequences |
| 4 open | Greater Reflex +1 Dash in a row 1 rank for 50 Darkness | Ruthless Reflex +50% damage and 50% dodge chance for 2 s after a Dash just before a hit 1 rank for 75 Darkness | Greater Reflex, or Ruthless Reflex if your dash timing is reliable |
| 5 5 keys | Boiling Blood Each rank gives +10% Attack and Special damage vs foes with a Bloodstone in them Up to +50% with 5 ranks, 250 Darkness | Abyssal Blood Each rank makes foes with a Bloodstone in them 6% slower and 6% weaker Up to 30% slower and weaker with 5 ranks, 300 Darkness | Boiling Blood, or Abyssal Blood if you need to take less damage |
| 6 5 keys | Infernal Soul Each rank gives +1 Bloodstone (you start with 1) Up to 3 Bloodstones with 2 ranks, 100 Darkness | Stygian Soul Bloodstones come back by themselves, every 4 s at rank 1 Up to a 3 s refill with 2 ranks, 180 Darkness | Stygian Soul, or Infernal Soul for Cast-heavy builds |
| 7 10 keys | Deep Pockets Each rank gives +10 Obols at the start of each escape Up to 100 Obols with 10 ranks, 525 Darkness | Golden Touch Each rank gives +5% of your Obols when you clear Tartarus, Asphodel and Elysium Up to 15%, three times, with 3 ranks, 270 Darkness | Deep Pockets, or Golden Touch if you leave each region with 225+ Obols |
| 8 10 keys | Thick Skin Each rank adds +5 to your Life Total Up to +50 Health with 10 ranks, 625 Darkness | High Confidence Each rank gives +5% damage while you are above 80% Health Up to +25% with 5 ranks, 750 Darkness | Thick Skin, or High Confidence if you rarely get hit |
| 9 20 keys | Privileged Status Each rank gives +20% damage vs foes with 2 or more different curses Up to +40% with 2 ranks, 550 Darkness | Family Favorite Each rank gives +2.5% damage per Olympian whose boons you have Up to +5% per god with 2 ranks, 200 Darkness | Privileged Status, or Family Favorite if your boons apply fewer than two different curses |
| 10 20 keys | Olympian Favor Each rank gives +1% chance for a Rare boon Up to +40% with 40 ranks, 2,000 Darkness | Dark Foresight Each rank gives +2% chance for gold-laurel rewards Up to +20% with 10 ranks, 1,500 Darkness | Dark Foresight, or Olympian Favor while you still need Darkness, Keys and Nectar |
| 11 30 keys | Gods’ Pride Each rank gives +1% chance for an Epic boon Up to +20% with 20 ranks, 2,000 Darkness | Gods’ Legacy Each rank gives +1% chance for a Legendary or Duo boon Up to +10% with 10 ranks, 2,500 Darkness | Gods’ Pride, or Gods’ Legacy if your build hinges on one Duo or Legendary |
| 12 30 keys | Fated Authority Each rank gives 1 die per escape to reroll the reward behind a door Up to 8 dice with 8 ranks, 11,000 Darkness | Fated Persuasion Each rank gives 1 die per escape to reroll boon, Well and Pool of Purging choices Up to 4 dice with 4 ranks, 10,000 Darkness | Fated Persuasion, or Fated Authority if you want more of one door type |
The damage talents in the Mirror are added to most of your other damage bonuses before the total is applied. As such, a +40% talent will feel smaller on a build that already stacks +200% on its Special, because 340% of the base damage instead of 300% is only about 13% more.
The Abilities section right below goes through every row in the order of the Mirror.
Abilities
Slot #1
Shadow Presence: Bonus damage to enemies from behind
Fiery Presence: Bonus damage to undamaged enemies
Recommendation: Shadow Presence
In numbers, Shadow Presence adds 10% per rank to Attack and Special hits from behind, up to +50% at 5 ranks. Fiery Presence adds 15% per rank against foes that have not taken any damage yet, up to +75%. Both cost 100 Darkness in total.
Fiery Presence only counts while a foe is still untouched, and that usually means your first hit. Armored foes stop counting as soon as their armor takes damage. That is why Shadow Presence is the better choice for bosses and for melee weapons that can get behind their targets. Fiery Presence will pay off if most foes die to one big opening hit, as they often do against Cast builds and slow, heavy ranged attacks.
Slot #2
Chthonic Vitality: Restore 3 health per chamber
Dark Regeneration: Upon collecting Darkness, also restore health by 60% of the Darkness
Recommendation: Dark Regeneration is triggered by collecting Darkness from chamber rewards, from Charon’s shop/well, from Infernal Troves, and from Sisyphus. A large amount of Darkness is dropped from bosses if you have already defeated them once before. Dark Regeneration is a good choice for beginners especially if you are collecting a lot of Darkness to upgrade your abilities.
Dark Regeneration has almost no benefits in Styx because Darkness is only available in Well of Charon here. Once you can comfortably reach Styx, you may want to switch to Chthonic Vitality.
For reference, Chthonic Vitality heals 1 Health per rank every time you leave a chamber, up to 3 Health per chamber for 70 Darkness. Dark Regeneration turns 30% of every Darkness pickup into Health per rank, up to 60% for 90 Darkness.
A normal Darkness chamber holds 10 Darkness (6 Health), and a skull chamber holds 25 (15 Health). The Furies, the Bone Hydra and Theseus and Asterius drop 50, 100 and 150 Darkness once you have beaten them before, good for 30, 60 and 90 Health, but that heal lands right before the chamber with the healing fountain, where it matters less.
Dark Regeneration is the better pick while you still take blue-laurel Darkness doors to build up the Mirror, and that is how most beginners play. Once you can reach Styx comfortably and start taking other doors, Chthonic Vitality is the steadier choice, since it will heal you after every single chamber, Styx included.
Slot #3
Death Defiance: Revives you with 50% health (3 chances)
Stubborn Defiance: Revives you with 30% health (1 chance per chamber)
Recommendation: Death Defiance offers much more survivability. It’s important to note that Death Defiances can be replenished from Well of Charon (replenish 1 Death Defiance for 200 Obol), from some of Athena’s boons, and from Patroclus (replenish all used Death Defiances).
Death Defiance costs 30, 500 and 1,000 Darkness for its three ranks, 1,530 in total, and gives you up to three revives at 50% Health for the whole escape. Stubborn Defiance costs 600 Darkness for its single rank and only revives you at 30% Health, but it comes back in every new chamber.
The difference shows most in boss fights. With Death Defiance, you can burn all three lives in the same fight, while Stubborn Defiance will only save you once per chamber, and the fight against Hades takes place in a single chamber.
Death Defiance is the better pick for most players. At high Heat, Lasting Consequences cuts most of your healing, but not the Health a revive gives back. That turns Stubborn Defiance into a 30% safety net in every chamber, and it becomes the stronger choice. Bear in mind that the Well of Charon item that refills a Death Defiance for 200 Obols is not offered while Stubborn Defiance is active.
Slot #4
Greater Reflex: Extra dash
Ruthless Reflex: Bonus damage and dodge if you dash before getting hit
Recommendation: The extra dash from Greater Reflex allows for more mobility and more safety. Midway through a dash, you can cancel into another dash. This is very helpful when you mistakenly dash into incoming enemy attacks.
Greater Reflex costs 50 Darkness and lets you Dash one more time in a row. Ruthless Reflex costs 75 Darkness and gives you +50% damage and a 50% dodge chance for 2 seconds whenever you Dash just before a hit would land.
I would say Greater Reflex is the better default, especially with Dash boons and dash-strikes. Ruthless Reflex starts to make sense once your dash timing is reliable, or once Hermes’ Greatest Reflex has already given you extra dashes.
Slot #5
Boiling Blood: Bonus damage to enemies with bloodstone (Cast ammo) attached
Abyssal Blood: Reduces speed and damage of enemies with bloodstone (Cast ammo) attached
Recommendation: Boiling Blood
Boiling Blood adds 10% per rank to your Attack and Special damage against foes with one of your Bloodstones stuck in them, up to +50% for 250 Darkness. One Bloodstone is enough, and more of them in the same foe will not add anything. Abyssal Blood makes those foes 6% slower and 6% weaker per rank, up to 30% for 300 Darkness.
Make sure your Cast actually lodges in its target before you invest here. With some god Casts, such as Demeter’s Crystal Beam, the Bloodstone does not end up in the foe at all. If your Cast does stick, take Boiling Blood when you want foes to die faster and Abyssal Blood when you are still struggling to survive.
Slot #6
Infernal Soul: Extra bloodstones (Cast ammo)
Stygian Soul: Bloodstones (Cast ammo) instead regenerate over time
Recommendation: Stygian Soul offers more consistent usage of Cast and is in general easier to use.
You start every escape with a single Bloodstone. Infernal Soul adds one more per rank, for 3 in total at max rank and 100 Darkness. With Stygian Soul, which costs 180 Darkness for both ranks, you will never pick your Bloodstones up again, as each one comes back by itself after 4 seconds at rank 1 and 3 seconds at rank 2.
Your choice here also decides which boons can show up. Zeus’ Lightning Rod and Hermes’ Flurry Cast, Quick Reload and Greater Recall need Infernal Soul, while Hermes’ Auto Reload and Bad News need Stygian Soul.
Infernal Soul is the one for Cast-heavy builds that want a burst of three shots. For everything else, Stygian Soul is probably the easier choice.
Slot #7
Deep Pockets: Start with 100 Obols
Golden Touch: Gain 15% of your Obols when you exit a region
Recommendation: Once you find yourself exiting a region with 500 Obols or more, Golden Touch will provide significantly more wealth than Deep Pockets.
Deep Pockets gives you 10 Obols per rank at the start of every escape, so 100 Obols at max rank for 525 Darkness. Golden Touch adds 5% of the Obols you carry per rank every time you clear Tartarus, Asphodel and Elysium. At max rank, that is 15% three times per escape, for only 270 Darkness.
To beat the flat 100 Obols, Golden Touch will need about 667 Obols in total over those three region exits, or roughly 225 each time. At the 500 Obols from the recommendation above, it pays 75 Obols per region exit.
If you like to buy a boon or a Daedalus Hammer in the first Charon shops, Deep Pockets will help you more. If you would rather save up for the later shops, Golden Touch is going to pay off. Hypnos’ Chthonic Coin Purse fits an early shopping trip as well, and the Hades keepsake tier list explains when to swap it away.
Slot #8
Thick Skin: +50 maximum health
High Confidence: +25% damage when above 80% health
Recommendation: Thick Skin
Thick Skin adds 5 to your Life Total per rank. At max rank, that is +50 for 625 Darkness, which doubles the 50 Health Zagreus starts with. High Confidence adds 5% damage per rank, up to +25% for 750 Darkness, but only while your Health is above 80%.
A single big hit will switch it off until you heal again, so High Confidence asks a little bit more of you. It is a pick for players who rarely get hit, and Thick Skin is the safer choice for everyone else.
Slot #9
Privileged Status: +40% damage to enemies with at least 2 status curses
Family Favorite: +5% damage for each unique Olympian whose boons you have
Recommendation: Privileged Status. It is not too difficult to apply two status curses. See notes below. Also, Family Favorite discourages you from getting higher tier boons.
Notes about Privileged Status
- Boon Tiers: Some boons enhance others and won’t appear until you have the prerequisite(s). For example, Aphrodite’s Broken Resolve enhances the Weak status curse and this won’t appear unless you already have a boon that applies Weak. There are 3 tiers.
- Status Curses: Each god (except Hermes) offers boons that can apply a status curse. Some of the status curses are available at Tier 1 and some at Tier 2.
Best Status Curses for Privileged Status
Some of the status curses are more accessible than others, and some are easier to maintain on enemies than others.
- Chill (Demeter, Tier 1, 8s duration)
- Hangover (Dionysus, Tier 1, 4s duration)
- Weak (Aphrodite, Tier 1, 3s duration)
- Exposed (Athena, Tier 2, 5s duration)
- Doom (Ares, Tier 1, 1s duration, duration does not refresh, see note below)
- Jolt (Zeus, Tier 2, 10s duration, expires when enemy attacks, see note below)
- Ruptured (Poseidon, Tier 2, 3s duration)
- Marked (Artemis, Tier 2, 2.5s duration, expires when enemy takes critical damage)
- When the conditions are met, the enemy is marked with a Punished icon next to their health bar.
- Attacks, Specials, and Casts inflict damage before they apply any status curses. For example, when an enemy is inflicted with only Hangover and then is hit with a Cast that applies Weak, the Cast’s damage comes first and is not increased due to Privileged Status.
- Doom technically deals damage before its status curse ends. This means that the enemy only needs to be inflicted with one other status curse in order for Doom to benefit from Privileged Status.
- Jolt deals damage after its status curse ends. This means that the enemy needs to be inflicted with two other status curses in order for Jolt to benefit from Privileged Status.
Privileged Status costs 50 Darkness for the first rank and 500 for the second. It gives +20% damage per rank, +40% in total, against any foe with at least two different status curses, and a third curse does not add more.
Family Favorite costs 200 Darkness for both ranks and gives +2.5% per rank for every Olympian whose boons you have. Hermes counts as an Olympian here, while Chaos does not. In most runs, you will meet four gods plus Hermes, and that puts Family Favorite at +25% on every hit once you hold boons from all five.
With five gods counted, Privileged Status only comes out ahead if at least 62.5% of your damage lands on foes with two curses, or 50% with four gods. That is easy when your Attack and Special apply two different curses, for example Aphrodite’s Weak on one and Ares’ Doom or Dionysus’ Hangover on the other, as in several of the Hades builds for every aspect. If your boons only bring one curse, Family Favorite is the safer pick.
Slot #10
Olympian Favor: +40% chance for Rare boons
Dark Foresight: +20% chance for God Boon, Daedalus Hammer, Obol, and Pom of Power chambers
Olympian Favor has 40 ranks at 50 Darkness each, 2,000 in total, and lifts the Rare roll of a boon from 10% to 50%. Dark Foresight has 10 ranks at 150 Darkness each, 1,500 in total, and moves the doors toward gold-laurel rewards: Boons, Daedalus Hammers, Obols, Poms of Power and Centaur Hearts.
The game aims for blue-laurel rewards (Darkness, Gemstones, Chthonic Keys and Nectar) behind about 45% of doors in Tartarus, 40% in Asphodel and 33% in Elysium and Styx. Max-rank Dark Foresight lowers each of those by 20 points.
More boons usually help a run more than rarer ones. That makes Dark Foresight one of the strongest talents in the Mirror once your upgrades are mostly done. While you still need Darkness, keys and Nectar, Olympian Favor is the better fit, because Dark Foresight will cut exactly those rewards.
Slot #11
God’s Pride: +20% chance for Epic boons
God’s Legacy: +10% chance for Legendary or Duo boons
Gods’ Pride has 20 ranks at 100 Darkness each, 2,000 in total, and raises the Epic roll of a boon from 5% to 25%. Gods’ Legacy has 10 ranks at 250 Darkness each, 2,500 in total, and raises the Legendary and Duo roll from 12% to 22%, but only when one of those can actually be offered.
Gods’ Pride helps in every run, as Epic versions of your core boons are simply stronger. Gods’ Legacy is the better pick once your build hinges on one specific Duo or Legendary boon and you already hold its prerequisites.
Slot #12
Fated Authority: Gain dice to alter the reward for the selected chamber
Fated Persuasion: Gain dice to alter the Boon and Well of Charon choices
Notes about Fated Authority
- 1 dice is needed to alter a chamber, and only that one chamber is altered.
- Gain 1 dice from Chthonic Key chambers.
- There are three types of chambers. A chamber can be altered only to another of its type.
Types of Chambers
- Blue laurel (Gemstones, Darkness, Chthonic Key, Nectar)
- Gold laurel (Obol, Pom of Power, Centaur Heart, Daedalus Hammer, God Boon)
- Unalterable (Charon’s Shop, NPC, Boss)
Notes about Fated Persuasion
- 1 dice is needed to alter a set of choices the first time, another 2 dice for the second successive alter, another 3 dice for the third successive alter, and so forth.
- Gain 1 dice from Chthonic Key chambers.
Fated Authority has 8 ranks, 11,000 Darkness in total, and gives you one die per rank for every escape. Each die rerolls the reward behind one chamber door into another reward of the same laurel color. Fated Persuasion has 4 ranks, 10,000 Darkness in total, and its dice reroll the choices themselves: boon offers, the Well of Charon and the Pool of Purging. Daedalus Hammer choices cannot be rerolled.
Additionally, with the Fated Keys work order, every Chthonic Key reward gives you one more die.
Fated Persuasion is the stronger pick for most runs, since it will let you fish for the exact boon you need. Fated Authority is better when you want more of one kind of door, such as Poms, Obols or the boons of one god.
General Tips
- Fishing: Instead of looking directly at the fishing spot, look above it and keep it in your peripheral vision. It will be easier to see the flash.
- God Mode: God mode grants 20% damage reduction plus 2% per failed escape attempt (i.e. damage reduction increases the more you fail). Turn on God Mode if you ever feel like the game is too difficult. You can enable and disable this at any time in Settings. There are no penalties for enabling or disabling this, and this has no impact on the story events.
- Bosses: Boss chambers appear at fixed numbers and the chamber immediately before will not have any enemies. The Boon Info overlay displays the current chamber number.
Boss Chambers- Chamber 1: Tartarus
- Chamber 13: no enemies
- Chamber 14: Tartarus boss (Furies)
- Chamber 16: Asphodel
- Chamber 23: no enemies
- Chamber 24: Asphodel boss (Hydra)
- Chamber 26: Elysium
- Chamber 35: no enemies
- Chamber 36: Elysium boss (Heroes)
Closing
This guide is aimed at new players who are working towards beating the game for the first time. The guide was written by the user Brahms who has graciously allowed me to feature his guide on my blog. Please feel free to leave a comment if you have any questions, suggestions, or corrections. Hopefully, the guide will be updated to cover the release of Hades soon.
Thanks for reading!
Consider checking Hades Review: The Fury Of The Underworld
Last updated: v0.32647 (Early Access Patch 044: The Blood Price update)

Our Caves of Qud beginner guide takes the same spoiler-light approach for another roguelike.