Introduction
Welcome guys, I’m Davdzsi, full-time lifeskiller, Life member, and theory crafter. I started bartering on the same week when the material refresh was introduced (2020, end of May). I’m over 47k barters, griefed my first 30k by listening to randoms, then I did the math. Lately, there were a lot of questions in the guild chat about what’s the most efficient way to barter, what’s good, and what’s bad. Since there wasn’t a good economic guide (or we couldn’t find it), I decided to write one for you.
First of all, this guide isn’t about how to make the most mil/h, because that highly depends on your ship, ship gear, sailors, lifeskill mastery gear, and RNG to get good barter goods placement on islands. so you can take T4 barters into T5 barters, getting 4 more barters on the way without having to go back to Iliya, having your 1:3 T2 and T3 barters close to Iliya, etc. Moreover, I think grinding and different lifeskills shouldn’t be compared based on just how much silver you can make in an hour because everything has its pros and cons. However what I think should be compared is different ways of doing the same thing, which viable strategy is better, so this guide’s main focus is to get the most silver spending the given amount of parley, in short, the most silver/parley.
This guide reflects my thoughts on how I think barter should be seen, for obvious reasons I think it is the only good way to view barter, but there is a possibility that I’m wrong and all I wrote is worth as much as another random Reddit comment from an anonymous person. I don’t wanna force you to follow everything I wrote, I just wish when you will make your next barter route, you will consider the points I made and maybe change it depending on if you believe me this is the right way to do it.
If you don’t care about the math and how things work, then you can skip and only read the conclusion.
Basic definitions
In this topic I will list some basic stuff, so later when you see something and are confused about what it should mean, you can come back and check what I meant by that.
T1 barter – where u exchange materials (like Red Tree Lump, Bloody Tree Knot etc) for T1 (white grade) barter goods
T2 barter – where u exchange T1 barter goods for T2 (green grade) barter goods, usually means 1:3 trades only
T3 barter – where u exchange T2 barter goods for T3 (blue grade) barter goods, usually means 1:3 trades only
T4 barter – where u exchange T3 barter goods for T4 (yellow grade) barter goods
T5 barter – where u exchange T4 barter goods for T5 (orange grade, 5 mill) barter goods
Normal barter – Doing T1-T5 barters
Barter chain – Doing all possible barter till you end up with one tier of barter goods.
Coin barter – where u exchange T5 barter goods for crow coins
T4 coin barter – where u exchange T4 barter goods for crow coins
Margoria barter (or T5m) – where u exchange T4 barter goods for T5m (orange grade, 10 mill) barter goods
Parley – basic resource for a barter
Barter unit – basic amount of parley needed for a barter, start at 14286 and scales down with barter level and value pack
Normal reset (or normal refresh)- Trade item barter refresh
Mat reset (or material refresh) – Ship material refresh
Coin reset – Rare case of a ship material refresh, where u get only crow coin barters
Average Efficiency – Efficiency for parley or barter unit. It shows how much silver you should earn if you spend x amount of parley/barter unit following a strategy. The higher the number, the more silver you get.
Barter Unit
In this guide, we will use barter units as our main resource to compare the possible trades instead of parley. Why? Let me explain how the two things work.
Every reset you get 1 million parley to spend. Each trade has a fixed parley requirement (see table 1.), then that is reduced by barter level and value pack bonus.
| Island Name | Base parley | Barter Unit/Ratio |
| Every basic Island, Old Moon Carrack | 14286 | 1 |
| T4 coin barter | 21650 | 1,515 |
| Kashuma, Halmad | 29430 | 2,06 |
| Derko | 36420 | 2,55 |
| Hakoven | 43780 | 3,06 |
| Shipwrecked Cargo Ship, Incomplete Ship, Lantinia’s Combat Raft | 46544 | 3,25 |
| Other Margoria barterers | 58180 | 4,07 |
Now I will make an example taking a single T4 barter. In a T4 barter, you exchange a T3 trade good and x amount of parley to get 2 T4 barter good. A T3 is worth 1 million silver and a T4 is worth 2 million silver. So in this exchange, you will get 3 million silver.
For a beginner 1 barter level sailor, whose exchange is 14286 parley, it made him

For a guru 1 sailor with valuepack, this exchange cost 10000 parley, thus he made

Let’s take another example:
A master 19 barter has 11554 parley barters, so in that exchange he makes

A master 20 barter has 11543 parley barters, so in that exchange he makes

If we divide the max parley (1 million) with the normal barter parley cost, in both cases the sailor can do only 86 barter


If they both do the same barters, they will end up with the same barter goods, worth the same silver. But how can it be the same, if the higher level barterer has higher efficiency trades? It’s thanks to the remaining parley, which is lower than the minimum amount of parley you need for a normal barter. When you wanna calculate your daily or reset income, you have to use the following equations:
=

Using this method requires you to check your remaining parley every time and to know your average efficiency for your barters, based on every barter level and if you have a value pack or not. Thus this method requires a lot of counting every time and I wouldn’t suggest using this.
The other method as I call it “barter units” is a simplified version of the parley method. By my definition, a barter unit is equal to the parley needed for a normal barter. So if you are beginner 1, a barter unit is 14286 parley, if you are master 19, it’s 11554 parley, if you are guru1 and use a value pack, it’s 10000 parley.
Using the examples above, if you do a T4 barter as beginner 1, it will be

If you do it as Guru 1 with Value Pack, it will be the same

Then what’s the difference between being a Beginner 1 or a Guru 1 barterer? It’s the number of available barter units you have. For example, a Beginner 1 barterer has

while a Guru 1 barterer with Value Pack has

So when you calculate your income, it will be

To sum it up, the advantage of this method is that the average efficiency of barter units only depends on the strategy you use and it’s independent of your barter level and value pack. What the barter level and value pack will determine is your available barter units, but it can be easily calculated. When you do normal barters, you will always end up with a whole number, when you do coin or margoria trades, you will end up with a fraction. So the remaining parley is represented as the fraction, like 0,59 barter units.
When you wanna convert the efficiency of barter unit back to parley, you just do a simple divide, like

and the fraction

Personally, I find the barter unit method easier, faster, and more constant than the parley method, but if you wanna see the results in silver/parley, you have to do the math yourself after every strategy I will exemplify because it’s not realistic for me to convert every number into 260 different numbers based on what barter level and value pack the reader could have.
Possible strategies
First some thoughts about how I think the income should be. Rather than focusing on the daily or reset income (seeing as I made 100 mill this run and 300 mill next round), we should focus on the large scale, like I made 25,7 bill in 10k or I made 28 bill in 10k barters. The next is how I see the barter chains. It’s nice to hear people saying that the profit from doing T4 and T5 barters are the same (3 mill) and even 1:3 T3 barters are as good as the other two, but either they think about the most complex, hard to execute strategy (probably not) or they are just wrong. They always forget that you need to do T1 and T2 barters (or not, see later), which won’t make money for you. Bartering is a chain of various tier barters and never should be separated into single ones. The other thing you should consider is when does the chain end? In my opinion, it ends when the barter good was sold for silver or exchanged for crow coins or ship materials. So when you see a 100 stack of T3 barter goods, it should mean a resource for future barters and not a pile of 100 mil silver (unless you wanna end your barter chain there). So to compare the possible strategies you could run, I will take a theoretical barter chain, summarize the end silver you get when u sell the barter goods and divide it with the total amount of barter units used in the chain. We will talk about only a single chain not considering if it’s repeatable enough times to be used or not in an actual run. About the viability, there will be a whole section.
T1 barters only (meme strat)
Technically there is a possibility to do only T1 barters, exchange the T1 goods for a Crow Merchants Guild’s Barter Voucher then exchange those for a Verdant Black Stone, which is worth 200k silver. When this guide was written, it was only profitable when you traded 100 x Rough Red Crystal (market price 1950) and it would make you 50k silver/barter unit, so it’s not really viable and never will be compared to what else you can do.
T3, T4 and T5 barters
In this part, we will use a table to compare the T3, T4, and T5 chains. We start with the normal materials, exchange them to a T1 barter good, then do a T2 barter, then do all T3 trade, etc, so in the end, we will only have one type of barter goods. So let’s see how the table works. (n is the row, n-1 is the previous row in the equations)
The Number of Barter Goods is how many barter goods we will have if we do all of the previous barters with the 1:x ratio.
The ratio is the number of how many barter goods we will get after doing that trade. The T1 barter is always a fixed 1:1. The T2 and T3 barters can be 1:1, 1:2, or 1:3, I don’t know if I have to explain why you should always do only the 1:3 ones, but I will make some examples for the non-believers. The T4 is always a 1:2 and the T5 is always a 1:1 exchange.

The barter unit is how many barter units the trade requires.
The sell is how much silver you get if you sell the barter good. It is 1 mil for a T3, 2 mil for a T4 and 5 mil for a T5.
Total barter unit is how many barter unit you used to get that amount of barter goods.

The value is how much the number of barter goods is worth if we sell them.

The Average Efficiency for a barter unit is the Value divided by the total amount of barter units you used to get there.

For example, we have 1 batch of normal materials. All T1 trade is fixed for a 1:1 ratio, so if we do that batch, we will end up with 1 T1 barter good. With that we can do 1 T2 barter, it’s 1:3. Then we do 3 T3 barter, ratio is 1:3 again. So in the T3 row you can see that we have 9 T3 barter goods, which worth a total of 9 million silver and we used 5 barter units to get that amount. So by doing only T1, T2 and T3 trades we can average 1,8 million silver/ barter unit.
| Number of Barter goods | Ratio1:x | Barter unit | Sell[million silver] | Total barter units | Value[million silver] | Average Efficiency for a barter unit [mil/b.u.] | |
| normal | 1 | 1 | 1 | 0 | 0 | 0 | |
| T1 | 1 | 3 | 1 | 0 | 1 | 0 | 0 |
| T2 | 3 | 3 | 1 | 0 | 2 | 0 | 0 |
| T3 | 9 | 2 | 1 | 1 | 5 | 9 | 1,8 |
| T4 | 18 | 1 | 1 | 2 | 14 | 36 | 2,571 |
| T5 | 18 | 5 | 32 | 90 | 2,812 |
We can get the same result for the T3 barter chains if we see it as the T1 and T2 barter makes no money and the T3 barters make 3 million each and average that.


So following the same logic, when you do T4 chains the average efficiency will be 2,57 million silver/ barter unit, when you do T5 chains, the average efficiency will be 2,81 million silver/ barter unit.
I hope it’s not a surprise that doing a longer chain will net you more. The main purpose for this part was to prove that the T3, T4, and T5 chains aren’t equal and they aren’t exactly 3 million silver/ barter unit trades. If you repeat these strategies for 10k barter units, you will end up with 18 billion if you do T3 chains, 25,7 billion if you do T4 chains, and 28,1 billion if you do T5 chains. I remember a Reddit comment, which stated that you should only do T5 barters if you wanna do coin barters or wanna sell the T5 for fast silver, but the best is to do T4 chains. Little does he know that he loses a potential 2,4 billion every 1,5-2 months by doing that. About the viability of these strategies, we will talk later.
Now just for the non-believers, I made the same table, but I changed one of the T2 or T3 barters to 1:2 instead of 1:3. You can compare how much these little changes matter on the average efficiency. I don’t wanna mention how bad it is if you combine these 2 or even do 1:1 T2 or T3 trades. Just believe that 3 is greater than 2 or 1.
| Number of Barter goods | Ratio1:x | Barter unit | Sell[million silver] | Total barter units | Value[million silver] | Average Efficiency for a barter unit [mil/b.u.] | |
| normal | 1 | 1 | 1 | 0 | 0 | 0 | |
| T1 | 1 | 2 | 1 | 0 | 1 | 0 | 0 |
| T2 | 2 | 3 | 1 | 0 | 2 | 0 | 0 |
| T3 | 6 | 2 | 1 | 1 | 4 | 6 | 1,5 |
| T4 | 12 | 1 | 1 | 2 | 10 | 24 | 2,4 |
| T5 | 12 | 5 | 22 | 60 | 2,727 |
| Number of Barter goods | Ratio1:x | Barter unit | Sell[million silver] | Total barter units | Value[million silver] | Average Efficiency for a barter unit [mil/b.u.] | |
| normal | 1 | 1 | 1 | 0 | 0 | 0 | |
| T1 | 1 | 3 | 1 | 0 | 1 | 0 | 0 |
| T2 | 3 | 2 | 1 | 0 | 2 | 0 | 0 |
| T3 | 6 | 2 | 1 | 1 | 5 | 6 | 1,2 |
| T4 | 12 | 1 | 1 | 2 | 11 | 24 | 2,181 |
| T5 | 12 | 5 | 23 | 60 | 2,609 |
Margoria barters
“Doing T5m (margoria barters) is the best, cos its 10 mil for a barter” – Reddit comment
I wanted to start this section with one of my favorite comments from Reddit. Just the beauty of what you can say with zero evidence and people will believe you. Now let’s prove what’s wrong with that sentence.
First of all, you trade a T4 for a T5m, so the value difference between those two is 8 million. Secondly, he forgot that doing Margoria barters require more parley than normal barters, or as we call them barter units. The third point is I don’t even know if you could spend all your parley going to Margoria faster than doing normal barters to get better mil/h, but in this guide, we don’t talk about how to optimize the time to get the most silver/h, we talk about getting the best silver/parley or silver/barter unit. So let’s get back to Margoria barters.
Every T5m item worth 10 million silver and you trade a T4 item for it. You can get it on every Margoria spot, so it could cost 3,25 or 4,07 barter units depending on the spot.
So if you would just only see it as single barters and not chains, your gains would be 8 mil/3,25 b.u. =2,46 mill/b.u. or 8 mil/4,07 b.u.=1,97 mil/b.u. Compare this to the 3 mill/b.u. single normal barters, it’s easy to see that they are bad, but we should see it as a chain of barters, so let’s check the tables.
| Number of Barter goods | Ratio1:x | Barter unit | Sell[million silver] | Total barter units | Value[million silver] | Average Efficiency for a barter unit [mil/b.u.] | |
| normal | 1 | 1 | 1 | 0 | 0 | 0 | |
| T1 | 1 | 3 | 1 | 0 | 1 | 0 | 0 |
| T2 | 3 | 3 | 1 | 0 | 2 | 0 | 0 |
| T3 | 9 | 2 | 1 | 1 | 5 | 9 | 1,8 |
| T4 | 18 | 1 | 3,25 | 2 | 14 | 36 | 2,571 |
| T5m | 18 | 10 | 72,5 | 180 | 2,483 |
| Number of Barter goods | Ratio1:x | Barter unit | Sell[million silver] | Total barter units | Value[million silver] | Average Efficiency for a barter unit [mil/b.u.] | |
| normal | 1 | 1 | 1 | 0 | 0 | 0 | |
| T1 | 1 | 3 | 1 | 0 | 1 | 0 | 0 |
| T2 | 3 | 3 | 1 | 0 | 2 | 0 | 0 |
| T3 | 9 | 2 | 1 | 1 | 5 | 9 | 1,8 |
| T4 | 18 | 1 | 4,07 | 2 | 14 | 36 | 2,571 |
| T5m | 18 | 10 | 87,26 | 180 | 2,063 |
As you can see, doing Margoria barter chains are worse than doing T5 chains or even doing T4 chains. I wouldn’t suggest you to ever go to Margoria to do these.
Coin barters
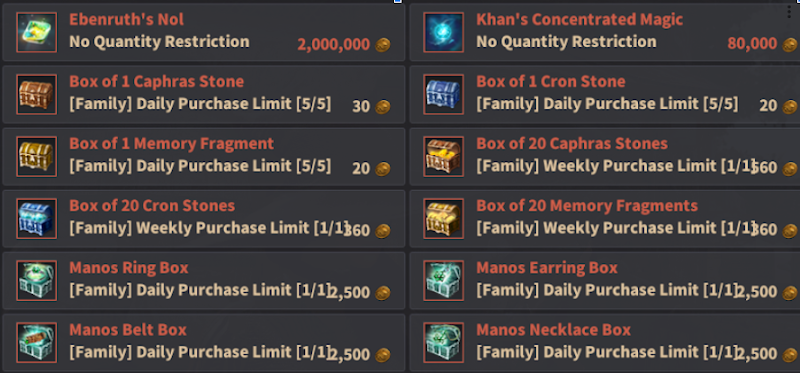
Coin barters are the most difficult to handle because the coin value isn’t fixed like all other barter goods, but they depend on marketplace prices, which can change at any time. So how can you value the crow coins? There is an NPC called Rebinia on Lema Island who sells stuff for crow coins, like caphras stones, memory fragments, Manos accessories, or even Khan’s concentrated magic. So what you can do is look up the marketplace prices, multiply it with the box number (1 or 20), tax it (if you wanna sell) then divide it by the coin cost.

| Crow Coin Value | ||||||
| n | coin | price | price after tax | Silver/coin no tax | silver/coin | |
| Caphras stone | 1 | 30 | 2,110,000 | 1782950 | 70333 | 59432 |
| Caphras bundle | 20 | 560 | 2,110,000 | 1782950 | 75357 | 63677 |
| Memory Fragment | 1 | 20 | 2,160,000 | 1825200 | 108000 | 91260 |
| Memory bundle | 20 | 360 | 2,160,000 | 1825200 | 120000 | 101400 |
| Cron Stone | 1 | 20 | 1000000 | 845000 | 50000 | 42250 |
| Cron bundle | 20 | 360 | 1000000 | 845000 | 55556 | 46944 |
| Manos Ring | 1 | 2500 | 191,000,000 | 161395000 | 76400 | 64558 |
| Manos Belt | 1 | 2500 | 190,000,000 | 160550000 | 76000 | 64220 |
| Manos necklace | 1 | 2500 | 186,000,000 | 157170000 | 74400 | 62868 |
| Manos earring | 1 | 2500 | 194,000,000 | 163930000 | 77600 | 65572 |
| Khan’s Heart: Life | 1 | 80000 | 7,500,000,000 | 6337500000 | 93750 | 79219 |
| Khan’s Heart: Destruction | 1 | 80000 | 4,490,000,000 | 3794050000 | 56125 | 47426 |
| Khan’s Heart: Protection | 1 | 80000 | 6,150,000,000 | 5196750000 | 76875 | 64959 |
After we get the coin values for the different options, we should sort them based on value (max to min), then we should assume our daily or weekly coin income. After we know how many coins we will get, we look at the sorted list to see what we can buy with that amount of coin. In my opinion, the coin price should be the lowest price, so we will get a bit more than that, but if you want, you can average is based on the coin prices (a bit harder but not impossible).
So let’s see an example. When the guide was written, the most efficient trade was the Memory fragment bundle, then the single memory fragment, then Khan (it should be less as it’s just one part, you need more things to craft it, but just ignore it now). Let’s say we make 1k coin a day. Sadly you only can purchase the memory bundle once a week and 5 memory fragments a day, so that costs way less coin than we make daily. The leftover coin will stack up, and after you get 80k, you can cash on the hearth. So if we use 100k silver/coin, we will get way more silver in our calculation than in reality, while if we use 74,5k silver/coin, we will get more silver than we calculated. In my opinion, it’s better to get 90 million while we calculated we will get 80 million, than getting 90 million while we counted as 100 million.
| Name | Coin | Silver/coin |
| Memory bundle | 360 | 101869 |
| Memory Fragment | 20 | 91683 |
| Khan’s Heart: Life | 80000 | 74466 |
| Manos Ring | 2500 | 66586 |
| Manos earring | 2500 | 65910 |
| Caphras bundle | 560 | 65789 |
| Manos Belt | 2500 | 65572 |
| Khan’s Heart: Protection | 80000 | 64959 |
| Manos necklace | 2500 | 64896 |
| Caphras stone | 30 | 61403 |
| Khan’s Heart: Destruction | 80000 | 47426 |
| Cron bundle | 360 | 46944 |
| Cron Stone | 20 | 42250 |
So after we know the coin value, we can get back to see how good the coin trades are. I saw people who would use the following equation to calculate if a coin barter is good or not, but you should never use that.

The problem is they won’t count with the barter units (or parley) they use, because most times you could do 2-4 normal barters to make more money. So the following equation should be used when calculating if a coin barter is good or not.

| Island | Base Parley | Barter Units | Silver | Coin | Coin Range |
| Hakoven | 43780 | 3.06 | 13.61 | 182 | 1-600 |
| Halmad | 29430 | 2.06 | 10.80 | 144 | 80-120 |
| Kashuma | 29430 | 2.06 | 10.80 | 144 | 60-140 |
| Derko | 36420 | 2.55 | 12.18 | 162 | 80-140 |
| 4 Island | 139060 | 9.73 | 32.39 | 632 | 221-1000 |
| Shipwrecked Cargo Ship | 46544 | 3.25 | 14.15 | 189 | 150-250 |
| Incomplete Ship | 46544 | 3.25 | 14.15 | 189 | 150-250 |
| Lantinia | 46544 | 3.25 | 14.15 | 189 | 50-150 |
| Other barters | 58180 | 4.07 | 16.46 | 219 | 50-150 |
| Random T4 coin | 21650 | 1.52 | 6.26 | 83 | 40-60? |
If you get the same or more with coins, it’s good, if not, then it’s bad. The average efficiency should be set between 2,57-2,81 (we will talk about it later). So I got the possible barters, barter units, and the expected coins (based on BDOCodex), using 75k as coin value and 2,81 as barter efficiency.
As you can see, most of the coin trades aren’t worth it with these prices. The 4 Island barter is doing the 4 Island going to Hakoven and averaging out the losses with the Hakoven extra coins. Maybe when the caphras prices will rise back to 3 million, and the coin value will reach 95-100k average, it will be worth doing coin trades for money, but with the current market prices, you are just wasting time doing coin barters. (Worth to mention that this is only for the coins you wanna turn to money, getting coins for your ship gear upgrade (mostly carrack) shouldn’t be measured this way.)
Coin resets
When you press material refresh, there is a low chance that you will get coin barters on every island instead of ship materials. This is called a coin reset. Let’s make the calculations for this case. Using the previous equation to determine if it’s worth or not.

In this case, the average barter unit efficiency should be 0, as you can’t do any barter that makes you money. So again, using 75k silver/coin as the coin value, the following table shows what trades are worth, what’s not.

| Possibility | Value | Coin |
| T2 | nan | nan |
| 1 T3 | 1000000 | 13 |
| 2 T3 | 2000000 | 27 |
| 3 T3 | 3000000 | 40 |
| 1 T4 | 2000000 | 27 |
| 2 T4 | 4000000 | 53 |
| 3 T4 | 6000000 | 80 |
| 1 T5 | 5000000 | 67 |
Worth mentioning that by taking T2 and T3 trades, while it seems it’s worth it, those will end your barter chains, indirectly lowering your average efficiency by forcing you to take more T1, T2, and T3 trades to get back the barter goods you used there.
Delinghart, Invernen Old Moon Carrack
There are few islands which offer you normal material or paintings to normal material barters. As these aren’t part of any barter chains, the calculation should be similar to how we see the coin value.

These barters cost 1 barter unit, but due to the end material amount and the material prices can constantly change, I let the reader decide if it’s worth for them to go to the Old Moon Carrack for the Old Tree Bark, knowing it will take a lot of time and the nearby coin and T5m barters aren’t that good compared to normal barters.
Viability
So after we know which barter chain is better than the others, let’s talk about if it can be used on a real barter run or not. First of how this will work. I will go over the possible strategies and give a number like it’s possible till 72 barter. Then the reader should look at what their barter count is and if they have fewer routes than the 12 maximum routes, then the end number should be corrected. If you can do less barter than that, then that’s a viable option to do, if you have more, then you have to do some filler barter too.

| Barter Count | Routes |
| 2550 | 9 route |
| 5110 | 10 route |
| 10230 | 11 route |
| 20470 | 12 route |
In this section 1 barter will mean 1 barter unit, as we won’t talk about margoria barters, and only a little bit of coin trades will be mentioned.
T3 barter chains
The T2 and T3 barters can be 1:1, 1:2, and 1:3 exchanges. Let’s assume that there is an equal chance to get one (33.3%-33.3%-33.3%). As there are 12 routes, the most probable outcome is that we will average around 4 islands with 1:3 barter. So every time one of the bottlenecks for viability should be the number of T2 or T3 islands go over 4, which means we have to take more than 8 T2 or more than 16 T3 barters, as you can do 2 T2 barter and 4 T3 barter per island. That means 24 T2 or 48 T3 barter goods. If you are interested in math, it will be at the end of the document, now just accept that it works this way.

Pic 2. Probability of getting k number of 1:3 trades out of 12
So if we assume that there will be 4 islands with 1:3 T3 trades on average and you can do 4 barter per island, that means its 4×4=16 T3 trades to do. For those 16 T3 trades, we need to do 5,33 (rounded up to 6) T2 barter (3 islands) and for that 6 T2 we need 6 T1 barter (1 island, as you can do 6 barter per island). So overall it is 28 barter what is possible to do using this strategy. As a beginner 1 sailor, you can do 69 barter. So bartering just for T3 barter goods to sell isn’t viable.
| T1 | T2 | T3 | |
| Barter goods | 6 | 16 | 48 |
| Ratio | 1 | 3 | 3 |
| Barters | 6 | 6 | 16 |
T4 barter chains
T4 barters are always 1:2 barters and you can do 6 barter per island. As there are always 12 islands with T4 barter (if you have less barter count, less), you can do 12×6=72 T4 barter per reset. For this, you need 72 T3 barter goods. Sadly that’s not sustainable, as on average you can get only 48 T3 barter goods. So we have to scale it down to the bottleneck. Thanks to this, we can do the 28 barter mentioned in the T3 barter chain strategy and an extra 48 T4 barter. This means 76 barter. So if you can do more, you are forced to take T5 and coin barters to maintain sustainability.
| T1 | T2 | T3 | T4 | |
| Barter goods | 6 | 16 | 48 | 96 |
| Ratio | 1 | 3 | 3 | 2 |
| Barters | 6 | 6 | 16 | 48 |
T5 barter chains
As you can take 4 T5 barters per island with a 1:1 ratio, the maximum amount of T5 barter you can do in a reset is 48. In table 14. you can see how many of each tier barter you have to do to reach the T5 bottleneck. Overall it’s 86 barter.
| T1 | T2 | T3 | T4 | T5 | |
| Barter goods | 3 | 8 | 24 | 48 | 48 |
| Ratio | 1 | 3 | 3 | 2 | 1 |
| Barters | 3 | 3 | 8 | 24 | 48 |
Sadly you can’t do 48 T5 barters every run, because the T5 barters share the same slot as T5m and T4 coin barters. This is because a barter route can end in 3 different ways.
T1-T2-T3-T4-T5-Coin
T1-T2-T3-T4-T5m
T1-T2-T3-T4-Coin
There are 4 islands on the way to Hakoven and there are 12 barter points in Margoria. The 4 Hakoven islands will always give coins, the old moon carrack will always have material to material trade, and there are some with only T5m (or ship mat), some with coin or T5m, and some only with coin. I wouldn’t go deep into how the rolls work, but from my personal experience, you can average around 9-10 T5 islands (assuming you have all 12 routes unlocked), which means an average 36-40 T4 exchange. So don’t worry if you are under the 86 barter unit/reset, you can still sustain your stack thanks to this RNG aspect of the game.
Just to compare the T4 and T5 strategies, let’s see a 86 barter reset. With the T5 strategy, you will end up with 48 T5 and 1 T2 barter goods (worth 240 mil, avg. efficiency of 2,79). With the T4 strategy, you do your main 76 barter and fill 10 T5 barter in. The end result of that reset will be 86 T4, 10 T5, and 2 T2 barter goods (worth 222, avg. efficiency 2,58 mil). It’s not a huge difference, only 18 million, but when you do 10k barter, it will be a lot.
Coin Barters
I would say there is no reason to try to focus your profit around coins as the coin prices can be volatile and the more coin you get daily/weekly will lower your coin value. Moreover, if you low roll the coins, sometimes it makes the route just a waste of time. In the end, it highly depends on the RNG and the market prices, so you have to redo your calculations every day or week. In my opinion coin barters should be seen as a filler barter, if you see a valuable Hakoven or 4 islands, you go for it, if not then you just do what your main strategy is.
Conclusion
What’s mentioned above are the ideal cases. Most of the time your reset will be a bit different. Sometimes you get 2 1:3 T3 barters, sometimes 6. So when the ideal reset says you should get 3 T2 barters done, it means you should average 2. Sometimes you won’t do any, sometime you will grab like 10 in a reset because it will line up perfectly. For doing this you will need a decent stack of barter goods stored up in Iliya storage, so you can avoid the RNG of the barters.
So what should you aim for when doing the barters, to get the most value out of your parley?
- (Always try to aim to do all trades when you do an island. Doing 3/6 trades on an island and another 3/6 on an another island is just a time waste in my opinion)
- Try to do all T5 trades
- If you see a good Hakoven or 4 islands route, try to do it.
- Aim to get 2 1:3 T2 islands if they line up good.
- Try to get 2 1:3 T3 islands if they line up good.
- Sometimes when you see some cheap T1 islands, do them.
- Put the rest of your remaining barters into T4 trades.
- If you can do more barter units, than the strategy needs, do any filler barter you want.
If you have a Value Pack, try to aim to get more T2 and T3 islands and try to raise your stack count. Don’t forget, it’s pretty easy to turn all your T3 barter goods into T4 barter goods later if you wanna stop bartering and cash out on your stack, but it’s nearly impossible to barter efficiently if you have no stack to avoid the T2-T3 island RNG.
Extra
This topic isn’t about barter efficiency, however, I think I should include this to help you understand bartering more.
Ideal stack size
There are always questions on “how much T1, T2, etc. I should stack”. I would say the more the better, but let’s stay in reality. Nobody other than me will have a 200-300 stack of T2 and T3 materials just to avoid the less than 0,001% chance, meaning doing 50 resets in a row, getting and doing all 1:3 T3 for a type of T2 while not getting any 1:3 barters of that. So let’s do it tier by tier.
T1
As you could see, on average you need 3 T1 barter goods per reset. For the T2 barters, you will use different types, mostly 2. Luckily the game gives you 6 T1 barter per island and if you have unlocked all 12 routes, that means there are 72 T1 barter you can take per reset. As you will only need 3 out of the 72, there should be no reason to keep a huge T1 stack. What I do is I have a 10+ stack of every T1 barter goods, and when one drops below 10, I start to look for a good deal and if I see one, I will take all 6. This means after dropping under 10 goods, you will have at least 5 reset to find the one you need. (T1-T5 barters are connected, meaning you can get the barter good you need for a higher tier in that reset.) Most times you have way more than 10-15 reset to find one. I saw someone asking for grounded bird meat and saps for barter, you shouldn’t do those. The cheaper T1 barters are around 200k-1 mil silver/T1, while the expensive ones can range from 1 mil to 5 mil. You have enough time to wait, don’t waste millions for nothing. Still in a full T5 barter chain, you will end up with 90 million, the 1-4 million extra seems small compared to that, but it’s 3×1-4 you don’t have to spend on average. Don’t forget, that 3-12 million is in the range like the 16 million extra you get by doing T5 chains instead of T4 chains.
T2
We talked about the T2 barters earlier, that on average you get 4 islands with 1:3 trade and every island has 2 exchanges. Overall you will need 8 T2 barter goods on average to sustain your barters, it has the worst island to island ratio. When you do all T1 barters on an island, you can do 3 T2 islands from that. With 1 T2 island (6 barter goods) you can only do 1,5 T3 islands. With the T3 barter good, you can do 2 T4 islands and with a T4 island you can do 3 T5 islands (and that to 4 coins). Thanks to this, I would suggest trying to get a 20-40 T2 stack of each material. It’s similar to the T1, you will have at least 5-10 reset to try to build up your stack again.
T3
Similar to the T2, I would suggest a 20-40 stack. It’s easier to maintain the T3 stacks, thanks to that you can choose from 12 T4 islands.
T4
The T4 stack is one that you don’t have to maintain. It’s pretty easy to build up (you can get 12 T4 barter goods per island and there is 12, without any RNG), the island to island ratio (with 1 T4 island you can do 3 T5 islands) is one of the best. I would say a 40 stack is ideal, you will need the stack just so you can go to the nearest T4 islands instead of Teyamal island (mostly time save).
T5
As your main focus should be to get all T5 every time and each T5 occupies a storage slot, there is no reason to keep a huge stack. Personally, I keep a 4 stack of each, run out only once (because of bad RNG and Elixir of Youth, combined with a coin reset where I had to use 3 of that and a kind pirate who got me while I was in the kitchen, making tea). The only reason to keep a bigger stack is if you wanna hard push coin barters for blue carrack gear, but doing that is equal to preordering on the marketplace. Someone likes to put a minimum preorder and wait till he gets it (similar to doing only value coin trades) and someone likes insta buying for max to save time (similar to going for every coin, regardless if it’s worth or not). I’m not the one to judge you by that.
T5m
As the description says “you can exchange this for valuable items if you take it to Sea Barterers”, but it’s a lie. At this moment you can’t use them in barters, so no reason to keep them (and no reason to get them).
Barter skips
WARNING! This strategy requires a lot of commitment and time to understand how the semi-randomness of BDO works. As the writer of this guide, I won’t take any responsibility if it causes any mental or physical harm to you or your environment.
There is a possibility to get barter goods without bartering. This is thanks to the Lost High/Medium/Low-Quality Trade Goods.
There are 3 possible ways to get them. The first and easier method is just to sail. While sailing there are multiple random events like you can get or lose some durability or rations, your sailors can recover some condition and you can get random items, like seaweed, silver key, bottle of sea water and the 3 crates mentioned. While it doesn’t require you to do anything, it’s pure RNG and you can’t rely on it long term. It’s just some bonus which will slightly increase your average efficiency. (I average like 0-2 crates per day, so not that much). If I remember correctly you can also get these crates while doing explore on an island. This requires 100.000 ration and has a 20 minute cooldown. This is again pure RNG, and only nets you a slight increase.
The third and most consistent way is to open chests on Oquilla’s Eye. Every few hours there is a chance that a lot of chest will spawn around Khan’s lake, and you will have 1 minute to open as much as you can. To open a chest you need a silver key. There are multiple types of chests with different loot tables, but if you are fast, you can open like 10+ chest and average like 2-3 barter good chest.
So why are we talking about these chests?
First let’s go back to the T3-T5 barter chains. What happens to the efficiency if we erase the need to make a T1 barter?
As you can see, without the 1 T1 barter the efficiency will rise a bit, due to you don’t have to take a single “zero” profit barter. If we do the same with the T2 skip, the average efficiency will rise to 3, so taking T3, T4 and T5 chains will be equally efficient. Stil taking a longer chain will mean you will need less T2 materials from the chest. Like if you have 100 barter units, doing T5 chain would mean you need 10 T2 barter goods, while doing T3 chains would require 100 T2 barter goods.
| Number of Barter Goods | Ratio 1:x | Barter unit | Sell | Total barter units | Value | AverageEfficiency for a barter unit | Previous Efficiency | |
| normal | 0 | 1 | 1 | 0 | 0 | 0 | ||
| T1 | 1 | 3 | 1 | 0 | 0 | 0 | ######## | 0 |
| T2 | 3 | 3 | 1 | 0 | 1 | 0 | 0 | 0 |
| T3 | 9 | 2 | 1 | 1 | 4 | 9 | 2,25 | 1,8 |
| T4 | 18 | 1 | 1 | 2 | 13 | 36 | 2,769 | 2,571 |
| T5 | 18 | 5 | 31 | 90 | 2,903 | 2,813 |
| Number of Barter Goods | Ratio 1:x | Barter unit | Sell | Total barter units | Value | AverageEfficiency for a barter unit | Previous Efficiency | |
| normal | 0 | 1 | 1 | 0 | 0 | 0 | ||
| T1 | 0 | 3 | 1 | 0 | 0 | 0 | ######## | 0 |
| T2 | 1 | 3 | 1 | 0 | 0 | 0 | ######## | 0 |
| T3 | 3 | 2 | 1 | 1 | 1 | 3 | 3 | 1,8 |
| T4 | 6 | 1 | 1 | 2 | 4 | 12 | 3,000 | 2,571 |
| T5 | 6 | 5 | 10 | 30 | 3,000 | 2,813 |
Sadly this average efficiency change wouldn’t make T5m barters viable, cos the average efficiency for those would be still close to 2. Moreover it would increase the minimum amount of coin for a coin trade to be viable slightly, thus making you take fewer coin trades. Getting a T3 barter good would let you do 3 max efficiency barter, while getting a T4 would let you do 1. Getting a T5 is just some extra money.
Theoretically, you need 3 T1 or 8 T2 barter goods per reset to sustain your barters. As you can only have 3 normal resets per day, it means 9 T1 or 24 T2 barter goods. For different guide websites, you can get some random information about how the Oquilla chest spawns work, but sadly I can’t 100% confirm it.
It works like you know when the chest will spawn in Oquilla, you swap to your Oquilla alt. He has a lot of silver keys, you open as many chests as you can in that 1 minute, then after those despawned, you maid the chests you got to Port Ratt. Every day you go a bit north to Lema island, so you can access the Ratt storage and take the chests, bring them to Iliya storage keeper, open them, and put the heavy barter goods into the storage. It sounds simple, but there are some flaws that can make your life really hard. First the spawns are only announced if you are on Oquilla. So you have to know when it will spawn or you will stay idle for minutes or hours, waiting for the announcement. Secondly, you need some maids to fast move the chests, however, it can be skipped if you take some time, go to Oquilla, load the chests to your ship, then go back to Iliya. I still don’t know if the chests spawn at the same time on all servers, or can be overlapped. One guide mentions it spawns every 3 hours. so technically you can get 8 spawns a day. Then it’s again RNG how many chests you get, and from those how many will be the desired T2 barter goods. So theoretically it’s possible to pull a full T1-T2 barter skip daily, but I never heard of a person making it work. If you are interested to test, feel free and if you succeed in making it work on a daily basis, maybe you can earn the craziest barterer title. Good luck, have fun!
Ship speed and is it worth it?
Some of the most frequently asked questions revolve around the ship’s speed and how good it is. Let me break it down for you.
As they teach in school, the velocity (speed) = distance/time
In our example the 1 index is our current stats, 2 is the increased stats after the speed bonus. We know that the new speed (v2) is the old speed (v1) and the speed increase we got (dv). The relative speed increase can be defined as .
We know that the distance between to island is constant, the old speed*old time = new speed* new time. The time we can save is old-time- new time.

After some sorting of the equations, we get the following equations. Then we can illustrate the correlation between the saved time and the relative speed on a diagram. The x-axis shows the relative speed increase, the y axis shows how many seconds we save every 10 minutes. It seems linear, around y=5.5*x

Let’s take an example. We have 120% speed on our ship and we buy a TET Manos clothes to replace our TET Loggia Clothes. Statwise it means a 1% increase, but relative to our current speed, it’s only a 1%/120%=0,83% increase. Then we look at the graph and we will know that it will save us around 4-5 seconds every 10 minutes. If we use the equation, it will give us 5,5*0,83=4,5 sec.
Some thoughts
- The more speed you have, the next 1% absolute increase will give less time saving, due to the less relative speed increase.
- The time saving only applies when you “actively” barter. If you collide into an island for more than the saved time, it won’t count because you lose it as idling.
- As you get better and better sailors, it will get harder and harder to get a better one. For example getting a 3.6 to replace a 3.4 is way easier, than getting a 3.8 to replace the 3.6 sailor. Considering the fact that you should have a +10 green geared carrack at this point, your speed should be 150%+. With these both sailor upgrade is a 0.013% relative speed increase, saving you half a second every 10 min.
- If you compare the TET Loggia and TET Manos Sailor Clothes, the difference the Manos one gives is to save around 30sec / hour. As a carrack owner, you will spend like 2-6 hour a day doing barter (Depends if you have a VP or not). Then ask yourself the question. Is it worth 3 billion silver to save 1-3 minute a day?
Little interaction to save a sweet 1 second
In this topic, I collected some little interactions that could save you some seconds. Sadly it’s really hard to tell if some of these are intended game mechanics (like animation cancels) or bugs. These are in the game for months if not years, and I doubt it will be punished as there are a lot of people who could subconsciously use them without even noticing it.
Island anchor cancel with breezy sail
The trick is just as the name says. When you press anchor near an island it quickly stops your ship, but if you are in the early animation of the breezy sail skill, that won’t happen. You will have a small (around 5 sec, depending on the barter NPC distance) interval, where you have to press the barter button, do the exchanges, then press the depart button. If you are fast enough, the breezy sail is still running and your ship won’t stop. You can save around 3-4 sec/island using this. (Overall around 1 min/reset)
Performance optimization
There is an option called performance optimization, which will optimize your performance to a point, where you can shoot your cannons 1 second faster. I still don’t know why it reduces your reload speed by one second, probably a bug, but it’s been in the game since I started bartering (2020. May). I always wondered why my reload speed was faster than what the guides say, but thanks to Lito, who pointed out it causes it, I can sleep well knowing what’s the cause. It is only useful when you fight sea monsters with high hp to survive the oneshot. It will save 1 sec for every extra shot, for example, a Heraku dies 2 sec faster if it’s not in an invincible state (underwater). The only exploit it can cause is when you do crocs, but usually, your cannonballs don’t last a whole hour. So if you wanna get more kills by this, you have to use cannonball supply, which will radically decrease your money. If you stop when you run out of cannonballs, then the most you can save is 200 sec (valor has 1800 cannonball, so 200 shots). Considering Port Ratt is around 10 min, and you last for a bit more than half an hour, that will save you 3 min for every 50-60 min.
Math for probability
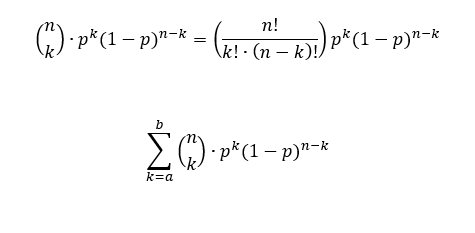
As I promised, here is the math to prove that the most probable outcome is 4.
Sorry, I’m not here to teach you math. If you are interested in statistical and probability theory, you should google probability distribution and you will find dozens of methods on how you can calculate the different scenarios. What I used is called Binomial Distribution. It’s a yes or no type method with a fixed chance for an outcome. Hope you are familiar with factorial and exponentiation, else it’s impossible for me to explain what’s happening.
n is the number of events
k is the number of the good events occur
p is the chance for the positive event to occur.
Conclusion
While this opinion is subjective of course, it is one that is backed up by math and a solid amount of reason. People who are into in-depth analysis and want to spend their time as optimized and efficient as possible should have most of their questions answered here.
In the end, bartering is like any other lifeskilling activity about money per hour versus the amount of effort you have to put in. Doing it efficiently and knowing all the ins and outs means that it becomes a little bit more competitive compared to other activities.


I feel I love you for bringing up this thesis on bartering. It is actually the best guide I’ve seen on bartering for silver hands down. Thank you for your time!
Thank you for this write-up! Trying to explain it to idiots must be really hard!
most sane bdo gamer