If you want a Grim Dawn character where your minions do the dirty work while you stay alive in the back, chances are you have already looked at the Conjurer (Occultist + Shaman). Pet builds are probably the easiest way into the game, and this one is a lightning version that holds up far past the story: its author shows it killing Celestials and Uber bosses in Hardcore mode.
This guide goes through the build pet by pet, explains what every skill is there for, and then tells you what to put your points into first while you level.
The build itself is not mine. It is the Celestial Killer Lightning Pets Conjurer guide on the official Crate forums by Oni_das_Alagoas, and all credit for the planning goes to them. You can read the original forum thread here (it also has the boss kill videos), and the complete level 100 version is in this GrimTools link (Conjurer, Level 100, patch 1.3.0.8). Keep that link open while you play. What I have added here is the beginner side: what each skill does, why it is in the build, and how to get there.
A quick personal note: pet builds are usually the first thing I recommend to anyone new to an ARPG, and the Conjurer is one of the best examples in Grim Dawn. Your pets do most of the fighting while you learn the game, and one or two mistakes won’t cost you the whole run. If you just want to enjoy the story and the world before you worry about min-maxing, this is a good place to start.
Mind that the snapshot was made on patch 1.3.0.8, so some small numbers may shift a little bit with later balance patches. The overall plan (which pets, which curses, which devotions) is what matters for a beginner.
How the Build Works
You will run four pets: the Familiar (your main lightning damage), the Hellhound (the tough one up front), the Briarthorn (a big plant that buffs the others) and the Primal Spirit (a lightning-flavored heavy hitter from Shaman). On top of that, you curse enemies to lower their resistances, drop a Wind Devil for even more resistance reduction, and keep a couple of passives running that make every pet hit harder.
Your own job is mostly positioning and pressing a few buttons at the right time. There are no attack chains to learn and no weapon combos. That is the whole reason pet builds are so friendly for new players (the author calls it “pretty easy to level”, which is true for most pet builds).
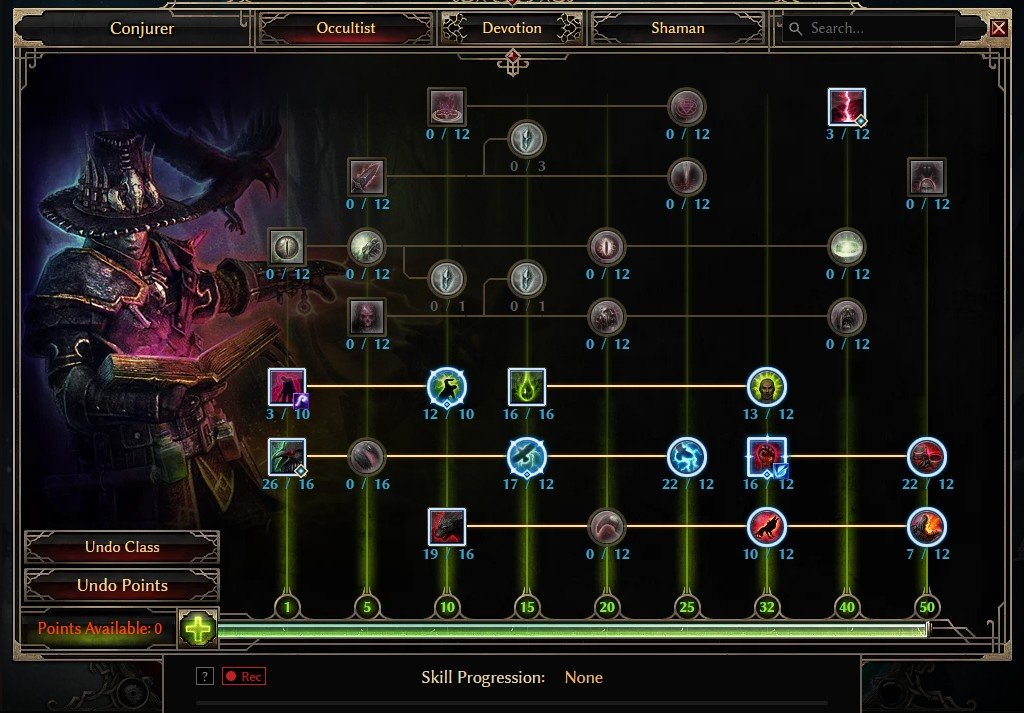
One thing to understand before you read the numbers below: every skill has a maximum you can reach with your own skill points. GrimTools shows something like “26 / 16” for Summon Familiar at level 100. The 16 is the max for your own points, and the 26 is the total after gear with “+ to skills” on it. Hover over a skill in the planner and it splits that total into your own points and the gear bonus. In the author’s level 100 setup, Summon Familiar has only 7 of his own points and 19 from gear. That is an endgame trick, not a leveling plan: you will not have that gear for a long time, so while leveling you put far more of your own points into the Familiar and move them elsewhere once your items take over. The table in the leveling section shows both numbers. Never try to spend more than the max, the game will not let you anyway.
Summon Familiar: Your Main Damage
The Familiar is a small flying pet that follows you around and shoots at whatever you are fighting. In this build it is the star of the show, and it is the first thing you should invest in. The level 100 planner has it at 26, but only 7 of those are the author’s own points and the other 19 come from gear. You will not have that gear while leveling, so you push the Familiar toward its max of 16 with your own points, exactly like the author recommends, and pull points back out later when your items cover it.
Along the same row in the Occultist tree sit the upgrades that make the Familiar a lightning pet:
- Storm Spirit (shown at 17, max 12): the lightning upgrade for the Familiar. The author maxes it with 12 of his own points.
- Lightning Strike (shown at 22, max 12): the next lightning upgrade in the same line. Only 5 own points here, the other 17 come from gear.
Further along that row you have two passives that help every pet you own, not just the Familiar. Bonds of Bysmiel (shown at 16, max 12) is a pet buff you keep running at all times, and it gets the full 12 own points. Manipulation (shown at 22, max 12) sits behind it and adds even more to your pets, with 11 own points and 11 from gear.
You might wonder why the Familiar row gets so many points. The answer is that almost all of your damage goes through it. Storm Spirit and Lightning Strike only improve the Familiar, while Bonds of Bysmiel and Manipulation boost the Familiar and everything else at the same time. As such, this row is where the build gets most of its power, and it is also why the author tells you to look for items that give “Bonus to all pets”.
Summon Hellhound: The Front Line
The Hellhound is your melee pet. It runs into packs, draws attention and hits things, which keeps enemies away from you and the Familiar. It is the second pet the author tells you to max while leveling, so it is not a one-point afterthought here. The planner shows it at 19, made up of 13 own points and 6 from gear. While leveling, push it toward 16 like the author suggests, and trim it back later once your gear adds skill levels.
The two skills further along the Hellhound row are its own upgrades. Hellfire is shown at 10 (max 12) and Infernal Breath at 7 (max 12), but the author spends just 1 point on each and gear does the rest. So they are single-point pickups for you, taken once the Familiar row and the Hellhound itself are done.
A small tip: the Hellhound will die now and then on harder content. That is fine. Resummon it and carry on, there is no penalty apart from the few seconds it takes.
Your Curses and Buffs
The rest of the Occultist tree is support. These are the skills that decide whether your pets feel strong or weak, and whether you survive when something gets past them.
Curse of Frailty and Vulnerability
Curse of Frailty is a curse you throw onto a pack of enemies. On its own it is only a small pickup here: the planner shows 3 out of 10, of which 1 is your own point and 2 come from gear. The reason you take it is Vulnerability, the upgrade right next to it, which lowers enemy resistances. That one gets maxed with your own 10 points (shown at 12 with gear). Curse of Frailty is also where the planner binds Shepherd’s Call from Shepherd’s Crook, so you cast it often anyway.
If resistance reduction is a new term for you: enemies resist damage the same way you do, and lowering their resistance makes every hit from every pet land harder. It is one of the biggest damage boosts in the game. So cast the curse on every pack that does not die instantly and on every boss, always.
Blood of Dreeg and Aspect of the Guardian
Blood of Dreeg is your emergency button. It heals you and gives you a buff for a while afterwards. The author names it as one of the early picks, and it ends up at 16/16 in the planner (14 own points plus 2 from gear). Get used to pressing it the moment a fight turns ugly instead of waiting until you are almost dead.
Aspect of the Guardian sits after it on the same row and adds passive defense. It is shown at 13 with a max of 12, made up of 11 own points and 2 from gear.
Doom Bolt
The planner shows Doom Bolt at 3, but that is 1 own point plus 2 from gear. That single point is there because Doom Bolt is the skill Bysmiel’s Command (from the Bysmiel’s Bonds constellation) gets bound to, so take it once you are about to finish that constellation.
The Shaman Side
You can pick your second mastery at level 10. For this build that is Shaman, and it brings two more pets, the best pet passive in the build and your second source of resistance reduction.
Summon Briarthorn
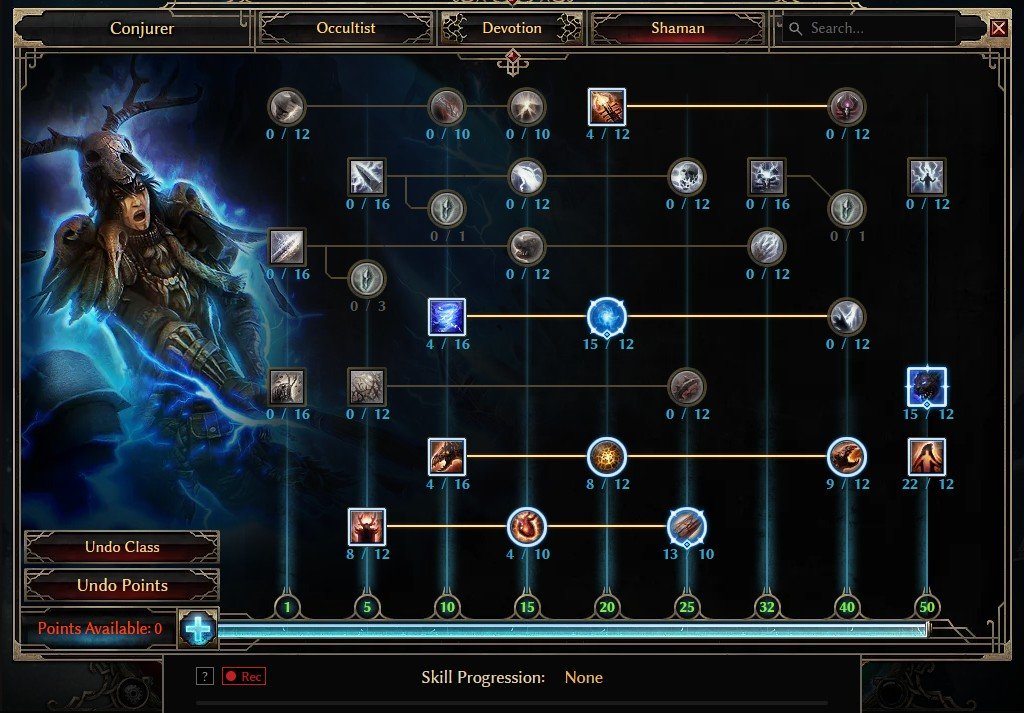
The Briarthorn is a big plant creature that fights next to your other pets. It is shown at 4 out of 16 in the planner, but only 1 of those is your own point, the rest is gear. The two skills on its row are the same story: Ground Slam (shown at 8, max 12), which gives the Briarthorn a stronger attack, and Emboldening Presence (shown at 9, max 12), an aura around the Briarthorn that helps your other pets, each get just 1 own point with gear doing the rest. Pick them up after your core skills.
Conjure Primal Spirit
Primal Spirit is the fourth pet, and it lives at the far end of the Shaman tree, so you will not have it early. It is shown at 15 with a max of 12, which is 12 own points (maxed) plus 3 from gear. Once you can reach it, summon it before every boss and every big pack. It adds a lot of lightning to the party.
Primal Bond
Primal Bond is the other skill at the end of the tree, and it is one of the most important passives in the whole build. It helps your pets hit harder and also helps you stay alive. The planner has it at 22 (max 12), the highest total of any Shaman skill, made up of 10 own points and 12 from gear. Put points into it as soon as your Shaman bar gets you there.
Wind Devil and Raging Tempest
Wind Devil is a small tornado you cast at enemies. The build does not care much about Wind Devil’s own damage (1 own point, the planner shows 4 with gear). The point of taking it is its upgrade, Raging Tempest, which lowers enemy resistances. That stacks with Vulnerability, and since your Familiar and Primal Spirit are lightning pets, it is a big boost. Raging Tempest is shown at 15 with a max of 12, so max it with your own 12 points.
This is the one skill that adds real button pressing to the build. Drop a Wind Devil on bosses and tough packs, right after your curse.
Mogdrogen’s Pact, Heart of the Wild and Oak Skin
The bottom row of the Shaman tree is your defensive line. Oak Skin is the one that gets maxed with your own 10 points (shown at 13 with gear). Mogdrogen’s Pact is shown at 8 and Heart of the Wild at 4, but the author spends only 1 point on each, so they are single points you pass on the way to Oak Skin.
Wendigo Totem
Wendigo Totem is a totem you place on the ground. The planner shows it at 4, but that is 1 own point plus gear, so this is another single point and not a priority while leveling.
Leveling Priority
The source build only comes with a level 100 snapshot, so there is no official level 20 or level 50 version to copy. Instead, here is the order the author recommends, expanded a little bit for beginners. The author also says that leveling a pet build is fluid and that a good drop can change your plans, so do not treat this as law either.
- Start Occultist and push Summon Familiar. Put points into the Occultist mastery bar as needed to reach the next skills.
- Get Summon Hellhound and work both pets toward their max (16 each). These two carry you through the early game. At level 100 the author has fewer own points in them (7 and 13) only because his gear adds so much, so do not copy those numbers while leveling.
- Pick up Curse of Frailty (one point) and Blood of Dreeg along the way. Curse of Frailty makes your pets hit harder, Blood of Dreeg keeps you alive.
- Take Bonds of Bysmiel once the Occultist bar reaches it.
- At level 10, pick Shaman as your second mastery. Grab a point in Summon Briarthorn early for the extra body, then keep pushing the Shaman bar toward Primal Bond and Conjure Primal Spirit.
- Fill in the Familiar’s lightning line (Storm Spirit, Lightning Strike), Vulnerability, Manipulation and Wind Devil with Raging Tempest.
- Last come the single-point skills: Hellfire, Infernal Breath, Ground Slam, Emboldening Presence, Mogdrogen’s Pact, Heart of the Wild, Wendigo Totem and Doom Bolt.
If you are dying, lean toward Blood of Dreeg, Aspect of the Guardian, Oak Skin and Primal Bond. If you are killing too slowly, lean toward the Familiar row, Vulnerability and Raging Tempest. Mind that both mastery bars end up filled all the way in the level 100 screenshots, so you will be spending plenty of points on the bars themselves too.
For reference, this is where the author ends up at level 100. The “Your own points” column is what he actually spends, and the gear column is what his +skill items add on top. If your gear adds less, you will need more own points in the big skills (especially Summon Familiar, Lightning Strike and Manipulation), and you can shave them down as better items come in.
| Skill | Planner shows (gear included) | Your own points | From gear |
|---|---|---|---|
| Summon Familiar | 26 / 16 | 7 | +19 |
| Storm Spirit | 17 / 12 | 12 | +5 |
| Lightning Strike | 22 / 12 | 5 | +17 |
| Bonds of Bysmiel | 16 / 12 | 12 | +4 |
| Manipulation | 22 / 12 | 11 | +11 |
| Summon Hellhound | 19 / 16 | 13 | +6 |
| Hellfire | 10 / 12 | 1 | +9 |
| Infernal Breath | 7 / 12 | 1 | +6 |
| Curse of Frailty | 3 / 10 | 1 | +2 |
| Vulnerability | 12 / 10 | 10 | +2 |
| Blood of Dreeg | 16 / 16 | 14 | +2 |
| Aspect of the Guardian | 13 / 12 | 11 | +2 |
| Doom Bolt | 3 / 12 | 1 | +2 |
| Summon Briarthorn | 4 / 16 | 1 | +3 |
| Ground Slam | 8 / 12 | 1 | +7 |
| Emboldening Presence | 9 / 12 | 1 | +8 |
| Conjure Primal Spirit | 15 / 12 | 12 | +3 |
| Primal Bond | 22 / 12 | 10 | +12 |
| Wind Devil | 4 / 16 | 1 | +3 |
| Raging Tempest | 15 / 12 | 12 | +3 |
| Mogdrogen’s Pact | 8 / 12 | 1 | +7 |
| Heart of the Wild | 4 / 10 | 1 | +3 |
| Oak Skin | 13 / 10 | 10 | +3 |
| Wendigo Totem | 4 / 12 | 1 | +3 |
The 1-point skills are there for a small bonus, to reach something behind them, or (for Doom Bolt and Curse of Frailty) to carry a Celestial Power. Gear then lifts them a few levels higher for free.
Devotions
Devotion points come from restoring shrines around the world (some only need a click, some need crafting materials, and the corrupted ones make you fight for it). You can have up to 55 with the Ashes of Malmouth expansion, and this build uses all 55. Make sure to grab every shrine you pass, since they are a big part of your power.
The Crossroads stars each give 1 affinity point so you can get into your first constellations, and the plan later refunds some of them at the Spirit Guide once you no longer need them (refunding devotions costs iron plus an Aether Crystal per point).
Here is the author’s own order, explained step by step.
Start with the yellow Crossroads (Order). From there go into Lion (3 stars), then Panther (4), Hound (3) and Stag (4). That gives you a solid early base.
Next, take the red Crossroads (Chaos) and use it for Viper (4 stars). After that, the purple Crossroads (Ascendant) gets you into Shepherd’s Crook (5) and then Typhos, the Jailor of Souls (6). When Shepherd’s Crook is complete, bind its power, Shepherd’s Call, to Curse of Frailty.
Then take the Crossroads (Eldritch) point and complete Raven (4), Staff of Rattosh (6) and Bysmiel’s Bonds (5). As the name suggests, Bysmiel’s Bonds is a pet constellation, which fits the build nicely. Its power, Bysmiel’s Command, goes on Doom Bolt (that is why Doom Bolt has a point).
Now comes the cleanup. Refund the Ascendant, Eldritch and Chaos Crossroads points, and use the freed points for Ishtak, the Spring Maiden (6 stars) and 3 stars of Rhowan’s Crown. The very last point goes into the blue Crossroads (Primordial). Bind Nature’s Guardians from Ishtak to Bonds of Bysmiel, and Elemental Storm from Rhowan’s Crown to Summon Familiar. The 3 stars of Rhowan’s Crown are enough, because they already include Elemental Storm.
So to make it quick:
- Crossroads (Order) -> Lion -> Panther -> Hound -> Stag
- Crossroads (Chaos) -> Viper
- Crossroads (Ascendant) -> Shepherd’s Crook (bind Shepherd’s Call to Curse of Frailty) -> Typhos, the Jailor of Souls
- Crossroads (Eldritch) -> Raven -> Staff of Rattosh -> Bysmiel’s Bonds (bind Bysmiel’s Command to Doom Bolt)
- Refund Ascendant, Eldritch and Chaos -> Ishtak, the Spring Maiden (bind Nature’s Guardians to Bonds of Bysmiel) -> Rhowan’s Crown, 3 stars (bind Elemental Storm to Summon Familiar) -> Crossroads (Primordial)
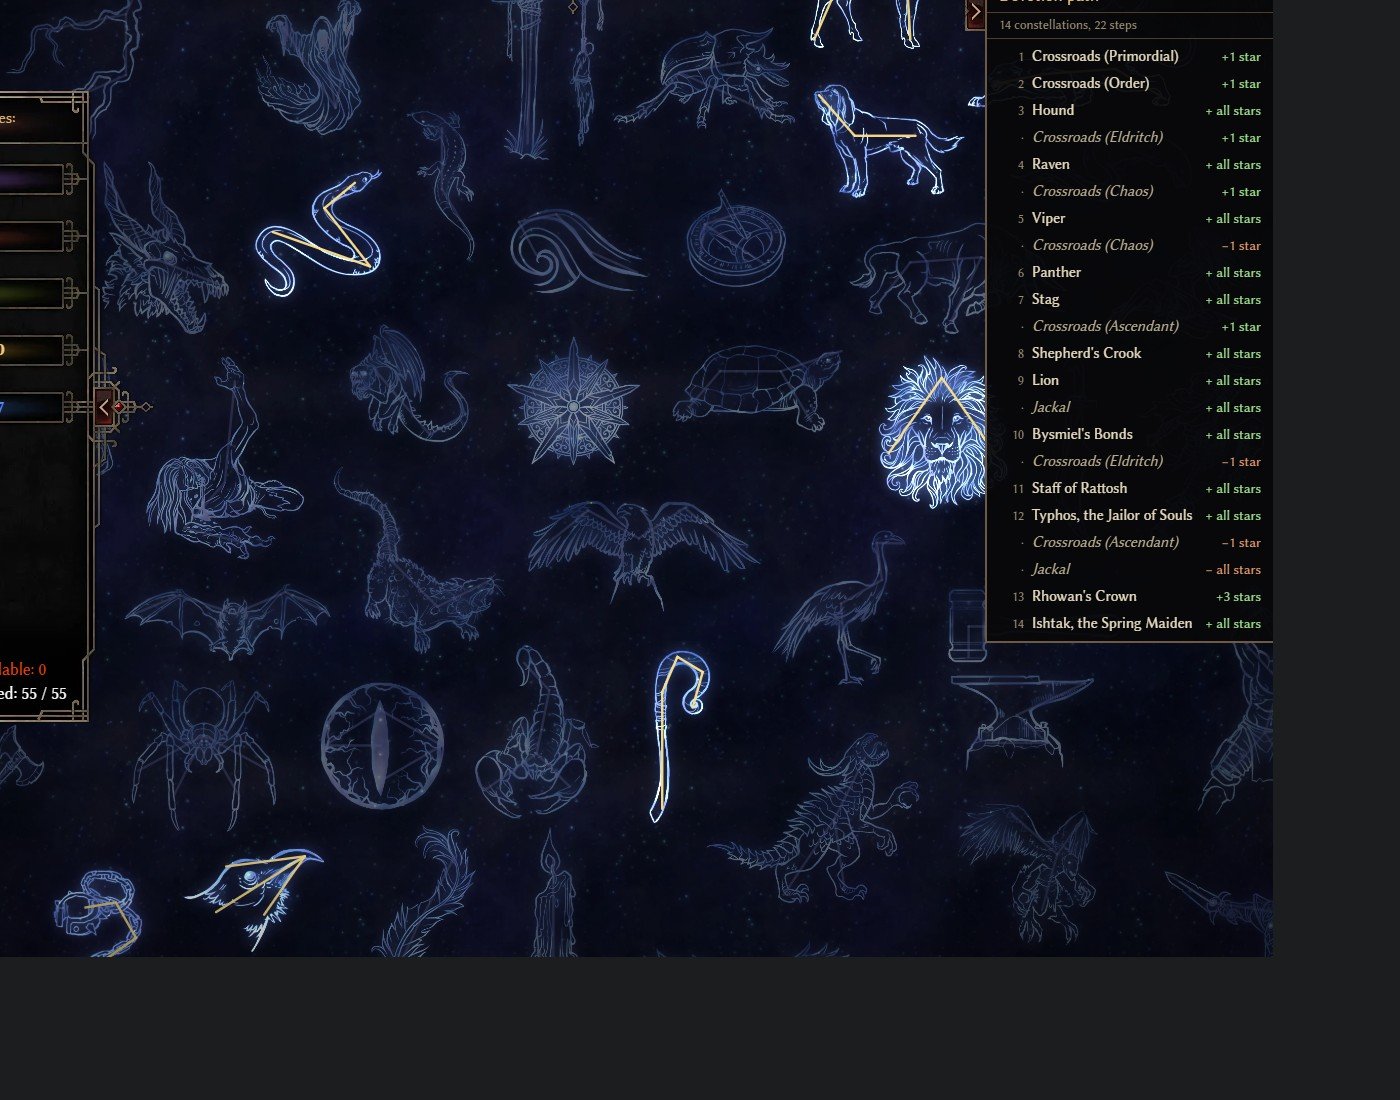
If you compare this with the path list in the screenshot, you will notice that GrimTools takes a slightly different route. It starts with Crossroads (Chaos) -> Viper -> Scarab -> Lion, then refunds Scarab, which is only a temporary stepping stone. From there it goes Crossroads (Order) -> Stag -> Panther -> Hound -> Crossroads (Ascendant) -> Shepherd’s Crook -> Typhos, the Jailor of Souls, refunds Crossroads (Ascendant), then takes Staff of Rattosh -> Crossroads (Eldritch) -> Raven, refunds Crossroads (Chaos), completes Bysmiel’s Bonds, refunds Crossroads (Eldritch), and finishes with Crossroads (Primordial) -> Rhowan’s Crown (3 stars) -> Ishtak, the Spring Maiden. Both routes end with the same 14 constellations, so use whichever is easier for you. The author’s written order above is the one I would follow, simply because it comes with the author’s own reasoning behind it.
Celestial Powers
Some constellations come with a Celestial Power, an extra effect you bind to one of your skills. It only levels up while it is bound, so do not forget to do it once you complete one. The binding menu only lets you choose skills that fit the power, so you cannot really get it wrong, but you can forget it.
The author’s GrimTools planner binds the four powers like this:
- Shepherd’s Call (Shepherd’s Crook) on Curse of Frailty
- Bysmiel’s Command (Bysmiel’s Bonds) on Doom Bolt
- Nature’s Guardians (Ishtak, the Spring Maiden) on Bonds of Bysmiel
- Elemental Storm (Rhowan’s Crown) on Summon Familiar
One thing worth knowing: the author mentions that Elemental Storm was not linked to any skill during his recorded boss fights, and the build did fine anyway. The planner links it to the Familiar, so do that and it can only get stronger.
Attributes
The attributes in this build are a little bit different from a melee build. The author’s advice is simple: do not spend attribute points as soon as you get them. Hold on to them, because you will regularly find items you cannot equip yet, and a few saved points in Physique, Cunning or Spirit let you put them on right away.
In practice that means:
- Keep a small stack of unspent points while leveling.
- When a good pet item drops, spend exactly what you need to meet its requirement.
- Whatever you do not need for gear can go into Physique, which is your health and defense (your pets scale off skills and pet bonuses, not off your attributes).
Gear Worth Knowing About
The most useful rule for gear comes straight from the author: prioritize items that have the “Bonus to all pets” stat on them. Regular damage bonuses on your own character mostly do nothing for your pets, while that block goes directly to them. Items with + to Occultist or Shaman skills are the other thing to look out for, since they push your maxed skills past their cap.
For the endgame, the build is built around the Bysmiel Trinkets set, which the author says was the reason the build was first made back around the Forgotten Gods expansion. The newer version adds the Eyes of Mogdrogen’s Chosen helm, which the author likes for its +1 to all skills, an extra pet and resistance reduction. The GrimTools link shows the full gear setup.
The snapshot also uses ascended bonuses, but the author states you can skip them. The build can do all content without them, and the Celestial kill video was recorded without any.
Common Mistakes
Spreading points evenly. It is tempting to give every pet a few points, but your damage comes from the Familiar row and your safety from the Hellhound. Max those first and let the small skills wait.
Forgetting the curse and the Wind Devil. Pet builds make it easy to just walk around and watch. Vulnerability and Raging Tempest are a big part of your damage, and they only work if you actually cast them.
Stacking your own damage. “+% Lightning Damage” on your character sounds perfect for a lightning build, but it is the pets that do the killing. Look for “Bonus to all pets” instead.
Ignoring your own resistances. Your pets take most of the hits, but ranged attacks and ground effects still find you. Check your character sheet every few levels and fix whatever resistance is lagging behind.
Dumping attributes too early. If all your points are already in Physique, you will be stuck staring at an item you cannot wear. Keep some in reserve, like the author suggests.
Skipping shrines and forgetting to bind Celestial Powers. Both are free power. Detour for shrines, and bind a power the moment you complete its constellation.
FAQ
Is this build good for a first character?
Yes. It is a pet build, so you do not need precise combat skills, and the author shows it working in Hardcore. The only real learning curve is remembering to cast your curse, Wind Devil and Blood of Dreeg.
Why are some skills above their max in GrimTools?
Because the level 100 snapshot includes gear. Items with + to skills push them past the number you can reach yourself. Hover over a skill in GrimTools to see how much is the author’s own points and how much is gear. With less gear, spend more of your own points on the key skills.
Can I skip the ascended bonuses?
Yes. The author says so directly, and the Celestial kills in the thread were done without them. They only make Uber bosses easier.
Can I play it in Softcore?
Of course. All the author’s gameplay was in Hardcore, and as they point out, whatever works there works the same way in Softcore.
Conclusion
This lightning Conjurer is a relaxed build to level and it keeps going well into the endgame. Max the Familiar and the Hellhound first, curse everything, keep your attribute points for gear, and follow the devotion order above. The rest falls into place once you start finding “Bonus to all pets” items.